An Apple ID is a personal account that allows you to access Apple services.
Without an Apple ID, you won't be able to:
download programs, games, movies and music from App Store And iTunes Store;
synchronize your iPhone data with iCloud cloud storage;
exchange text messages(iMessage) and make video calls (FaceTime) between Apple technology users;
Find your iPhone, iPad or Mac if it's lost or stolen.
Read also other ways to create an Apple ID account:
To create a new account with using iTunes you will need:
Mac or PC Windows based;
Internet connection;
iTunes program (download from Apple website);
your email.
The following points are exactly the same for both Windows and Mac.
1. Launch iTunes, go to the iTunes Store and click on the “Login” button.

3. In the welcome window, click “Continue” to confirm that you want to create an account.

4. At this point, read and accept Terms of use, by checking the box next to the phrase “I have read and accept these terms and conditions” at the end of the agreement. Then click the "Accept" button.

5. In the next window you need to enter the required data in the appropriate fields. All fields are required:
Email. Enter your existing address in this field Email, which you have access to. It is this that will act as the username when logging into your Apple ID.
Password. Try to come up with enough complex password, consisting of at least 8 characters, containing uppercase and lowercase letters and numbers. Do not choose easy passwords to avoid your account being hacked. In the second text field, enter the password you created again.
Safety. Select three security questions and enter your answers to them in the text fields. This information will be useful if you need to restore access to your account. Apple records ID.
Backup email. Enter an additional email address (if you have one) to make it easier to regain access to your Apple ID account if you lose your password. This field is optional.
Enter your date of birth. According to Apple's internal policy, the system will refuse to register an Apple ID if less than 13 years have passed from the entered date to the present. If you indicate that you are over 18 years old, then you will not be subject to age restrictions on iTunes.

At the very bottom of the page, the system by default subscribes you to receive recommendations and various advertising information to the e-mail entered above. You have the right to uncheck the boxes and refuse to receive this information on your email. Mailbox.
After entering all the information, click “Continue” in the lower right corner of the page. If all data is entered correctly, the system will open next page registration. If any data is entered incorrectly, they should be replaced with the correct ones, and then click “Continue” again.
6. Payment information. At this stage, you need to enter payment information about your bank card, as well as physical adress required for written delivery of invoices.

Keep in mind that iTunes automatically detects your region of residence, to which your Apple ID account is subsequently linked. That is, if you are in Russia and register in the Russian segment, then the card you specified must be issued on the territory of the Russian Federation and the physical address must be indicated within the Russian Federation.
If you wish, you can later change your country and payment details in your account settings.

After entering all the data, click “Create Apple ID”
7. Account confirmation. A registration confirmation email will be sent to the email address specified as your Apple ID.


Your account will be verified and your Apple ID will be created.

An Apple ID is a personal account that provides access to Apple services.
By following the instructions below, you will be able to:
download programs, games, music and movies from the App Store and iTunes Store;
synchronize photos, contacts, notes, browser bookmarks and other data between your Apple devices by using cloud storage iCloud;
exchange iMessage instant messages and FaceTime video calls with other Apple technology users for free;
Find your iPhone, iPad or Mac if it's lost or stolen.
Other ways to create an Apple ID:
How to create an Apple ID without a bank card from an iPhone or iPad
Step 1: Launch the App Store on your iPhone or iPad.
Step 2: Go to the "Top Charts" tab and try downloading any free application .
Step 3: Click on the “Login” button, and then select “Create an Apple ID”.
Step 4: A list of countries will open in front of you. Select the country in which you would like to register an account and click Next.

Step 5
Step 6: On the page that opens, fill in the following fields:
E-mail. Enter an existing email address that you have access to. This will be your Apple ID;
Password. Try to come up with a fairly complex password, consisting of at least 8 characters, alternating capitals and lowercase letters and numbers. Do not choose easy passwords to avoid your account being hacked. In the second text field, enter the password you created again.
Important! Remember well, or better yet, write down the password you come up with. Without it, you won't be able to use your Apple ID.
Safety. Select three security questions and enter your answers to them in the text fields. You'll need this information if you forget your Apple ID password.
Reserve Email. If you lose your Apple ID password, a backup email will make it easier to recover. This field is optional.
Date of Birth. According to Apple's internal policy, the system will refuse to register an Apple ID if less than 13 years have passed from the entered date to the present.
Step 7

Step 8

How to create an Apple ID without a bank card using a Mac or PC
Step 1: Launch the iTunes application on your computer.
Step 2: Click on the drop-down menu on the left top corner iTunes windows.
Step 3: Select the "Programs" section.
Step 4: At the top of the screen, select "App Store".

Step 5: You have been taken to the App Store, the same as on the iPhone and iPad. Select any free application and click "Download".
Step 6: In the window that opens, click on “Create an Apple ID.”

Step 7: Accept the user agreement, then confirm your agreement by clicking “Accept”.
Step 8: Fill out the information on the page that opens, as described above in this article, and click “Next.”

Step 9: On this page you must provide payment information. If you did everything correctly, “No” will appear among the credit card type selection. Select it.
Step 10: A registration confirmation email will be sent to the email address specified as your Apple ID. Open this email and follow the link to complete creating your Apple ID.
Apple provides users of their devices with a large number of free and paid services that allow you to simplify access to files and synchronize your phone or tablet with your laptop. But to use them, you need to create your own unique account. Many people have problems with this. We'll tell you below how to create a new Apple ID and register correctly in the App Store.
What is the Apple ID for?
Apple ID is your unique login and password, which allows you to use many features and services. Also, account owners have the opportunity to attach to it credit card or use another payment method, after which they will be able to make purchases of applications, music and in-game currency in just a couple of steps. If you are logged into your iPhone account, you can download special program and set up the “Find iPhone” function so that if the device is lost or stolen, you can quickly find it. Another reason to create an account is the ability to create or join a Family Sharing group to get some discounts and always have information about what actions were performed on the device of your family members.
How to create a new Apple ID and register in the App Store (without a card)
There are several ways to get yourself account In Apple's system, which one to choose depends on which device you want to complete the registration procedure from. Also, a separate paragraph will be devoted to how to create an Apple ID without entering a bank card number. When registering a new account, it is worth remembering that the account and the App Store are one and the same.
Using iPhone, iPod Touch or iPad
If it is more convenient for you to register through a phone, tablet or player with access to iTunes, then follow these steps:
- Go to the Settings app.
- Open iTunes and App Store.
- Go to the “Create a new Apple ID” tab.
- Scroll through the list that opens and mark the desired country. Remember that the interface of applications linked to Apple ID will change to the language of the country you choose as the main one.
- Read the instructions and confirm that you agree to the terms.
- Confirm the action again.
- Enter the required data: email, password, security questions and date of birth. Indicate a real email that you actually have access to, as it will be needed to complete registration, and later, to confirm many operations with your account. In the “Secret Questions” section, select a question and come up with an answer to it that only you can know. Record all data in a storage location where you can always view it, but only you should have access to it.
- Choose one of several payment methods and enter your details.
If for some reason you cannot start the registration process through the settings, then follow these steps:
You can also create an account through your browser:

If you are starting your device for the first time or have reset the settings, then the “Setup Assistant” will open, in which you must go through several steps (select a region, activate the device, set up Touch ID, restore settings), and then, at the “Login with your Apple ID”, click the button “Don’t have an Apple ID or forgot it?” and go through steps 4–10 from the first instructions.
Via Mac OS or Windows
If it is more convenient for you to create an account through your laptop or computer, follow these steps:
- Open the iTunes application.
- On the left side of the Quick Access bar, click the "Login" button.
- Click on the “Create Apple ID” button to proceed to registration.
- Read the terms and conditions and confirm that you agree to them by checking the box and clicking the “Accept” button.
- Enter all requested information. Indicate a real email that you actually have access to, as it will be needed to complete registration, and later, to confirm many operations with your account. In the “Secret Questions” section, select a question and come up with an answer to it that only you can know. Record all data in a storage facility where you can always view it, but only you should have access to it.
- Now select one of the payment methods and enter your details.
- Click the "Create Apple ID" button.
- Go to the email address you provided during registration and confirm that it is you who want to create an account.
Registration without entering a bank card number using an iPhone, iPod Touch or iPad
If you don't intend to make purchases through Apple ID services or don't have an this moment card issued by the bank of the country you want to choose when registering.
- Open the App Store on your device.
- Go to the Top Charts section.
- In the section that opens, go to the “Free” subsection.
- Select any application from the list and click the “Download” button opposite it.
- In the window that opens, select the “Create Apple ID” section.
Registration without entering a bank card number using Mac OS or Windows
If it is more convenient for you to register an account without entering a credit card number via a computer or laptop, follow these steps:
- Open the iTunes application.
- Click on the iTunesStore button.
- On the page that opens, click the AppStore button to go to the application store.
- From the list of “Best Free Apps”, select one and start downloading it.
- In the window that opens, click on “Create AppleID”.
- Pass standard process registration to the “Payment method” section and select “No”, which appears only if you start registration by installing a free application.
- Click on the “Create Apple ID” button and follow the instructions received in the letter to complete the registration process.
Video Tutorial: Creating an Apple ID Account
Possible problems
When logging in to the iCloud service, you may receive a notification “The limit on the number of free accounts has been activated on this iPhone.” This means that with of this device The maximum number of free accounts has been activated - three. If you have exceeded this limit, there is only one way out - to link a bank card to your account, since after this it will receive the status of “Paid account”.
If you have not received a letter with a link to the end of the registration process, then the first thing you should do is go to your mail and check such sections as “Spam”, “Deleted”, “Archive”, etc. In the event that you do not find them the desired letter, go to your account, open the Manage your Apple ID section and click on the Resend button next to the name of the email entered during registration. After this, instructions for confirming your account will be sent to your email again.
In the event that you have any unique problems not described above, or have any questions, you can write a letter to support by following the link https://support.apple.com/ru-ru and by clicking the “Contact Support” button. Fill out the form using exclusively English language, and submit your request, then expect a response within a few business days.
After purchasing a new device, the first thing you need to do is register a unique Apple ID in order to use special services. This can be done via a tablet, phone, computer or player, with iTunes support. If you do not want to initially attach a bank card to your account, you will have to start registering by installing free program from the App Store. Until you set up a payment method for your Apple ID, it will remain a free account.
If you are a user of at least one Apple product, then in any case you are required to have a registered Apple ID account, which is your personal account and a repository for all your acquisitions. How this account is created different ways, and will be discussed in the article.
Apple ID is a single account that allows you to store information about your existing devices, purchase and access media content, work with services such as iCloud, iMessage, FaceTime, etc. In a word, no account means no ability to use Apple products.
You can register an Apple ID account in three ways: using an Apple device (phone, tablet or player), through the iTunes program and, of course, through the website.
Method 1: Create an Apple ID through the website
So, you want to create an Apple ID through your browser.


Method 2: Create an Apple ID through iTunes
Any user who interacts with Apple products knows about the iTunes program, which is effective means to interact your gadgets with your computer. But besides this, it is also an excellent media player.
Naturally, an account can be created using this program. Previously, our website has already covered in detail the issue of registering an account through this program, so we won’t dwell on it.
Method 3: Registration via Apple device
If you own an iPhone, iPad or iPod touch, then you can easily register an Apple ID directly from your device.

How to register an Apple ID without linking a bank card
The user does not always want or can indicate his credit card during registration, however, if, for example, you decide to register from your device, then the screenshot above shows that it is impossible to refuse to indicate the payment method. Fortunately, there are secrets that will still allow you to create an account without a credit card.
Method 1: registration through the website


Method 2: Register via iTunes
Registration can easily be done through the iTunes program installed on your computer, and, if necessary, you can avoid linking a bank card.
This process has also already been discussed in detail on our website in the same article on registration through iTunes (look at the second part of the article).
Method 3: Register via Apple device
For example, you have an iPhone and you want to register an account without specifying a payment method from it.

How to register an account in another country
Sometimes users may encounter the fact that some applications are more expensive in their native store than in the Store of another country, or are not available at all. It is in such situations that you may need to register an Apple ID of another country.
- For example, you want to register an American Apple ID. To do this you will need to run on computer iTunes and, if necessary, log out of your account. Select a tab "Account" and go to the point "Go out".
- Go to section "Shop". Scroll to the very bottom of the page and click on the flag icon in the lower right corner.
- The screen will display a list of countries from which we need to select "United States".
- You will be redirected to the American store, where in the right area of the window you will need to open the section "App Store".
- Again, pay attention to the right area of the window where the section is located "Top Free Apps". Among them, you will need to open any application you like.
- Click the button "Get" to start downloading the application.
- Since you need to log in to your account to download, a corresponding window will appear on the screen. Click the button "Create a new Apple ID".
- You will be redirected to the registration page where you will need to click on the button "Continue".
- Check the box next to the license agreement and click the button "Agree".
- On the registration page, first of all, you will need to provide your email address. IN in this case It's better not to use a mail account with a Russian domain ( ru), and register a profile with a domain com. The optimal solution is to create mail account Google. In the line below, enter a strong password twice.


The App Store is one of the reasons pushing many to prefer iOS devices. In the Apple app store you can find not only a lot of games, but also a lot of useful programs, which can significantly simplify the life of owners mobile devices. Another thing is that without Apple ID ID, which is the key to Apple services, is not possible to use the App Store or iTunes Store as a whole. Therefore, to be able to appreciate all the benefits using iPhone or iPad, you must first create an Apple ID account.
Contents of the instructions You can create a new Apple ID both on the iPhone itself and using a computer, through the iTunes program, or even do it through a browser from any device with access to the Internet. Each of the indicated methods is convenient and justified in its own way in certain life situations.
How to create an Apple ID through iTunes
Launch iTunes on your computer and look for the “Login” button in the upper right corner. We click on it and in the window that opens, prompting us to either enter an existing Apple ID or create a new one, select “Create an Apple ID.”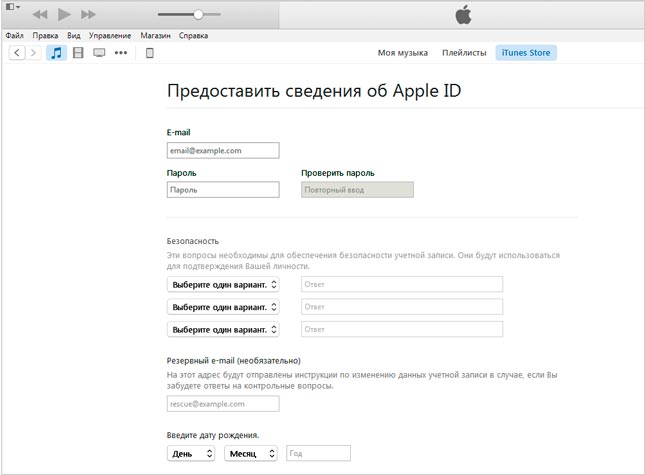
Here we need to indicate an active e-mail, password, select security questions and give answers to them, indicate the date of birth and, if possible, a backup e-mail. Unlike registering an Apple ID from an iPhone or iPad (see below), iTunes does not offer to create a new @icloud.com mailbox, so you must have an e-mail and, importantly, an active one.
After entering the required information, you will be redirected to the next page where you must indicate the payment method.

If you use a bank card, this registration step will not cause you any difficulties. Otherwise, read the instructions below.
How to create an Apple ID account without a card
The method of creating an Apple ID using the iTunes program requires, at one of the registration stages, to select a payment method and indicate a bank card number. This can be a problem for some, but it is very easy to solve.Create Apple account You can use ID without a card in iTunes. Launch iTunes and go to iTunes Store > App Store.

Here we are interested in any free application. We choose what we like and try to download it.

In this case, of course, the program will immediately prompt us to either specify an Apple ID or create a new one. We agree to create a new one and go through the same procedure for filling out the data described above. Moreover, at the stage of specifying the payment method, a pleasant surprise awaits us - the opportunity to refuse to select a card.

We select “No” in the “Payment Method” line, after which we only need to fill out the “Billing Address” section. You will no longer be required to provide an iTunes card. Don’t forget to check your mailbox afterwards and activate the created account.
You can also create an Apple ID without a card on your iPhone in the device settings. The following explains how to do this.
How to create an Apple ID on iPhone, iPad
You can create an Apple ID on your iPhone or iPad in the following ways:- when activating the device using the Setup Assistant program;
- in the device settings;
- through Apps Store or iTunes Store;
- on the My Apple ID website.
You can create a new Apple ID immediately when activating your device using the Setup Assistant. That is, when you bring home a brand new iPhone or iPad, you can immediately, during the process of activating and setting it up, acquire an Apple ID. It's very easy to do. We hold down the Power button, located on the side panel on the iPhone 6 and iPhone 6 Plus, and on the top on earlier models, and wait until the apple appears on the screen - the Apple logo. Next, we are greeted by the Setup Assistant program, following the instructions of which you can create a new Apple ID.
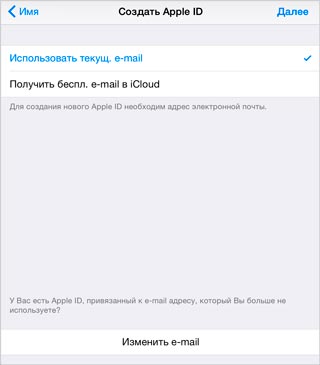
2. Create an Apple ID on your iPhone or iPad through the Settings application.
If your device is already activated, you can create a new Apple ID directly in iPhone settings or iPad. To do this, launch the “Settings” application and go to the iCloud section. Here you can find the treasured “Create Apple ID” button.

By tapping on it, we will be asked to indicate our date of birth, first and last name, e-mail, password, go through security questions, and so on.

After completing all stages of registration, you can safely use your newly created Apple iD in the App Store. However, when trying to buy something in the App Store or iTunes Store, users of the Apple ID created in this way will have to go through a number of steps, including specifying the payment method. What is noteworthy is that the Apple store will not require you to provide your bank card number.
3. Create an Apple ID on an iPhone or iPad through the App Store or iTunes Store (registration in the App Store)
Similar to the method described above, you can create an Apple ID through the App Store or iTunes Store. To do this, you need to launch one of two applications to choose from and go to the first section. For example, in the App Store it will be “Selection”. Here, at the very bottom of the page, there is a panel with quick links, under which there is a “Login” button. When we tap on the button, we will be asked to choose how we want to enter the App Store: with an existing Apple ID or create a new one. Select “Create an Apple ID” and patiently go through all the necessary registration steps.

Accordingly, if you already have an Apple ID, but need to create a new one, you can simply sign out of your iCloud, App Store or iTunes Store accounts and follow the instructions described above.
4. Create an Apple ID on the “My Apple ID” page.
So, open the “My Apple ID” page and pay attention to the “Create Apple ID” button.

Here we are again waiting for a number of fields for data entry. We need to indicate your full name, e-mail, which will be used as an Apple ID, create a password, select and answer security questions, indicate your date of birth, mailing address and preferred language.

After this, you must confirm your e-mail. To do this, you will need to open your mail, find and open the letter from Apple. Next, follow the “Confirm Now” link and log in using your new Apple ID and password.
How to create a US Apple ID
It happens that the program or game you are interested in is not in the Russian segment of the App Store, but at the same time it is available for download in the American or New Zealand segments, which cannot be accessed without a “local” account. This happens, for example, with applications. How to create an American Apple ID, as well as New Zealand, Canadian, Australian and so on.Creating an American Apple ID account is no different from creating a Russian one, with the only difference being that when registering an Apple ID, at one stage you should indicate the country whose App Store segment you want to access.
If you haven’t found an answer to your question or something didn’t work out for you, and there is no suitable solution in the comments below, ask a question through ours. It's fast, simple, convenient and doesn't require registration. You will find answers to your and other questions in the section.