This lesson does not talk about the secrets of design in Photoshop, but conveys the basic principles of creating calendars.
Create a new A3 file in book format, 300 dpi resolution.
Calendar grid (KS)
1. Turn on Smart Guides, which will help us align the copter.
2. Having chosen the appropriate font and size, we begin to type the required dates of the month in a COLUMN - let’s take JUNE.
Enter-7-Enter-14- Enter -21- Enter -28.
Note that the first character is empty and so we are waiting for Enter to reserve space here.
Align the text “Right”.
3. Enter-1-Enter-8- Enter -15- Enter -22-Enter-29.
Having typed the second column, hold down Ctrl+left mouse button, as a result of which it becomes movable (the cursor takes the form of a black triangle). We move it without releasing anything to the right of the first column until the Purple lines appear - these are our Quick Guides. You need to drive slowly, without a large amplitude. The quick guides in this case will only be horizontal, but if necessary, they can be vertical, and aligned to the top/bottom/center, depending on which side you will bring the movable column from. Experiment.

4. We type all the remaining numbers in columns and align them. We make the horizontal space between the columns “by eye”.
5. Each column is made into a new layer.
6. That's all. Everything is very simple. As a result, you received a smooth, beautiful calendar grid that can be easily changed according to any parameters without compromising quality.
How to change the CS.
1. At the moment we have 7 layers with numbers and 1 layer with the background.
Select the layers with numbers - click on the top layer, hold Shift and click on the last layer with numbers.
All digital layers are selected.
2. Ctrl+T – our entire CS falls under Free Transformation. Stretch it to the required size by pulling the corner (top/bottom/side) - Enter.

3. Look in the “Symbol” window, where the text parameters are displayed - your text size has changed to a larger one. And if you look at the numbers at 100% scale, you will see that they have retained their original quality. Edges are not blurred or pixelated. If you stretched the picture, the quality would deteriorate.
4. Experiment with the text settings - all digital layers should be selected. I slightly increased the horizontal distance between the lines.

5. Let's highlight the weekends in red - to do this, select two layers with the necessary numbers - hold Shift and click on them - in the "Symbol" panel change the color to red.

6. June 14 is also a day off this year - accordingly, we highlight only this number and change its color.

7. I completely forgot about the days of the week - let's add their names at the beginning of each column. Select the layer with the first column + Text tool + Enter (the column moves down 1 line) + write “mon”. And so on for all columns. In this case, the CS is simply shifted down a line, and the names of the days of the week appear in the layers in front of the numbers. It's simple.

8. Let's put some order in the layers to make it easier to continue working. Select all layers while holding Shift. Click on the properties in the upper right corner of the Layers panel and create a New Group of Layers – let’s call it “Calendar Grid”.


What else can you focus on when aligning the CS?
1. Ruler tool (Ctrl+R). They are configured in Edit – Settings – Units of Measurement and Rulers.

2. You can draw a grid for yourself as a guide - use a ruler to measure the required dimensions of the cells and draw them with a pencil. Here you can download the markings 21 x 15 cm - 3x3 cm squares. In *.psd format. At this stage, we’ll leave work on the CS for now and move on to creating the main design of the calendar.

Calendar design
1. Take a photo, crop it and align it with the frame. Here we will turn on the Quick Guides with center alignment and help us connect everything.

2. Add the name of the month to the KS. We write JUNE on a new layer and move it to the KS group - it will automatically “fall” to the very bottom. I also reduced the vertical CS a little so that everything would fit. You already know how to do this (select layers with columns while holding Shift - Ctrl+T - reduce to the desired size - Enter). This is approximately the sequence of layers you should have at this stage and this is what the working file should look like.

We now have a basic calendar layout. Now let's get to the "decorations". The internet is full of a variety of clipart and backgrounds, making the process of creating a calendar simple and quick that anyone can do. Let's look at the main points you can apply.
SCRUBS.
These are sets of elements and backgrounds of the same style. The main advantage of using them is a uniform style. In order not to complicate the work on the first calendar too much, I selected elements from different scrubs that I thought were suitable for each other - usually there is much more of everything and the choice is richer. Download scrub. Here's what I got:

Try reproducing this design yourself.
What you need to know for this:
1. How to insert elements - open in Photoshop - Crtl + A - Crtl + C (selected element) - go to the window with our calendar - Crtl + V.
2. Changing an element – click on the layer with the required element – Ctrl+T (free transform) – and pull/compress/rotate the corners/sides to the desired size.
3. Flip the element – again stand on the layer with the required element – Edit – Transform – flip horizontally/flip vertically.
4. Try to keep the Layers panel “in order” so that you don’t get confused and it’s convenient to use this file in the future:
- merge layers with the same type of elements, for example, “White flowers”, “Green leaves” - Standing on the top layer, press Crtl + E (merge with previous) and rename the layer (double click on the layer name).
5. Pay attention to the sequence of layers - Green leaves should be under the Frame, just like the Photo.
6. You already know how to change CS. Let's focus on highlighting family dates. This is the second important function of the Family Calendar. The first is the ability to look at your favorite shots without looking at the album. Let’s assume that June 23 is Natasha’s birthday. There are two ways to mark this: highlighting with color and signing. Just like you can sign in different ways - for example, if we leave the markings in the cells, then in this case a simple signature would be appropriate. And if it is not there, you can make a circular inscription - see the lesson on creating such texts (http://www.forum.fotowedding.ru/viewtopic.php?f=117&t=4464), only instead of a brush we use Text.
FRAMES, BACKGROUND, CLIPART - everything is the same, but only separately you search and select a set for yourself according to the color scheme, style and your preferences yourself. You can also use any lesson on creating Collages, postcards, frames, etc. Everything will do.
We will not dwell on this, because... The topic is very broad - our task is to understand the basic principle of creating calendars.
And now an important point - so that subsequent sheets do not move and all the elements on them are located exactly the same, we do the following:
1. File – Save As – enter the name of the next month “July”.
2. Now we change the CS for the month of July - without moving anything. Select the layer and change the numbers to the required ones. We move the selection of dates to July. All. Very simple. And fast. And it is no different from the previous page; there is no need to equalize or create anything again.
3. Change the photo. Ready

Etc. up to the number of months you need. Don’t forget about the title page and the final page - on the first you can write congratulations or wishes for the New Year, and the latter will be in good form in the design. By typing the KS once, you can use it indefinitely - if you want to make a one-page calendar, transfer the group of KS layers to a new file , change the sizes. That's all. Fast and easy.
TIPS for printing calendars
1. Leave more space around the edges - printers have so-called “dead margins” and to prevent them from “eating” some important part for you, it is better to leave “more air around the edges”, as the guys from the printing house say
2. If the calendar is multi-page, do not forget to leave space for fastening with a spring (at least 1 cm).
3. Book A3 format is convenient for those who have A4 photo printers at home. Having divided the file in half, you print it all on A4 double-sided format, and then fasten it in the middle with a spring and unfold it to get the final A3 format, which you hang on the wall after making a hole for a nail in the upper half with a hole punch. How to split a file - open the original A3 format. “Image – Canvas Size – reduce “Height” by half, without a checkmark on “Relative” (i.e. the width does not change) – check Location:

And print the top half. You also do the bottom half - only in the Location you select the bottom square.
4. “An iron thing that is inserted into a spring and on which a calendar is hung” - called a crossbar
5. One-page calendars can be attached to the wall with double-sided tape - it is similar to plasticine, but can be easily removed without leaving marks either on the walls or on the calendar after it has served its purpose.
P.S. If you have a question, a graphic file will help you explain the problem - the PrtScr button takes a “photo” of your monitor. Click it with Photoshop open and the file in it, then create a new document and paste the captured image there (PrtScr - Ctr+N – Enter – Ctr+V).
02.07.11,
Ole

Let's make a calendar interface today for the current month, with an active date and navigation for scrolling through the months. First we will make several rectangles with rounded edges, different in size and superimposed on each other. Let's apply different layer styles to them. Then, using the text, we will make a grid of lines for the calendar grid. Then we will write the text with the dates of the month. After this, we will design a block with the name of the month in the form of a ribbon folded over the edges. And at the end we will write a title, apply a layer style to it and make navigation arrows.
Step 1.
Create a new document in Photoshop and fill it with white. Create a rectangle with rounded edges, any color, size 214x234 pixels. 
Step 2.
Apply a layer style “Color Overlay”, color #fcfcfc. 
Step 3. 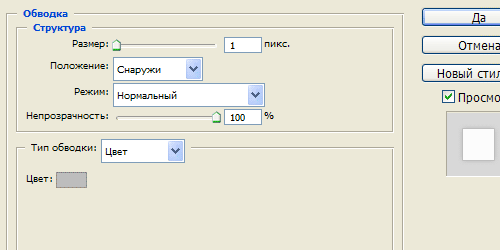
Step 4. 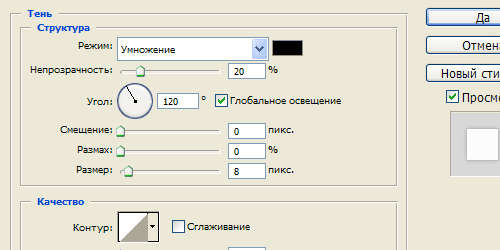
Step 5.
This is the result. 
Step 6.
Create a rectangle with rounded edges, size 196x181 pixels. 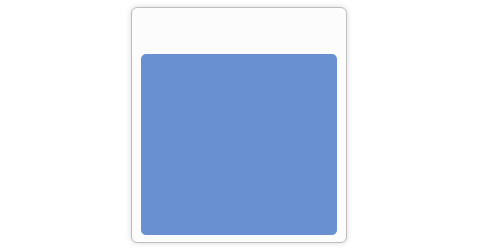
Step 7
Apply layer style “Color Overlay”, color #f3f3f3. 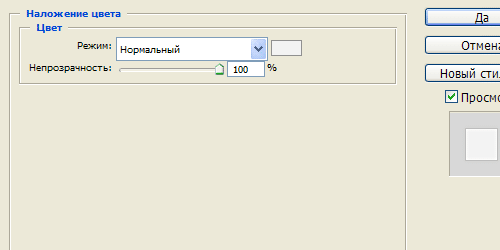
Step 8
Layer style “Stroke”, color #bdbdbd. 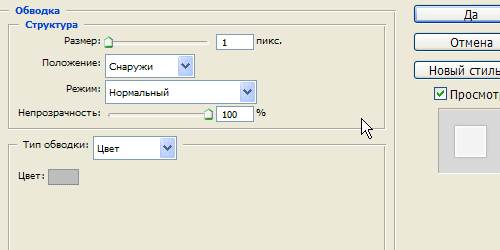
Step 9
Layer style “Inner Glow”. 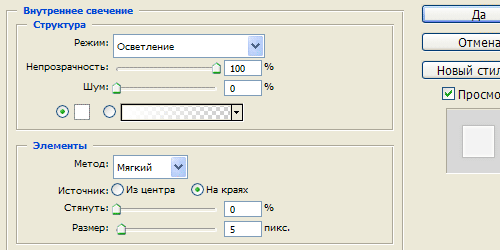
Step 10
Layer style “Shadow” (Drop Shadow). 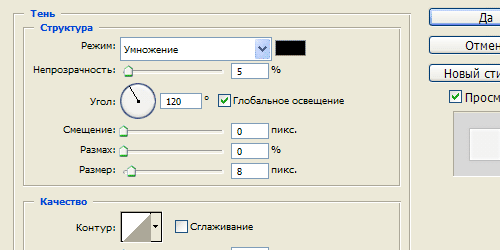
Step 11
This is the result. 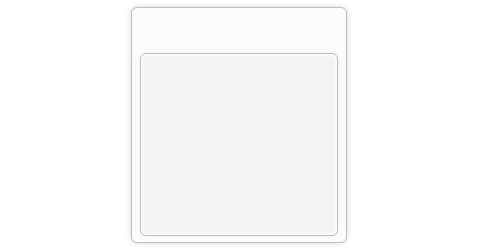
Step 12
Make another rectangle on top with rounded edges, size 196x157 pixels. Fill it with a gradient from #3169b4 on top to #154695 on bottom. 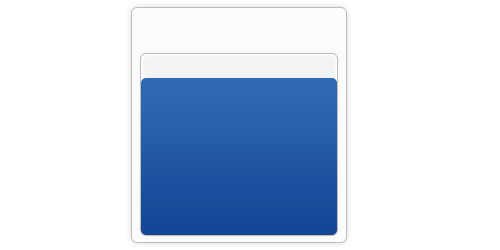
Step 13
Let’s use the “Text” tool (Type Tool) and using the underscore key (upper case between the keys) and +) create a straight line from the left side of the rectangle to the right, then move the carriage and then draw the line. You should get five lines, color #0f326b. 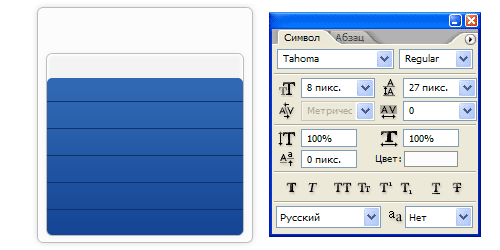
Step 14
Apply layer style “Shadow” (Drop Shadow). 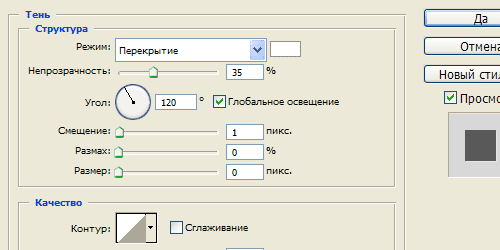
Step 15
This is the result. 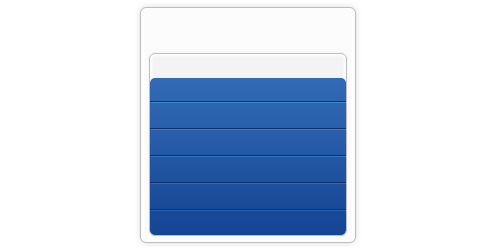
Step 16
Make a duplicate of the text layer, rotate it 90 degrees counterclockwise, remove the extra tails in the lines, and add another line. Text settings are as in the picture below. 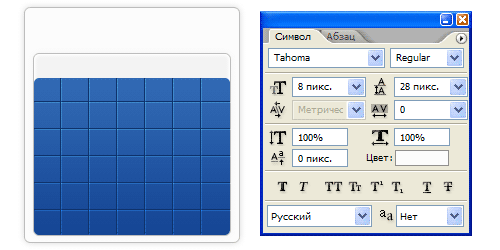
Step 17
This is the result. 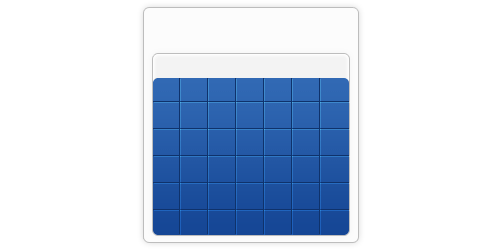
Step 18
Now let's use the Type Tool again. First, select the area in which we will write the text, then write the numbers separated by a space, 7 calendar dates in a row. Then go to the “Paragraph” bookmarks and set the text alignment, as in the figure below. 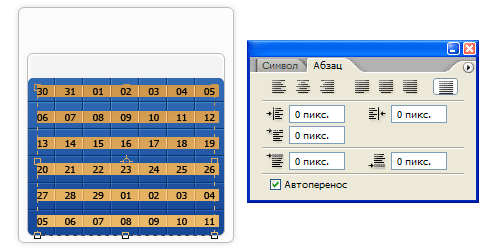
Step 19
This is the result. Text color is white. 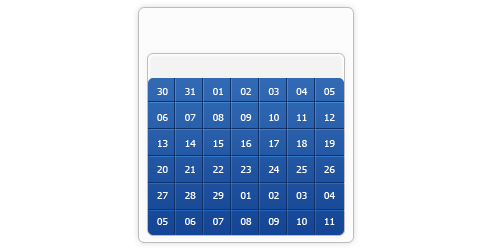
Step 20.
Now make a duplicate of the layer from Step 12, drag it to the very top, fill it with color #0f326b. Change the layer blending mode to “Multiply” and reduce the layer transparency to 40 percent. 
Step 21
Now we carefully remove areas related to the current month. 
Step 22
Select the current date square and fill it with color #4d86d2. 
Step 23
Apply the layer style “Inner Shadow” to it and change the blending mode to “Lighten”. 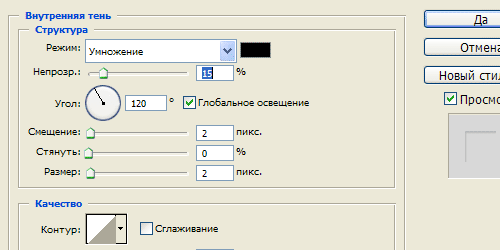
Step 24
This is the result. 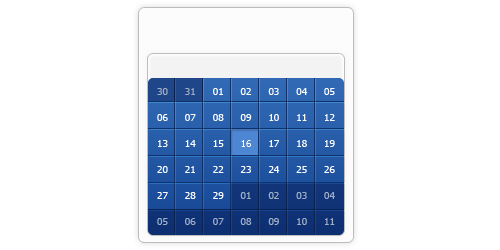
Step 25
We print the names of the days of the week, color #707173. 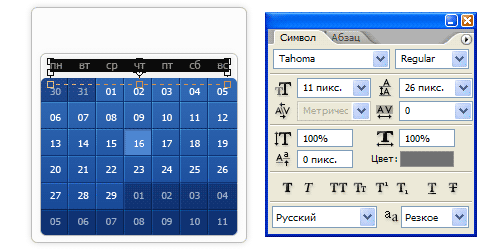
Today we will learn how to create a calendar grid in the program Adobe Photoshop.
First, I’ll explain why you need to create a grid in Photoshop. Firstly, you can at any time adjust the font size, color, brightness, contrast and other parameters of your text, which is impossible when creating a calendar grid in other programs, or the settings in them are limited. Secondly, you will have a layout with which further processing is possible, that is, you edit only the image, and move the calendar grid wherever you want. And thirdly, you can create operations to add text and adjust your layout (an example of such an operation is in the video below).
So, let's begin!
First, let's create any document, for example A4 size. Next, select Horizontal Type Tool
We print numbers, for example, 01. Then we create guides to make it easier to distribute the text later. We make them in the shape of squares, as shown in the figure below. There should be 7 cells horizontally and the same number vertically.
Now we create the remaining numbers - up to the 07th, entering them into each cell in a separate block.
To make it easier for you when cloning numbers, you can, while holding down the Alt key and selecting a number, drag it to a new location, this way you make a copy of the layer.
When all the numbers have been entered, select the first 7 digits horizontally and go to the menu Layer-Align-Vertical Centers . We align the line spacing and move on.
Simplifying the task is the most important thing in this project, so we highlight while pressing the key Shift layers from 01 to 07, right-click and select Link Layers. Then, while pressing the key Alt move the layers down to the next row of empty cells. We rename the text and perform similar operations with the remaining numbers. You should have 5 layers with numbers from 01 to 31. Remove unnecessary numbers.
Now, if necessary, you can add days of the week using the same action.
Select all the text layers again and go to the Photoshop menu: Layer-Smart Objects-Convert to Smart Object . Thus, we will convert all layers into Smart Objects, which will give us more flexible settings over subsequent actions.
Rename the layer to “month”, or whatever you like 😉
Then we take the tool Rectangular Marquee Tool and select the numbers from 06 to 28 in the form of a rectangle, as shown in the figure below.
The video below automates actions such as typing data into text fields, connecting and grouping layers, creating additional actions to remove extra numbers, and much more.
Have you decided to create a calendar with your own hands? Stock up on patience and time, and everything else is a matter of technique.
Preparing for work
Background picture. For this purpose, it is better to take images or drawings with the repetition of an object, plants, geometric shapes, buildings. The background should not distract attention from the main object of the calendar, but complement it.

Texture background. It can either be used or not. Aged pictures, rough surfaces, relief of wood, feathers, plants - all this refers to the textured background.
Calendar grid. The freely accessible Internet offers a huge selection. Select the grid that best suits the style for your future calendar and download it to a file on your computer.
Main picture. Photo, drawing or other image that will be the center of attention. It may not exist, but it will be more interesting.
It is convenient to work when all the necessary files with pictures are stored in one folder, for example, on the computer desktop.
Process of creation
Launch photoshop and create a new file, then a blank sheet (A 4) and flip it horizontally.
Functionally, you need to do the following manipulations: click “file”, then click “create”, click on “image”, then on “rotate image”, then rotate “...by 90º”.
This way you will get a blank sheet on which the calendar will be located.
Take your future background and apply it to the created sheet. In fact, we drag it from the folder to the open working window of Photoshop.
An overlay image will appear on the created sheet. It may not match at the edges. To do this, take it by the grid that appears and stretch it with the mouse to the required size. After completing the manipulations, you must press the Enter button.
We also do the same with the texture background (if there is one) and the calendar grid.
Don't forget about the main image. It is necessary to leave free space for it. To adjust and arbitrarily move the calendar grid within the future calendar, you must use the “free transformation” function. It is located in the "editing" section.
We add the main image to the calendar and, using the “free transformation” button, place it in the right place and at the right angle.

The last missing link on the calendar is to write the year in numbers. On the left of the functional panel we find the large letter “T” and click on it with the mouse. Next, write the year numbers on the calendar field, for example, “2015.” On the top functional bar we select the font and size. We carry out the inscription. Using the eyedropper tool and the color picker, paint the inscription in the required color.
Let's summarize what happened at this stage. The created layers should be arranged in the following order:
Top with text "2015"
Below is the main picture
Below the picture is a calendar grid
Under the grid, under each other, there are two layers with a relief background and a background image

Now look carefully at your work again. Is everything correct, are there any errors? Then finish the job by merging the layers and saving the result.
Photoshop is a program that has been able to win the hearts of many users. It is used to work with graphic data. As novice users say, for processing pictures and photographs. In Photoshop you can create various kinds of graphic objects. For example, business cards or postcards.
Today we need to understand how to make a calendar in Photoshop. This question is asked by many users. Especially those who prefer certain actions with images as their main work. What advice and recommendations can you give regarding the task at hand? What will help you create your own calendar in Photoshop?
Calendar grid
The first stage is the creation of the so-called calendar grid. Without this component it will not be possible to make a calendar.
How to make a calendar in Photoshop? To create a mesh you need:
- Open Photoshop. You can use any version of the application.
- Create a new document. Preferably fixed sizes. A4 or A5 is ideal. It all depends on what kind of calendar you want to get. To do this, just press Ctrl + N.
- Give the grid a name.
- If A5 format was selected, you will need to flip the sheet 90 degrees.
- Click on the Horizontal Type Tool. For ease of operation, you will need to enable the guides.
- How to make a calendar in Photoshop? You need to start printing days (by numbers) in certain cells on the sheet. For example, the first of January is Monday, and the seventh is Sunday. In the 1st line of the grid there will be: 01, 02, 03... 07.
- Continue creating a document in accordance with the days of the week in a particular month.

This is the first stage of work. As soon as certain days in the document are filled in, you can begin editing the file. How to create a calendar in Photoshop? You must follow the recommendations below.
Working with layers (in a grid)
So, the previously proposed algorithm has been passed. What's next? How to make a calendar in Photoshop?
In order for the first mesh (and subsequent ones as well, they are all made according to the same principles) to look appropriate, it is necessary:
- Select the first 7 horizontal digits (first line).
- Go to the Layer-Align-Vertical Centers menu.
- Align line spacing. It is important to keep an eye on how alignment affects the mesh.
- Press Shift, select all layers from 1 to 7. Next, right-click and select Link Layers.
- Hold Alt and drag the layers below - onto a row of empty cells.
- Rename the layer. Continue similar actions with the remaining numbers. The end result will be 5 layers with numbers from 1 to 31.
- Remove unnecessary numbers.
- Add days of the week in the same way.
Everything is almost ready. How to make a calendar in Photoshop? Its primitive version does not require special knowledge from the user. All that remains is to mark the weekends on the grid.

Celebrating the weekend
This is not difficult to do, especially if there are no additional official holidays in a particular month. This will speed up your work in Photoshop.
To mark the weekend separately, you will need:
- Select all text layers on the previously created grid.
- Go to Layer-Smart Objects-Convert to Smart Object. This is not a necessary step, but it will make further work much easier. The layers will be merged into a “Smart Object”.
- Rename the resulting object. For example, by the name of the month in the calendar.
- Select the Selection tool. It is advisable to give preference to selection in the shape of a rectangle.
- Select the area responsible for weekends. Usually these are the last and penultimate numbers in each line.
- Select Create new fill or adjustment layer.
- Choose the color that will be used to indicate the weekend on the calendar. Usually it's red.
- Save changes.
- Click on the layer with the red (or any other previously selected) fill. Click on the keyboard shortcut Ctrl + Alt + G.
Ready! Now it’s clear how to make a calendar in Photoshop. The proposed algorithm of actions will help to create an appropriate calendar grid for each month.

With photographs and pictures
Most often, users are not satisfied with the usual grid in the form of a calendar. I would like to make a more beautiful graphic object. Then you have to figure out how to make a calendar in Photoshop with photographs or pictures.
Unfortunately, there is no single algorithm of action here. It all depends on how exactly the images will be positioned. For example, above the grid or as its background. Most often, the first option interests users to a greater extent.
What is offered for creating a calendar with photos? To do this you need:
- Create a new graphic object, canvas. This is done in exactly the same way as with the calendar grid. It is advisable to choose a larger sheet size.
- Divide the canvas into 2 parts: a grid (how to make it was described earlier) and a place for a photo.
- Open in Photoshop the photo you want to insert into the calendar.
- Select the entire image or part of it using well-known tools.
- Copy photo to clipboard.
- Create a calendar grid.
- Insert a picture into the space provided for the image.
This way you can make a desk calendar in Photoshop or one designed for the whole year. It all depends on the user's preferences.
Templates
There is a simpler option. Don't want to think about creating a calendar? Then use one little trick. You could say it's a ready-made calendar template for Photoshop. Usually these are ready-made graphic objects with a calendar grid. All that remains for the user to do is to insert the photographs and pictures that they want into the specially designated places.
A calendar template is the fastest and easiest solution. The main thing is to download the document for a specific year. Otherwise, there is simply no point in a ready-made template.

Conclusions and Conclusions
Now it’s clear how to make a calendar in Photoshop. Some problems users encounter at the stage of creating a calendar grid. Otherwise, you can complete the task in just a few minutes.
For people who do not have Photoshop skills, ready-made calendar templates are ideal. You can find both reversible and general options.
