Gone are the days when you needed a DVD-ROM to install the system, which in turn could get scratched and freeze during installation. A bootable USB flash drive for Windows 10, Windows 7, Windows XP to install the system on a computer will be faster and more convenient. Let's create bootable flash drive by using Rufus And . When installing the system, I recommend inserting the drive into the rear USB ports of the computer.
Let's start the procedure for the PC with bios UEFI, (you can read the types of bios) for older computers and laptops, they may not be suitable, for older PCs we will consider below. Using a proprietary utility from microsoft. Downloading Windows 10 Installation Media Creation Tool, run the downloaded program and select "Create installation drive".

- There should be a checkmark, then it will automatically adjust to your system.
- You can manually select what you need, for this you need to uncheck the box in paragraph 1.
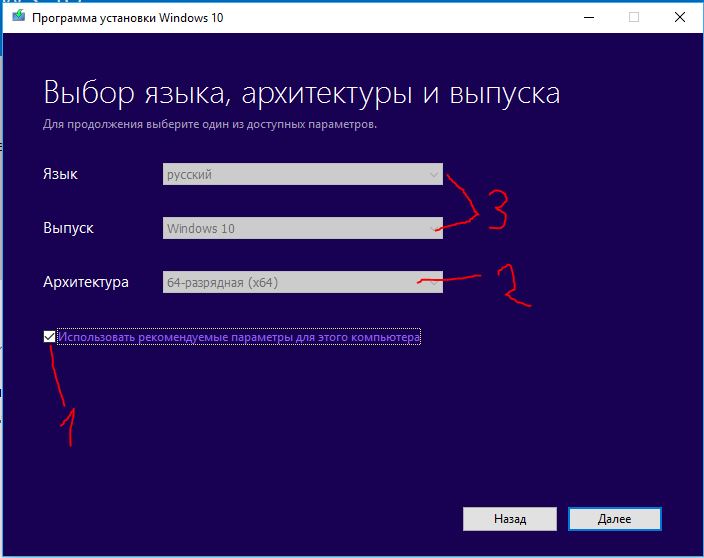

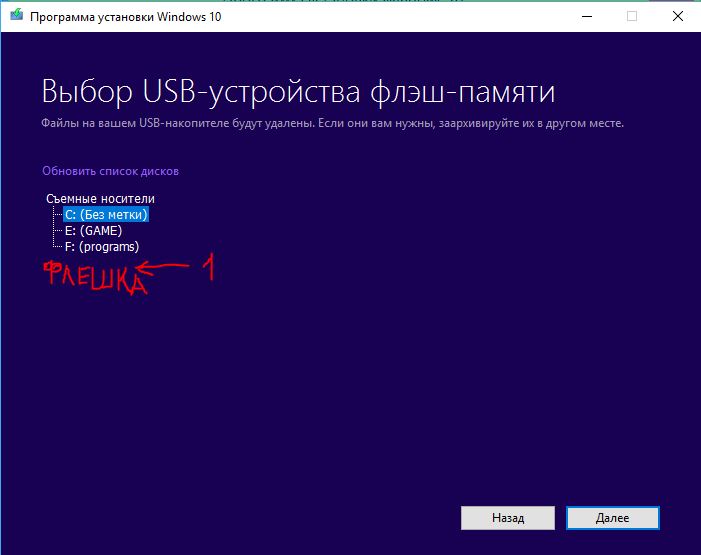
- Specify the media that will be a USB device.

- You specify (choose) the path to the device. We are waiting for the end of the download and recording. That's all!!!
Windows 8.1 installation media
Downloading Windows 8 Installation Media Creation Tool a similar situation. We do as described above with the tenth version.
Create bootable USB flash drive Windows 10 without programs
Let's analyze the option without programs (suitable only for UEFI bios). You will need a downloaded distribution kit in ISO format and a USB drive formatted in FAT32.
- Select the windows image and click on it right click mice.
- In the context menu, click "Connect".
- There will be such a disk as in the picture with windows files and folders.


- Circle (select) everything and right-click on the file or folder.
- Click "send" in the context menu.
- Select a USB device.


Create bootable USB flash drive Windows 10, 7, XP using Ultraiso
The seventh version is old, so we will create the windows 7 installation media using the UltraISO program. With this program, you can also write to a USB flash drive and windows 10 and XP. Download the software and install it.
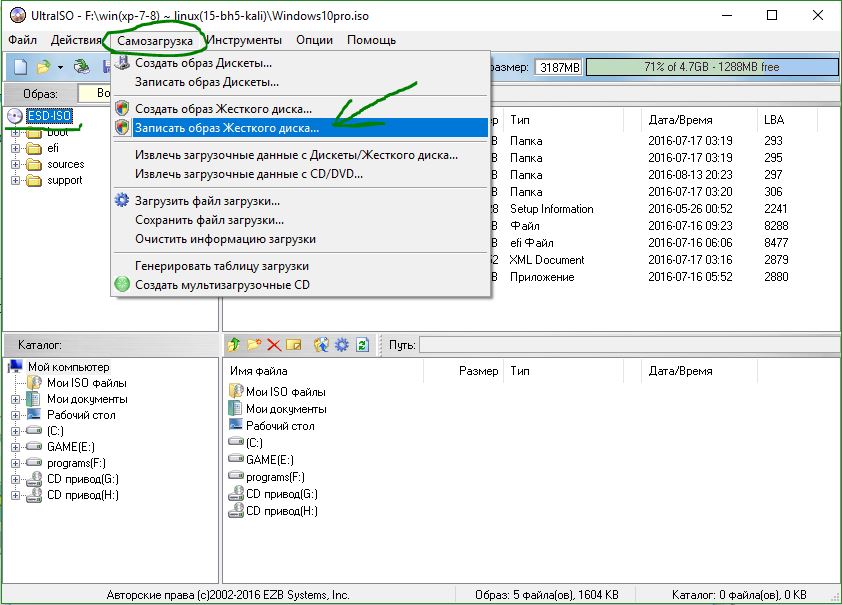
- Open our downloaded image with windows system 7, 8, 10 xp.
- We look that the disk icon would be selected.
- Select "Burn Hard Disk Image".
- We look carefully to stand USB stick so as not to format your hard drive.
- Select the recording method "USB-HDD+". (When booting the computer, select USB-HDD + in BootMenu).
- We press "record".

Bootable USB flash drive windows 7, 10, XP using Rufus
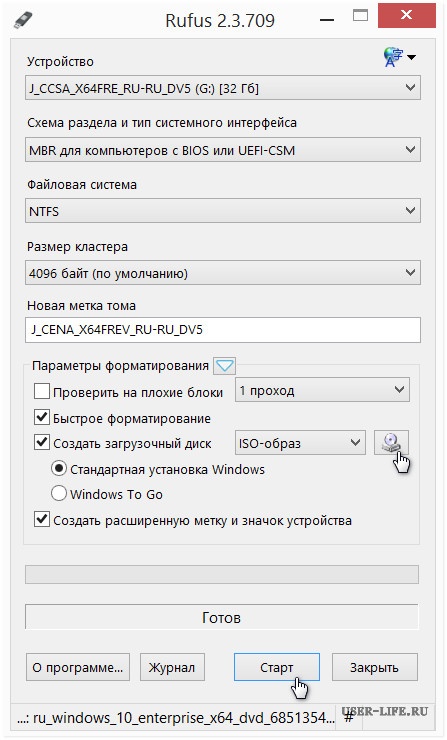
If your bios is old, not uefi, then Rufus is made for this. Suitable for everyone windows versions. Select in the column "Partition scheme and type system interface": For old BIOS, select MBR. For modern UEFI. Download and install rufus.

Bootable windows 7 flash drive using USB/DVD Download Tool
The utility from microsoft created in ancient times is very relevant to this day to create windows 7 installation media with Windows USB/DVD Download Tool. Download and install on your computer.
- Select USB storage.


- Click "Erase".


- We squeeze "Yes", it formats the drive, writes, and you're done.


For every PC user, there comes a time when you need to reinstall Windows. But here's the problem. The disk drive is broken or it is not in the device at all. What then to do, there is only one way out - to create a bootable USB flash drive. How to make bootable Windows flash drive find out by reading this article.
Preparation
Before you create a bootable USB flash drive with Windows, you need to prepare. You must have with you:
- flash drive with sufficient memory
- Windows 7 ISO image;
- program for burning ISO-image.
The operating system required for reinstallation can be downloaded from the official Microsoft website. This can be done by paying a certain amount or by entering a special code that comes with a licensed Windows boot disk. However, not every user can afford to purchase operating system. In this case, the ISO image can be found without any problems in the open spaces. world wide web. However, you should be careful. In hacked operating systems, attackers can insert various malware. Therefore, you need to download the image only on proven resources.
It is also worth noting that the storage device will be completely formatted when the image is written. If it contains some valuable data, then it is worth writing them to a separate disk or any other storage medium.
Create a bootable flash drive
Making a bootable flash drive is very easy. Anyone can cope with this simple task if you follow certain instructions. There are at least 4 ways to install Windows 7 from a flash drive. They differ from each other in the software that is used to install Windows on a flash drive.
Windows 7 USB/DVD Download Tool
To create a bootable USB drive, you can use the official tool from Microsoft. The program can be downloaded directly from the Microsoft website. To create a bootable USB flash drive with Windows 7, follow the instructions below:
When the process of copying the image is completed, you will have a bootable USB flash drive with Windows 7 ISO at your disposal. Now you can install Windows 7 on your PC.
UltraISO
You can make a USB flash drive with Windows in a different way. This method implies a program called UltraISO. UltraISO- paid software to interact with images. You can download 30 days trial version. The program has a fairly extensive functionality. With its help, you can record, edit, convert images, etc. But we are interested in the recording function. You can write a Windows 7 image to a USB flash drive using the following instructions:

As you could understand, the process of creating a bootable USB flash drive through UltraISO does not require any specialized knowledge. In the same way, a bootable USB flash drive for Windows XP can be made.
WinSetupFromUSB
To create a bootable Windows flash drive, you can use WinSetupFromUSB. The program has several functions for working with images. Nevertheless, we are interested in creating a bootable USB flash drive. The program consists of only one window and is quite simple in terms of operation. To create a flash drive, do the following:

Now the Windows 7 bootable USB flash drive is ready and you can use it.
Windows command line
You can create a bootable Windows flash drive using command line OS. Creating a bootable flash drive this way is a little trickier. However, you do not have to download any additional programs.

After preparation, you need to write to the device setup files OS by simply unpacking the image downloaded from the Internet. And thus, at your disposal will be a flash drive with Windows written down.
Conclusion
This article addressed the question of how to create a bootable Windows 7 USB flash drive to reinstall this OS. To solve this problem, you can use one of the four methods proposed above. Each user has the right to choose any of them, based on their preferences or capabilities. To obtain the desired result, you must follow the instructions given above and related to the selected method.
Related videos
Habitual CDs/ DVD disc and seriously pushed USB drives, which differ in speed, large capacity, compactness, reasonable price and versatility because USB ports equipped with a wide range of electronic devices.
Specialized programs are used to create installation USB drives for Windows or Linux. In this article, we will look at some of them. First, let's look at ways to create bootable media for Windows environments without the use of special utilities.
Users can create bootable flash media for latest versions Windows OS without help special programs. This requires: a flash drive with a capacity of at least 4 GB and an ISO image or disk with the necessary Windows distribution.
The algorithm for creating a bootable flash drive is simple:
- USB - formatted in FAT32
- ISO image with the necessary distribution can be unpacked by any archiver;
- after extraction on the computer, a pack with installation files is obtained;
- the folder opens - all files contained in it are copied to a formatted USB drive;
- when copying is completed, the flash drive is ejected.

The bootable flash drive is ready, you can use it on any computer.
Bootable flash drive from command line
Another way to create a bootable flash drive without special utilities involves using command line.
A flash drive formed in this way installs Windows 8 or 10 distributions on a computer, regardless of whether it is equipped with a UEFI interface or not.
The algorithm of actions for the formation of the carrier is as follows:
After the above steps, the USB drive should appear in Windows Explorer with a drive letter assigned to it.
Next, you need to make the media bootable, for which the ISO image with the OS distribution is connected to the system and the command “Y: bootsect /nt60 X:” is entered on the command line (where Y is the name of the ISO image, and X is the name of the media);
Then, on the command line, enter the XCOPY Y:\*.* X:\ /E /F /H command (where Y is the media from where the copy is coming from and the name of the ISO image, and X is the name of the media) which the installation files are copied to the USB drive (command example: XCOPY "Y:\win.iso" X:\ /E /F /H).
This is a special application that directly from the Microsoft website downloads the Windows distribution kit (8, 8.1, 10) to the user's computer and then generates boot disk for further installation of the OS on the computer.

In the case of Windows 10, the program, at the user's choice, updates the version of the OS installed on him to Windows 10 (Pro, Home).
The algorithm for creating media is as follows:
- With official page Microsoft downloads a program file with a bit depth similar to the OS installed on the user's computer;
- the downloaded file is launched;
- in the window that opens, select the option: "create installation media";
- select: language, OS release; bit depth (x32, x64, "both");
- media is selected (capacity - at least 3 GB, and if it is supposed to record both bit depths - at least 6 GB);
- in the next window, the selected media is displayed, and the "Next" button is pressed;
- after the creation of media is completed, the window " USB device done”, in which the “Finish” button is pressed to exit the program.
Creating bootable USB drives is also required for the Linux software environment, here the various methods, two of which are discussed below.
First of all, the preferred Linux distribution image (Ubuntu, etc.) is selected. Then a USB drive with a capacity of at least 1 GB is connected to the computer.

In the window that opens, the “Disk Image” item is checked, after which the “…” button is pressed and the required image file is selected. After pressing the "OK" button, the recording process starts, after which the program closes. Installation USB The disk has been created and is ready to be used for its intended purpose.
The second method is just as simple and involves the use of the XBoot utility.
xboot
XBoot is a free program designed to create a multi-boot USB drive with several Linux distributions, antiviruses and other utilities.

For XBoot to work correctly, installation is required. NET Framework 4 or higher.
The media creation algorithm is as follows:
- launch xboot;
- ISO images of the necessary distributions and utilities are transferred to the main window;
- the program extracts information and generates an installation list;
- if necessary, the fields "Name", "Category", "Help Text" are edited by the user;
- after generating a set of utilities, the “Create USB” button is pressed;
- in the window that opens, select the drive and bootloader (it is recommended to use Syslinux), click the "OK" button;
- when the process ends, the program closes. It is better to download the utility on the official website.
Let's also look at some simple yet effective programs that allow you to create bootable USB drives.
This is a free portable utility that helps you create an installation Windows package on USB drives. The program is a single zipped file that does not require installation. You can download the utility on the official website.

The compact interface offers two options:
- drive formatting (FAT32 is not supported in NTFS);
- package selection Windows installation(Version 8 is supported).
To create bootable disks, ISO images, local folders, DVD disks are used.
UltraISO
The main function of the utility is to create, edit and convert images. At the same time, it is also able to form bootable USB media, you can download the program. The algorithm for this procedure is simple:
The USB drive is connected to the computer;
- UltraISO starts;
- the “File” tab is selected in the menu, then the “Open” item, after which the required image is selected in the “Open ISO file” window that opens;

- in the menu, select the "Boot" tab and the item "Burn HD image";

- in the disk image recording window: specify the path to the image file, select the drive, select the USB-HDD method, click the "Burn" button.

- at the end of the process, the message "Recording completed" appears, after which the program can be closed.
Rufus
Rufus is a free, portable program that creates boot drives for Windows (all latest releases) and Linux.

In addition, the utility allows you to:
- work on computers without installed OS
- flash BIOS;
- make other firmware from under DOS;
- run the low-level formatting utility;
- check the drive for bad blocks;
- format the drive.
The program does not require installation and starts immediately after downloading.
The utility's customizable interface is simple and straightforward, since it is a clone of the disk formatting window in Windows.
When analyzing the issues of creating bootable media, one cannot ignore the creation of so-called multiboot flash drives.
Multiboot flash drives
A multiboot USB drive is a universal tool that includes a set of utilities and distributions, with the help of which: OS (Windows, Linux) is installed, system recovery is done, hardware is checked and tested, the hard disk is partitioned, portable OS (LiveCD) is loaded etc.
There are many options for creating multiboot flash drives, so let's consider two popular methods involving the use of WinSetupFromUSB and Easy2Boot programs.
In addition to the latter, you will need the distributions that you intend to use (Windows 8.10, Ubuntu, LiveCD, Acronis Disk Director), and actually the USB drive itself, which turns into a multi-boot one. Its capacity is selected in such a way that the necessary utilities fit. So, let's consider the first option.
This option uses WinSetupFromUSB, a free program that creates a multi-boot flash drive from Windows 8, Linux installation images, and utility disks. With its help, the media is prepared for transformation into a bootable one, formatted in the required form, etc.

The utility does not require installation - the downloaded archive is unpacked and the required version (x32 or x64) is launched.
The algorithm of actions is as follows:
- after launch, in the main window, a USB drive is selected to which the recording is made;
- the item “AutoFormat it with FBinst” is checked - initiates formatting of the selected drive and transformation into a boot disk. (The mentioned item is checked if the image is written to the media for the first time. If a drive previously created using this utility is used, then when the corresponding images are added to it, formatting is not applied);
- the required distribution is marked (or several, if a multiboot flash drive is needed) and the path to it is indicated
- after adding distributions, the “Go” button is pressed;
- after the process is completed, the "Exit" button is pressed.
Now let's move on to the second option.
This option uses the Easy2Boot utility, designed to create multiboot flash drives. It complements the RMPrepUSB application, which is pre-installed on the computer.

The algorithm of actions is as follows:
- RMPrepUSB starts;
- in the window that opens, the position “Do not ask questions” is marked;
- in the size section, the position is marked - MAX;
- in the volume label section, the position is set to “any”;
- in the Boot sector section, the position is marked - Win PE v2;
- in the file system and options section, positions are marked - FAT32 + Boot as HDD or NTFS + Boot as HDD. FAT32;
- the position "Copy system files from …” and the path to the archive with Easy2Boot that has not yet been unpacked is indicated;
- the "Prepare Disk" button is pressed;
- after waiting, the button "Install Grub4Dos" is pressed;
- the question that appears is answered - "No";
- without leaving the program, the contents of the USB drive are opened in Explorer;
- from the ISO folder, the necessary images are transferred to the appropriate folders;
- after transferring the images to the disk, the Ctrl + F2 buttons are pressed;
- when the process is complete, the multiboot USB drive is ready.
FAQ
I recorded a Windows distribution kit on a USB flash drive without programs, during the boot process an error occurs "Insert a Windows disk into the device ..."
An error occurs if a non-licensed assembly was used Windows image(pirated), errors occurred during the formatting of the flash drive (at the same time, the explorer did not show an error message), the ISO image was unpacked by the archiver directly to the USB drive:
- Reformat the USB drive by unchecking "Quick Format";
- First, unpack the ISO to any folder on the PC, then copy it to the media.
After formatting, the flash drive is no longer detected in Windows Explorer
- The problem appears when there was a forced interruption of the formatting process.
- The USB port may be damaged. motherboard(contact is lost from time to time) - rearrange to another port and reformat.
Bootable flash drives are used to install operating systems on personal computers and laptops. They work exactly like installation DVDs. The BIOS can recognize such a flash drive due to the presence of a special boot sector on it - MBR - and run the programs stored on it. This article describes how to make a USB flash drive bootable, how it differs from a regular media, what programs are needed, and so on.
What is a bootable flash drive
At the physical level, such a flash drive is no different from any other USB storage medium. You can create it from any device: make from external hard disk, removable solid state drive or regular flash drive. The only requirement is that you have the required amount of space on your device.
A special image of the operating system is unpacked onto a bootable USB flash drive in ISO format. An entire structure is created on it: a boot MBR sector, a table with the addresses of the necessary files, directories with the services needed during installation, and so on.
Creation is usually carried out using special software. There are many paid and free programs, which allow you to work with ISO images and make a bootable USB flash drive. However, you can create it manually: use the command line to mark up boot sector, write to it necessary files and so on. 
This process is quite complicated. General users there is no sense in it. It is essential for experienced computer professionals who want to make a multi-boot USB. It allows you to record several operating systems and choose which one you want to install directly in the BIOS.
Programs for working with ISO images
There is enough a large number of a variety of programs that can help you create a bootable USB. With their help, you can often burn an image to a DVD disc or make an image from an already finished disc. For example, if you have installation disk Windows 7, you can simply copy its contents to a USB flash drive. This is much more convenient, as it allows you to install the operating system even on those computers that do not have a DVD drive.
Another way to get an image is to download it from the web. if you have license key, you can download the original ISO directly from the official Microsoft website. To do this, do the following: go to https://www.microsoft.com/en-us/software-download/windows7 if you want to create a flash drive for Windows installations 7 and enter your code in the text box. If it turns out to be correct, you will get permission to download from Microsoft servers.

Otherwise, you will need to find the image online. There are many sites called torrent trackers where you can find the files you need. You can burn the original Windows installer to a USB flash drive or disk, or use ready-made assemblies. They may include large sets of drivers for many devices, pre-installed useful programs, activators and so on.
This article discusses exclusively free software with which users can easily and quickly make themselves a bootable USB flash drive.
Windows7 USB Download Tool
This is the official utility from Microsoft for creating bootable media and burning images to DVD. Working with it is completely free. Follow the provided instructions:

Please note that creating bootable media from a regular USB flash drive will destroy all data. It will be impossible to restore the lost. Therefore, it is highly recommended that you carefully check the USB media you are using.
WiNToBootic
Another free app, with which users can make a bootloader for the operating system. It can be downloaded from the official website of the program - http://www.wintobootic.com/. Just go to the given link and click on the green "Download" button on the right upper corner pages. 
To your Personal Computer the archive will be saved in zip format. To work with the program, you need to unzip it. You can use any free archiver, such as WinRar or SevenZip .
The advantage of this utility over the Windows Download Tool is that it does not need to be installed. This is the portable version. You can burn it to your USB flash drive or place it on cloud storage to have access to it at any time from any personal computer.
 The application interface is very clear at a glance. In the left part of the window, you need to select the devices that you want to make the bootloader. On the right side, specify the path to the location of the image in ISO format. After that, click on the “Do it! ", which is located in the center.
I can't remember the last time I used an installation disc Windows or ubuntu on PC. Every time I create a bootable USB flash drive, or an installation one, as it suits you, I use the same method that I want to talk about in this post, citing step by step instructions with screenshots.
I have to install Windows from a flash drive quite often! I always use the same flash drive. I can’t tell the exact number of computers on which I had to install Windows from a USB flash drive, there were approximately a little more than 20 of them, that’s for sure!
For all this time, installing Windows from a USB flash drive, I have not encountered a single problem, and I wish you the same !!!
I use a very simple flash drive. And the flash drive itself is already old, God only knows how old it is.
In general, the simplest and most common 4 gig flash drive.
Preparation of a flash card.
Preparing a flash card consists of one simple thing. It needs to be formatted in the file system NTFS. This can be done without any problems standard means Windows. Go to my computer and RMB on the flash drive icon, from context menu select "Format..."
In chapter " File system" you are taking NTFS and press the button " Start" In the warning window, agree by pressing the button" ok".
This completes the preparation of the flash card, now it remains to prepare the image with windows.
Preparing a Windows Disk Image.
Windows preparation consists in unpacking all files from " ISO» image with Windows. It can be done in this way.
1 - Unpack with the usual archiver " Win RARom" To do this, open the iso image file using " Win RAR"
And extract all the files in the previously created folder, for example "win7".
2- Use the "Ultra ISO" program, the principle of action is the same.
Open the image, select all the files and drag it to the folder " win 7" Or whatever you called it there!
The windows files are unpacked and that's it, you can start creating a bootable USB flash drive.
Create a bootable USB flash drive with Windows.
Flash drive is ready Windows files extracted from the ISO image, there is still a little left and the bootable flash drive will be ready to go.
Download the program " WinSetupFromUSB"(Link at the bottom of this post). And we launch.
In the main window of the program, click the " Bootice»
In the next window, make sure that the flash drive you need is selected in the drop-down list and click the " PerformFormat»
Here you need to select " USBHDDmode (SinglePartition) » and press the button « Nextstep»
In the next window select file system NTFS and click "ok"
After clicking the ok button, respond positively to all received warnings. Then close all windows and go to the main program window.
Check the box next to " Vista / 7/ server 2008…… " and select the same "win7" folder where you previously unpacked the Windows files from the iso image.
It remains to press the "GO" button and wait about 10 minutes until the program finishes its work.
It is worth noting that the program may not respond and simply freeze, in which case you do not need to turn it off. In fact, it works you just need to wait. After some time, the program comes to its senses and you can observe the progress of the work.
