Computers have long entered our lives and penetrated almost all areas of human activity, even many people have several computers at home. For example, a child may have one computer and is intended for study or games, the second PC can be used for work. What can we say about commercial firms and enterprises in which the number of computers can be in the hundreds or even thousands. For remote control of one computer or administration of an entire fleet of machines, there are special programs remote control of computers, we will consider one of them in this review.
LiteManager is a set of programs for remote control of computers, distinctive feature which is the presence of two versions: the full version of LiteManager Pro and the free LiteManager Free. You can download the program, as well as find a full description on the official website.
The free version of LiteManager Free has the basic functions of LiteManager Pro and provides the ability to manage 30 computers for free, with minor limitations. The license of the free version of the program allows it to be installed by both physical and legal entities, this is one of the main advantages of this program.
Let's look at the capabilities of the LiteManager program, as well as the difference free versions from full Pro.
The program consists of client and server parts - Viewer and Server, respectively. The client part of LiteManager Viewer is installed on the administrator's computer, LiteManager Server modules are installed on remote machines. The installation process is standard; no special operations need to be performed. Upon completion of the installation of the server part, you are required to enter a password; you can also use the Windows NT authorization system. To connect to a remote workstation, you only need to enter its IP address and the set password.
The program has a user-friendly interface entirely in Russian.
For ease of administration, in the main window of LiteManager Viewer, computers are displayed in the form of informative thumbnails of remote desktops, from which you can judge the current state of the computer.
LiteManager main window
On the tab Modes The available remote access modes are located; just select the desired operating mode and click on the computer in the list. On the tab Groups A list of connection groups is displayed for more convenient navigation through the list of computers. You can change the location of the tabs at your discretion or hide them if necessary.
The list of connections can also be displayed in the form of a topological map, where computers can be arranged in any order, additional objects can be added such as a scanner, printer, modem, etc.

Network map
The main and most important connection mode is Remote Desktop Connection. The remote computer is controlled in real time: all mouse and keyboard actions are instantly transmitted to the remote computer. The remote computer control window remains fully interactive. You can use the usual Drag&Drop functions, switch between computer monitors, lock the screen to hide your actions from remote user.

Remote control desktop
When connected to Window 7, the program does not disable the Aero graphical shell, but if desired, you can enable automatic shutdown Aero in LiteManager settings.
The program provides access to the file system of a remote computer with the ability to copy, delete and run files.

File manager
The built-in task manager allows you to manage processes and services on a remote computer. Outwardly, it is similar to the standard Windows task manager.

Task Manager
LiteManager has the ability to connect to system registry a computer with functions for creating, deleting or editing data. It is possible to import and export registry keys.

Registry Editor
Using the built-in chat, you can communicate with remote users. It is also possible to send a simple message that will appear on the remote user's screen on top of all windows, which will attract his attention.

Note that the program also includes capabilities for managing computer power. These are functions of shutting down, locking or restarting the computer. Telnet connection to a computer, device manager generating a report on installed software and hardware, scheduled screen recording that allows you to monitor the user’s work throughout the working day.
To deploy LiteManager on a large network, there is a remote installation option.

Remote installation
Using this tool, you can quickly update the program to a new version, stop or start LiteManager Server. If necessary, you can pre-configure the distribution package of the program to be installed and set the necessary LiteManager Server settings.
A situation often arises when the remote computer is behind NAT, has a dynamic IP address, or is located on a different enterprise subnet, so it is not possible to directly access it. For this case, the program uses a number of technological solutions that allow you to remotely control such computers.
Function Connect via server allows you to implement a cascade connection of LiteManager Server, along a chain, and gain access to a server located in a different subnet.

Cascade connection diagram

Setting up a cascade connection
Function Reverse connection allows LiteManager Server to initiate a connection with LiteManager Viewer. In this case, you need to specify the IP address of the LiteManager Viewer client module, and after connecting, you can work with the LiteManager Server as if it were connected directly. This function is intended for connecting LiteManager Servers that do not have a permanent IP address or are located behind NAT.

Creating a reverse connection on the server
On the client side in LiteManager Viewer you need to enable incoming connections. Alerts for incoming reverse connections will be displayed automatically, after which you can accept or reject the connection. In addition to manually responding to a request, you can enable the option to automatically accept incoming connections.

Setting up a reverse connection on LiteManager Viewer
A separate solution in the program provides the ability to connect without using a permanent IP address, using an arbitrary ID. The NoIPServer application communicates between LiteManager Viewer and LiteManager Server using ID, while both Viewer and Server may not have their own IP address and be behind NAT.

Connection diagram via NoIPServer

Setting up NoIPServer
To work through NoIpServer, just run it on a computer accessible to both LiteManager Viewer and LiteManager Server. After that, on the LiteManager Server you need to create a reverse connection to NoIPServer, specifying your ID, and on the LiteManager Viewer, add a new connection to NoIpServer by specifying the ID of the required LiteManager Server.
More detailed description These functions and instructions for using them are provided in the LiteManager help system.
We have looked at the main features of the LiteManager program, now let’s summarize them in a table and determine the differences full version programs from the free version.
| Possibilities | LiteManager Pro | LiteManager Free |
| Control/View the Desktop of a Remote Computer | ||
| File manager - file system management module | ||
| Remote Task Manager | ||
| Remote Device Manager | ||
| Telnet - command line access | ||
| Power management | ||
| Remote launch of programs | ||
| Text chat | ||
| RDP connection | ||
| Record server desktop according to schedule | ||
| Overlay video interception | ||
| Remote installation | ||
| The "Reverse Connection" function allows you to bypass firewalls and NAT | ||
| LiteManager Server cascade connection | ||
| Network map | ||
| Searching for computers on the network | ||
| Interception sound signals | ||
| Lock the screen and keyboard of a remote computer | ||
| NoIPServer | ||
| Registry Editor | ||
| Limitation | 30 days | 30 computers |
Available
- available with restrictions. The remote registry is only available in view mode
- not available
The free version of the LiteManager Free program limited only a few features that most users do not need in their daily work, so their absence may not even be noticed. Limit of 30 available computers can be easily increased by purchasing license key. The cost of 1 program license is 300 rubles, which is one of the lowest compared to other analogues.
The program implements more than 10 remote access modes, added additional functions for working in networks with a complex structure, and the program interface remains intuitive and user-friendly, so working with the program will be easy and convenient. All data over the network is transmitted in compressed and encrypted form.
The free version of the LiteManager Free program is suitable for both home and commercial use, so LiteManager Free can be considered one of the optimal solutions in the field of remote computer management.
Friends, today I want to tell you about a new computer management application that I recently came across. The LiteManager product represents a whole range of effective solutions for providing convenient management of laptops, computers and other objects through remote administration technology.
Today there are 2 versions:
- full (Pro) – ideal for large corporate networks;
- free (Free) – for home and small organizations.
There are no significant differences between them, with the exception of some functional limitations. On a free basis, you can control no more than 30 computers at a time, while the extended Pro version provides a wider range of options for organizing a large local space.
Built-in administration tools allow you to organize efficient and reliable management of different computers at absolutely any scale of the existing enterprise system.
To quickly install the application, just download the portable ROM version or download a separate “msi” distribution kit - the process of unpacking and installing the necessary files will take no more than one minute.
The product includes several active modules:
- client (Viewer) – installed on the main PC;
- server (Server) – for local objects.
The client initialization process is standard, and after unpacking the “msi” Server distribution kit, you will additionally need to enter a password, which is required for subsequent connections.
As an alternative, you can log in using Windows help N.T. To set up synchronization with a PC, just specify the correct local address and enter the access password.
Interface features
The application stands out not only for its implemented functions, but also for its friendly, intuitive clear interface, which is entirely in Russian. This makes it much easier to get to know the basic settings and options. In the main window, the display of available elements and objects can be configured in the form of attractive thumbnails, which is very convenient.
You can easily change the display of groups and contacts at your own discretion - to do this, go to the “View” tab and select the most best option. Available connections can be viewed in the form of a topological map. This window also displays additional objects: working modems, connected printers or scanners.
IN top menu There are contact settings, computer search and other options. The left sidebar presents the main modes - to select the one you need, just click on a specific group from the existing list.
To connect, you can use an IP address or a unique user ID. 
Subsequent work occurs in real time, and the main window remains interactive. By using certain settings You can completely hide your actions, lock the screen and much more. The administrator gets full access to system resources and processes - you can switch between terminal sessions, simultaneously control several monitors, etc. LiteManager's capabilities are truly impressive.
PC Control Principles
An important feature is the most comfortable work with the file system - you can install necessary programs, update drivers, as well as run and copy any files. 
Having your own task manager is necessary for full control and management of active OS service processes in order to effectively solve various tasks. In addition, the developers have provided the ability to connect to Windows registry for the purpose of editing data. The administrator can import or export registry keys without any problems. 
Other interesting features worth noting are the fast sending of messages in chat. The following functions also deserve special attention:
- remote PC power management;
- Scheduled screen recording;
- custom demo mode.
Availability high speed internet is not a requirement. You can configure data exchange within a local or closed work network.
Available features
“Remote installation” allows you to quickly update software components, as well as independently control the process of installing and launching applications. If the object is located in a different subnet of the organization or a dynamic IP protocol is used, then the developers have implemented useful function"Connect via server."
There is also a “Reverse connection” - a user of a PC on which the Server version is installed can, if necessary, independently request to establish a connection with the administrator. To do this, you only need to enter the current IP address of the Viewer client module. This function will be very useful in cases where the IP address is constantly changing or the computer is outside NAT.
Main advantages
Among key features The application cannot fail to note its reliable security and data protection. For this purpose, certified encryption algorithms are provided, which can be found in detail in the server parameters. The administrator can differentiate access rights and activate a permission request when establishing a connection.
There are several security subsystems: password protection and special Windows services, providing internal security of data transfer protocols.
The screen capture feature allows you to effectively control your desktop. This technology integrates seamlessly into the operating system, does not lead to critical errors during the operation of the video card driver and does not cause conflicts with the graphical shell.
An interesting addition is a separate module that provides quick search network objects using a specified range of IP addresses. If for some reason it is not possible to find out the current IP protocol, then you can use an intermediate NOIP server to connect, which establishes communication via ID.
Comparison with analogues
On par with such popular products as LogMeIn Hamachi And TeamViewer, LiteManager looks quite decent. They are similar in many ways, but there are also fundamental differences. The application provides inventory modes and has its own ID server. In addition, LogMeIn Hamachi is not intended for free use, and in the case of TeamViewer, only non-commercial use is allowed. Among the minor shortcomings of LiteManager, we can note the lack of integration with cloud services and mobile platform.
It’s safe to say that even the Free version is practically in no way inferior to its main “opponents”, and in some points even surpasses them. Significant advantages are:
- No restrictions and free updates;
- Adaptation for different operating systems – Windows,
Computers and global computer network The Internet has long entered our lives and become an integral part of it, but many users are far from high technology and use the computer only for a narrow purpose, for example: printing documents, typing texts, visiting certain Internet resources, such as Odnoklassniki or Vkontakte. For this category of users, any Windows message about an error or even about the need to update the system causes panic and fear of viruses, sometimes quite justified. To help the user deal with his problem, Administrators use programs remote control of computers, they allow you to remotely connect to a computer, providing almost complete control over the remote machine; by the way, such programs are also suitable for home use to help your friend or acquaintance.
The purpose of this course is to introduce you to the means remote computer administration using the example of the universal set of remote control programs LiteManager.
1. Introduction to the topic: what is it remote access.
2. Creating a new connection, working with the contact list.
3. Server setup and its parameters.
4. Opportunities for the program to work in complex networks. Reverse connection, NoIPServer and Cascade connection.
5. Additional features of the LiteManager program, remote installation, built-in search, parameters command line.
1. What is remote access and everything connected with it.
Remote access this is the ability for a user to connect and work from one computer to another, you can see the desktop of a remote computer and perform tasks on it necessary actions using your mouse and keyboard. When connected, you also get access to other computer resources, its file system, processes, registry, etc.
To explain how the connection occurs, it is necessary to define the concept of an IP address; for many, this term is clear and does not require explanation, but for others it is just two Latin characters. An IP address is the address of a computer on the Internet, similar to yours. postal address, but it is represented as numbers, for example 192.168.0.1. To connect to a computer, you need to specify its IP address and the program port; the port, by analogy with a postal address, can be considered an apartment number; in a multi-apartment building, for example, the default port of the LiteManager program is 5650.
When connecting and working via the Internet, the quality of communication plays an important role; the better the communication channel, the more convenient it is to work; ideally, work occurs in real time, so sometimes you forget that you are working at a remote computer.
Particular difficulties when connecting are created by NAT firewalls, dynamic IP addressing, dividing the network into subnets, and remote management in such conditions is not an easy task, since the computer may not be accessible by its IP address. In this case, you have to look for separate technological solutions for connecting to such computers; you can configure Port-Forwarding, configure virtual network by using Hamachi programs, get temporary DNS name, but consideration of these solutions is beyond the scope of the training course, and LiteManager offers its own solutions to these problems.
The LiteManager program copes with all the assigned tasks and provides remote access to the computer in real time. The program consists of two parts: the Viewer client module, installed on the administrator’s computer, and the Server server module, installed on remote computers. Installing the program is very simple and does not require additional manipulations; upon completion of the installation of the server module, you will be prompted to enter your password to access this computer via the Viewer client module.
2. Create a new connection. Working with a list of contacts.
The lesson is devoted to working with the LiteManager Viewer client module installed on the administrator’s computer, with the help of which remote control of the computer is carried out, we will consider the process of creating a new connection and the available control modes.
Adding a new connection in the Viewer client module is very simple.
Rice. 1. Window for adding a connection.
1. In the main window, select the “Add new connection” action, perform this action can be done from the main menu “Connection - Add”, as well as from context menu contact list and using the add button located in the program menu.
2. In the window that appears for adding a new connection, you must specify the IP address of the remote computer or its DNS name, specify the name of the connection, it can be anything convenient for you, and enter the password to access the LiteManager server module.
3. If you wish, you can also check the “Save password” checkbox, this will allow you not to enter a password every time you connect. The “Auto-logon” checkbox will allow the program to automatically connect to a remote computer when it is online.
4. After closing the window, a new connection icon will appear in the list.
Connection icons will appear differently depending on the status of the remote computer. If the connection has the “OffLine” status, it means that the computer is turned off or is completely inaccessible; if the connection has the “Not Found” status, it means that the computer is online, but the program’s server module is unavailable. If the connection is displayed with the status “Locked”, this means that the computer and the server module of the program are accessible and you can connect to it by specifying an access password, after which the connection will take on the status “OnLine" and a thumbnail of the remote desktop will be displayed. 
Rice. 2. The main window of the program with a list of connections.
Now let's try to connect to the computer in some remote access mode.
1. To do this, select the required mode from the list on the modes tab and click on the connection in the list, or immediately select the connection mode in the context menu for the required connection.
2. If a password for the connection is not specified, a window will appear to enter a password, enter the password for accessing the server; when using NTLM authorization, a window will appear to enter the user name, password and domain; if there is no domain, leave the “domain” field empty.
3. Then the window for the selected connection mode to the remote computer will appear.
Let's try to connect in remote control mode of the computer desktop; this connection mode in most cases is the most popular when working remotely. 
Rice. 3. Remote desktop control window.
I think you will spend most of your time working in this connection mode; let’s take a closer look at the capabilities provided by the LiteManager program in remote control mode of your computer’s desktop.
At the top of the window there is a pop-up panel with the most frequently used functions displayed on it.
Figure 3.1. — Open the remote control mode settings window.
Figure 3.2. — Start another connection mode.
Figure 3.3. — Switches between monitors of the remote computer, if there are several of them.
Figure 3.4. - Enable or disable mouse and keyboard controls.
Figure 3.5. — Block the remote computer.
Figure 3.6. - Send Alt-Ctrl-Del.
Figure 3.7. - Retrieve remote clipboard.
Figure 3.8. - Install remote clipboard.
The program settings window presents a full set of options; their names indicate their purpose, so understanding them will not be difficult. Note the ability to intercept audio signals from a remote computer, enable the interception of translucent windows and an economical operating mode that allows you to reduce the consumption of network traffic by the program, which will be very convenient when working via the Internet on a communication channel with a slow data transfer rate.
The remote control window is fully interactive and scalable, you can use the Drag&Drop functions, move any file directly to the desktop of the remote computer and back, and high resolution The screen image can be scaled by setting the option “In window (compressed)”.
The program provides about 10 separate modes remote connection, the interface of each of them is intuitive and not difficult to master; we list the main ones and briefly describe their purpose.
File manager, allows you to view file system remote computer, copy, delete or run (open) files; a bookmark system is built in for quick navigation.
. Task Manager allows you to manage processes and services on a remote computer, as well as view information about running programs.
. Power management using this mode you can turn off, restart or turn on the remote computer using the Wake On LAN function.
. Device Manager generates a report on installed software and equipment on the remote computer. Not available in the free version.
. Text chat allows you to communicate with a remote user in chat mode, you can also use the function of sending a single message to the user.
. Terminal, connection in command line mode.
. Record a remote screen on a schedule; in this mode, you can configure offline recording of the desktop of a remote computer into a video file and then view it. Not available in the free version.
. Registry editor, connection to the system registry with the ability to edit data, as well as import and export registry keys. The free version is available for viewing only.
. RDP - connection in standard remote worker protocol mode Windows desktop. Not available in the free version.
. Remote launch - launch an application on a remote computer.
To make it easier to work with the connection list, you can display it as a map. Objects can be arranged in any order on the map; additional objects can be added, such as a printer, scanner, modem, etc., and communication lines between computers can be drawn.
Let's draw a simple network map. 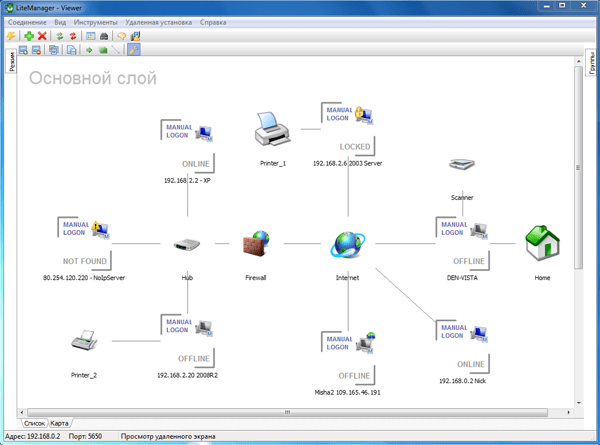
Rice. 4. - Network map.
1. To open the map window, just click on the “Map” tab located at the bottom of the window.
2. To move a connection, simply hold down the left mouse button and move it on the map to the desired position, the usual drag-and-drop operation.
3. What to add new object on the map, just call the “Add image” action from the context menu or the main menu of the map. In the window that appears, select the desired object and click “OK”, after which the object will be displayed on the map.
4. To add a new image to the collection of pictures, call the “Add new image” function.
5. In order to draw a line between objects, call the object’s context menu and select “Draw a line to...” after which the mouse pointer will change to a cross and you will need to click on the second connection on the map.
For the convenience of working with the map, there is a map editing mode; to enable it, call the “Edit Mode” function from the context or main menu of the map. 
Rice. 5. - Map editing mode window.
Let's look at the main points.
1. On the general tab there are General settings maps, here you can change the size of elements and set the map scale. Switch to the group display mode, then the map elements will be sorted into groups, as in a regular list, you can pin elements so that they do not move around the map and much more.
2. On the “Layers” tab, you can add an additional layer; by default, all connections are located in the main map layer. To move an object from one layer to another, you need to call the object’s context menu and select “Move to layer.”
3. On the “Element Color” tab, you can select the background color of the object; if you check the “Display frame only” checkbox, then the object will have a frame of the specified color.
4. On the "Options" tab you can set additional parameters maps, field size, “Auto scroll” when moving the mouse to the edge of the map field, configure the field grid.
In editing mode, you can separately change the properties of each object; to do this, you just need to select the desired object, and the settings window will appear automatically. 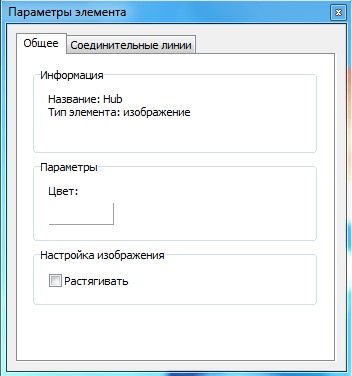
Rice. 6. - Map element parameters window.
1. On the “General” tab there are general properties of the object; here you can change the color of the object or its display style.
2. On the tab "Connective Lines" displays a list of object lines and their parameters, such as line color, line thickness and style.
The purpose of most of the program's options and settings is clear from their name; their full description can be found in the program's help system, which can be opened through the main menu, the item - help.
3 Setting up the server and its parameters.
The previous lesson on the LiteManager program was devoted to the client module, now let’s look at the server module of the program.
During the installation of the server module, at the final stage, a server security settings window appears in front of you, where you are prompted to enter the password to access it. Let’s look at the setup process in more detail. 
Rice. 7. - Setting up server security.
1. The server settings window opens from the context menu of the server, the icon of which is located in the system tray, the “ROM Server Settings” item, or from system menu start, section of the program “LiteManager Pro - Sever”, item “Settings for LM-Server”.
2. In the server settings window that appears, click on the “Server Settings” button and select “Security”.
3. In the server security settings window that appears, you can see four tabs, the first “Authorization” allows you to select the type of authorization “Password protection” or “WinNT security system”. In the first case, it is enough to enter a password, which should consist of 8 characters; if access to the server will be carried out via the Internet, it is better to set complex password, in the second case WinNT security is used, add users who will be allowed access.
4. On the tab "Authentication"You can select the security level; all data in the program is transmitted in encrypted form, so when working via the Internet it is recommended to set the maximum level.
5. On the “IP filter” tab, you can set a filter for IP addresses from which access to the server is allowed, or vice versa, specify those IP addresses from which access is prohibited.
6. On the “Modes” tab, you can prohibit a specific access mode to this server. 
Rice. 8. - Authorization WinNT.
Now let’s look at the general server settings, the “Settings” item. 
Rice. 9. - Server parameters.
1. On the “General” tab, you can hide the server icon from system tray, disable the display of the “Stop ROM Server” menu item, and also configure server notifications when a client connects.
2. On the “Network” tab, you can change the server port and bind it to a specific network interface.
3. On the “Reverse Connection” tab, you can enable the option to automatically connect a reverse connection and the interval between auto-connections. Reverse connection technology will be discussed later.
4. On the “Logging” tab, you can enable recording of events on the server to a file; the file is created in the directory of the installed server in the “Logs” folder.
The remaining items in the server settings menu allow you to change the server startup type, automatic or manual, select the menu language, and set a password for changing server settings.
The menu item “Reverse connection” remained unconsidered; a reverse connection is a technology that allows the server to connect to the client module and thereby enable the client to control the server. We'll look at this feature in the next lesson.
4 Opportunities for the program to work in complex networks. Reverse connection, NoIPServer and cascade connection.
In the last lesson, we looked at setting up the server and its parameters, focusing on the “Reverse Connection” technology; we will take a closer look at the technological solutions of the LiteManager program for working in networks with a complex structure.
The Callback function allows the server to initiate a network connection. Thanks to this mechanism, you can connect even to a server that is located behind a firewall or if its IP address is not known.
In order to set up a reverse connection, you need to configure the server and client modules in a certain way.
Setting up the program server module. 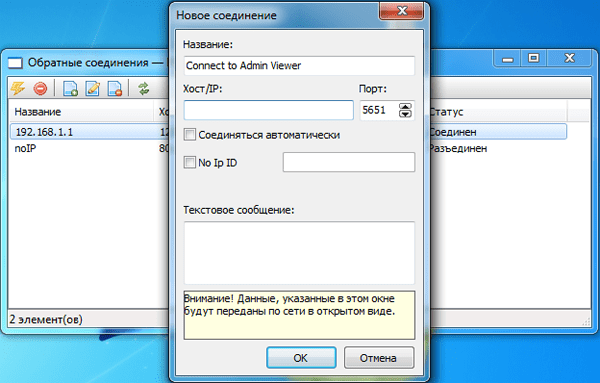
Rice. 10 - Reverse connection settings window on the server.
1. Right-click on the server icon next to the system clock. In the context menu, select “Reverse connection...” - the reverse connections management window will open. The reverse connection settings window can also be opened from the program settings.
2. Click “Add reverse connection” on the toolbar - a window with the parameters of the new connection will open.
3. Specify the IP address of the ROM-Viewer and the invitation text that the remote administrator will see, click OK.
4. Select the created connection in the list and click “Set connection”.
5. After the administrator on the client application accepts and confirms the return connection, he can connect to the server.
In order for the client module to be able to accept return connections, it is necessary to enable incoming connections in its settings. 
Rice. 11. - LiteManager Viewer program settings.
1. Open the client module settings window, main menu “Tools”, item “Settings”.
2. On the Reverse Connection tab, select the Allow incoming connections checkbox.
3. In the reverse connection settings, you can also specify the port on which connections will be received and edit the black and white lists of IP addresses of incoming connections.
In order for the client module to accept return connections from the server, it is necessary to configure the firewall security policy so that the Viewer can accept incoming network connections. Most often, it is enough to add ROMViewer.exe to the firewall exclusion list.
For the reverse connection to work, you must specify the IP address of the client module, but sometimes the client module is not accessible by its IP address or it is simply unknown, to solve this problem the LiteManager program is present additional application NoIPServer.
NoIp Server is a separate application that allows you to connect Viewer and Server to each other without an IP address, through NAT and other network barriers, communication is carried out by ID. NoIpServer comes bundled with LiteManager Viewer, an application called LMNoIpServer.exe, and is located in the directory where LiteManager Viewer is installed. The application runs on a computer to which both Viewer and Server have access; several servers and clients can be connected.
Setting up NoIpServer 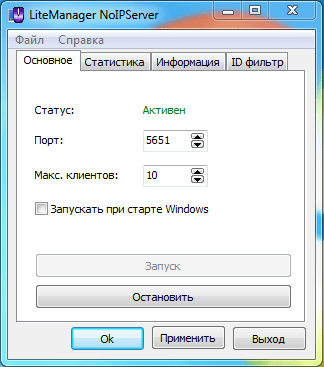
Rice. 12. - Setting up NoIPServer.
1. Launch the NoIpServer application, the application is located in the directory with the installed client module, or from the system start menu.
2. Click start, after which the status changes to “Active”.
3. In the application settings, you can select a port, limit the number of connected servers, and also configure IP and ID filters. The statistics tab displays connected servers; you can forcefully terminate the connection.
4. On the server side, we create a new reverse connection, where NoIPServer acts as the client, specify its IP and port, as well as our unique ID. To select an ID, you must check the “No IP ID” checkbox and enter an arbitrary ID in the field as a regular line.
5. On the Viewer client side, create a new connection, where NoIPServer acts as the server, specify its IP and port. We indicate that we are connecting to the managed server via NoIPServer; to do this, check the “use ID” box and enter the ID of the required server in the field.
6. Now you can connect to the server. 
Rice. 13 - NoIPServer statistics.
The “Statistics” NoIPServer tab displays a list of servers connected to it.
We looked at two useful network solutions of the LiteManager program “Reverse connection” and NoIPServer, but the program also has a third interesting solution “Connect via server”.
Modern networks have a complex structure and are often divided into segments, small subnets with their own addressing. To access computers located behind a gateway or in another subnet, LiteManager provides the “Connect via server” function. Using this function, you can use the installed LiteManager Server as a gateway to access servers on another network through it. 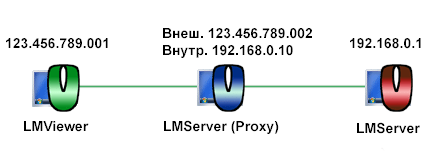
Rice. 14. - Cascade connection diagram.
1. Let's add two connections in the client module, the first to the intermediate server, the second to the final server, which we need to manage.
2. In the settings of the final server on the “Network and operating modes” tab, check the “Connect through server” checkbox and select an intermediate server from the list. Save the settings.
3. Now we connect to the required server, logging in first on the intermediate server. 
Rice. 15. - Setting up a cascade server.
We looked at the main solutions offered by the LiteManager program for working in complex networks; they greatly simplify the work and sometimes provide the ability to remotely connect even to computers that were not previously accessible.
5 Additional features of the LiteManager program, remote installation, built-in search, command line parameters.
In this lesson we will look at additional features LiteManager programs, one of them is the ability to remotely install the program’s server module. When installing the program on a large number of For computers, remote installation tools will save a lot of time and effort. To install the program, you need to know the name and password of the administrator user on the remote computer, and the password should not be empty. 
Rice. 16. - Remote installation.
1. Add a new connection to the list, the computer on which the server module of the program will be remotely installed. In the context menu of the connection, select “Remote installation/removal/launch...”.
2. In the remote installation tool window that opens, specify the path to the installation package of the server module; if desired, it can be configured in advance, thereby setting the necessary parameters for the future server. For the configurator to work correctly, run Viewer as an administrator.
3. Next, we perform the required action; in addition to installation, it is possible to remotely stop, restart or delete the server.
4. If selected Windows security NT, a dialog will appear to enter the login and password of the remote user, but if LiteManager authorization is selected, then you need to enter the access password to the already installed server on the remote computer, in this case the already installed server module of the program will be updated.
When installing a program remotely in Windows system XP on the remote computer you need to disable simple general access to files, this can be done in the Control Panel, “Folder Options” section, “View” tab. Uncheck the “Use simple file sharing” checkbox.
To quickly add computers from the network to the list of connections, you can use the built-in computer search, in the “Tools” section of the main menu of the program, select “Search for ROM Servers on the network...”. 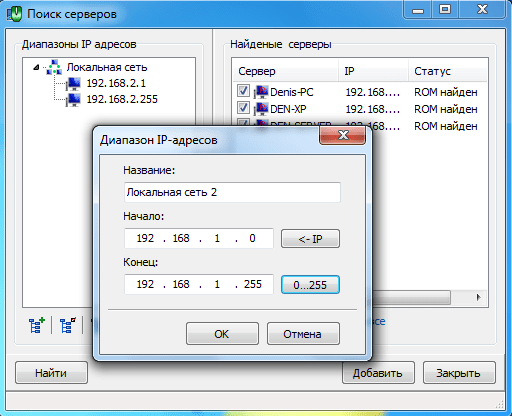
Rice. 17. - Search for computers on the network.
1. Add a search range; you can specify several of them by calling the “Add Range” function from the context menu or the search menu.
2. We start the search process with the “Find” command.
3. In the found list of computers, we can select the ones we need and add them to the main list of connections.
The program allows you to launch a specific connection mode using the command line, for example “ROMViewer .exe /name:XP /fullcontrol”, this command launches remote control mode, to a connection called “XP”. A complete list of command line switches, as well as much more useful information You can find it in the program's help system.
Lastly, let’s look at the program’s license manager. The LiteManager program has two versions: the free LiteManager Free and the full LiteManager Pro. The program has licensed server modules, the client module is free. To avoid entering licenses separately on each server, the key is entered once in the client module in the license manager. 
Rice. 18. - License manager.
1. To open the manager, select “Manage licenses...” in the help section of the main menu of the program.
2. To add a key, enter it in the field and click “Add”.
3. The free version of the program includes a free key for 30 licenses. When adding a new key, this limit will be increased by the number of licenses in the new key.
Note that the free version is available to both individuals and legal entities, which distinguishes the program from many other free analogues.
Download full or free version programs, and also learn more detailed information You can find out more about the program on the official website
Personal accounts for Viewers on NOIP ( Personal Area). Audio-video chat in conference mode. Automatic import of computers from a domain, local network or with NOIP.
January 04, 2018 LiteManager 4.8 and client for Android, Mac OS and iOSA new version LiteManager 4.8 with built-in network chat, NOIP jabber. New mode of operation Teacher, for conducting educational tests, collecting and distributing files in educational institutions.
LiteManager client for Android, OSX and iOS platforms.
July 06, 2015 LiteManager remote customer supportProgram for remote client support Pro/Free version in one distribution. Remote access via the Internet via IP or ID connection. Remote Desktop Support new Windows 10. Screen sharing mode allows you to organize the educational process in an educational institution, distance learning. Free for personal or commercial use.
June 06, 2015New design of the LiteManager remote access program website, added a help system, overview of solutions, instructions for using the program, comparative reviews and articles. LiteManager with full support for running Linux under Wine, now the program can be run on operating systems Linux.
How to use LiteManager
You can always download the latest version of the program on the official website; the program archive contains two installation modules: the administrator Viewer and the client Server. The server module of the program is installed on all computers that need to be accessed remotely, the client module is installed on administrators' computers.
The connection is established directly using the IP address of the remote computer, after which you need to log in to it by entering the access password. If the remote computer does not have a permanent IP address or is located on a different subnet, you can use an ID connection, a cascade connection, or a reverse connection.
The server module of the program works as a service by default, but can also be launched as normal application. Both the client and server modules can be launched in compact mode, for example from removable media (portable version).
The additional program NOIP (ID router) is an ID connection server that allows you to connect Viewer client modules and Server server modules to each other by a given ID, without using an IP address.
Terminology
- LiteManager is a product of the LiteManagerTeam development group, consisting of two main programs - Server and Viewer.
- Server is a program that is installed on a remote computer and allows you to manage this computer.
- Viewer is a program that establishes a connection to a Server installed on a remote computer and controls it. All main functions and modes are available in the main program window.
- Connection mode is a way to control a remote computer. LiteManager supports several connection modes: management, viewing, file transfer, task manager, device manager, terminal, power management, remote launch, scheduled remote screen recording, overlay video interception.
- NoIP is a program that allows you to connect Viewer and Server without an IP address. Installed and launched on a computer with a permanent IP address on the Internet. The application comes bundled with Viwer and is located in the directory with the installed Viewer, by default C:\Program Files\LiteManager Pro - Viewer\LMNoIpServer.exe.
LiteManager is a program for remote administration of a fleet of PCs running OS Microsoft Windows. The program's rich functionality, user-friendly interface and low license cost make it a worthy alternative Team Viewer and RAdmin. Connection security, audio capture, the ability to connect bypassing NAT, data exchange via the clipboard and support for the Aero interface - these are far from full list advantages of this program.
Video review of LiteManager 4.4.3
With the widespread use of computers, a serious problem has arisen - in addition to specialists who can deal with almost any problem with an “iron friend,” there are also a large number of users who do not have such skills. Sometimes assistance in person is impossible or too difficult - in such cases system administrators, technical support staff or even home users with more than one computer can benefit from remote administration solutions. There are quite a number of programs that provide quick access to resources local computer from anywhere in the world - with access to the Internet, of course. Take, for example, the program current version which settled today in our test laboratory.
Installation and initial setup LiteManager 4.4.3
The program can be downloaded. The archive contains two executable file, responsible for installing, respectively, the client and server parts of the program. The installer in both cases is the same and extremely simple; In addition, for the server side of the application, post-installation default security settings are optimal, so that the user is essentially left to enter a password, which must consist of a minimum of eight characters.
Security settings LiteManager 4.4.3After launch LiteManager Server A blue icon with a schematic image of a computer mouse appears in the system tray; when you hover over it, a hint appears with the name of the program and the IP address of the computer.
 LiteManager 4.4.3 tray icon
Right-clicking on the icon opens a menu LiteManager Server, which allows you to configure the program, close it, or initiate a connection. To use the program on a small local network, the default connection settings do not even need to be changed. We'll talk about the flexibility of settings in more complex networks later.
 Menu LiteManager 4.4.3
LiteManager Viewer also installs in just a couple of seconds and after installation pleases us almost the same as LiteManager Server, tray icon - the difference is the color of the “mouse”, in this case green.
Tray iconIf you used standard parameters when setting up the server part, and the network firewall does not block anything, then you just need to click on the button to scan IP addresses on the network, select computers with installed LiteManager Server and control them as planned. The author of this article, by the way, used similar software in school to prank classmates, since he knew the password set by the teacher. It seems, however, that the joker-sysadmin, unlike the author who went unpunished, will very seriously receive a slap from his superiors and offended users, so it’s better to use LiteManager on business. This is what we will talk about in the next section of our review.
Features and Features of LiteManager 4.4.3
LiteManager 4.4.3- a program with truly wide capabilities. Flexibility in configuration allows you to perfectly organize work depending on the resources of the network, the speed of data transfer through it, as well as the power of the computers included in it - and all this with a high degree of security, since decrypting the 2048-bit key used will require literally cosmic-scale computers and the same level of patience.
Selecting the encryption level in LiteManager 4.4.3In the main window LiteManager Viewer a list of available computers is displayed. Moreover, you can build a network map that clearly explains to a forgetful administrator where everything is.
Network map in LiteManager 4.4.3You can connect to a remote computer as follows: traditional way- knowing the IP and logging in using a password - and using the computer ID in case NAT is used or, for example, the system administrator is simply on the other side of the world on vacation, and the accountant panics and urgently demands to “remove this thing in the processor”, without giving a damn on the ethics of such an attitude towards a tired computer scientist, who for once exposed his pale bodies to the southern sun.
To connect by ID you must select the appropriate item in the menu LiteManager Server and specify the name (ID) of the computer. If it is free, the message will appear Green colour, saying “Connected,” after which you can provide the ID to the person who will connect to your computer. This person will enter the computer ID and the password you specified during installation - or after - into LiteManager Viewer and will gain access to your PC resources.
 Connection by ID
 Entering a password when connecting
View of the main window upon successful connection
Entering a password when connecting
View of the main window upon successful connection
The possibilities, it must be said, are very wide:
Remote installation of the server module with configuration.
Terminal.
Access to the system registry with the ability to fully edit.
Access to the task manager with the ability to terminate any process or shut down the computer.
Reports on computer hardware configuration.
- Using the clipboard and the Drag"n"Drop function.
- Text, video and audio chat.
Displaying system messages on top of other windows.
And all this is not counting, in fact, the main function - managing the desktop of a remote computer as if it were your own. By the way, it is possible to open several connections simultaneously in different windows and feel like a multi-armed Shiva in some way.
Two open remote desktop connections and text chatDepending on the bandwidth network connecting both computers, you can set different screen refresh rates and colors of the resulting image, as well as disable or enable audio capture.
 Setting the screen refresh rate and color
 Setting up audio capture
In general, you will agree that the ability to listen to your home playlist while being far away is a very good thing.
Remote desktop in "economy" mode Remote desktop with high color and fps settingsUnfortunately, you can watch the video remotely only if you have powerful computers and an extremely high-speed connection between them - in the case of our office network with a speed of 100 Mbit/s and more or less fast modern PCs, the number of frames per second rarely went beyond 5-7.
fps (on the left top corner) when watching a video on YouTubeLiteManager consumes very little system resources— with two remote sessions running, the processor load was less than 20%. But the video from the remote PC still continued to slow down during such loading, so it was not possible to attribute the “brakes” to the author’s work computer.
There is also a problem with the video and audio chat described above. Unfortunately, video capture from the webcam does not work with any drivers, and the sound lags significantly.
 AV chat without image
Differences between LiteManager Pro and LiteManager Free
LiteManager has a flexible licensing policy - the cost of the key varies depending on the number of machines on which you plan to use the program. Prices are shown in the table below.
Compared to competitors, prices are very low - say, one license per RAdmin costs 1250 rubles. In addition, the full-featured version of the program can be used for free for 30 days; if you plan to use LiteManager with no more than 30 cars, you don’t have to buy Pro-version, but use LiteManager Free, which differs from the paid version not so much. The only differences are these.