Many websites and apps require users to register. Sometimes they offer a choice - register or log in using one of the social networks. This is convenient for users - they do not need to fill out each time registration forms, just click the login button and confirm access.
How does social login work?
It’s very simple: just select the “social network” through which you want to register, click on the appropriate button, and then confirm permission to access your personal data. Most often, the site or application itself offers several social networks to choose from. After this, all the necessary data will be sent to the site, and the fields in the registration form will be filled in automatically.
In this case, the site does not “recognize” the password from your social network account.
It should be noted that in this case, the site does not “learn” the password from your social network account - only the information from the profile that is necessary for registration is transmitted. If the site seems suspicious to you and you don’t want to give it access to your data, just select regular registration.

note
Sometimes apps and sites ask for permission not only to log in from social networks, but also to access your friends list or post on your behalf in the event feed. In such cases, you can often choose which actions you allow and which you block. If one day you change your mind and decide that you have allowed too much of a site, you can always block access to social network data in the settings of that site or application.

Many organizations and manufacturers are trying to become as involved as possible in the lives of users, and social networks are one of the ways.
In general, this is a convenient way to save time and not have to re-enter all your data, which can be a lot for registration. At the same time, some sites make it possible not only to fill out your account, but also to act on it, for example, in the comments, and at the same time tag publications from this site on your social network page. Often, such social authorization is used by sports applications and sites, where after authorization you can find friends, follow their sports successes, share achievements with them, and compete. Many organizations and manufacturers are trying to become as involved as possible in the lives of users, and social networks are one of the ways.
Technically, this is a very common solution, but you should always trust only trusted sites and carefully pay attention to warnings and instructions when logging in.
Based on materials from the Mail.Ru Agent support service
The vast majority of sites today, along with the main authorization system, provide users with the ability to log in through social networks. This approach is very convenient for the site visitor, since he does not need to fill out any fields at all. Instead, just select the button of the social network in which he already has a profile, and in three clicks he will become an authorized user of the site.
How it works
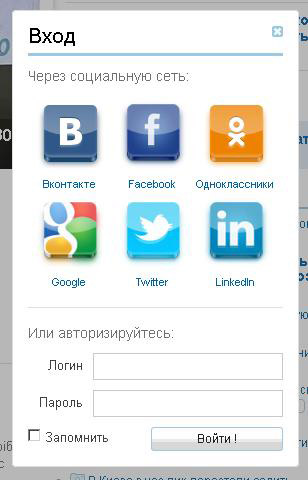
Near the authorization form under the inscription “Log in using” there are buttons for the most popular networks. Most users have a profile on one social network or another. The visitor selects a button with an icon of the service with which he would like to register on the site.
As an example, consider authorization via Facebook.
After the visitor has clicked the appropriate button, a window appears on the monitor screen in which Facebook asks the user for permission to allow the site from which authorization is made to receive the necessary data. In order to express his consent, the user just needs to click on the appropriate button. When a visitor gives his permission, data from the social network is transferred to the site and recorded in the user's profile.
Now the visitor is a registered user of your online store.
This authorization system is absolutely safe for the visitor, because the password is not transmitted from the social network, but only data from the user’s profile is reported.
Authorization services
Every year there are more and more social networks on the Internet. To enable webmasters to enable users to register through various social networks, there are special services that provide scripts (mini-programs) that the webmaster installs on his website. Thus, visitors to his site can log in using a profile on one of the most popular social networks.
The most popular of these services are Loginza and ULogin.

Advantages of the method:
- Easy integration.
- Save time. By installing a script for one of these services once, you automatically make it possible to log in through multiple social networks at once.
Flaws:
- The authorized user's data is not transferred to you, but to the service that provided the script.
- You are deprived of the ability to “customize” your interaction with users. For example, when providing authorization through the VKontakte network, you cannot “bind” the user to your group or public page on this network.
- You are only partially taking advantage of social media.
Creating your own social network application
In order for your website and social network to exchange data, you need to somehow “designate” the presence of your website on the social network. For this purpose, in social services there is such a thing as application registration. By registering the application, you link your website to the social network. After this, you receive application authorization data, which must be used to configure the site management system. Now users can authenticate through this social network.
Disadvantages of the method:
After you have registered the application on a social network, you just need to connect a special widget in the administrative part of the site and enter the necessary data into it.
 |
 |
Install the plugin - Social Login, Social Sharing by miniOrange you can directly from the WordPress admin panel. Go to the page: Plugins - Add New, enter the name of the plugin in the search form, press Enter, install and activate the plugin.

After installing and activating the plugin, go to the page: miniOrange Social Login, Sharing. To connect the plugin you need to register on the miniOrange website, to do this, click on the tab - Register or Login with miniOrange. Or you can register on the plugin settings page. Enter your data into the form, your name, phone number, password twice and click on the button - Next.

After registration, go to the Social Login page (in top menu). Here you can configure the display of social networks on the login page.
— Customize Login Icons, here you can configure appearance social network icons.
— Customize Text For Social Login Buttons/Icons, You can specify the text that will be displayed above the login form and above the social buttons.
— Customize Text to show user after Login, You can customize the text that will be displayed to the user after logging in.
— Display Options display options.
Select the options where you want to display the social login icons, choose where social media icons will be displayed.
Redirect URL after login , you can configure redirect redirection after login.
Enable Logout Redirection, you can configure redirection after logout.
— Registration Options By default, registration via social networks is enabled.
Registration disabled message , message about disabled registration.
— Click on the button— Save to save the settings.

Additional functions:
— Social Comments, You can set up commenting via social networks.
— Licensing Plans Here are the plugin rates. With the free plan, you can use the Social Login feature for the first 30 days free of charge.
From the author: In this lesson we will talk about user authorization on the site. But we will not talk about classical authorization, but about authorization using the resources of the social network VKontakte. IN this moment Social networks are extremely popular among Internet users and sometimes it is very convenient to use information added by the user to the social network directly on your website for authorization.
Introduction
For authorization through the social network VKontakte, the open protocol OAuth 2.0 is used. OAuth is an open authorization protocol that allows you, the developers, to gain access to user resources stored, for example, on the VKontakte social network. In this case, the user does not need to tell you his login and password to access his data.
This system authorization works as follows. First, the user must be authorized on the social network; to do this, you redirect him from your website to a specific social network address (which we will talk about later). Then, after successful authorization, Vkontakte will redirect the user back to your site, and you will be given a special code that is necessary to obtain user data and indicating successful authorization.

YII2 framework. Fast development with modern PHP framework
Learn the intricacies of modern web development using the YII2 framework
Now, since we will work directly with the social network, our script must be located on a real server. Since there will be a constant exchange of data between our script and the VKontakte service. At the same time, on local computer(for example Denwer) the script will not work.
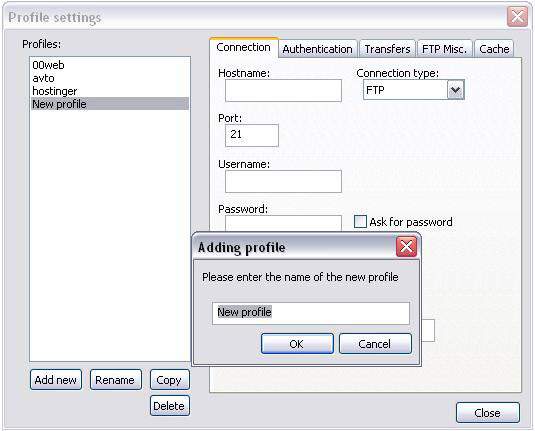
For the convenience of working with a remote server, we will use text editor Notepad++, which contains a built-in plugin for working with the FTP protocol. Using which we can open and edit script files directly on the remote server. To do this, launch a text editor, open the Plugins menu, then NppFTP and activate Show NppFTP Window. This will open a window for browsing files and folders on remote servers. In this window, you need to open the settings (Settings button), namely the profile settings (Profile Settings) and add a new profile for connecting to the ftp server (you must specify the connection settings).
Then, by clicking on the Connect button, we connect via FTP:
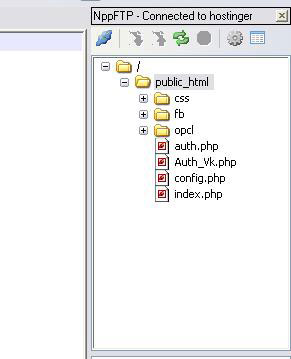
To add new files, just right click Click on the appropriate folder and select Create new file. You can open the corresponding file double click mice.
Creating an application in contact
To create an authorization mechanism through the VKontakte social network, you must have an account. It is also necessary to create an application, because the user data will be received by your created application, which is also necessary to identify who receives the data.
So, let's create an application, to do this follow the link https://vk.com/editapp?act=create:

Enter the name of the application and check the website box, enter the path to the site and its base domain (the path to the site may contain the domain and folder in which the site or test script is located) and click “Connect application”.
![]()
Next, go to the settings tab and copy the application identifier and its secret key, which will be needed later. IMPORTANT: do not share the application ID and its secret key with anyone and do not post them on open access, as they can be used by attackers.
I would also like to draw your attention to next page: http://vk.com/developers.php?oid=-1&p=%D0%90%D0%B2%D1%82%D0%BE%D1%80%D0%B8%D0%B7%D0%B0 %D1%86%D0%B8%D1%8F_%D1%81%D0%B0%D0%B9%D1%82%D0%BE%D0%B2. This is documentation on the topic of this lesson.
Authorization on VKontakte
First of all, let's create a page with an Authorization link, by clicking on which the user will be redirected to the VKontakte authorization page. To do this, create a file index.php:
Site content
Authorization
This page looks like this:

Session_start(); define("APP_ID","application identifier"); define("APP_SECRET","Secret key"); define("REDIRECT_URI","http://avtomirock.esy.es/auth.php"); define("URL_ACCESS_TOKEN","https://oauth.vk.com/access_token"); define("URL_AUTH ","http://oauth.vk.com/authorize"); define("URL_GET_USER","https://api.vk.com/method/users.get");
Where: APP_ID is the identifier of your application, APP_SECRET is the secret key, REDIRECT_URI is the path to which VKontakte will send and redirect the user, URL_ACCESS_TOKEN is the path along which you need to perform a request to obtain an access_token (access key to user data), URL_AUTH is the path of the VKontakte authorization page, URL_GET_USER – the path along which the request must be executed to obtain user data. Now let's create a new file (Auth_VK.php) and add the following code to it:
code = $code; ) public function set_token($token) ( $this->token = $token; ) public function set_uid($id) ( $this->uid = $id; ) public function redirect($url) ( header("HTTP/ 1.1 301 Moved Permanently"); header("Location:".$url); exit(); ) ) ?>
This class is the logical core of our script. Class properties: $code – code that VKontakte will send as a result of successful user authorization, $token – access_token – access key to user data; $uid – user identifier in the VKontakte system. In the class constructor we will include the configuration file. The redirect() method is necessary to redirect the user to the address that is passed in the argument when calling the method. Auxiliary methods set_code(), set_token(), set_uid() are required to set private class properties. Now let's create an auth.php file and add the following code to it:
redirect(URL_AUTH."?".$query); ) ?>
That is, at the beginning we connect the previously created class, then we create its object. As I said earlier, after successful authorization, VKontakte will send this file data using GET parameters (that is, via address bar). This will be the code parameter - the special code required to obtain an access_token. Therefore if this parameter no, that means you need to redirect the user to the VKontakte authorization page. In this case, the following parameters must be passed through the address bar:
client_id – user application identifier;
scope – application access rights (offline – means access to user data at any time);
redirect_uri – the path along which the code parameter will be sent. This address must be within the domain specified in the application settings.;
response_type – the response from the server must be the code parameter.
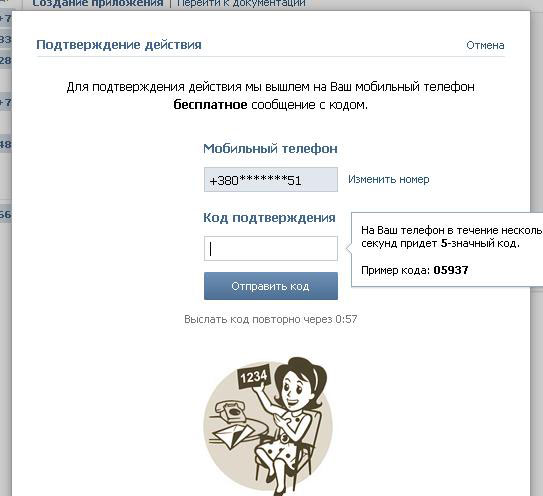
Now let's perform authorization (click on the Authorization link):

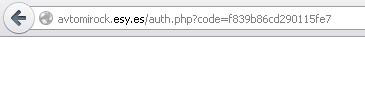
Enter your username and password, then you need to allow the application to access user data (in in this case We act as the user and allow our own application to receive our data). After successful authorization, VKontakte redirects us back to the auth.php page and passes the code parameter through the address bar.
Getting access_code
If($_GET["code"]) ( $o->set_code($_GET["code"]); $res = $o->get_token(); ) if($_GET["error"]) ( exit ($_GET["error_description"]); )
By the way, if errors occurred during authorization, then instead of the code parameter, the error parameter will come - the error code, along with its description - error_description. Therefore, if we really received the code, then we write it into a class property and call the get_token() method, which will receive the access_token. Now let’s add the get_token() method code to the Auth_Vk class:
Public function get_token() ( if(!$this->code) ( exit("Incorrect code"); ) $ku = curl_init(); $query = "client_id=".APP_ID."&client_secret=".APP_SECRET. "&code=".$this->code."&redirect_uri=".REDIRECT_URI; curl_setopt($ku,CURLOPT_URL,URL_ACCESS_TOKEN."?".$query); curl_setopt($ku,CURLOPT_RETURNTRANSFER,TRUE); $result = curl_exec( $ku); curl_close($ku); $ob = json_decode($result); if($ob->access_token) ( $this->set_token($ob->access_token); $this->set_uid($ob- >user_id); return TRUE; ) elseif($ob->error) ( $_SESSION["error"] = "Error"; return FALSE; ) )
To obtain an access_token, you must send a request to the address stored in the URL_ACCESS_TOKEN constant, and pass the following parameters using the GET method:
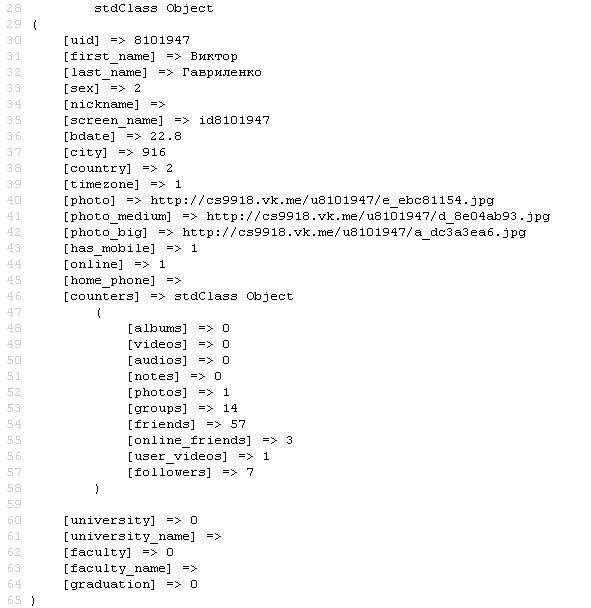
We will send the request using the CURL library. In this case, the response from the VKontakte server will come in JSON string format. So, using the json_decode() function, we decode this line into the object. We will get the following object:
If there is an error, we will get the following:
![]()
That is, we will get an object that will have either an access_token property or an error property. Therefore, if we receive an access_token, we will write its value and user identifier into the corresponding properties of the class and return TRUE, but if an error occurs, we will write it to the session and return FALSE.
Retrieving user data
After we have received the access_token access key, we can obtain the user data. To do this, add the following code to the auth.php file (after calling the get_token() method):
If($res) ( $o->get_user(); ) else ( exit($_SESSION["error"]); )
Now let's describe the get_user() method, which will receive and return user data:
Public function get_user() ( if(!$this->token) ( exit("Wrong code"); ) if(!$this->uid) ( exit("Wrong code"); ) $query = "uids= ".$this->uid."&fields=first_name,last_name,nickname,screen_name,sex,bdate,city, country,timezone,photo,photo_medium,photo_big,has_mobile,rate,contacts, education,online,counters&access_token=".$ this->token; //echo $query; $kur = curl_init(); curl_setopt($kur, CURLOPT_URL, URL_GET_USER."?".$query); curl_setopt($kur, CURLOPT_SSL_VERIFYPEER, false); curl_setopt($kur, CURLOPT_SSL_VERIFYHOST, false); curl_setopt($kur,CURLOPT_RETURNTRANSFER,TRUE); $result2 = curl_exec($kur); curl_close($kur); $_SESSION["user"] = json_decode($result2); $this->redirect( "http://avtomirock.esy.es"); )
To obtain user data, you must send a request to the address stored in the URL_GET_USER constant and send the following data using the GET method:
uids – user identifier received along with access_token;
fields – data that needs to be obtained (more information about the data can be found in the documentation http://vk.com/developers.php?oid=-1&p=users.get)
access_token – access_token received previously.
As usual, we send the request using the CURL library. The data will arrive as usual JSON format strings, so we decode them and save them in the session for further display. And we immediately redirect to home page our site. Let's print the user data object that we get after decoding the JSON string:
Now all that remains is to display the user data in the place you need, or save it in the database, etc. I will display the user data immediately below the Authorization link:
response; //print_r($user); ) ?> photo_medium;?>">
first_name;?>
last_name;?>
This concludes this lesson. All the best to you and happy coding!!!
I talked about the fact that the site needs to be made as convenient as possible for users, I also mentioned that it is necessary to make it easier for people to enter the site by making it possible to log in through social networks. As promised, today I have prepared a manual for you, with the help of which you can easily learn how to attach this feature to your sites.
Today you will learn how to log in to a website through such popular services as Vkontakte, Facebook and Tweeter. Add authorization through these social networks. We will be online using special services: Loginza and its analogue uLogin. I will show you on the example of a WordPress site, you can see what it looks like on my test blog.
Authorization via social networks using uLogin
The service is accessible and understandable even to the average Internet user. Supports everything known systems content management and many social networks (including Odnoklassniki, mail and Google +). To set up authorization, go to the service, select the desired platform (in this case, Wordpress) and click on “link to plugin page”:
We will be prompted to download the plugin to our computer, select the folder where we want to save the archive and download it. Then unpack the archive to any folder on the disk and using any file manager(I, for example, use Total Commander) upload the folder to the site in the wp-content/plugins directory.
Now all that remains is to activate the plugin in the admin panel. Go to the admin panel, plugins section, opposite “uLogin” click “activate”. All! Now on our WordPress site it is possible to log in and comment through the most famous social networks:
If you go to the “plugins” section in the admin panel, then you can see the uLogin subitem, which is responsible for setting up the form:
On the settings page you can change the display of social media. networks on the form panel, service menu, requested fields, additional fields and login text:
I didn’t touch anything here, but as I understand it, all changes need to be made in English. In principle, you can play around with these parameters, but the plugin already functions perfectly. If you want to attach authorization to sites on other platforms, then each archive contains a Readme file, which describes step-by-step the installation of the plugin for specific CMSs.
As you can see, there is nothing complicated, and the entire installation will only take you a couple of minutes.
Setting up authorization via social networks using the Loginza service
This service is also integrated with the most popular social networks. networks, and also has flexible configuration of the authorization window. First, go to the service and log in. This can be done using any social network. After logging in, you will be taken to your account page, where the form will be configured:
Go to the “my Loginza widget” section and add the desired site:
To work with the site, you must confirm your rights to it. We click on the “Confirm rights” button, we will be asked to insert a special tag on the main page:
Here we can select social. networks through which the user can log in, language and color scheme of the form. For everything to work, you must enter the ID and secret key of the site in the appropriate fields (I wrote about them above). After all the settings, click “Save” and voila, everything works:
Like this in a simple way We have inserted an authorization form via social networks. Honestly, I prefer the uLogin service, if only because there is much less fuss with it.
And that’s all for me, any questions as always in the comments. If something is already very global, then straight to feedback. Don't be a radish and share the article on social media. networks.