We will not deny that the interface mail client Microsoft Outlook clear enough. Some elements can be configured without instructions by delving into the program using pure intuition. Nevertheless, to quickly and correctly configure the basic elements of Microsoft Outlook, we present you with this mini-guide.
Different versions of Microsoft Outlook
Microsoft Outlook has been developing and acquiring new features for a long time. The design changed, some functions were replaced by others. Today, especially in enterprises, you can encounter releases of this program from different years. But at the same time, each of them is suitable for automating your work with sending and receiving mail.
Regardless of the version of the program, adding a new mail account is carried out in a similar way - you will need to enter your name, address Email and the password for it.
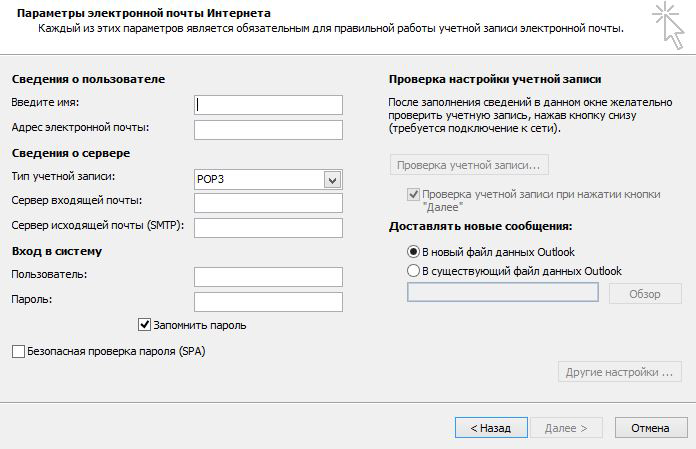
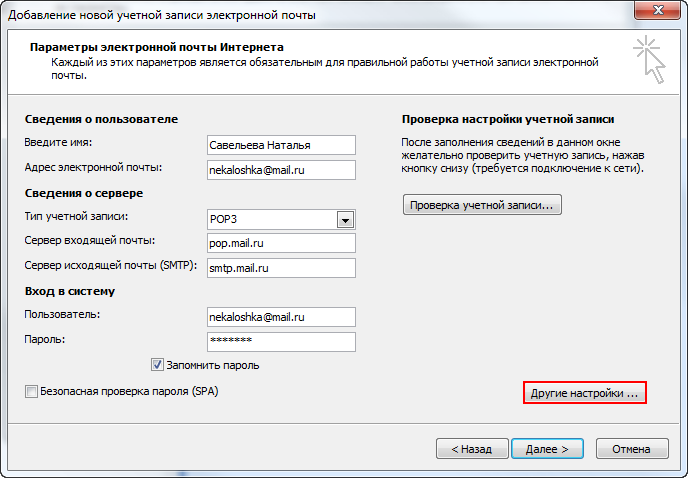
 To automatically add mail, enter the data and click “Next”
 But this is if we are talking about adding an email account automatic method. If you want to add Post service yourself, you will need to know some accurate data. We are talking about the type of encryption and the exact server addresses.
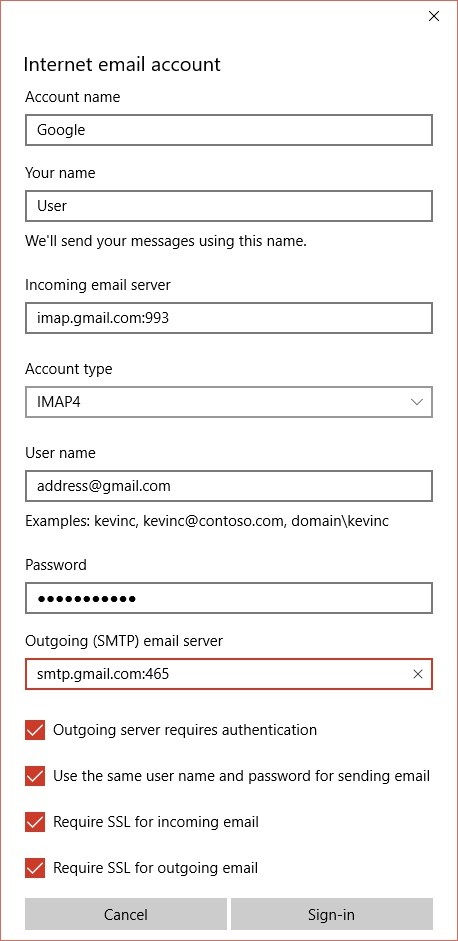
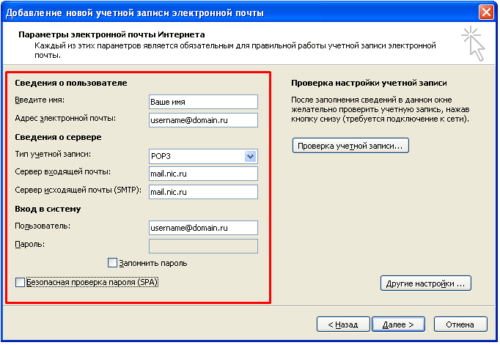 In addition to the address name and login information, you must specify the type of account and server for incoming/outgoing mail
 Table: data for manually adding an Outlook account
| Company | Gmail | Yandex Mail | Outlook.com | Ukr.net | |
| IMAP | 993 | 993 | 993 | 993 or 143 | 993 |
| POP3 | 995 | 995 | 995 | 995 | 995 |
| SMTP | 465 | 465 | 465 | 587 | 465 or 2525 |
| Incoming server | imap.mail.ru pop.mail.ru |
imap.gmail.com pop.gmail.com |
imap.yandex.ru pop.yandex.ru |
outlook.office365.com | imap.ukr.net pop.ukr.net |
| Outgoing server | smtp.mail.ru | smtp.gmail.com | smtp.yandex.ru | smtp.office365.com | smtp.ukr.net |
Problems adding an email account
When connecting your account, you may encounter certain problems. First of all:
Another problem sometimes appears with the e-mail service. gmail- this is an error with the text “Your IMAP server wants to alert you to following: Please login in via your web browser.” The reason for its appearance lies in the operation of Google's authentication system.
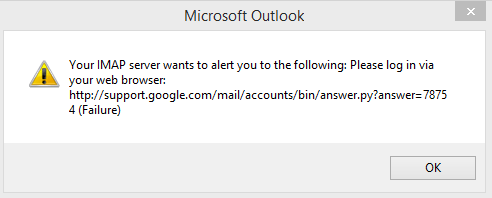 Server access error caused by access being denied for unverified applications
 To fix the error, just give unverified applications access to your account. This is done like this:

Connecting Microsoft Outlook to Exchange Server
Exchange Server, a popular program among large organizations, can also be connected to Outlook. It is very convenient for working with corporate email. To connect Microsoft Outlook to this program, do the following:
Video: How to connect Outlook to Exchange Server
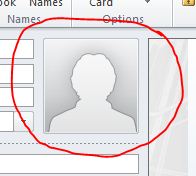
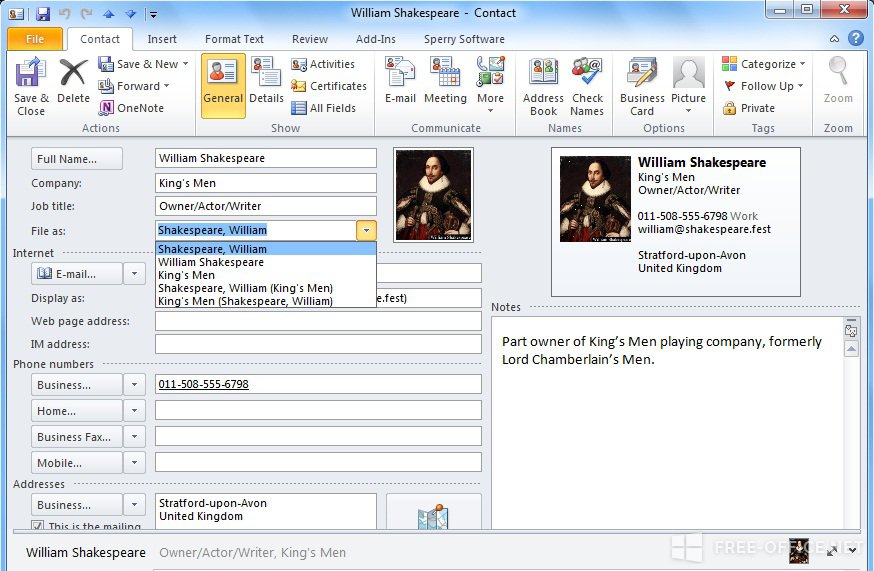
Photos of contacts in Microsoft Outlook
To make working in Microsoft Outlook easier, you can add an image to each of your contacts. This will allow you to quickly find the right person or company. In addition, you can add your own photo for the convenience of other users.
Add a photo to your Outlook account
To add your own photo in Microsoft Outlook, do the following:
How to assign a picture to a contact in Outlook
To assign an image to someone's contact, you need to follow these steps:
If you need to delete an image, then instead of the “Add” item, when you click on the image, you must select delete.
Changing the encoding of a received message
It happens that when you receive a message, instead of text, it displays a set of strange characters. This is due to incorrectly set text encoding. To correct the situation, do the following:
In addition, you can place the encoding change menu on the quick access panel.
 You can add the encoding function to the quick access panel
 Video: fixing message encoding in Microsoft Outlook
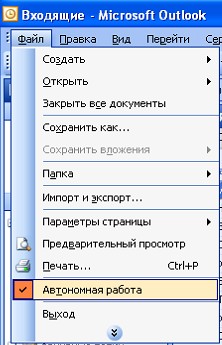
Disable offline Microsoft Outlook
Offline mode Microsoft program Outlook is used to work when the Internet is turned off. Of course, you will not be able to receive or send messages, but you will have access to your contact list and the ability to view messages received and sent previously. To disable the mode, you must:
After this, the program should connect to the network.
A huge number of people use Outlook to manage your email accounts. It allows users send or receive emails without having to open a browser or log into other services. In this guide you will learn how to set up Outlook to manage your emails.
In this tutorial, we will use an email account created in cPanel as an example, however, all the steps in this tutorial will apply to other accounts as well.
Before we start this guide, you will need the following:
- Outlook installed on your computer.
- A work email account with your external service provider.
- Data about POP3/IMAP And SMTP your service provider.
Step 1 - Collect POP3/IMAP and SMTP Data
Step 1.1 - Collecting Data in Hostinger Control Panel
First, you need to obtain information from your service provider about POP3/IMAP And SMTP your email account that you want to know how to set up Outlook. The section below will tell you about data collection in the Hostinger control panel. If you are using another service provider, feel free to skip to Step 1.2.
- Go to the section Mail accounts in your Hostinger control panel.
- Next, click the button Management → Information on the account you want to set up in Outlook.
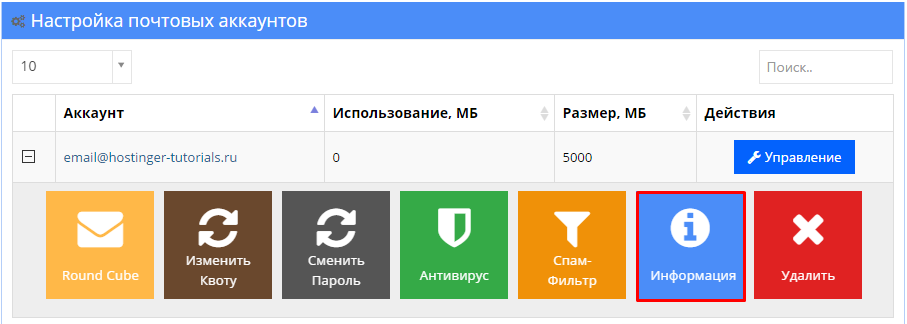
- A pop-up window will appear with all the necessary data.
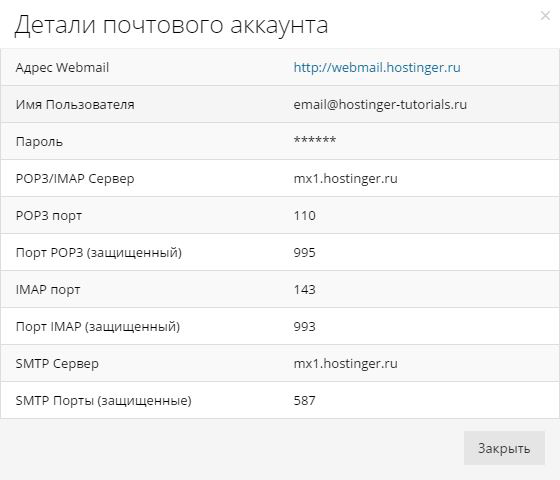
- Write or copy this information into a notepad. You will need it in the next step.
Step 1.2 - Collecting Data in cPanel
Below are the steps that apply to cPanel, but if you are using any other service provider, please contact them for the required information.
Login to your hosting account's cPanel and follow these instructions:
- Click on the icon Email accounts, located in the section Email.

- After entering the tab Email accounts, press Set up an email client.
IMPORTANT! On this moment, you must already have an email account created in cPanel.
- On this page, you should see information about POP3 And SMTP. cPanel provides two settings options SSL/TLS Protected Options And Non-SSL options, it is always recommended to use protected option.
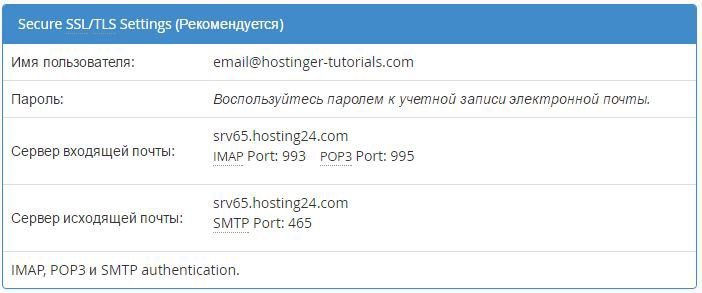

- Copy the information to text editor on your computer or just leave the page open.
Step 2 - How to Set Up Outlook
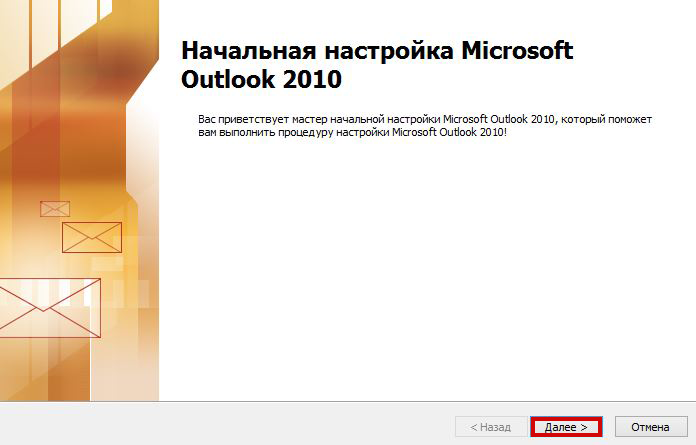
In this example, we will use Outlook 2010, however, the same steps apply for other versions as well.
- If you open Outlook for the first time you will see Welcome message. Click Further.
.
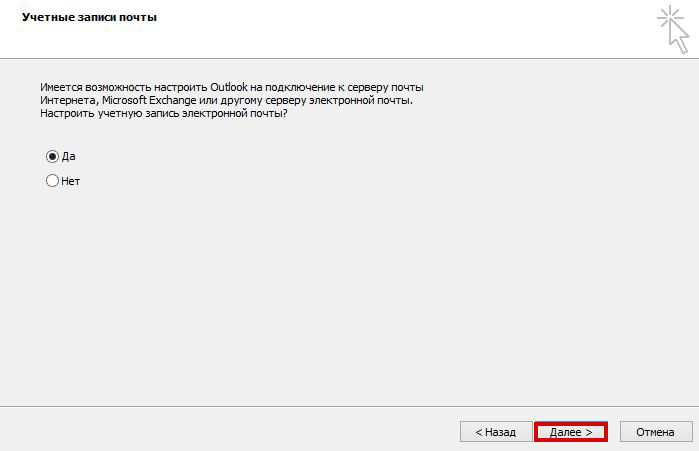
- You should see a window with a question Do you want to set up Outlook to connect to your email account? Select Yes and press Further.
- (optional) If this is not your first time opening Outlook and you already have an account configured, to add a new one you must click File in the upper left corner of the screen.
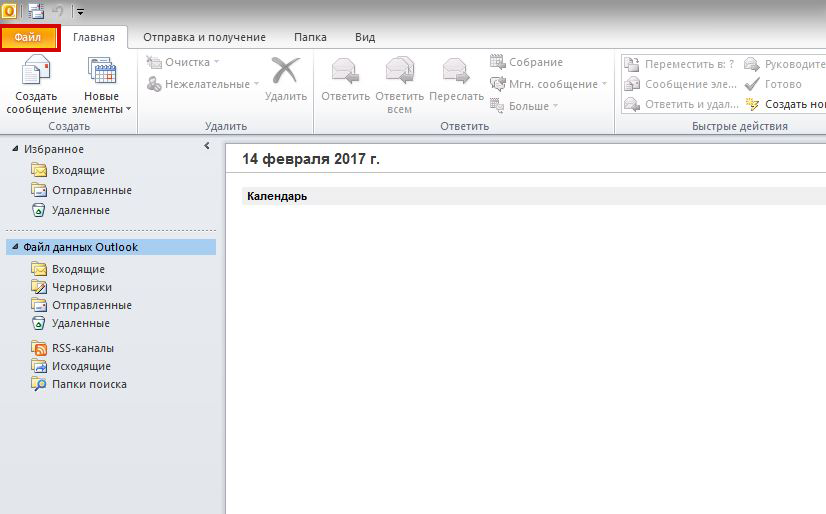
- Then press Addition account to set up a new one.

- On next page you will find 2 options on how to configure Outlook, we will use the second one Tune manually server parameters or additional types servers. Click Further.
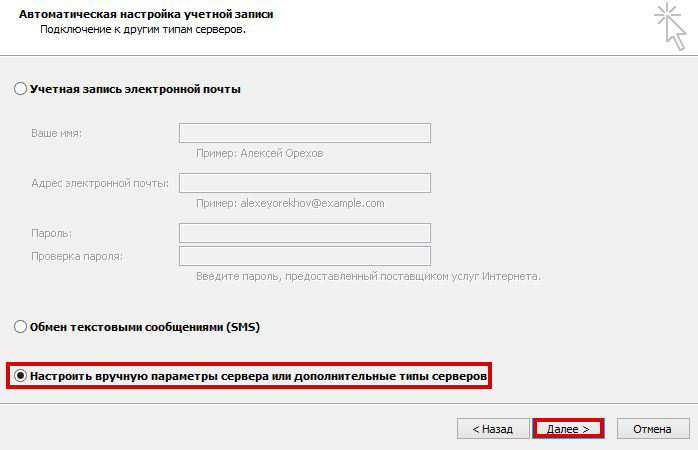
THE NOTE! The first option will automatically help you set up Outlook for your email. You don't have to fill in the server details, just yours email address and password. However, in most cases, it is recommended to set up your account manually to avoid problems.
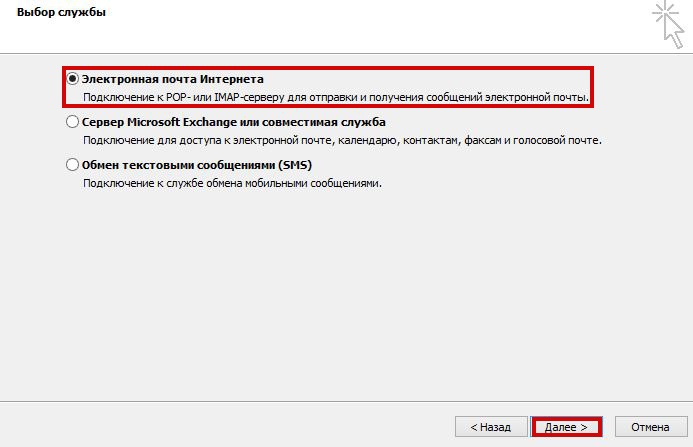
- Now you need to select the service for which you are setting up an email account. Select POP or IMAP and press Further.
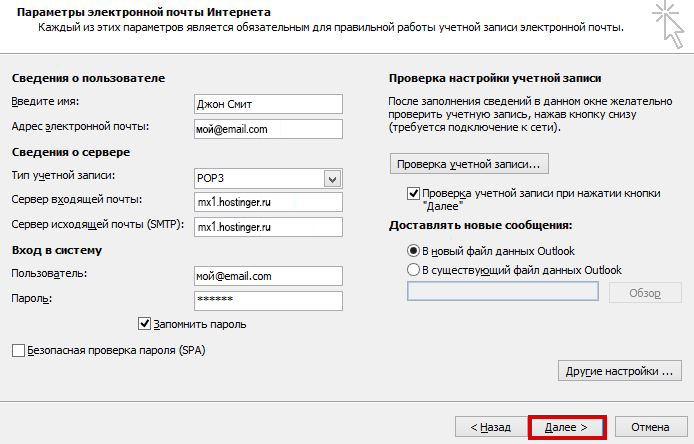
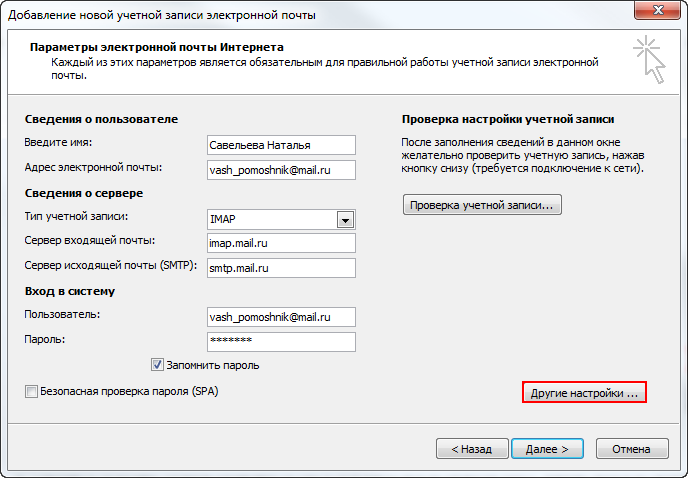
- At this stage, it is important to correctly provide the data (collected in Step 1):
- Enter your name– This name will be displayed to the recipient when you send him a message. Choose it yourself.
- E-mail address– enter the email address of the mail you are setting up.
- Account type– most email/hosting providers offer a choice between POP3 And IMAP and there is no single correct opinion on which one to use. You can learn about the differences between them here: Differences between POP3 and IMAP. However for regular user, there are no differences. In this example we will choose POP3.
- Field incoming mail server fill in name incoming server from data collected in Step 1.
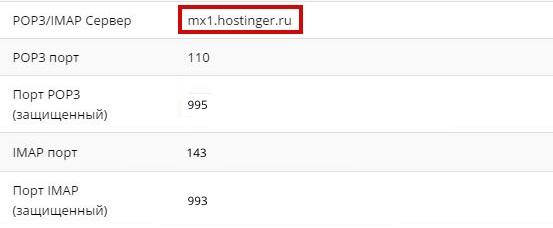
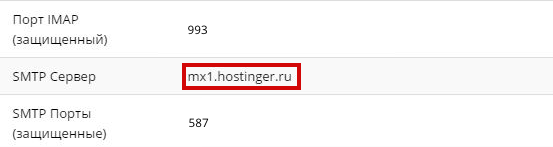
- For outgoing mail server (SMTP) you must specify outgoing mail server name from data collected in Step 1.
- For information upon login use username and password from your email.

- Remember password, so you don't have to enter your password every time you use it.
- Click Other settings …

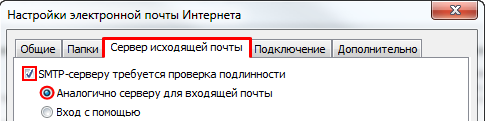
- Open the tab Outgoing mail server in the window that appears.

In this window you need:
- Check the box next to SMTP server requires authentication. This is necessary if your hosting or mail service provider requires SMTP authorization.
- Select Login using and fill in the fields with your account information – Username And password.
- Don't forget to check the box next to Remember password.
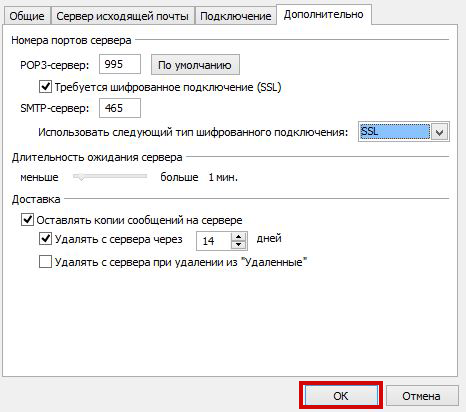
- The window should be filled as in the screenshot below. When you're done, open the tab Additionally.

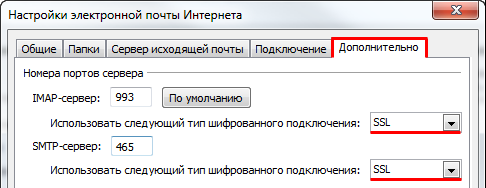
- At this stage, you need to fill in both incoming and outgoing ports mail server (This information was collected in Step 1)
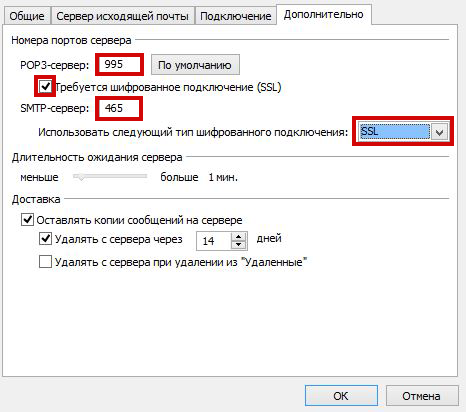
- For Incoming server enter Incoming server port(depends on the account type you have chosen - POP3 or IMAP) from data collected in Step 1.

- For Outgoing server (SMTP) enter Outgoing server port from data collected in Step 1.
IMPORTANT! If you used SSL/TLS protected settings when we collected data from your provider, you must check the box next to This server requires a secure connection(SSL) and select SSL V Use next type secure connection.
Or vice versa, if you used non-protected settings, leave everything as it is.
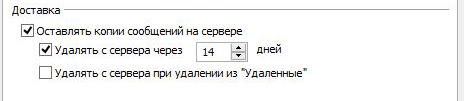
- (Optional) In the tab Delivery you can make additional changes related to email. Check the box next to Leave copies of messages on the server, you will be sure that a copy of each letter will be saved on the server. In effect, you will have two copies of the same letter. One in Outlook and the other on your service provider's platform.
- When everything is filled in, click the button OK.
- You will be returned to the previous page. Click Further.
- Outlook will automatically check the receipt and sending of messages from the account you have configured. If both tests are successful, you will see similar results:
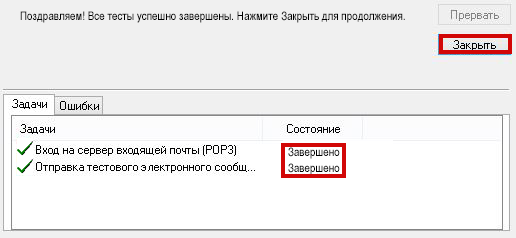
If you receive error messages, check that the data you entered is correct; if the data is correct and you still receive errors, contact your hosting/mail provider.
Click Close, if the tests completed successfully.
- After successfully setting up your mail account V Outlook you should see a message like this:
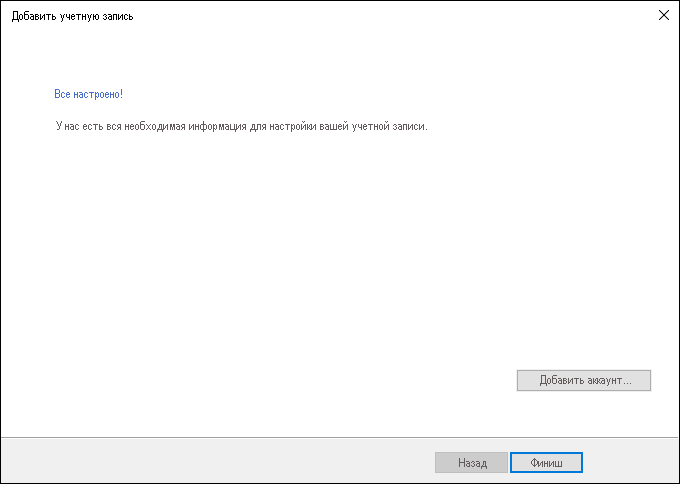
- You can press the button Finish and start using your account in Outlook.
Conclusion
In this guide, you learned how to set up Outlook. Now you can receive and send mail without using unnecessary programs and your email provider's platform. How to do it backup letters from using Outlook, you can find .
Settings in Microsoft Outlook 2003/2007
The security of working in Microsoft Outlook versions 2003 and 2007 can only be guaranteed if it is installed on a computer running Windows XP SP3, Vista, 7, 8, 10. If version operating system below Windows XP SP3, then it is not safe to use it. We recommend installing more new version an email client such as Microsoft Outlook 2010, 2013, or 2016.
Configure via IMAP protocol
via IMAP protocol:

- Email address - your full name mailbox.
- Account type - IMAP;
- Incoming mail server - imap.mail.ru;
- User - the name of your mailbox in full format [email protected] ;
9. Go to the “Outgoing Mail Server” tab and check the box next to “SMTP server requires authentication”. Check the “Same as server for incoming mail” box.
10. For better protection The data you send and receive using your email program must be encrypted. To do this, go to the “Advanced” tab and select “SSL” in the drop-down lists opposite “IMAP server” and “SMTP server”.
Check that the IMAP server port is 993 and the SMTP server port is 465.
11. After everything additional settings produced, click "OK".
13. To make the list of folders in your mail program similar to the list of folders in your mailbox, click right click mouse over the name of the newly created account and select “Update folder list”. 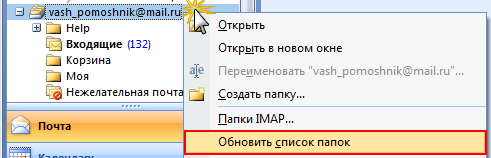
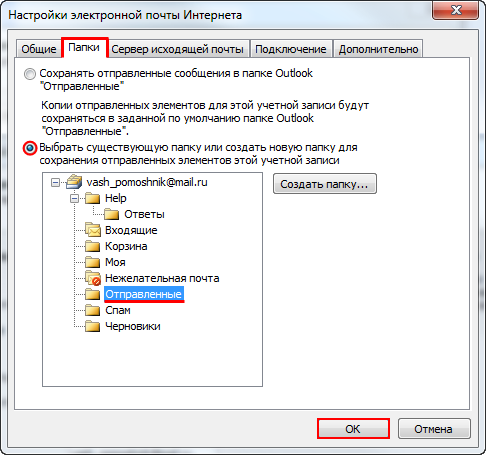
14. Now you need to specify the folder in which all letters sent from the mail program will be saved. To do this, go to “Tools” - “Account Settings...”, as in step 1, select the newly created account and click “Change”. In the window that appears, click “Other Settings” and go to the “Folders” tab. Check the box next to “Select an existing folder” and select the “Sent Items” folder in the proposed list, click “OK” - the account is configured.
Configure by protocol POP3
To configure the Microsoft Outlook 2003/2007 email program via POP3 protocol:
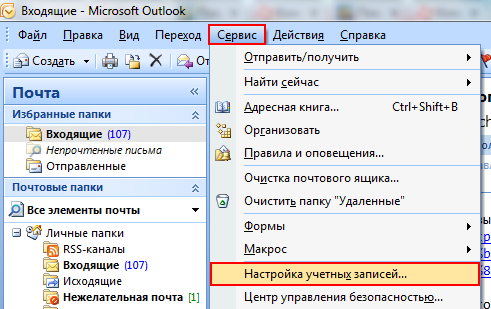
1. In the top panel, in the “Tools” menu, select “Account Settings...”;
2. In the window that appears, click “Create...”;
3. Check the box next to “Exchange Server, POP3, IMAP or HTML” and click “Next”;
4. In the window that appears, check the box next to “Manually configure server settings or additional server types” and click “Next”;
5. Check the box next to “Internet Email” and click “Next”;
6. In the “User Information” section, provide the following information:
- Enter a name - the name that will appear in the "From:" field for all messages sent;
- Email address - the name of your mailbox.
In the "Server Information" section, provide the following information:
- Account type - POP3;
- Incoming mail server - pop.mail.ru;
- Outgoing mail server (SMTP) - smtp.mail.ru.
In the “Login” section, enter the following information:
- User - the full name of your mailbox in the format [email protected] ;
- Password—the current password for your mailbox.
7. Check the box next to “Remember password” if you want the mail program to remember the password for your mailbox and not ask for it every time you try to download mail.
8. Click the “Other settings...” button;
9. Go to the “Outgoing Mail Server” tab and check the box next to “SMTP server requires authentication”. Check the “Similar to incoming mail server” checkbox.
10. To better protect the data you send and receive using your email program, you can enable encryption. To do this, go to the “Advanced” tab and check the box next to “Require an encrypted connection (SSL)”, and in the “Use the following encrypted connection type” drop-down list, select “SSL”.

Check that the POP3 server port is 995 and the SMTP server port is 465.
11. If you want to leave messages downloaded by the mail program on the server, then check the box next to “Leave copies of messages on the server.”
12. After all additional settings have been made, click “OK”.
Change SSL settings
Please note that security in Microsoft Outlook versions 2003 and 2007 can only be guaranteed if it is installed on a computer runningWindows XP SP3, Vista, 7, 8, 10. If the operating system version is lower than Windows XP SP3, then it is not safe to use it. We recommend installing a newer version of your email client, such as Microsoft Outlook 2010, 2013, or 2016.
To configure your Microsort Outlook 2003/2007 email program using the secure SSL protocol:
If the above settings are already installed in your email program, then no changes need to be made.
If you have problems setting up your email program, use our