Let's talk about how to control your computer from your phone. There are times when this is necessary, for example, for me;) If you are one of the same people, write about it in the comment. In the article I will present several programs and tell you how to work with them.
How to control your computer from your smartphone or tablet
TeamViewer
I think I won’t be mistaken if I say the answer that will immediately come to mind for many. Yes, TeamViewer!
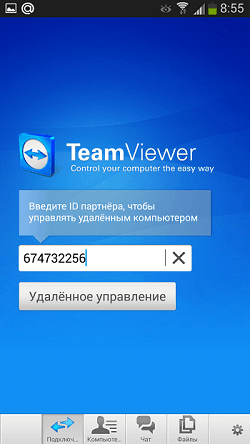
So, we install and launch the application on both the gadget and the computer. Enter the ID of the remote machine and click the “Remote Control” button.
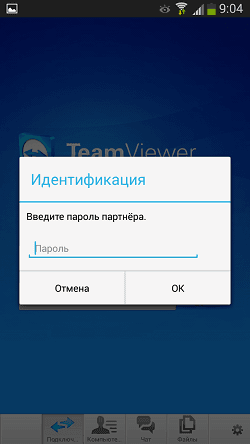
Enter the password
In a new window that opens, they show us the basics of interacting with the mouse.
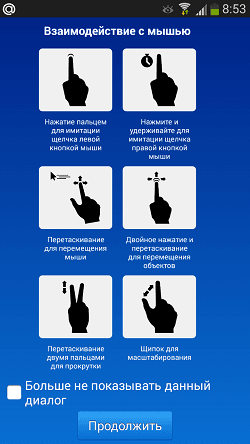
Click continue and the remote desktop will immediately appear on the screen.
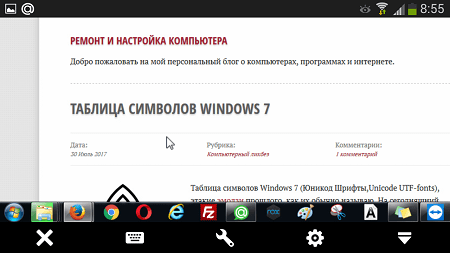
Using bottom panel with buttons you can:
- Show on-screen keyboard
- Actions (lock, restart PC, open Task Manager)
- Open session settings (change image quality, select an extension, hide wallpaper, disable or enable the remote machine cursor, use gestures, configure file transfer, etc.).
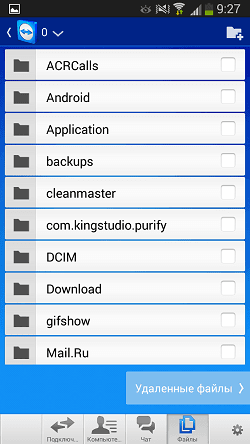
Speaking of files, if you intend to transfer files from your phone to your computer, you need to select the appropriate tab in the bottom menu. Go to the desired folder and send the document from there - instead of checking the box right away, the entire folder will be sent.
Unified Remote
As in the case described above, you need to install the program on your PC and gadget. In the first case, the role of the server will be played, in the second, the role of the client.
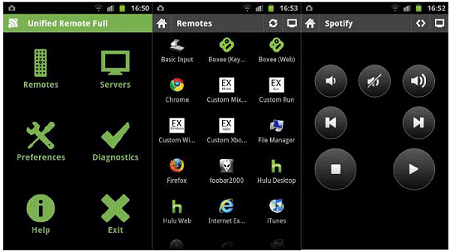
As soon as Unified Remote is launched on the computer, the client on the smartphone or tablet will automatically turn on. Next will be involved automatic search servers, after finding it, all you need to do is connect to it. That's all!
Bluetooth
Of course, you can't bypass Bluetooth connections either. This method nowadays it is used extremely rarely and the methods are similar to those described in this article, I would only like to mention the Monect PC Remote utility. It has quite extensive operating modes and, most interestingly, it can interact with games.
VLC Direct Pro

You can also control your computer via your phone using this multimedia client. After installation, the first thing you should do is select the web interface. This is done in the player settings, after which gadgets are connected. All actions will be displayed step by step on the screen, just follow the information shown. .
How to make a TV remote from a phone
I recommend "Mouse and Keyboard Remote" (M&KR). Believe me, this is the most the best option from the ones I tried. Download and install this Android application, and then on your computer, - Remote Control Server. No other way! Check that the smartphone and PC are connected to the same network.
Launch Mouse and Keyboard Remote, go to “Devices” and start the search, you can enter the IP yourself. If you don't know the right IP in Remote Control Server, you can look it up.
Today, almost every home has a Wi-Fi router, and a smartphone with Internet access in your pocket. Wireless technologies open to users a large number of possibilities that previously we could only see in science fiction films. For example, you can control your home computer via your smartphone, no matter where you are. In this article we will tell you how to control a computer via an Android phone.
How to control a computer via phone
There are two scenarios for controlling a computer via phone:
- remote access to a PC via the Internet
- control the mouse cursor, media players and other programs via Wi-Fi
To control your computer via your phone you need special applications, which are installed on PCs and smartphones. Below we will look at the best applications for remote access and PC management.
Remote access from your phone via TeamViewer
TeamViewer is rightfully considered best app for secure remote access. This program first firmly established itself as the main tool for remote diagnostics and configuration of computers, and then the TeamViewer developers released applications for mobile operating systems, including Android.
To get started, you need to install the TeamViewer PC client on your computer and the application on your smartphone. After this, register an account and log in to it on your PC and smartphone, now you can gain remote access to your computer via the Internet.
Open the TeamViewer app on your smartphone and go to the Computers section. Next to the name of your computer, its status will be displayed: if you see a green circle, it means that the computer is turned on and access to it can be obtained. Click on the arrow button. The connection will be made and on the smartphone screen you will see what is happening on the monitor of your PC.
The mouse cursor is controlled using touch screen phone. You can also fully use your smartphone's software keyboard to enter text on your computer.
In the “Computers” section you can add as many PCs for remote control as you need. To do this, each of them must have TeamViewer installed. Remote access to computers can be obtained without using an account; to do this, you must enter a temporary password generated in the program on your PC in the application on your smartphone.
Controlling your PC via Chrome Remote Desktop
Remote Worker Application Chrome table» allows you to gain remote access to your PC via Google account. It is much simpler than TeamViewer, but it does its only task perfectly well.
First, open on your computer Chrome browser and install Chrome Remote Desktop.
After installation, click "Get Started", download additional software components and install them. You will then be asked to create a security PIN, which you will then need to enter into the app on your smartphone.
Now open the Chrome Remote Desktop application on your smartphone, click on the name of your PC and enter the PIN code you created earlier. To avoid entering it again later, check the appropriate box.
After this, you will receive remote access to your PC via the Internet and will be able to control the mouse and keyboard. Also, sound from the connected computer will be broadcast to the smartphone.
How to make a remote control for a computer from a smartphone
The smartphone can be used as a remote control for a PC using the Goldworm Remote Control application. Connection is made via home network Wi-Fi, that is, the computer and smartphone must be connected to the same Wi-Fi router. You need to install the Goldworm server on your PC.
The application has a minimal set of settings. You can check the box so that the server boots with the system when you turn on the PC, activate checking for updates, and set a password. By default, the program should work immediately after installation. In some cases, you will need to manually enter the IP address from the Goldworm server on your PC into the app on your smartphone.
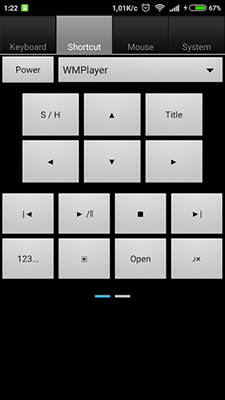
At the top of the application window you will see four tabs. You can change them later in the settings. The Keyboard tab contains a trackpad for controlling the mouse cursor. On the right there is a vertical strip that imitates a scroll wheel. You can use the button below to call up the keyboard.
The Shortcut tab is designed to control the media player on a PC; WMPlayer is selected by default.
This lesson will tell you how you can control your computer from a distance, or rather how to quickly and easily set up remote access.
You don't know what remote access is? I assure you, remote access is such a useful “thing” that will be useful to every user, and especially to beginners. And to make sure of this, let’s figure out what it is and how to “do it”...
To put it simply, remote access is working with a computer at a distance, i.e. the ability to connect via the Internet to someone else’s computer (with the owner’s permission, of course) and control it from your computer.
Why is this necessary?
For example, your friend asks you to help figure out some program, but you are too lazy to go to his house, and doing it over the phone is unrealistic. Or this friend lives in another city (or maybe even in another country). What to do in this case? Of course, it’s better to “get into” his computer without leaving home and show him how the program works, while his friend will watch all your actions on his computer.
Or you yourself find yourself in a situation where something incomprehensible is happening to your computer and you need the help of a specialist. In this case, instead of calling an assistant to your home, you simply organize remote access to your computer, after which the specialist will be able to “look” into your computer even from a thousand kilometers away.
If this seems like a fairy tale to you, then you are wrong! This is really possible and very easy to do. So, without wasting any time, let's start understanding how this works in practice.
So let's say we want to set up remote access between computer № 1 And computer№ 2 .
Let's agree that No. 1 will mean the main computer, i.e. the computer from which remote access will be carried out. And let's assume that we are sitting at this computer.
And by No. 2 we mean a computer to which we will be allowed access, i.e. our client's (friend's) computer.
Thus, we (sitting at computer No. 1) will have to gain access to computer No. 2, which can be located anywhere in the world.
The goal is clear and so now let's start connecting step by step.
To create remote access we will use special program, which is called TeamViewer.
Step 1: Prepare Computer #1
Download and install the full version of the TeamViewer program on our computer.
For non-commercial use this program It is distributed free of charge, so feel free to download and proceed with installation.
In the pictures below you will see what settings I selected during installation:


![]()

Step 2: Preparing Computer #2
There are two options here:
a) If remote access will be used ONLY in one direction (to this computer), then it is not necessary to install the full version of TeamViewer on this computer. It will be enough to download a small module of the TeamViewer QuickSupport client, which does not require installation (or administrator rights). Downloaded, clicked on the downloaded file and it’s already working!
b) If computer No. 2 will sometimes also be used as the main one, then it is necessary to install the full version of the program.
In this lesson we will consider the first option, i.e. the client does not need to install anything, just download TeamViewerQS.
Step 3: Launch the program on computer No. 1TeamViewer
Step 4: The client launches the TeamViewerQS program on computer No. 2
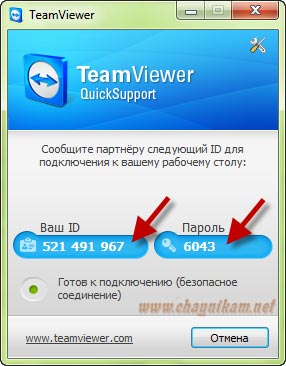
As you can see, in the window that appears on the client there is some data that is necessary to set up remote access, namely ID and password.
Step 5: The client (computer #2) informs us (computer #1)ID and the password that the TeamViewerQS module gave it
To do this, you can use any available communication method (phone, icq, skype, e-mail, etc.)
Step 6: Enter the received data in computer No. 1
First, enter the ID in the appropriate field:
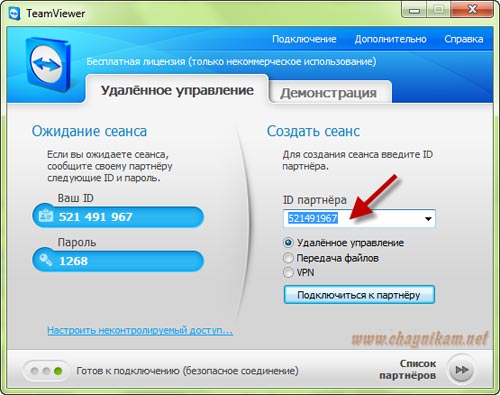
For example, if we want to exchange files, then select the item Transferring files, and if we want to show the work of some program or perform Windows setup, then select the item Remote control.
After this, press the button Connect to a partner.
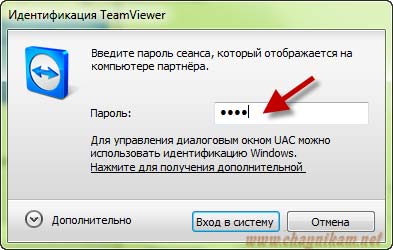
In the window that appears, enter the password received from the client and press the button Login:
That's all!!!
If we did everything correctly and did not make a mistake when entering data, then in a couple of seconds we will have access to computer No. 2.
If the access method has been selected Remote control, then it will look like a separate window on our screen, inside which everything that is in this moment displayed on computer screen 2:
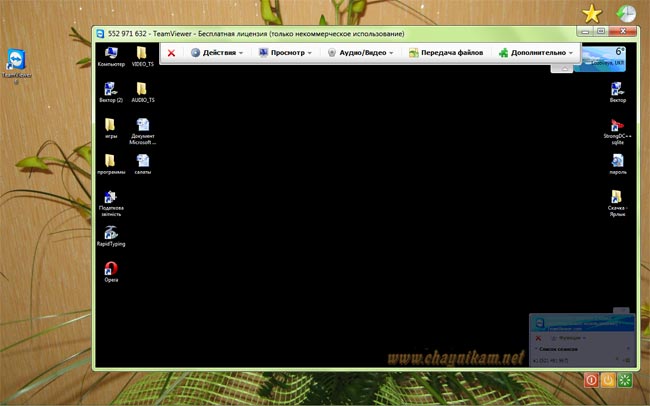
Please note that by default the desktop picture of computer #2 will not be displayed (it will be black).
If we begin to perform any actions in this window (open folders, copy or delete files), then the client will be able to observe all our actions on his screen (and will be very surprised that the mouse cursor moves on its own :)).
Having received this access, we can control computer No. 2, but we cannot copy files between our computers. Therefore, if we need to exchange files, when setting up the connection (after entering the ID) we must select the item File transfer.
In this case, after connecting we will see a window similar to file manager:
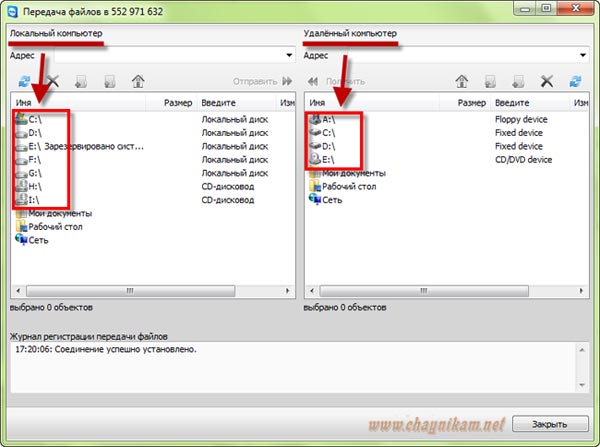
This window will display all our disks on the left, and the disks of the remote computer on the right. By opening any disk or folder, we can copy the required file to the folder we need.
As you can see, the program allows even a beginner to set up remote access in just a couple of minutes and does this without any additional settings. Well, if you want to change any settings in the program itself, you can do this by selecting the menu item Additional - Options.
Surely not every PC user (especially a beginner) knows that a computer can be safely controlled from a distance, and fully! Those. as if you were sitting and working at your own computer, but from a distance, and doing it, for example, from a tablet or another computer. This can be very convenient and, for example, I use this opportunity regularly. Why do I need it? I work a lot on the Internet, but I can’t always sit at my computer. Sometimes I need to go somewhere or see someone, but some urgent matter comes up and I need my computer to open some program, run something, look at something. Carrying a computer with you always and everywhere is very problematic. It weighs about 4 kg, which feels good when carrying it :) But on the other hand, I always have a tablet or smartphone with me, from which I can connect to my computer at any time and from anywhere, which I leave turned on at home. And this way, I can work on it just as if I were at home. Another reason for remote access is the ability to ask a friend or colleague to help you sort out any problems in the settings or programs on your computer through remote access. You yourself can also help someone solve some problem on their computer by connecting remotely to this person. And lastly... It happens that the right computer is in a hard-to-reach place or you need to walk to it. In this case, the easiest way is to connect to it remotely and you’re done!
This article of mine will talk about how to remotely control a computer from any device, and with the help of this guide you will learn how to do it easily even if you are a complete beginner! We will consider the most, in my opinion, convenient program for this matter - TeamViewer, and today I will tell you about its main most necessary and useful functions. Yes, it is also free for non-commercial use! There are only 2 conditions for remote device management: the presence of an Internet connection on both devices, and the presence of the TeamViewer program on both devices.
Today, the TeamViewer program is supported, one might say, by all devices:
- Smartphones based on Android operating systems, Windows Phone 8;
- Tablets on the same Android systems,Windows Phone 8;
- iPad of all modifications;
- IPhone;
- Computers based on the operating system Mac, Linux, Windows.
For all these devices, you can download the TeamViewer app for free.
It is also interesting that you can control it the other way around – smartphones and tablets from a desktop computer.
So, let's begin to understand the program step by step, starting with its installation process.
Installing TeaViewer
- First you need to download the program itself. It is best to download from the official website, since the most latest version. Go to the official TeamViewer website using the link:
- At the top of the page that opens you can’t help but notice the large “Free full version" Here we press it:
- After downloading the file, find it on your computer and run it. The file will be named: “TeamViewer_Setup_ru”:
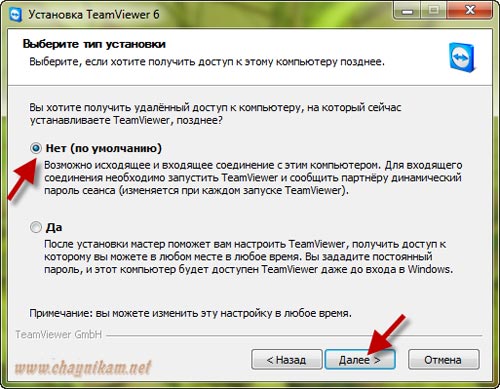
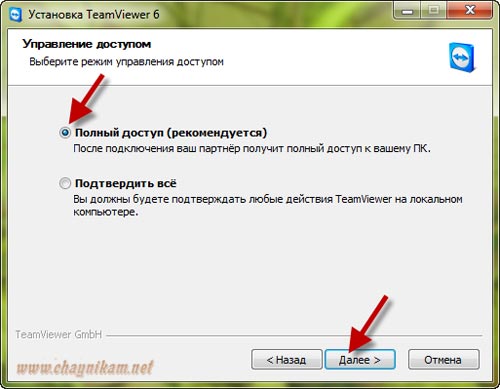
- The next program window will ask you to select the option to use TeamViewer. These settings can be changed at any time after installation. If you want to control this computer (on which you are installing the program) remotely, then immediately select the appropriate item. Otherwise, simply select Install.
Below, be sure to select the “Personal, non-commercial use” option, since the program is distributed free of charge only for this use case.
At the end, check the box “Show additional settings" and click the "Accept - Next" button:
- Account control Windows entries may ask you for confirmation to continue with the installation. Just click “Yes”:
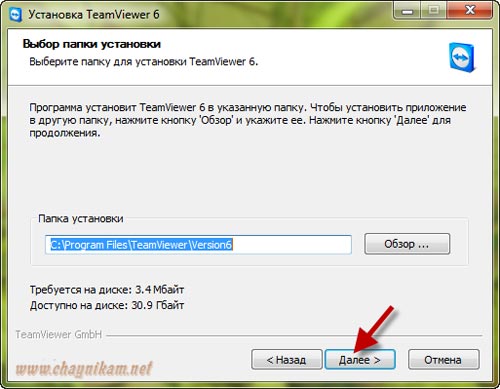
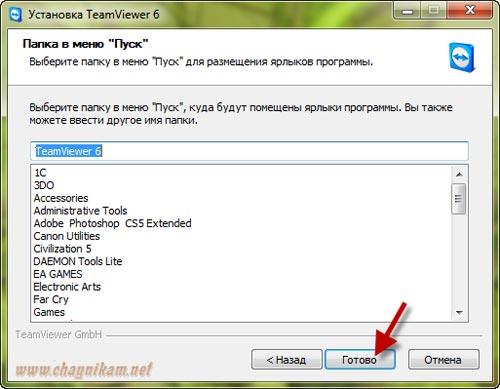
- In the next window, check the path where the program will be installed and change it if desired. But I recommend leaving the default path. The options below may not be enabled. All of them, if necessary, can be set after installation. Click the “Finish” button:
A quick program installation process will begin, which will take from a few seconds to a minute.
This completes the installation of the TeamViewer program! Let's move on to its settings and application.
Setting up TeamViewer
Setting up uncontrolled access to a computer:
Now we can freely control this computer from any other device, no matter where we are within the Internet access zone :) But for this, let’s deal with the information that we (or anyone else) need to know so that we can connect to this computer remotely.
Data required for remote control of any device:
Perhaps the most important thing is to know the data by which you can connect remotely to your current computer.
To connect to this computer from another computer / device with TeamViewer installed, you only need to know:
- ID of this computer;
- Password for accessing this computer via TeamViewer (not to be confused with the password for logging into Windows!).
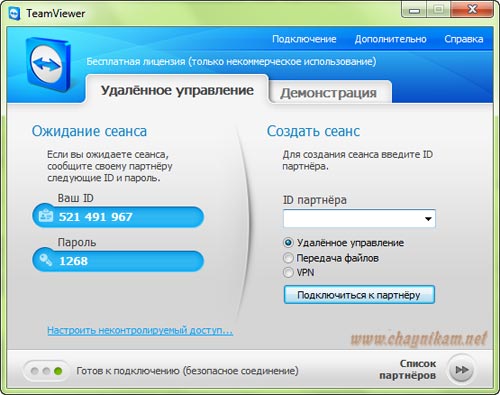
All this data is located in the main program window:
According to my example (see image above), to remotely access this computer at the moment I need to point to remote device ID: 900 288 832 and password: 6sx71k.
The ID in TeamViewer for each specific computer does not change. Those. the one that is indicated in the box you will always indicate when remote connection. And there are 2 types of passwords in TeamViewer: temporary (random) and personal (permanent). Now more about this:
I hope you understand the difference in passwords :)
Now let's go through the main most important settings of the program.
Basic program settings:
- To go to all program settings, open the “Advanced” menu at the top and select “Options”:
- We will immediately be taken to the “Main” tab. Here you can enable or disable automatic start TeamViewer programs when booting Windows. If you are going to control this computer remotely, then I strongly recommend leaving this item enabled. Then you don’t have to launch TeamViewer manually, especially if you are far away and TeamViewer is at this computer will not be launched, you will not be able to connect to it.
Below you can see a message that you are linked to the account you created earlier. If you click the "Delete" button, you can break this connection.
On this tab, there are no more important settings that are not set by default. Go to the next tab “Security”.
- On the “Security” tab we can change the “Personal” password by entering a new one and repeating it at the very top. Below you can set up a “random” password by specifying the number of characters. By default, such a password will always be 6 characters long.
In the last section, “Rules for connecting to this computer,” you can allow or deny logging in remotely using Windows password. It's safest to leave this parameter set by default, i.e. - "Is not allowed". The easiest way to connect is through a TeamViewer password and it will be safer this way.
- “Remote control” tab. There are important settings. All these settings are global - i.e. for any connection. But if you created for yourself account, then for each computer added to your personal list, you can set your own connection parameters, but more on that later.
This is what the settings on this tab look like:
At the very top you can adjust the image quality when connecting to a remote computer. It’s better to leave either “Automatic quality selection” or “Optimize speed”. I always set speed optimization to connect to a remote machine and work with virtually no delays even through Mobile Internet. There is only one minus - the image quality (the way we see the remote computer) will not be the best, but sometimes this is not even noticeable.
Below, as you can see, the “Hide wallpaper on the remote machine” option is enabled. This means that when you connect to a remote computer, the desktop background there will become simply black. I always leave this option enabled so as not to waste resources on loading a sometimes large background image.
Even lower are additional settings that can be configured according to everyone’s preferences. For example, if the "Play computer sounds and music" feature is turned on, you will hear all sounds accordingly remote computer.
It can be useful to enable the “Send keyboard shortcut” option. If you enable this option, then when you connect to a remote computer, you will be able to use your usual keyboard shortcuts. For example, a quick way to open the task manager is “Ctrl+Shift+Esc”.
In general, here you configure it as you need.
Let’s go straight to the “Computers and Contacts” tab.
- The “Computers and Contacts” tab will display your account settings, which will then show all the remote computers and users you have added. On this tab you can change your account information, as well as computer display settings.
At this point we have discussed the basic settings. Now let's move on to the main thing - remote computer control.
The principle of remote computer control
We can, as I already said, control a computer or any other device (TeamViewer must also be installed and configured on them!) from any point where there is access to the Internet and we just need to know the ID of the managed device and its password (random or permanent ). Knowing these 2 parameters, we can control the computer.
Let's try to connect to the computer remotely:
- In the main TeamViewer window, where the “Manage Computer” section is located, indicate the ID of the computer that we will manage in the “Partner ID” field.
If you created an account, then we can immediately add the computer to our “Favorites” list by clicking the button with an asterisk:
- A window for access settings for the computer that we add to the list will open in front of us:
In the image above, I have marked the fields and lists where it is best to make changes:
- We specify the password if you know the “personal” password of the remote computer. Otherwise, leave the field blank.
- Specify network name remote computer (for your own convenience). It will appear in the list of your computers.
- If you wish, you can specify a description of the remote computer to be added for convenience if you have a large list of them.
- In the Window list, I selected Full Screen Mode. This means that when connecting to a remote TeamViewer computer will display the remote computer in full screen. It will look like you are fully working on that computer. You can select another option, for example " Windowed mode", and then the remote computer will be displayed in the window.
- In the “Quality” list, I always select “Optimize speed” so as not to sacrifice performance, especially when connected to a slow Internet.
- It is better to always set “Identification mode” to “TeamViewer Identification”. Then you will only need to know the password set for a particular computer in the TeamViewer program to connect to it.
The remaining settings can be left with the “Inherited” value, because, as a rule, there is no need for them and, in extreme cases, they can be configured at any time.
When the settings are set, click the “OK” button.
The computers that you will add to your list will be visible in a separate window, as in my example in the image below:
In the example, I added a computer named “Test TeamViewer”.
- Now that the computer is in the list, to connect to it, simply double-click on its name. If you immediately specified a password, it will not be requested and the connection will occur immediately (within a couple of seconds).
Another way to quickly connect to a computer, if for some reason you did not create an account and do not add computers to your favorites list, is to simply enter the ID in the appropriate field and click “Connect to partner”:
The default mode is “Remote Control”, which is what we need. And we can enable the “File Transfer” mode at any time during a remote session.
Now a window will appear where you need to enter a password to connect to the remote computer:
Enter the password and click the “Login” button.
- The connection usually occurs in a couple of seconds, but this depends on the speed of the Internet on both sides. After connecting to the remote computer, the window will look like this:
As you can see, the screen of the remote computer is black. As you probably remember, in the settings we left the “Hide wallpaper on the remote machine” option enabled. As a result, the wallpaper on the remote machine became black, which will reduce resource consumption, and immediately after disconnecting from the remote computer, its desktop wallpaper will return to its previous appearance.
This is how simple and easy it is to connect to a remote computer :)
You will be able to fully control your computer from any distance, and at the same time it will look exactly as if you were sitting at that computer.
Let me remind you once again that the same can be done from almost any device. If you, for example, have an iPad, then download TeamViewer onto it (it’s always free!), enter the ID and password of the remote computer, and that’s it! You will connect and be able to control it directly from your tablet, and it’s also very convenient!
Now let's look at some of the functions available to us during a remote session.
Functions available during a remote computer session using TeamViewer:
So, we are connected to a remote computer. At the top we see a panel with a set of functions. Let's go through the most necessary of them:
- The button numbered “1” allows you to immediately terminate the connection with the remote computer.
After any termination of a TeamViewer session on both devices, a window will be displayed indicating that the free session has ended. Just always click "OK":You can also instantly terminate the connection while on that remote computer. For example, someone remotely helps you set up a system or fixes a problem. If suddenly that person began to do some actions on your computer that, in your opinion, he does not need to do at all, then you can break the connection with just one button in the form of a cross (see image below):
- The button numbered “2” allows you to hide this panel of remote session functions.
- The button numbered “3” allows you to instantly switch to full screen mode, which I use 99% of the time.
- Very useful function is transferring files from local computer to the remote one and back. You can do this by simply dragging and dropping necessary files from your computer window to the remote computer window.
Another way is to use a special manager – “File Transfer”. It opens from the same panel that is fixed at the top. Select “File Transfer”, and then “File Transfer” again:
A special manager will open - Explorer. There is nothing complicated here either. We indicate from which folder on the local computer the file will be transferred, then indicate the folder where exactly the file will be transferred to the remote computer. Then select the file itself on the local computer that we will transfer and click the “Send” button:
Here you can change the scaling, for example, enable full screen mode. Here, in the “Quality” submenu, you can select the quality you want for displaying content on the remote computer, for example, by turning on “Optimize speed”. Also here you can change the resolution of the remote computer (for example, if the resolution of your local computer is very different) and show / hide the wallpaper on the remote machine. Everything else is not so significant and necessary...
Well, that’s probably all the most useful things you need to know about how to remotely control a computer using TeamViewer :) Cool program, isn’t it? :)
The most important thing is that it is extremely simple, convenient, and even a beginner can handle it. And, of course, it’s free! In general, to be honest, I have not seen a better worthy replacement for the TeamViewer program.
This is where I finish writing this article.
All remote actions on devices are very convenient to use, so they are quickly gaining popularity, one of such features is control your computer from your phone. At home, you can easily work with a computer, being far enough away from it. This way you can configure the application, monitor the progress of installation/downloading/analysis/encoding or many other operations.
Today, special mobile and computer applications. Google Play contains about 10 programs that allow you to organize the work of your PC from a smartphone or tablet. Why do they work with different operating systems– Linux, Windows, Mac. Among all these applications, few work for free, and even more so provide sufficient functionality, so we will consider exclusively best solutions for PC control.
Teamviewer
Teamviewer remote access is a program for controlling a computer from a phone, which home use does not require subscription fee. Today it is considered the most popular solution for this type of administration.
To work, you need the application client to be installed on the computer you will be managing, and the extension for your smartphone to be installed. The extension is available to work exclusively on synchronized devices.
Supported Operating Systems:
- PC – Linux, Windows, Mac;
- Smartphones – mobile Windows, Android and iOS.
The simplest type of connection is TeamViewer QuickSupport, but it imposes restrictions on synchronization with other devices. You need to download the PC and Smartphone apps separately. For a phone, the link is https://play.google.com/store/apps/details?id=com.teamviewer.teamviewer.market.mobile – the file weight is 11 MB. For PC, you can download the program from the website https://teamviewer.com.
To debug access to a PC, you should download and run the program in which you will be awarded an identification number computer, which consists of 9 digits. A 4-digit password will also be generated; it is generated dynamically and changes each time the application is launched. If you wish, you can create your own password so that it does not change constantly.