Today modern computer games, as never before, have become very demanding on hardware. In particular, this applies to video cards. But how to properly set up the graphics chip so that the gameplay is comfortable and the card works at its maximum capabilities? For this, there is a special free utility MSI Afterburner. at first glance it is very simple. But this is only at first glance, because when setting certain parameters, you need to take into account some nuances so that the card does not fail.
MSI Afterburner Preview
In short, the MSI Afterburner application is a program for controlling all the parameters of video cards, adjusting their performance and overclocking. That is why it is very popular among gamers who are trying to "squeeze" everything possible out of the card, and overlockers.
But there is one caveat, which is that the MSI Afterburner setting only works with officially released models of NVIDIA and AMD Radeon graphics chips. In addition, some application settings may be locked, and auto mode applying parameters in the program is not the best. Below will be described how to work with this utility, and so as not to disable the card.
Installation and Initial Setup of MSI Afterburner
The first stage of setup is to properly install the utility. After launching the installer, the normal installation process will begin, during which the application will offer to install additional Riva tuner Statistics Server. You must agree with this without fail, since some functions and settings of the main program may not be available.
At the end of the installation, setting up MSI Afterburner for games involves changing some key interface elements. If the English version was installed by default, use the Settings menu, where we select the User Interface section. Here you need to change the language and turn off prompts if they are not needed.
After that, you need to use the basic settings tab. Here you should check all the boxes, except for the top line for synchronizing the settings of identical GPUs (it is used only if there are several video cards), the voltage boost line and the check for beta versions check box (optional). You can also set the program to start at startup. operating system. After saving the presets, the application will need to be restarted for them to take effect.
Core Clock Options
The initial setup of MSI Afterburner is now complete. Now let's look at the main points with the available options. Let's move on to the GPU frequency section.
To begin with, you can move the slider a little to the right (by about 40-50 MHz). The current frequency will be displayed in a special window. After that, it is advisable to test the video card with any utility designed for this, for example, 3D Mark or FurMark. At the same time, you should pay attention that during the test the temperature does not rise above 90 degrees, and the monitor does not show side effects (streaks, flickering, irregularities in the color palette, etc.). If the test did not reveal anything critical, for reliability it is better to launch some resource-intensive game and play for at least an hour. If everything is fine here, you can move the frequency slider even more to the right, but by a lower value (say, not 40, but 20 MHz) and test again. The further to the right the slider is moved, the lower the value used.
In the process of passing the game, you can display the display of the current parameters on the screen in the form of a translucent window. As soon as it is noticed incorrect work maps on certain value, the slider should be returned to the previous position and stop there.
Memory Clock Settings
For memory, there is a slider located just below. In principle, you can do the same as in the previous case. First we shift it to the right by 50 units, test it, then add another 20 units, etc. Again, the value will need to be reduced by approximately 1.5-2 times, compared to the previous state.
MSI Afterburner: cooler setup
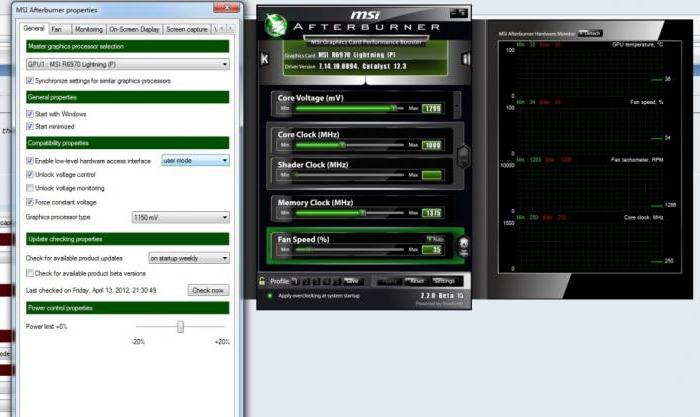
These parameters can be called up from the settings section, in which the corresponding tab is selected. For full access to them, you should immediately check the box next to the line for enabling the program user mode.
![]()
A graph is displayed a little lower, showing a direct dependence of the fan speed on. You can change the parameters by moving around the graph area of gray squares, but for more fine tuning it is advisable to use them large quantity, simply by clicking on the empty space of the dependency line and changing the position of certain points. But don't get carried away by showing maximum values for any temperature. So the cooler itself can fail. By combining the graph parameters and the above settings, you can achieve the optimal result.
Saving settings and profiles
To save the current settings, the MSI Afterburner setup offers the user a choice of five profiles.
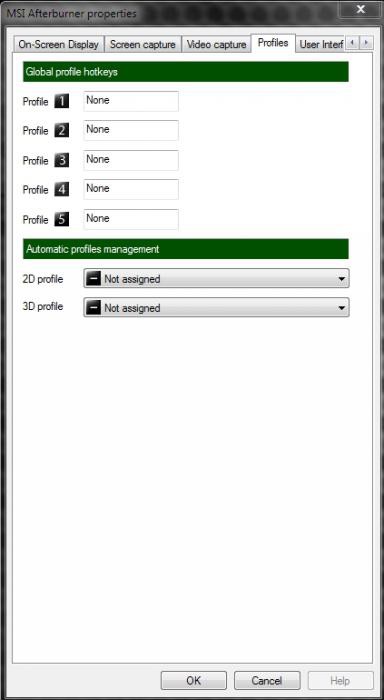
On the corresponding tab in the 2D section, we leave everything unchanged, and in the 3D drop-down menu, select our newly configured profile, in which the settings will be indicated (there is also an “Auto” value, that is, this profile will be used by default when the application starts).
What if the settings are not available?
Sometimes you can come across a situation where all the sliders are shifted to the right, but it is impossible to change their position. This is a common lock in case the video card does not support overclocking. But there is a way out.
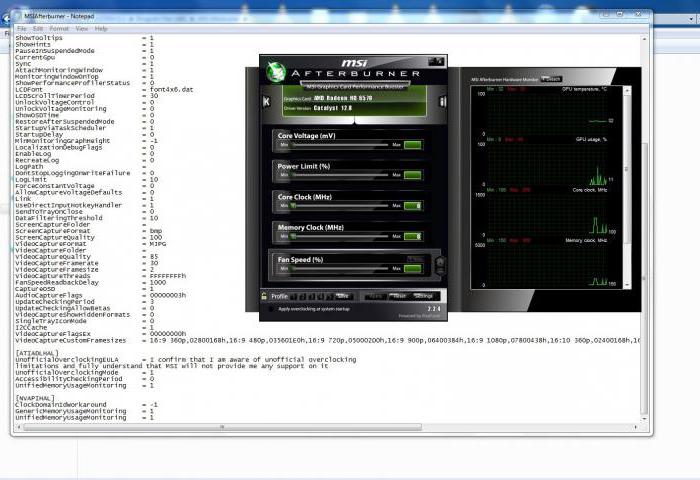
To begin with, in the directory where the program was installed, we find the MSIAfterburner.cfg file and open it with Notepad. We scroll through the contents to the line UnofficialOverclockingEULA. In it, after the equal sign, you need to write the text "I confirm that I am aware of unofficial overlocking limitations and fully understanding that MSI will not provide me any support on it" ”, and then in the line UnoficcialOverlockingMode after the equal sign, put one.
overlay monitor
These were the main points related to the question of whether
MSI Afterburner is a fairly popular overclocking program for fine-tuning and monitoring a video card.
MSI Afterburner is a program from the creator of Riva Tuner - Alexey Nikolaychuk (Unwinder).
At first glance, MSI Afterburner seems like a very simple program, but this is just the first. With a deeper acquaintance, the opinion about the program changes.
This note is made to facilitate the use of the above software.
MSI Afterburner - instructions for use.
Part One: Installation
Download the program and install it. After installing it, you will have MSI Afterburner and MSI Afterburner on screen display server.
Part two: Initial setup.
1) Launch Afterburner, and go to the "Settings" menu:
2) Scroll it all the way to the right and go to the "User Interface" menu. We change the language to Russian.
3) Disable hints, if you don't need them, in the same menu:
4) Go to the first tab "Basic":
Where:
a) Synchronization of settings with two GPUs - for those who have SLI or CrossFireX tandems.
b) Booting from Windows. If you want the program to always boot from Windows, check the box.
c) Minimizing the program to the tray - this is so that when you close it, the program continues to work, but would be in the tray.
d) Voltage release - ATTENTION! BE CAREFUL WITH VOLTAGE, their excessive increase can cause GPU DEATH.
e) Enabling voltage monitoring in the monitor window.
f) Forcing constant voltage- when this option is enabled, you will not change the voltage in 2D and 3D modes.
5) After making changes, do not forget to click OK.
6) Go to the Cooler tab - check the box "Enable software user mode".
We study the schedule, and set the curve that suits you. It is advisable to stick a lot of transitions - it will turn out better to set up.
7) Go to the "Monitoring" tab:
A) You can adjust the data reading period. The default is 1000ms.
B) Monitoring can be logged. This practically does not affect performance, so those who are interested can safely install it, indicating the place for its further saving.
Setting up active monitoring schedules:
A) Check the boxes next to the indicators you are interested in.
I advise everyone everywhere to be sure to check the box next to the “GPU loading” item.
Monitoring this parameter will help you determine how well the processor matches your graphics card. If the video card in the game is constantly not fully loaded (load 50–90%), then this means that the processor either needs to be overclocked (if it has not been overclocked yet), or it needs to be changed to a more powerful one, or if the FPS (number of frames per second) suits you, you can twist the graphics settings to the maximum.
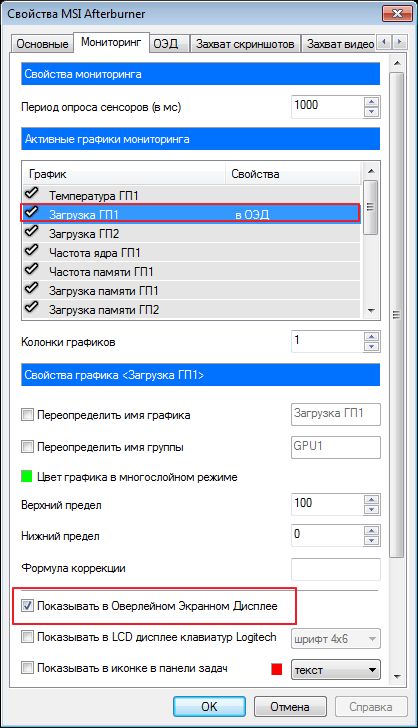
B) In order for everything that you have noted to be reflected on the monitor during the game, check the item you are interested in - for example, "GPU load", and check the box below "Show in overlay screen display":
Thus, you can add the indicators you are interested in to the overlay. I advise you to add GPU loading there. It is very convenient to monitor the load of the GPU in games where you do not have enough processor performance. I think this figure will surprise many.
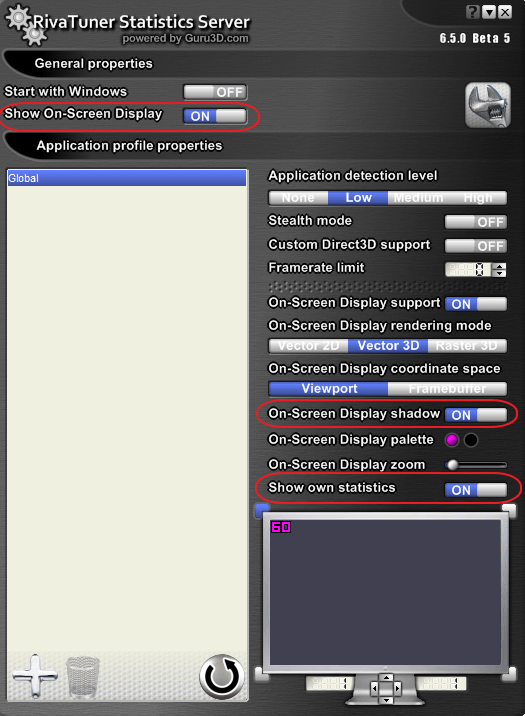
This softinka is responsible for displaying monitoring indicators on the screen during application launch.
In order for the program to start itself, put "ON" opposite the inscription "Start with Windows":
Also, I circled in white circles the items that can be used to adjust the font size, color, and position on the screen.
This completes the real-time monitoring setup. Now your screen will display the parameters that you specified.
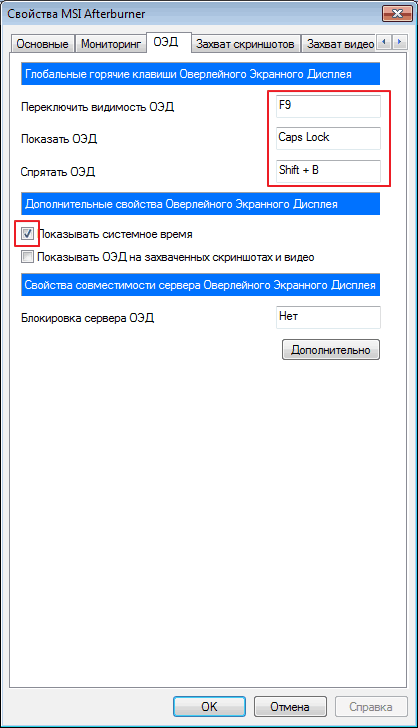
9) We go back to MSI Afterburner, to Settings, and go to the "OED" tab.
Everything in it is in Russian, so there should be no questions, because. all clear.
10) Go to the "capture screenshots" tab. It's pretty simple too. Choose a place on the hard drive where they (screenshots) will be saved and the format of the graphic file.
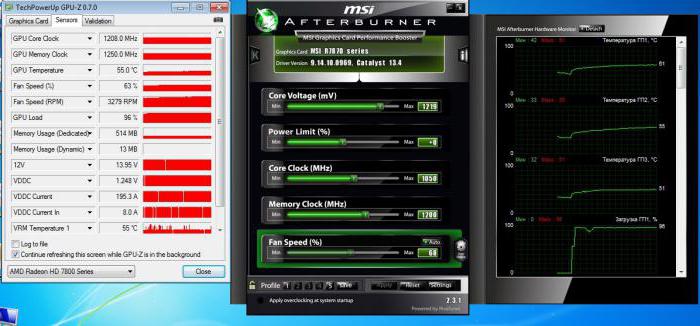
Part Three: Cooler speed, applying overclocking, disabling shader and GPU clock synchronization for GeForce:
1) ON/OFF frequency synchronization.
2) In order for the graph that you have drawn for your cooler to work, you need to click on the "User Define" button in the MSI AB window (number 2 on the screen). And to control the speed of the cooler directly by setting the speed, in the "FAN Speed" window, press the AUTO button, then set the speed in percent on the scale.
3) In order for overclocking to be enabled after reboot, press the button marked in Figure 3.
DO NOT FORGET to click Apply or OK when making changes
Part four: creating and applying overclocking profiles.
1) To create a profile, we need to set the desired frequencies.
2) Unlock saving profiles by pressing button 1.
After pressing, the lock should open, and the "Save" button should light up (marked 2 in the figure).
3) Press the SAVE button and save the profile to one of the five squares that will start flashing.
4) We create as many profiles as you need. And we press the lock - so that no one drags
5) Go to the "Settings" menu and scroll to the "Profiles" tab. In it, we select a profile for 2D and 3D.
We press OK.
DO NOT FORGET to click Apply or OK when making changes.
I immediately apologize for the large screenshots, and I don’t have time to cut the crooked text.
I have described all the features of MSI AB to the best of my ability and time. This manual should help novice overclockers and experienced comrades in using all the functions of this program.
I recommend everyone to display the GPU load in Overlay, because very often people on the forum ask if this or that processor is enough to unlock the potential of a video card.
PS:
1) Questions like: “up to what frequencies to drive the card, and what voltage to set?” ask in special forums IN THE CONFERENCE Overclockers.ru. I will not answer them.
2) I will not give consultations about MSI AB either, because everything is described in the instructions, you just need to read everything to the end.
3) Monitor GPU load in real time - this gives a lot of information about games and what they lack.
4) Good luck to everyone using this simple but very functional utility!
Overclocking a video card using MSI Afterburner requires periodic testing. In order to track its parameters, the program provides a monitoring mode. If something goes wrong, you can always correct the operation of the card to prevent it from breaking. Let's see how to set it up.
Monitoring tab
After starting the program, go to the tab "Settings-Monitoring". In field "Active monitor graphics", we need to decide which parameters will be displayed. Having marked the required chart, move to the bottom of the window and check the box "Show in Overlay Screen Display". If we monitor several parameters, then add the rest one by one.
After the done actions, in the right part of the window with graphs, in the column "Properties", additional inscriptions should appear "in the OED".

EED
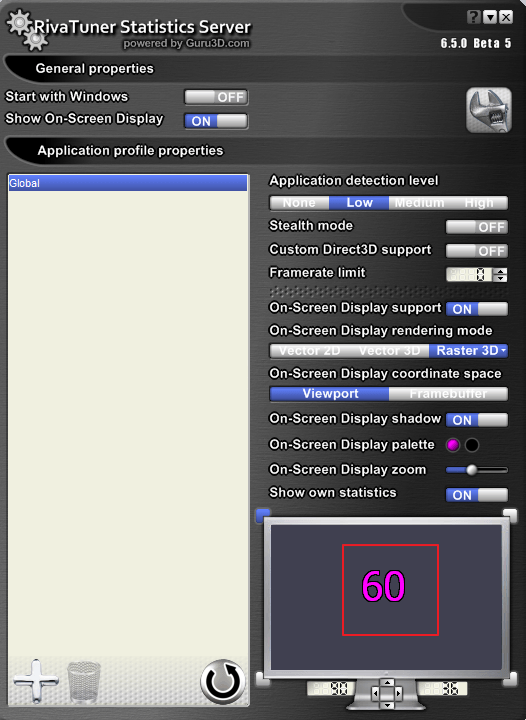
Without leaving the settings, open the tab "OED".
If this tab is not displayed for you, then when MSI installation Afterburner you didn't install additional program RivaTuner. These applications are interconnected, so its installation is required. Reinstall MSI Afterburner without unchecking RivaTuner and the problem will disappear.
Now let's set up hotkeys that will control the monitor window. To add it, put the cursor in the desired field and press the desired key, it will immediately be displayed.
Click "Additionally". Here we just need the installed RivaTuner. We turn on the necessary functions, as in the screenshot.
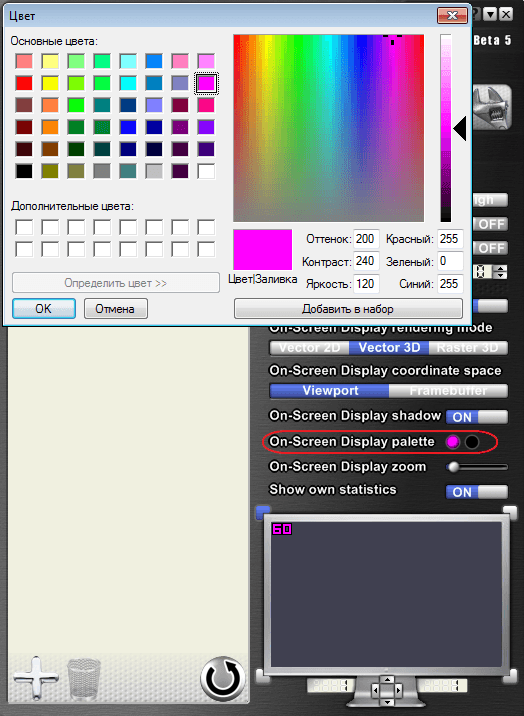
If you want to set a specific font color, then click on the field On-screen display palette.
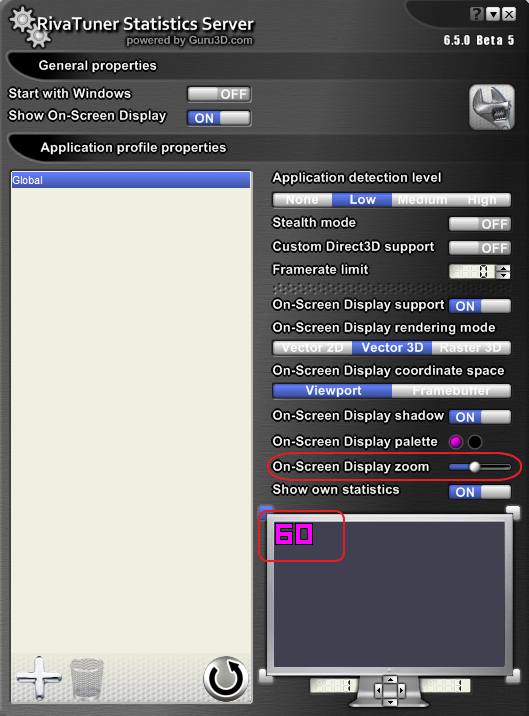
To change the scale, use the option "On-screen Zoom".
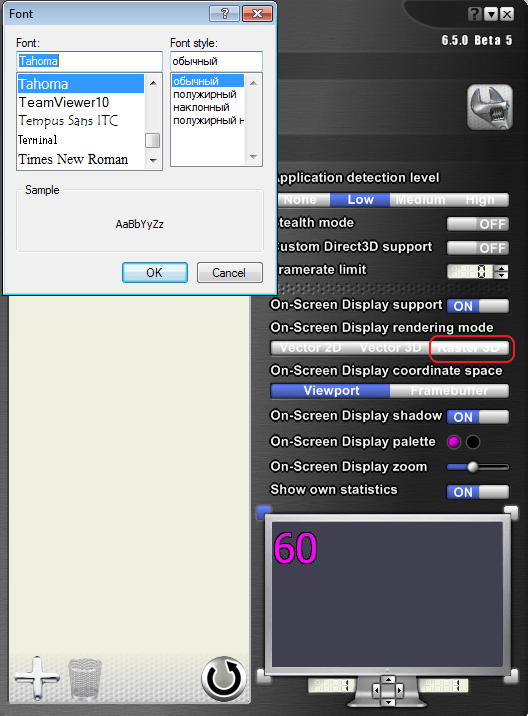
We can also change the font. To do this, go to Raster 3D.
All changes made are displayed in a special window. For our convenience, we can move the text to the center by simply dragging it with the mouse. Similarly, it will be displayed on the screen during monitoring.