The remote control connects to the computer at any free time. USB port and does not require drivers for its operation.
No drivers needed
function wireless mouse
34 buttons + 3 cursor control buttons (mouse replacement)
Now, having turned on music on your PC and doing household chores, there is no need to be distracted in order to switch a track you don’t like, and while watching a movie, sitting in a comfortable chair or lying on an even more comfortable sofa, it’s convenient to pause or turn up the volume at an interesting moment. When it comes to presentation, the benefits of such a wireless device can hardly be overestimated. You can easily give a lecture or show photos or video materials that interest you, synchronously, without being distracted by manual control of the console, switching the material at the interval you need.
-Compact, convenient, very useful thing
-Manage CD, VCD, DVD, MP, Microsoft Media -Player, RealPlayer, WinAmp, WinDVD, PowerDVD, Internet, presentations, etc.
-Works in the infrared range, maximum radius 13 meters!
-Mouse function
-USB plug & play, no drivers required
-Supported OS: Windows98/2000/ME/XP/Vista/Windows 7/Linux/Mac OS
-Power: CR3025 battery
-Dimensions: 12x5x1 cm
How to use the remote control for PC?
1. Connect the USB receiver to the PC.
2. Take it out protective film from the battery compartment.
3. Point the remote control towards the receiver and use the remote control.
The remote control works correctly with the following software:
WMP RealPlayer, KMPlayer, ttplay, WinDVD, PowerDVD.
How to program buttons (A, B, C, D) on the remote control?
For example, we need to program the A button so that when pressed it launches KMPlayer
1. Find the KMPlayer shortcut.
2. Right-click on this shortcut.
3. Select the Properties menu item
4. Place the cursor in the Quick call field and simultaneously press the Ctrl + Alt + B buttons and then apply.
Now pressing the A button will launch KMPlayer
I took it out of the box, plugged it in - no need to configure anything.
No drivers required.
-Very compact size.
-Full functionality of a multimedia keyboard and mouse.
- Rewindable receiver cord.
Operating instructions in English - 1 piece
|
Eternal lighter without gas and flint with a flashlight, etc.. |
2 in 1 Manual charging dynamo + flashlight USB Dynamo Ha.. |
USB Rechargeable batteries AA, charged from port.. |
If there is a COM port (RS-232), then the simplest “five-piece” circuit is perfect for our purpose: controlling a PC from a remote control. The circuit is literally assembled from five parts. No microcontroller or programming needed.
Of course, Bluetooth mice and keyboards are good, but not everyone has them. And everyone certainly has a remote control for a TV or VCR, stereo system, or air conditioner.
The device for receiving infrared signals is assembled from five parts:
- Compensating voltage stabilizer for 5 V, 100 mA: type 78L05 or domestic analogue KREN5.
- Infrared receiver, at a carrier frequency of 38 kHz: TK-19 or its analogues SFH506-38, TSOP1138, TSOP2238, TSOP4838. Check the pinout of the selected IR receiver.
- 150 mA rectifier diode: 1N4148, KD522, KD521 or another small size.
- Resistor 0.125 W, resistance 4.7 kOhm.
- Capacitor with a capacity of 4.7 µF, for voltages of 6, 10, 16, 25, 50 V.
Additionally, you may need to purchase:
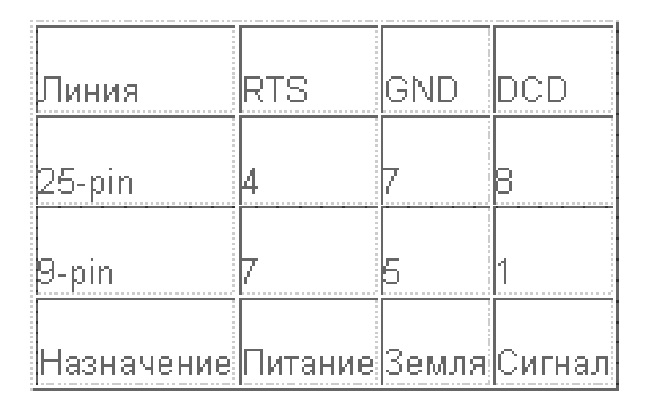
- COM connector plug for 9 or 25 pins.
- Three-core cable.
- Capacitor with a capacity of 100 pF, for voltages of 6, 10, 16, 25 V.
If assembled correctly, the computer IR receiver circuit does not require adjustment.
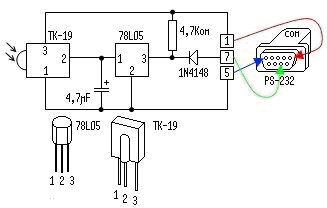
A diode is needed to prevent negative voltage from entering the stabilizer input.

Naturally, it will not be possible to turn the computer on and off using the remote control using this scheme, and we will not install relays in the system unit. And why, if it’s much easier to buy a Bluetooth keyboard or mouse, and use them to operate the computer’s power, when you’re too lazy to get up from the couch.
The pinout of COM ports for 9 and 25 pins for connecting a three-wire cable is in the table.
All parts are soldered onto the contacts of the purchased COM connector for surface mounting. Together they fit perfectly inside the COM plug housing.
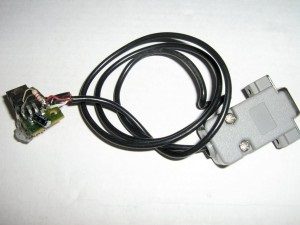
Without use printed circuit board The assembled structure is very neat and compact.

To make everything beautiful and avoid hanging wires outside, the structure assembled on a COM connector can be placed inside system unit. Remove the plastic plug from the unused CD-ROM or Floppy drive bay and drill an 8mm hole in it for the infrared receiver. We attach the IR photo sensor itself to the inside of the plug using hot-melt adhesive.
When the computer is turned off, we plug the plug with the assembled structure into the corresponding COM socket.
Now all that remains is to acquire suitable software for processing signals from the remote control. The most successful software for controlling a computer from a remote control is: the WinLIRC driver, the Girder or IREX client console.
You can also install programs from it:

Complete instructions for setting up Girder and WinLIRC to work with an IR remote control are in the archive and are also available on the developers’ websites. It is worth mentioning that in these programs you can specify almost any action with the computer: keystrokes, mouse movements. But the most popular functions remain: pause, play, stop, rewind, sound control, because they create comfort when watching movies and listening to music.
Choosing the right remote control for your computer
Not every remote control will fit the IR sensor you are using. An IR receiver was selected that operates at the most common frequency for control panels, 38 kHz. But there are remote controls that use frequencies of 36 or 40 kHz.
If circumstances force you to use these rare models of remote controls, then problems with signal transmission may arise. You have to bring the remote control too close to the IR receiver, and batteries have nothing to do with it.
Well, for those who do not have a COM port on their PC, you will have to assemble a more complex device for controlling a computer from a remote control USB . Then you will need a microcontroller and firmware for it.
Looking for a way to control your computer from across the room? Today we will tell you how to turn your iPhone into a remote control remote control.
What we need:
A computer with Windows, Mac or Linux (in our case we will use Windows 7).
HippoVNC Server software installed on your computer.
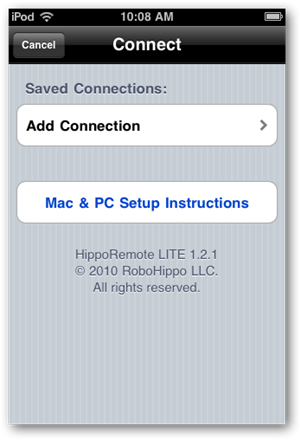
HippoRemote Lite application installed from the App Store.
WiFi router.
Installing HippoVNC Server

Run the file.

Select the folder where you would like to extract the files.

Run the WinVNC.exe file.

If the firewall window pops up, you need to allow access for HippoVNC.

In the settings window, enter the password for authentication and click “OK”.

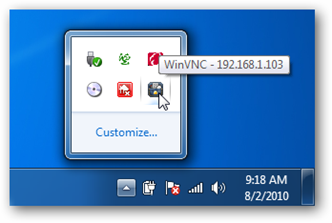
If iTunes is not installed on your computer, you need to find out the IP address of your machine. There is a lot for this in various ways, but the simplest is to hover your mouse over the HippoRemote Lite icon in the system tray.
Note: If your computer hasiTunes, HippoRemote will automatically detect your computer, so enterYou don't need an IP address.
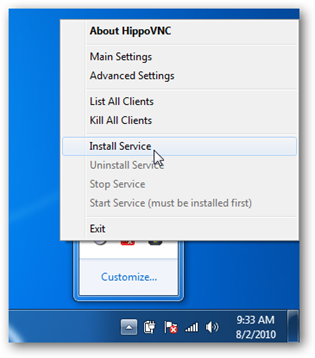
Run HippoVNC as a service
Next you need to start HippoVNC as a service. Otherwise, you will have to launch it manually every time you want to use it. To start HippoVNC as a service, click right click mouse on the icon on the taskbar and select “Install Service”.
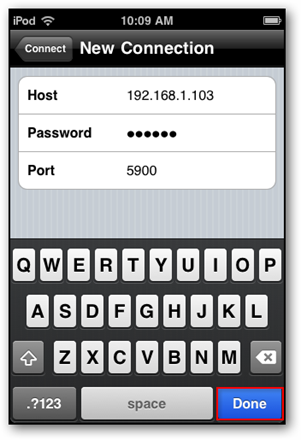
Enter the host IP address and password that you previously entered in the HippoVNC settings window. When finished, click “Done”.
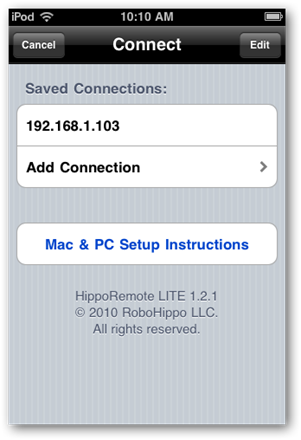
You will now see your computer's IP address under “Saved Connections”. Select it to connect to your computer.
After completing the above steps, you will be in the HippoRemote settings menu where you can make certain changes such as maximum speed mouse movements (Tracking Speed) and scrolling speed (Scrolling Speed). Some options are only available in the full (paid) version of HippoRemote. Click on the “Trackpad” button on the left top corner to go to the trackpad.
![]()
Now everything is ready to use the computer. To control the cursor on the computer screen, move your finger across the touchpad.

The keys on top act as the right and left mouse buttons.
Hi-Fi feeling
Every DVD player or TV comes with a remote control. Even car radios come with remote controls! Remote controls come in both infrared and radio, but they perform the same task: they allow you to control your equipment without leaving the couch. It is hardly possible to imagine a modern apartment without these small devices. Tell me, are you ready for the fact that you have to get up from the couch and change the channel on the TV manually? It’s unlikely, unless, of course, the remote control was chewed off by a dog.
Today, a remote control can also be useful for a computer. And there are quite a lot of ways to use it. Usually on computer consoles there are special function keys, making it easier to work with the PC user interface. In some applications, the remote can replace the mouse and keyboard.
Under Windows XP Media Center Edition (MCE) 2005, which has a special multimedia interface, the remote controls show themselves in all their glory. But the remote control can also be used in old Windows versions, or in multimedia shells, for example, in PowerCinema from Cyberlink.
Soundgraph: Infrared Remote Controls
Soundgraph Remote Controls: They hit the market in a big way last year.
The Korean company Soundgraph was one of the first to enter the new growing market. She suggested two interesting products. iMON Knob- external USB solution consisting of a receiver module and a large remote control. And set iMON VFD, which contains a front display for the 5.25" bay and the same remote control. The infrared receiver is located next to the two-line vacuum fluorescent display (VFD) on the front panel. Connecting the module to a PC is possible either through an external USB interface or through the USB pins on motherboard. Both products feature the same user interface, which has extended to numerous OEM offerings, including home theater enclosures (HTPC) from Silverstone and 3R Systems.
Soundgraph iMon Knob: External USB Receiver
The iMON Knob external module is a small plastic box with an IR receiver that can be connected to a desktop PC or laptop via USB. When you do this, the blue LED on the module will light up. By the way, the receiver module also allows you to adjust the volume.
The large remote control provides convenient and easy control of multimedia applications on your PC. By the way, software included in the package and, to a certain extent, is capable of performing the same functions as Microsoft MCE.
The receiver module is plugged into any free USB port.
The Knob module glows in the dark.
Soundgraph iMON Knob included.
Advantages and disadvantages
Advantages:
- easy installation;
- connects to any PC and even laptop;
- good full remote control;
- functional user interface.
Flaws:
- no front display.
Technical information
| Manufacturer/Model | Soundgraph iMON KNOB |
| Website | www.soundgraph.com/index_e.asp |
| Price (check price.ru) | $50-60 |
| Communication type | IR |
| Front display | No |
| PC connection | USB 1.1 |
| Supported OS | Windows 98 - XP, Windows MCE2005 |
| Special Features | External IR receiver |
| Contents of the delivery set | IR receiver, remote control, instructions, CD-ROM |
Rating
| Soundgraph iMON KNOB | ||
| Weight | Category | Result |
| 40% | Settings | 85% |
| 35% | Ergonomics | 75% |
| 10% | Price-quality ratio | 75% |
| 5% | Design | 75% |
| 10% | Service | 75% |
| Overall rating | 79% | |
|
|||
|
| |||
There are a lot of solutions for controlling a computer from a remote control, for example, IR receivers from Microsoft, GotView, etc. Existing auxiliary software allows flexible control settings application programs remote control, such as video or audio players, almost turning your computer into a multimedia center. Unfortunately, only “almost”. For the most part, IR receivers are deprived of one very important function - they do not allow you to turn on the computer remotely - from the remote control.
This means that someone will have to get up from their “favorite” sofa to turn on the computer that acts as a video player in the living room. As a rule, this “someone” was myself, which began to little by little irritate me. As you know, laziness is the engine of progress, so I started looking for options to solve the issue of turning on the computer remotely from the remote control.
Analysis of existing solutions
First, let's analyze technical solutions that allow you to turn on your computer without using the Power button.
Turn on the PC using the keyboard or mouse. Motherboards equipped with a PS/2 connector allow you to set an option in the BIOS that allows the computer to turn on when you press a key on the keyboard or mouse. This type The interface is on its last days, and, unfortunately, is no longer available on my motherboard.
The computer can be turned on via the COM port by applying the Ring Indicator signal to the RI input. This is exactly how the computer was turned on from an external modem after receiving a call signal. The modem was powered from external source nutrition. This inclusion option also disappears, since COM ports have long disappeared from motherboards, and the use of an additional power source is not justified.
The computer can be turned on by sending a special packet to the network card - “magic packet” - with the specified MAC address of the network card. IN modern models On motherboards (MP), this function is activated through the BIOS and the properties of the network card. On older MP models there was a special WOL (Wake-On-Lan) connector, which connected the network card to the MP via a 3-core cable. Considering the fact that almost all MPs come with integrated network card, it is unlikely that you will be able to find this connector now.
However, the presence of this connector allows you to implement the simplest scheme to turn on the PC from the remote control - Fig. 1.

Fig. 1 – Connection diagram for a computer with a remote control
The disadvantages of this scheme include the involuntary turning on of the computer if another device is controlled nearby, with a long press of a key on the remote control, for example, when changing the volume.
But the main disadvantage of this scheme is the inability to control applications, since an additional interface is required to transmit signals from the IR receiver to the computer, and most importantly, the disappearance of this connector from modern MPs.
Thus, modern desktop computers, at first glance, are deprived of the possibility of including them through standard interfaces input/output. But still…
Universal solution
What if you try to solve the problem of turning on a PC head-on.
Let a certain device close the contacts of the POWER button when a signal is sent from the remote control to turn on the computer.
In order to implement this very “simple” idea, it is necessary to solve several technically complex issues:
1. where to get the voltage to power the device when the computer is turned off;
2. how to close the contacts of the POWER button without interfering with the functionality of the PC;
3. that will receive and process the signal from the remote control when the computer is turned off and the processing and recognition programs are not running;
4. how to link all this together.
Let us consider in order all the stages of designing such a device.
Device power
The idea of using an additional source of external voltage immediately seemed irrational to me. Firstly, additional wires will only get in the way; secondly, the computer power supply has the required 5V voltage - you just need to find a way to “remove” it. Difficulties are caused by the lack of standby power, which was previously on the WOL connector. To be fair, it must be said that there is standby voltage on the PCI bus when the computer is turned off. However, making a device for removing standby voltage from the bus at home is quite difficult and I did not consider this method.
Fortunately, on the connectors usb interface When the computer is turned off, standby voltage is present to power devices that support waking up the computer in S3 mode. Presence of standby voltage on usb connectors after turning off the computer, you can determine it by the LED of the optical mice, which continues to glow.
To do this, through the BIOS you need to activate the Advanced Configuration and Power Interface (ACPI) and specify which mode will be used when entering the power saving state: S1(POS) (in some BIOS versions the value looks like S1( PowerOn-Suspend)) or S3(STR) (in some BIOS versions - S3(Suspend-To-RAM)). If your motherboard and power supply are compatible with the second mode, choose it as it is more economical.
Contact closure
The diagram of the device for closing the Power contacts responsible for turning on the computer from the remote control is shown in Fig. 2.

Fig. 2 – diagram of the Power contact closure on the motherboard
When a signal arrives at input X2.2, transistor switch VT1 opens and relay K1 closes contacts PWR-1.1, PWR-1.2 of the Power connector on the motherboard, turning on the computer. The connector of the Power button located on the system unit case is connected to contacts Pw-1.1, Pw-1.2, thereby turning on the computer in normal mode. The circuit is powered by 5V voltage, which is removed from the USB connector.
Signal receiver
It is planned to turn on the computer and control it from a regular infrared (IR) remote control (RC). Choosing an IR receiver turned out to be a non-trivial task, despite all their diversity. The first and main requirement is the complete autonomy of the IR receiver, that is, the ability to receive, process and recognize signals when the computer is turned off. The second selection condition is the ability to generate a signal to close the Power contacts when a command is received from the remote control to turn on the computer.
At the stage of choosing a model, I had to abandon the Microsoft IR receiver and remote control and IrLink Dec that I had, since they do not work when the computer is turned off. Among the remote computer control systems known to me, only Redray Grani J series IR receivers have their own hardware decoding. J-Series receivers use a special decoding algorithm, calculating a unique HASH code for each key pressed on the remote control. This ability makes the J Series receivers universal, allowing them to “understand” remote controls different manufacturers, in contrast to devices whose decoding algorithm is designed to work with one remote control (protocol).
When the computer is turned on and a signal from the remote control is received, the Redray J series IR receiver calculates the HASH code of the key and sends it to the computer on which special program performs an action pre-assigned to this code, such as changing the volume, launching a program, or fast forwarding while playing media content.
The second feature of the receivers in this series is the ability to save the HASH code of any key into non-volatile memory. If a key is pressed on the remote control, the HASH code of which matches the code stored in the receiver’s memory, a pulse will be generated at a special pin. Since the signal processing is handled by the receiver's microcontroller, there is no need for a computer, and it can be turned off. The main thing is that usb connector interface there was a standby voltage to power the receiver. Thus, the device that will send a signal to turn on the computer from the remote control has been found - this is the Redray Grani J series.
How does it all work
All the links in the chain for turning on the computer from the remote control have been identified, all that remains is to connect them together. The final diagram of the device for turning on the computer from the remote control is shown in Fig. 3

Fig. 3 – diagram of connecting a computer with a remote control
The location of the contacts for the elements of the circuit for turning on the computer from the remote control is shown in Fig. 4.

The diagram for turning on a computer using the remote control shows the elements responsible for closing the Power contacts on the motherboard. An impulse from the IR Redray Grani J series opens the key on the VT1 transistor and the K1 contacts close for a short time, simulating pressing the Power button on the computer case. The time during which relay K1 will be in the closed state depends on the value of capacitor C3 - the more, the longer. The selected values of C3 and R1 provide a relay response time of approximately 0.3 seconds. IR Redray Grani J generates a pulse when the HASK code of the pressed key matches the HASH code stored in non-volatile memory.
Naturally, before this, the HASH code of the key responsible for turning on the computer from the remote control must be entered into the non-volatile memory of the IR receiver. This is done using the “IR Server” program, which is on the disk included with the Redray Grani J IR receiver.
The signal to turn on the computer from the remote control, the Redray Grani J series IR receiver generates at pin 9 (PD5) and is fed to the input of the contactor X2.2 Fig. 3. For this purpose, there is a special contact pad on the device board (Fig. 5).

Fig.5 - contact pad
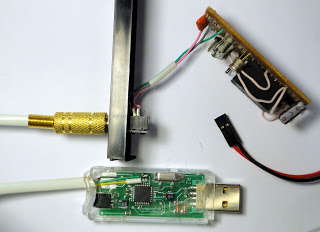
The circuit is powered from the standby voltage, which is present on the USB connector. If the computer does not supply standby voltage to the pins of the USB connector when it is turned off, then you can power the contactor circuit and the IR receiver from the WOL – W1 connector. I implemented an option where the IR receiver is powered from the standby voltage on the USB connector, and the contactor is powered from the technological contact pads - Fig. 6
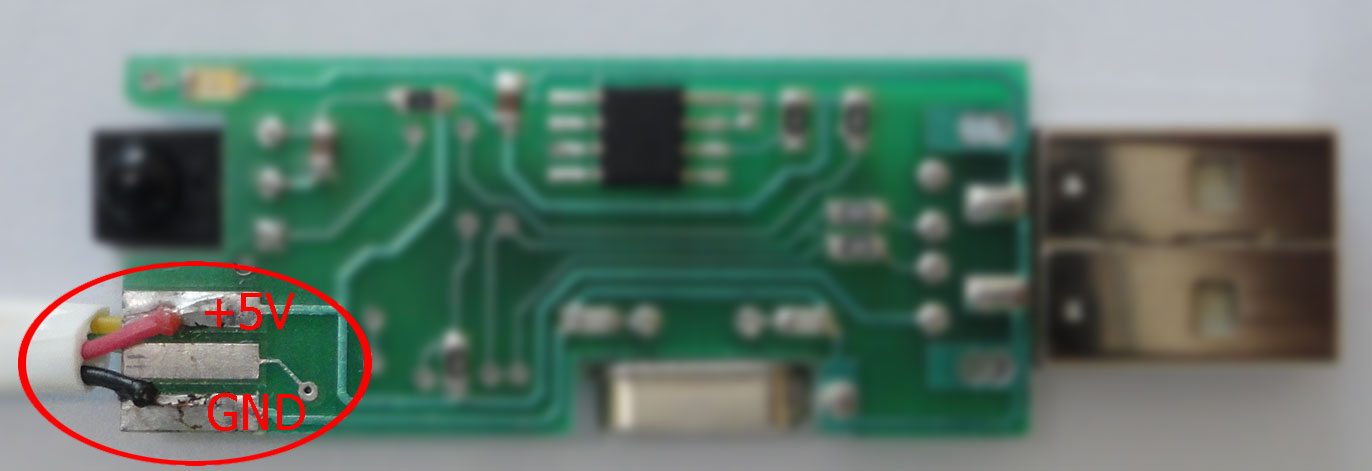
Fig. 6 – removing the supply voltage for the contactor
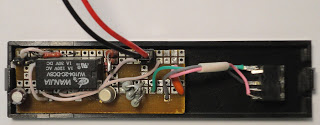
I assembled the contactor circuit on a circuit board. The contactor board is placed on a 3.5” false panel inside the case. Connects to the IR receiver via a 3.5mm jack.
Assembly of the entire structure

At the beginning of the packet there is a so-called “synchronization chain”: 6 bytes equal to 0xFF. Then - MAC address network card, repeated 16 times.
S3 (Suspend to RAM or STR or Suspend) – power saving mode in which power is supplied only to RAM. All other PC components are disabled;
Each manufacturer uses a proprietary IR signal encoding protocol in its remote control. So Philips uses the RC-5, RC-6 protocol based on biphase coding, where each bit is transmitted during a fixed time interval, the value of the bit is determined by the direction of the transition in the middle of this time; SONY, Panasonic, and Samsung companies use time interval coding in their remote control systems, where the value of the transmitted bit is determined by the ratio of the pulse duration and the pause between pulses.
— latest version“IR Server” programs can be downloaded from the developer’s website - http://www.ir-max.ru/