phpMyAdmin contains a tool called Designer. This tool allows you to simplify the work of creating tables in the database and relationships between tables.
First, create a database and log in with the received user data phpMyAdmin.
Stage I: Creating a configuration repository
Stage II. Working with the Designer
- In the left field with the list of databases, select the newly created one
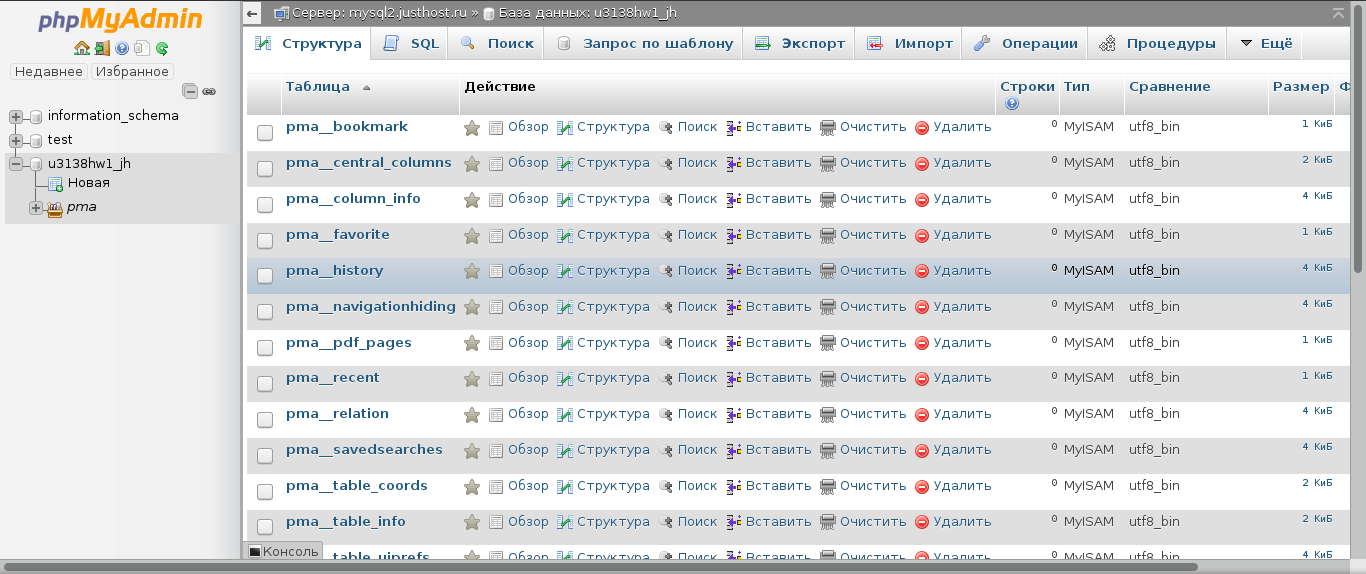
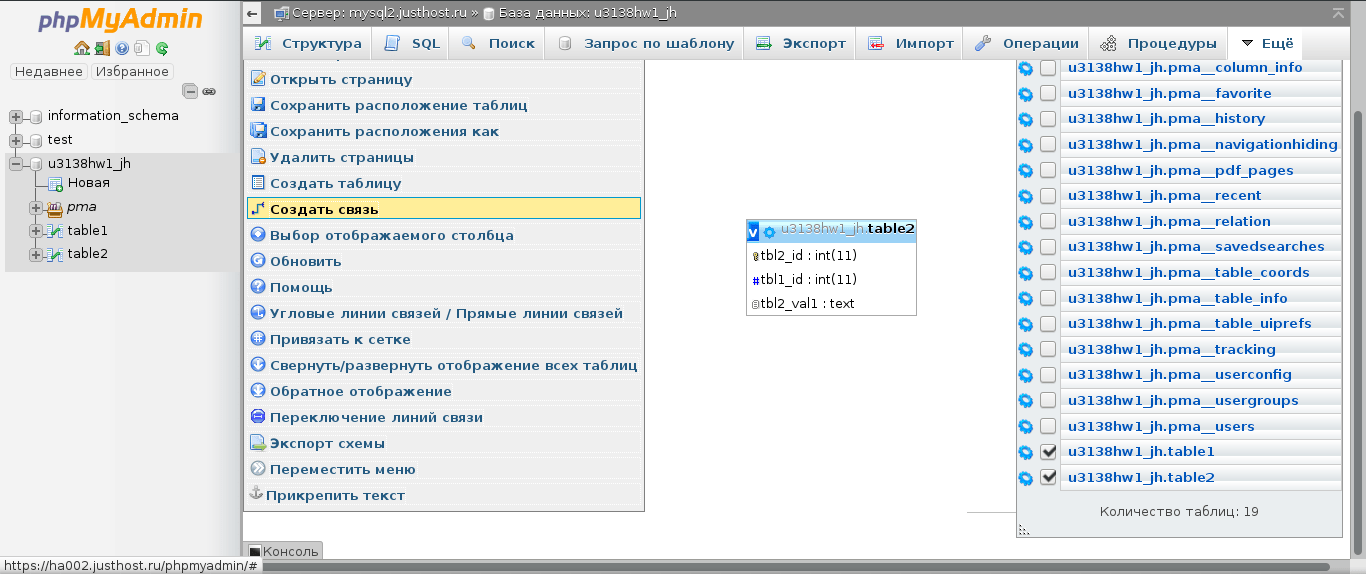
- Go to the menu More and submenu Designer

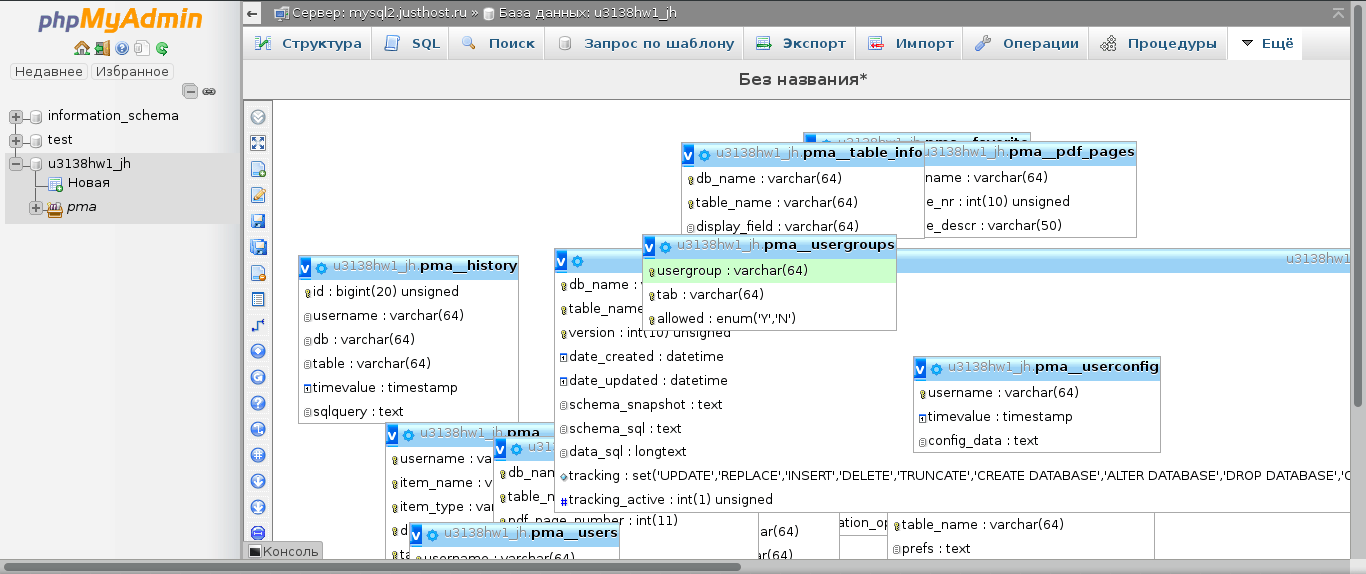
- In the toolbar on the right, select Show/Hide list of tables
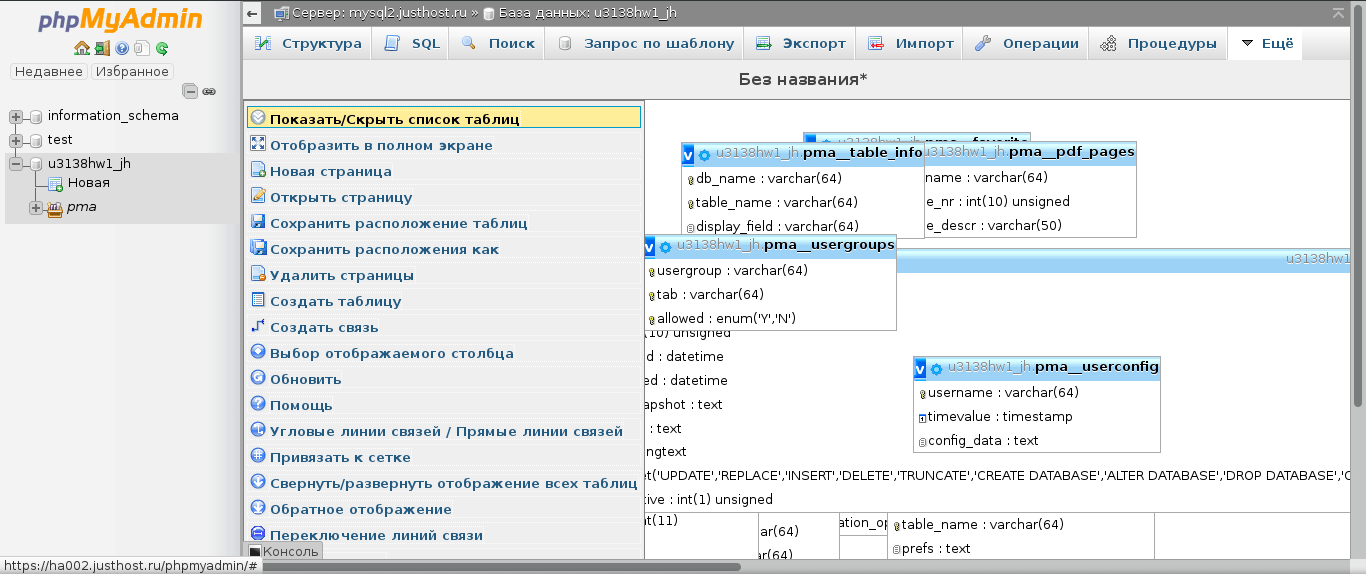
- A panel with a list of tables will open on the left. Hide/show unnecessary tables related to Settings store (pma), you can remove/install the corresponding checkbox

Creating a connection
- Selecting the tables between which you need to configure relationships
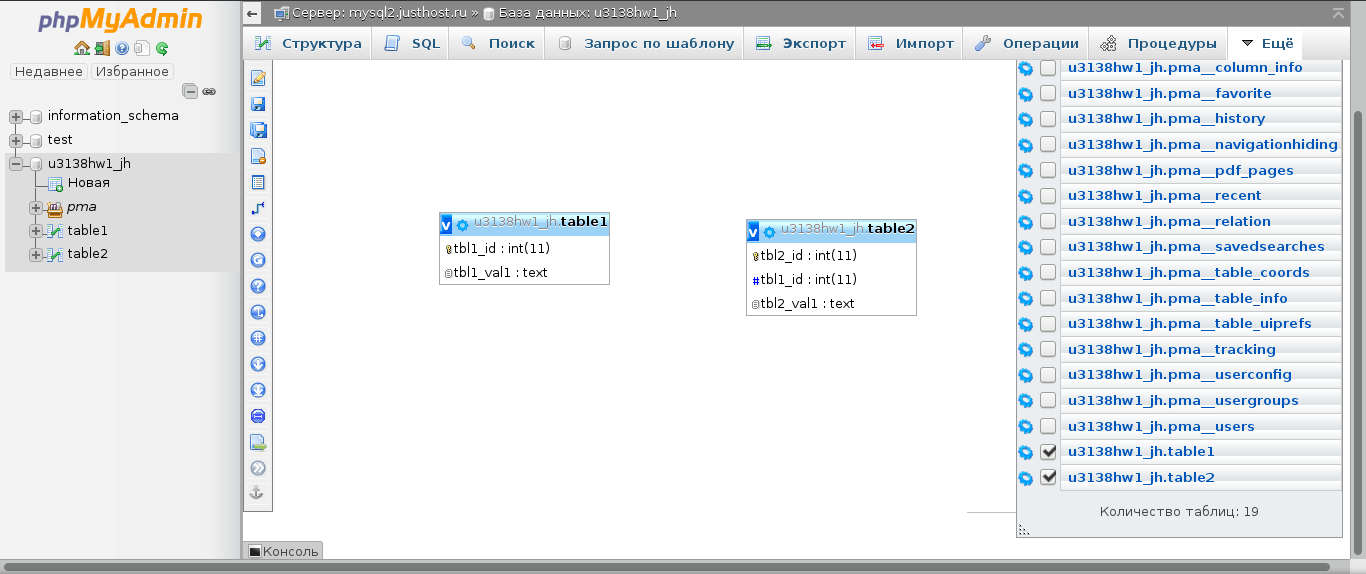
- Click Create a connection in the toolbar
- Next, the arrow will have the inscription Select reference key. You need to click on the primary key of the table. In our case, this is the key tbl1_id in table table1
- The arrow will change to Select foreign key. You must click on the corresponding field of the linked table. In our case, this is the tbl1_id field in the table table2
- In the dialog box select OK


Laboratory report No. 11
Discipline:"Web programming"
Topic: “MySQL DBMS. Working with the phpMyAdmin utility »
Option No. 14
Theoretical part
The phpMyAdmin utility is implemented in PHP language and is available for free download from the website www.phpmyadmin.net. This tool has a user-friendly interface and allows you to rip out the language of communication.
Creating tables using phpMyAdmin. The phpMyAdmin page has a special field for creating a new table in this database.
Enter the name of the new table (for example, book_new) and indicate in the adjacent field what should be in this table, for example, four columns – 4 (id - number, title - title of the book, author - author, price - price).
Click the button OK This will create a four-column table book_new in database db_1408057. A window will appear on the screen with fields for setting the properties of the new table (each line contains attribute fields of one column of the new table). Add the necessary attributes to it.
To make changes to the column parameters, you must click on the “pencil” icon in the corresponding line on this page.
To view the general structure of the database, click on the name of the selected database in the left field.
To enter data into a new table, you need to click on the button in the row of this table in the general list Insert.
After filling out these fields, click the button OK.
Having completed filling out the table, return to the previous page with summary data for all tables in the database - and in the book_new table row, click on the button Review. As a result, the contents of the table will be displayed, that is, the data just entered into it (see the table below).
If there are many rows in the table and all of them are not immediately visible, then the button Show allow you to specify starting from which line and how many lines should be displayed in the window.
To make changes to an individual entry, click on the “pencil” icon in the line displaying the contents of this entry.
This way you can fill in all the necessary tables.
Executing queries against database tables. To execute an SQL query, click on the button SQL. A window will open in which you can type an SQL query.
The structure of the database in graphical form (according to the topic of the course work “Kindergarten”).
Figure 1. Database logical model

Figure 2. Physical model of the database
The procedure for working with the phpMyAdmin utility to create tables, enter, select, change and delete data.

Figure 3. Creating a database named “g141003_nalivko”

Figure 4. Creating a Deti database table, where the number of fields is 5

Figure 5. Displaying a window with fields for setting properties of the new Deti table

Figure 6. Displaying the structure of the Deti table.

Figure 7. Making changes to the parameters of the Deti table column by clicking on the “pencil” icon in the corresponding row on this page.

Figure 8. Entering data into the Deti table by clicking on the Insert button in a row of this table in the general list

Figure 9. Filling in the fields in the Deti table

Figure 10. Adding one row to the Deti table

Figure 11. Displaying the contents of the table Deti, that is, the data just entered into it when you click on the Review button.

Figure 12. Displaying the contents of the Deti table.

Figure 13. Deleting a record from the Deti table.

Figure 14. Display of the Groupy table structure.

Figure 15. Displaying the contents of the Groupy table.

Figure 16. Display of the structure of the Vospitateli table.

Figure 17. Displaying the contents of the Vospitateli table.

Figure 18. Display of the g141003_nalivko database structure.


Figure 20. Result of a select query on the Deti table


Figure 22. Result of a query to select data from the Deti table, the group number of which is 13


Figure 24. Result of a query to select data from the fields id_g, id_v, id_k of the Gruppy table


Figure 26. Result of a query to select data from the fields id_v, fio_v, telefon of the Vospitateli table

Figure 27. Sorting alphabetically by fio_v field in the Vospitateli table

Figure 28. Result of sorting in alphabetical order by the fio_v field in the Vospitateli table

Figure 29. Sorting alphabetically by the id_k field in the Gruppy table

Figure 30. Result of sorting in alphabetical order by the id_k field in the Groupy table

Figure 31. Sort alphabetically by fio_d field in the Deti table

Figure 32. Result of sorting in alphabetical order by the fio_d field in the Deti table

Figure 33. Grouping data in the Deti table by the id_g field

Figure 34. The result of grouping data in the Deti table by the id_g field

Figure 35. Grouping data in the Groupy table by the id_k field

Figure 36. Result of grouping data in the Groupy table by field id_k

Figure 37. Grouping data in the Vospitateli table by the id_g field

Figure 38. Result of grouping data in the Vospitateli table by the id_g field

Figure 39. Using the aggregate function COUNT() – counting the number of records in the Vospitateli table by the fio_v field

Figure 40. The result of using the aggregate function COUNT() - counting the number of records in the Vospitateli table by the fio_v field

Figure 41. Using the aggregate function MAX() – maximum value in the Groupy table by field id_k

Figure 42. The result of using the aggregate function MAX() - the maximum value in the Groupy table by field id_k

Figure 43. Using the aggregate function SUM() - calculates the sum in the Deti table by the id_g field

Figure 44. Result of using the aggregate function SUM() - calculates the sum in the Deti table by the id_g field
In the previous lesson, we learned how to create a connection to a database server. The next step is to create the database and tables.
Let's look at two ways to create a database and tables. The first is how it is done in PHP, the second is using the more friendly PhpMyAdmin utility, which is standard on most web hosts and in XAMPP.
If you host a site with PHP and MySQL support, the database may have already been created for you, and you can skip this section of the tutorial and start creating tables. Don't forget to consult the host's help pages.
Creating databases and tables using PHP
The mysql_query function is used to query the MySQL database. Requests are written in language S structured Q uery L language (SQL). SQL is the most widely used database query language - not just for MySQL databases - it is very logical and easy to learn. In this and the next lessons you will learn everything important about SQL queries.
When creating a database, the SQL query CREATE DATABASE is used with the following syntax:
CREATE DATABASE db name
Easy and simple, isn't it!? Let's try to insert this into a PHP script:
Mysql_connect("mysql.myhost.com", "user", "sesame") or die(mysql_error());
mysql_query("CREATE DATABASE mydatabase") or die(mysql_error());
mysql_close();
First we connect to the MySQL server. Then we create the database "mydatabase". And finally, close the connection to the MySQL server. So far so good... but things get a little more complicated when we want to create tables in PHP. When creating tables, we use the CREATE TABLE SQL query with the following syntax: (CREATE TABLE table name column_name1 DATA_TYPE, ...)
column_name2 DATA_TYPE, column_name3 DATA_TYPE, table_name And column_name these are, of course, appropriate names.
DATA_TYPE
used to specify the type of data inserted into a column. Here are the most common types:
Integers Decimal numbers Short text up to 255 characters long Regular text up to 65,535 characters Long text up to 4,294,967,295 characters Dates in the format YYYY-MM-DD Time in the format HH:MM:SS Time and date in the format YYYY-MM-DD HH:MM :SS
In general, it is logical and relatively simple. Let's try to insert this into our example:
Mysql_connect("mysql.myhost.com", "user", "sesame") or die(mysql_error());
mysql_select_db("people") or die(mysql_error());
mysql_query("CREATE TABLE MyTable (id INT AUTO_INCREMENT, FirstName CHAR, LastName CHAR, Phone INT, BirthDate DATE PRIMARY KEY(id)")) Or die(mysql_error());
It can be useful to be able to create databases and tables directly in PHP. But it is often easier to use phpMyAdmin (or any other MySQL administration utility), which is standard on most web hosts and XAMPP. The screenshot below shows how to create a database and tables using phpMyAdmin.
Good day to all! Today I will tell you about how to create a database inphpmyadmin. And so, first of all, we start the server and go to phpMyAdmin. If you the server is installed on the local computer, That in Danwer phpMyAdmin is located at http://localhost/tools/phpmyadmin/, and in WAMP and on other servers, phpMyAdmin is available at http://localhost/phpmyadmin/
On real hosting, phpMyadmin is available at a different address. Which one you need to find out from your hosting provider.
In version 5.5 it looks like this:

Next, in the new database name field, enter the name of our database, for example test. In the comparison field, select the database encoding, utf8_general_ci. If we do not specify the encoding, that is, we leave the “comparison” as is, then this encoding is selected by default. After filling out these fields, click on the button create.

A message will appear in the middle of the screen that the test database has been created. It will appear in the list with the created databases. We find it in this list, click on its name and find ourselves inside the created database. Initially it is empty, so let's create a table.
There are two ways to create tables:
First way: In the left column click on create table

And the following window will appear:

Set a name for the table and a title for each field. For example, we want to create a table with website categories. Therefore, we set the table name categories. For this table we only need 2 fields, these are id and category names ( name) According to the rules in any table, the first field always has the name id, that is, an identifier. For this field, be sure to select the INT type and set the length of the value in numbers, for example 2. We select the index PRIMARY, so we give it a primary key and insert a checkbox for A_I (Auto Increment) so that its value is automatically increased by one.
For the category name field, select the VARCHAR type and set the maximum length to 255 characters.
If you want to add one more or more fields, then in the field add, enter the number that corresponds to the number of fields you want to add and click ok.
We don’t need four fields, but only two, so we filled in only two fields and left the rest empty. Only filled fields will be added to the table. After you have filled out all the required fields, move down the page a little lower and click on

Save. categories That's it, a table with a name

created. It will appear in the list of tables on the left side of the screen.
Second way: Immediately after entering the database we see such a block Create table . This block has 2 fields where we can enter the name of the table and the number of columns in the table. Let's create, for example, a table with registered users, let's call this table users . This table will have the following fields: id, login, password, e-mail, f_name, s_name

, In the number of columns field, enter 6 and click OK.

The same window will appear as in the first method. After filling out all the fields, go down a little lower and click on the button
save. . This block has 2 fields where we can enter the name of the table and the number of columns in the table. Let's create, for example, a table with registered users, let's call this table All table
created. It was also added to the left list with the created databases. That's all for today. Now you know, how to create MySQL database and tables in phpmyadmin
without difficulties and puzzles. I wish everyone good luck!
Did you like the article? Hello, today we will figure out how work with tables in PHPMyAdmin
, and we will learn how to create, edit, add tables, and also consider their structure. In order to add a table, first of all you need to create a database, and the next step is to create the table.

First, you need to go to the database you created, after which the following will appear in front of you:

Where you should enter the name of the table and the number of columns you will need. Next, the following field should appear in front of you, where you will have to enter the data:
First of all, you specify the name of the field that will be created, for example the id of the inserted record.
Next, specify the data type of your field. We will talk specifically about all types separately.
Next step, you can specify the length of the value in characters. You can also specify a default value.
In comparison, you must select the encoding, but you need to remember that it should be specified for strings, i.e., if in our example we store the record identifier, then the encoding does not need to be specified. I recommend that you use the value in the attributes unsigned
, and use it exclusively for numbers. If you set the checkbox Null
, then the value can accept it, i.e., it may not contain anything. In the next field you can specify the index you need:, is the primary key and must be unique for the entire table being created. Just for our ID field, it will do. UNIQUE, if you set this value, the field should remain unique, for example, user login. Meaning INDEX, specifies the index for the specified field. And the meaning FullText specifies the full-text index for the field.
, and use it exclusively for numbers. A_I, then each time a new record is added to the table, the value of this field will increase by one automatically.
In the future, you can specify your comment for the field. The remaining parameters are not very important, so we will not analyze them, I will just note one more thing. In the table type you can specify InnoDB or MyISAM, and also do not forget to set the encoding for the table. At this point we can complete creating the table and click ok. The entire table has been created and appears on your left side.

When you click on it, you should see a menu like this: Now you can edit your fields by selecting the ones you need and click the edit button. You can also delete a field in a similar way, click the delete button and confirm the deletion. If you remember that you are missing one more field, you can add it, indicating the number of fields, after which field to insert them and click OK. So I have listed the main manipulations performed with tables. You can look a little more at all the possible settings and options. This concludes our study working with PHPMyAdmin tables