Update! Since the home group was removed in Windows 10 starting with version 1803, this article is no longer relevant. I prepared new instructions on setting up a local network and managing shared folders and files in Windows 10: .
In a previous article I wrote about setting up a local network on Windows 7. But, since the number Windows users 10 is growing every day, I decided to prepare instructions for setting up a local network in Windows 10. Using these instructions, you can connect to your home local network all the computers that you have are connected to one Wi-Fi router. I will show the example of setting up a network between a computer on Windows 10 and Windows 7. But, computers on Windows 8, or several computers on Windows 10 can also participate in this network. The instructions are universal, and if you have several ordinary desktop computers and laptops are connected to the same router, you can easily combine them into a local network. And at the same time, it doesn’t matter at all on what Windows versions they work (except Windows XP).
After creating a local network, you will be able to:
- Share files between computers in home network.
- Use general access to the printer. For example: you connected a printer to one computer on the local network, and you can print documents from other computers.
- Play games over a local network.
And all this can be done by air. If your computers and laptops are connected to the router via Wi-Fi networks. This is how it works for you. You can connect some computers via cable, and laptops, for example, via Wi-Fi. Everything will work.
I have set up a local network between two computers (desktop PC and laptop). One works on Windows 10, and the second on Windows 7. I set it up through a home group. I think this is the most correct and safe way. You can also configure it by disabling password-protected sharing, as I did in the instructions for.
How does the local network work through setup using a home group? Very important point, since the settings there are a little confusing, the main thing is to understand how everything works, and it will be easier to configure. This means we create a home group on one of the computers and receive a password (I created on Windows 7, it doesn't matter). And all other computers that we want to connect to the network, we simply join the home group using the received password. That's all. It is precisely this scheme that we will now consider in more detail.
I made a small diagram for clarity (you may have more or fewer computers, and a printer does not need to be connected):
Before proceeding with the setup, you must check time and date. Check that the time and date on all computers that will participate in the network are the same.
Creating a homegroup in Windows 7
If, for example, all your computers are on Windows 10, then we create a home group on one of the computers with “ten”, everything is exactly the same there. Or in Windows 8, for example.
Click on the Internet connection icon in the notification panel. Then, select .

There will be our connection to the router (via cable or Wi-Fi). It is important that it has the Home Network status. If you have a Public Network like me in the screenshot, then click on this link and select home network.

Close the window for selecting network location. Now, our connection has the status "Home Network". Go to section Home group.

Click on the button Create a home group.
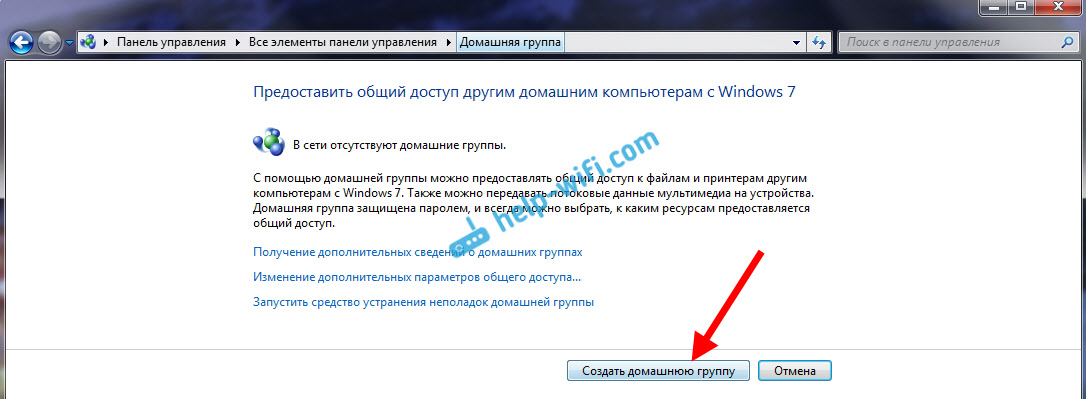
Select the checkboxes for the required items that will be shared (shared folders) and click Further.

Write down or take a photo of the password you receive. Using this password, we will connect other computers to our network.

At this point, the creation of a home group is completed. If you go back to Network and Sharing Center - Home group, then you can remember your password, change it, leave the group, change sharing settings, etc.

That's it, the group has been created. We have the password. Now we connect the necessary computers on our network to the homegroup.
Setting up a local network in Windows 10: connecting to a homegroup
Let's move on to another computer. Now I will show, using the example of a computer with Windows 10, how to connect to a home group to create a home local network. Using this scheme, you can connect not only computers with installed Windows 10, but also with Windows 7 and Windows 8.
Already according to the standard scheme we press right click mouse over the internet icon and select Network and Sharing Center. Let's go to Home group.

If you have a message "HomeGroup is not available because you are not connected to your home network.", then click on , and click on the button Yes.

We wait a little and see a message that we can join the home group. Click on the button Will join.

You will be prompted for a password. We indicate the password that we received when creating a homegroup on another computer. Click Ok.

A message appears that you have joined the homegroup. Click Ready.

If you open the Network and Sharing Center - Home Group, you can set up sharing, leave the group, view the password, etc.

That's it, the local network between computers is already working. Open Explorer (This Computer), go to the network tab on the left, and see the computers on the local network. We can open them and view the folders that are shared. A computer with Windows 10 can easily see a computer with Windows 7 installed on the network.

In the same way, a computer running Windows 7 sees and logs into a computer running Windows 10. In this way, you can connect other computers. One condition is that they are connected to your router.
What to do next? How to use the local network?
It all depends on the purpose for which you connected computers into one network.
- If you want to play online, then everything should already work. Sometimes antivirus programs block such connections. Therefore, if problems arise when the computers do not see each other, then just try it for a while disable antivirus.
- To share files, you can use shared folders. Just copy the files, for example, to the "My Images" folder (assuming we shared this folder during setup), and they will be accessible from all computers on the network. If you want to share your folder on local disk, then follow . See after the heading "Setting up sharing of files and folders."
- I will prepare a separate article on setting up shared access to the printer.
These are the tips. I hope you found the article useful.
Hi all! This article is a logical continuation of the story about creating a home network. Anyone who has not yet read the previous material is strongly recommended to do so.
There we climbed on dusty floors and laid cables. Today, noble work will be on the agenda. Namely, setting up a local network in Windows 7 and 10. Wow, I can’t wait to get started.
To do this, we need to configure the PC network cards according to one template. And in fact, this is a fairly simple procedure. Moreover, this has already been discussed on the blog before. Here is the link to the required publication:
We remember that there are as many as nine machines in our network. It would be logical to assign IP addresses to them in ascending order. That is, the following values will be entered in the settings of the network cards of the first and last computers:

Please note that the first computer has an IP address of “192.168.1.2”. This is done because our scheme already contains , which by default has the address "192.168.1.1".
That is why this value is specified in the "Default gateway" field. Thus, each PC is given the opportunity to access the Internet. If this column is left empty, then there will be no access to the Global Wide Web.
It is also important to know that two identical IP addresses should not be on the same local network. Now on Windows 7 and 10 you need to make the following important settings. Go to the "Network and Sharing Center":

There we go to the “Change additional sharing settings” section:

And in it, for all network profiles, we activate the options shown in the figure below:

After this, be sure to select the “All networks” profile and activate the line “Disable password protected sharing”:

This measure will allow you to gain access to other computers over the network without entering any strange passwords. Now we can say that setting up a local network in Windows 7 and 10 is almost complete. Only a little remains.
The final stage will be to transfer all computers into one workgroup. This will avoid various conflicts and inexperienced users will be less confused when working.
Therefore, now you need to open the “System” tab:

And look at what is indicated in the “Working Group” column:

Usually the default value is "Workgroup". In principle, let it remain that way. But remember that all computers must have exactly the same group. If you want to rename it, then click “Change settings”.
In the window that opens, select “Change”:

Now you can make the necessary changes:

By the way, pay attention to the "Computer name" field. It is advisable to enter a name in it in Latin that would allow other participants in the local network to understand what kind of computer it is and whose it is.
Well, okay, what’s the need to explain for a long time. Reboot all computers after changes made and on the desktop click on the “Network” shortcut:

And here they are, our darlings:

Now try to figure out whose computer it is, highlighted in the screenshot above. Well, okay, friends, at this step we can safely say that setting up a local network in Windows 7 and 10 has come to an end.
All that remains is to open shared resources on your PC and you can use it. But we’ll talk about this in detail in the next article. In the meantime, ask your questions in the comments to the article and watch another very cool video.
With the release of the first versions of the Windows 10 operating system, many users encountered the problem that it was impossible to establish a stable connection between computers. This happened due to the fact that the drivers for the network cards were not fully optimized. The release of updates eliminated this problem. Also on this OS the user interface has been redesigned, and some configurations have changed their location. In principle, setting up a local network in Windows 10 is not much different, but there are still a number of pitfalls that it is advisable to know about. If you want to buy the latest version of the windows system, then follow the link buy windows 10 Kyiv.
How to create a local network on Windows 10?
You can set up a LAN between PCs in several ways:
- via a router;
- create a direct connection between computers.
The most technically correct and convenient solution is to create a LAN, through WiFi router. Usually, by default, the router has a DHCP server enabled, which assigns network addresses to devices, so to connect you just need to connect the cable to the computer and router and wait for the parameters to be automatically determined. Or find it in the list WiFi hotspot, and connect via radio channel.
Creating a Windows 10 local network over a wired connection is accomplished through a series of simple sequential configuration steps network card, connection and firewall.
Presetting parameters
Before creation network connection Let's make sure that the resources united on the LAN are part of the same workgroup, that network discovery is allowed on all networks, and that the firewall properties allow access to connect to shared resources. Now all the steps are in order:
- Open the properties window by right-clicking on “My Computer”. The second method is more convenient. Press the key combination “Win (Microsoft logo key) + R” and enter the command “sysdm.cpl”.
- In the window that opens, on the “Computer name” tab there will be a name working group, and change it if necessary. Under no circumstances should you use the Cyrillic alphabet in your name.
- The PC will be included in the workgroup after a reboot.
- Next, go to the “Network and Sharing Center” through the “Control Panel” or right-click on the connection icon in the “Taskbar” (bottom right of the screen).
- Windows works with multiple profiles, such as Home or Public, so the following step must be performed for each of them or for all of them together. Press the button " Extra options Sharing" and enable network discovery, file and printer sharing, and allow the system to automatically manage HomeGroup. You should also disable password access.
These preparatory steps allow you to understand how to create a local network on Windows 10, and are required to be performed on each machine. There is no need to separately configure the firewall; all actions automatically make changes to its policies. Another point that you should definitely pay attention to is that all computers have the same time and date. Without this, it will be impossible to configure the LAN.
Setting the computer's IP address
When creating a wired connection without using a router, we will set static addresses for each computer. The procedure is as follows:
- The “Network and Sharing Center” opens.
- Select the “Advanced adapter settings” item.
- The properties window for the required adapter is displayed.
- Select “Internet Protocol Version 4” and click the “Properties” button.
- Manually install IP addresses from the range allocated for use on the LAN. Information about these ranges can be found on the Internet.
- DNS and gateway can be left in automatic mode.
The IP for each computer must be unique, but belong to the same subnet, i.e. Only the last digits should differ. After applying these settings, the connection should be up and you can begin setting up shared resources.
Setting up sharing
To “share” a folder, its properties are called up. The “Access” tab allows you to manage user rights. In order for the folder to be visible locally, click “Advanced settings” and then “Share this folder”. Becomes active button“Permissions”, which we click to manage security policies. A new window will allow you to select either one specific user or give permission to absolutely everyone. It depends on what tasks are set for public access.
This is where all the steps on how to set up a local network on Windows 10 end. Similarly, you can give permissions to access a printer or scanner. All shared resources can be found by opening Explorer or any other file manager in the network section. When you connect for the first time, a search for devices and allowed resources will occur, which may take some time. For comfort shared folder can be connected as a drive by assigning it a specific letter.
Readers have contacted me several times asking for help in solving a problem with displaying computers in network environment on the last Windows builds 10. Indeed, in the latest releases of Windows 10, your computer may no longer see neighboring computers in the local network workgroup, or it may disappear from the network environment. Let's look at how to fix this.
Windows 10 computers are not displayed in a workgroup network environment
Users began to encounter problems displaying neighboring computers on a workgroup local network starting with Windows 10 1703 (Creators Update). After installing this W10 build, when viewing devices in a networked environment, the computer stops seeing neighboring computers.
The list of computers in the network environment can be viewed in Explorer or with the command:
If the list is empty (the command returned There are no elements in the list), please check the following settings first.
Check if your file and folder access service is enabled. Go to section Control Panel -> Network and Sharing Center -> More sharing options.
Make sure that in your current network profile section Private (current profile) options included:
- Enable network discovery
- Enable access to files and printers
- Allow Windows to manage homegroup connections

Then to profiles All networks activate options:
- Enable sharing so network users can read and write files in shared folders
- Disable password protection (if you trust all devices on your network)

Then open the item Windows Settings -> Network and Internet -> Ethernet(if you are connected to the local network via wireless connection, select Wi-Fi). Click on network icon and check that the option is enabled Make this computer discoverable.
In some cases, to enable detection you need to command line With administrator rights run the command:
netsh advfirewall firewall set rule group="Network Discovery" new enable=Yes
In some cases, your Windows computer may not appear in Network Neighborhood due to incorrect settings working group. Try adding this computer to the workgroup again by rewriting the settings ( Control Panel -> System -> Advanced System Settings -> Computer name-> button Identification).

In the Join a Domain or Workgroup Wizard that opens, select: The computer is part of corporate network-> My organization uses a network without domains -> your workgroup name. After this you need to restart your computer.
If after rebooting the computer appears in the network environment, but you cannot log into it, check the computer’s network type. Most likely your local network was recognized as Public. You need to change the network type to Private. To do this, open Options -> Network and Internet -> State -> Home group -> Changing your network location.

Click on the link Change network location, then in the sidebar with the request “Do you want to allow other computers and devices on this network to discover your PC? We recommend doing this on your home or work network rather than on a public network." Select Yes.
Open Network Neighborhood and check if computers appear.

If the above tips did not help and the computers in your workgroup are still not visible, try resetting your network settings (Settings -> Network and Internet -> Status -> Reset Network).

You can reset network settings and firewall rules with the following commands:
netsh int ip reset reset.txt
netsh winsock reset
netsh advfirewall reset
After which you need to restart your computer.
Also check if the following services are running (to display the network environment correctly, they must be in the automatic startup state):
- Function Discovery Provider Host
- Function Discovery Resource Publication (see below)
- DNS Client
- SSDP Discovery
- UPnP Device Host
SMB 1.0 and problems with Master Browser in Windows 10
It happens that problems with displaying computers in a network environment are associated with the Network Browser service. This service is responsible for building and maintaining a list of active computers on the network (). There can be only one active computer on the local network with the role of master browser.
In Windows 10 1703 service Network Browser it works incorrectly. It is recommended to completely disable this service on Windows 10 and use a Windows 7 computer as the main network browser (via the registry).
In addition, in Windows 10 1709 and higher by default, the Computer Browser service is also disabled, which, as we said, is responsible for compiling a list of computers on the network and displaying them. If you only have computers with Win 10 1709 and higher on your network (see table), to solve the problem you will have to enable the SMB v1.0 protocol on at least one computer (unsafe!), which will be your main network browser (Master Browser). Installing SMB 1.0 is done by adding 3 components in Control Panel.

The computer is not visible on the network after updating to Windows 10 1803
In Windows 10 1803 (Spring Creators Update) developers, in addition, computers with Windows 10 no longer appear in Network Neighborhood Explorer when viewing network devices.
The fact is that, from Microsoft’s point of view, workgroups are an outdated functionality for organizing a local network for access to shared resources and printers. Instead of using a workgroup, Microsoft suggests using your own cloud services(OneDrive, access via Accounts Microsoft Account). In my opinion, this is unjustified.
However, in fact, in 1803, in order to access the resources of another computer on the local network, you need to know its name (\\pcname1) or IP address (in the format \\192.168.1.100), but neighboring computers are not displayed in the network environment. However, this can be fixed.
The fact is that a separate service is responsible for detecting computers on the network in Windows 10 Function Discovery Resource Publication, which after installing 1803 does not start by default (the startup type has been changed from Automatic to Disabled). If this service is stopped, the computer is not discoverable by other computers on the network. Here's how to enable the Autodiscover service in Windows 10 1803.

After rebooting, I will be able to detect other computers on the local network this computer and its resources (printers and shared folders).
How to properly connect and configure the Internet on personal computers With operating system Windows 10 is the topic of the article. It will be especially useful for unprepared users who have updated their PC to latest version, but still haven’t figured out all the intricacies of the settings. Some users do not know where and what is configured to connect to the Internet, while for others it does not work at all, even with the parameters set correctly.
You will learn four different ways connections - standard Ethernet network, high-speed connection via PPPoE protocol, connection via wireless, Wi-Fi, technology and using modems.
So, how to set the correct parameters, or configure the connection again if the Internet is not connected.
There are several ways to connect your computer to the global network. You will learn about four basic connections:
- About a standard Ethernet connection that is connected using a cable. This uses a direct connection, modem technology or a router.
- About a high-speed connection that supports the PPPoE tunneling protocol.
- About wireless, Wi-Fi, technology.
- About connecting to the Internet using 3G/4G USB modems.
Ethernet: connecting to the Internet in Windows 10 via a network cable (router, modem)
Ethernet, a packet data technology, is called the simplest connection. Internet service providers install network cables into homes and connect individual apartments. With this connection, the Internet can be connected directly or through a router or ADSL modem. This is the same Internet connection, but connected using various devices. To be more precise, it is used everywhere network cable, only the connection method is different - direct or through special devices for packet data transmission.To set up an Ethernet connection, connect the cable from your router, modem, or service provider to your personal computer into the special connector for network cards:

At correct settings The connection will occur automatically, and you do not need to enter any passwords or logins: they are absent in this connection. If the connection status changes in the notification panel, it means the Internet is working. What to do if the network cable is connected normally, but the computer does not see it? You need to look for the reason in the drivers for the network card.
This is a common problem after a system update. The driver for the card is installed automatically during the update by the OS itself, but for some reason it does not work. And you can solve the problem by installing the correct driver. To do this you need to download it from official page, selecting your PC model, and install on the device.
Now, what should you do if, after connecting the cable, the connection is activated, but its status is “ Limited"? The reasons may be hidden in incorrect parameters of the Ethernet adapter.
To check that the settings are correct and set the desired parameters, do the following:


If all parameters are correct, the Internet connection status will be active. If the status does not change, try rebooting. If even after a reboot the network is not found, not recognized, or is limited, make sure that the network cable, router, or modem is connected correctly. Also contact your service provider's technical support - the problem may be on their side.
If you connect without routers and modems, that is, directly, check with your provider for the terms of provision of Internet services. You may need to bind your Internet connection to the MAC address of your network card. If this is so, then after binding, your Internet will work immediately.
Setting up a high-speed connection (PPPoE) in Windows 10
PPPoE or high-speed connection differs from Ethernet in just a few nuances. Internet service providers also install cables into homes and connect individual apartments. But to connect to the Internet in this case you will need a password, login and possibly some additional settings on a PC or router if wireless technology is used. But this is not the most important thing. For the Internet to work, you need to connect it, that is, first create a connection, and only then enter logins and passwords.If you use a router with configured connections (including PPPoE) to connect to the Internet, you do not need to change any settings on your PC. Simply connect the cable to the device and configure it as you would with an Ethernet connection.
If you connect to the network directly via cable, without devices, and with a password and login, you must first create this connection.
To create a connection, do the following:


Click on the icon and delete, change connection parameters, etc.
Internet connection via Wi-Fi
In the presence of Wi-Fi router you can connect to the Internet via wireless technology. You can also connect your PC to the network of friends and other places where there is free access. The first thing to do when using this internet connection is to check the driver. If it is installed, the system usually does this automatically, open available networks, select your Wi-Fi and enjoy the connection. Well, perhaps you will first have to enter a password if there is protection.
Connecting via wireless, Wi-Fi, technology on Windows 10 is easy.
Setting up the Internet via a 3G/4G modem in Windows 10
And finally, the fourth method of Internet connection, which uses 3G/4G modems (3rd and 4th generation mobile communications). The first step is to connect the modem to the computer. But for the device to work, it must have a working and suitable driver.It is better to download drivers from official resources - it is more reliable. This is the case if you did not find a disk with them in the box with the modem. When searching for a driver, focus on the modem model. If it has not yet been released by the manufacturer for Windows 10, download it for other versions of the OS. Should come up.
The modem is connected, the driver is installed and the setup begins. Looking ahead: the connection is configured in almost the same way as high-speed PPPoE Internet.
So do this:


If the parameters are set correctly, you will see the connection created and activated. If not, the settings may be incorrect or the modem is not properly connected to the PC. If this does not help, contact technical support for clarification. If coverage is poor and the signal level is weak, the Internet will be slow or not work at all. Sometimes increasing the signal level helps, but it is best to worry about buying an antenna for the modem.
The connection you created can be edited, deleted, etc. To change settings and other actions, click on its icon.

There is an icon for your connection in the notification panel. Monitor its status, stop, reconnect, set new parameters if necessary, etc.
This is how you can easily and quickly connect and configure the Internet on Windows 10.
And a few more words
Now, by connecting your computer/laptop to the Internet, you can turn it into Wi-Fi router and distribute the Internet to peripherals- other PCs, smartphones, tablets. In this case, you do not need to buy special equipment for this. All you need is to create an access point on your computer using one of the free specialized utilities. . Even an untrained user can understand it.Are you connected via cable or wireless network, having set the correct settings, but the Internet does not work, and you see a notification about and Exclamation point yellow color? This error is common on personal computers with OS Windows family, and in new version, and on old ones..