A router in repeater mode is a rather useful device whose purpose is to extend the i.
On the Internet you can find a lot of articles about how such a device works and where you can get it.
But most of these do not really answer the question, but only confuse users even more. We, in turn, will try to explain complex things in the simplest possible way.
A simple everyday situation, when the Internet does not catch in the bedroom or in the kitchen, is easily solved with the help of a repeater or a second router that can be used as a repeater.
Now it makes sense to talk about how to set up a second router so that it can.
But before that, it is worth clarifying a few points regarding the cases in which you can use the router as a repeater.
When is a router suitable for use as a repeater?
Experts agree that it makes sense to use it in this way only if you have an unnecessary one.
In other cases, it is better to purchase a full-fledged repeater. And there are several reasons for this, namely:
- it is far from always possible to provide a signal of the same quality as it comes from the main router;
- signal stability can also often suffer;
- it is also far from always possible to successfully complete all the manipulations to set up such a connection the first time.
The problem is that each router is configured in a completely special way, although there is a certain general algorithm for performing such actions.
Tip: Use two routers from the same manufacturer. Then both will work much better.
In it, click on the button "Disable WPS". We will not go into details of what it is.
4. Reboot the second router, that is, unplug it from the outlet and plug it in again. The same can be done if you click on the inscription "click here", which will appear after completing the previous step.
5. After that, go to the "Network" menu and the "LAN" submenu. Enter a new IP address in the "IP Address" field. It should be more than the one that was, by one.
That is, it was originally 192.168.0.1, and now you need to enter 192.168.0.2, as shown in Figure 6. Click the "Save" button to save the settings.
6. Now in address bar enter the address that was provided in the previous step.
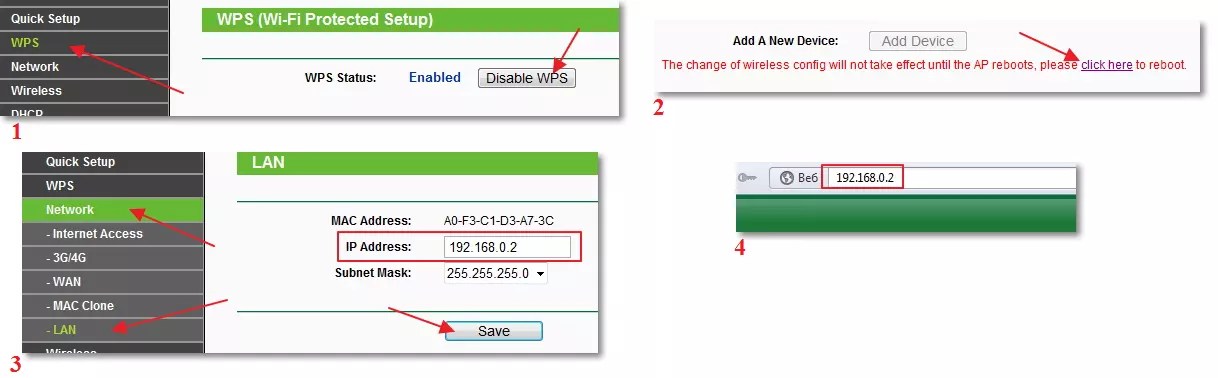
Rice. 6. The first steps in setting up a router in repeater mode
7. The previous step will allow you to go back to the settings of the second router. Go back to the "Wireless" section and to the "Wireless Settings" subsection.
There we will be interested in the following parameters:
- "Wireless Network Name" - the name of the network that the second router will distribute;
- "Region" - region (the country in which you live);
- "Channel" - channel (we said above that for example we will take its value 6);
- "Enable WDS Bridging" - just check the box, this is the item that enables WDS.
8. Click on the "Survey" button to continue working.

Rice. 7. Setting up a second router and connecting to the first
10. After that, it remains to enter the password for the network to which we are trying to connect. To do this, enter the type of encryption used in the first router (this is done in the "Key type" field).

Rice. 8. Finishing the connection of the second router to the first
That's all! Now the network should work fine.
Hint: WDS is a repeater mode.
Hard enough.
But from the entire procedure described above, you can extract the very algorithm that is suitable for connecting any two routers and using the second one as a repeater.
It looks like this:
- turn on the first possibility of using its signal by a repeater;
- we set the same channel on both (although this is not always necessary, but if there is a corresponding item in the settings, indicate its value);
- connect the second to the first in repeater mode;
- we use.
The procedure outlined above is shown using routers as an example.
In some cases, there is an item called "Repeater" (not "WDS") if the device settings have a Russian interface.
It can be in many different sections, so you will have to look for it. But be that as it may, if this item is, you can definitely find it.
What if I don't get anything?
If something doesn't work for you, there are several options:
- Try to perform all the above procedures again, from the very beginning.
- Write in the comments under this article at what stage you have problems, we will definitely help you.
- Contact the manufacturer of the devices (at least one of the two) you are using for assistance.
- Call a specialist from your provider. These people should help their customers use the Internet in a way that suits them.
But there are not as many manipulations as it might seem at first glance, so even a novice user can perform all of them.
The main thing is to follow the algorithm described above and adhere (at least roughly) to the procedure that we also talked about earlier. Good luck with your setup!
Mode repeater, or wifi booster present in almost every Asus router model. This function can be very useful if you already have a wireless network configured. But the signal strength is not enough to have a stable connection in some remote room. In this case, you can not buy a wifi amplifier separately, but set up a regular one as a repeater Asus RT-N12 router where I'll show you how it's done.
What is the repeater-amplifier mode on the router?
The repeater mode, or wifi amplifier, is a special state of the router, in which it simultaneously receives and relays the Internet over a wireless channel.
Although we do not change the router so often, in any case, the equipment is periodically updated. And somewhere in the closet, the old Asus router, which has not yet been used, can probably fall. And it was a pity to throw it away. This is where it will come in handy for us as a signal repeater to amplify and expand the reception area from the main hotspots.
Main router configuration for connection as an ASUS RT-N12 repeater
Before putting your Asus router into repeater mode, you need to make one very important setting on the main router, which has Internet access and from which we are going to relay the signal.
Namely, install one . Without it, it is most likely impossible to achieve stable and high-quality reception. About what it is and how to choose a channel is described in detail in a separate entry on our website.
At the same time, the manufacturer of the main device does not have to be Asus, you can amplify wifi from any model.
Nothing more needs to be done here - if wifi network successfully works, then we will be able to connect to it and relay it.
Asus RT-N12 router as wifi repeater
From the line of Asus router models, I came across RT-N10U, RT-N14U, RT-N12 and several others, and all of them had the ability to use as a repeater. To activate it, you must first connect it to the computer and then, which is located at http://192.168.1.1, the default login and password are the same - "admin". If they don't fit, then just do full reset button "Reset" on the case - anyway, you will not need the previous settings on it.
Setting up an Asus router as a wifi booster
The transfer of the Asus router to the role of a repeater occurs in the "Administration" menu. Here we check the box for "Repeater Mode" and click on the "Save" button
After a few moments of thought, the router will switch to quick settings already in a new capacity, where you will need to select from the wifi list the network that you want to expand - enter the password from it to connect.


After that, we save and wait until the Asus router starts repeating the signal from another access point. In this case, the network will be one, and the devices themselves will choose where in this moment the signal is more stable and to which point to connect.
How to log into the router in repeater mode?
As you understand, the entrance to the Asus router, acting as a wifi repeater, will no longer be available at the old address, since it now depends on another device. How now to go into its settings if we want to change something in them?
In addition to the option to look at its ip in the list of connected devices through the main router, there is another very good way for Asus. Download the Asus Discovery Utility and install it on your computer.

We launch and click on the "Search" button - the program will find your router and indicate its current IP address. It is enough now to click on the “Configuration” button to get to the settings panel. If this method does not work, then you can always set everything up from scratch.
Video on setting up an Asus router as a wifi amplifier
Introduction
Today we bring to your attention a review of two wireless routers ASUS RT-N10 rev.B1 and ASUS RT-G32 rev.C1, which are in many ways similar to the RT-N10U model, but have distinctive features. ASUS RT-N10 B1 and ASUS RT-G32 C1 are inexpensive devices that support multiple wireless networks simultaneously with similar technical specifications, so they are reviewed jointly.
Appearance and hardware platform
The RT-N10 rev.B1 wireless router is made in a black plastic case, and the RT-G32 rev.C1 is in white, but otherwise appearance devices are identical.


ASUS also releases revision C1 for the RT-N10 model, which differs only in body from revision B1, but since we didn't have it, we won't describe it in detail in our review.

The overall dimensions of the case are 173x130x26 mm, excluding the antenna. On the top panel there is a ventilation grate, as well as a volumetric name of the manufacturer.

There are four rubber feet on the bottom of the devices for convenient positioning. wireless router on the table. In addition, there are two T-shaped technological holes for wall placement of the device. The information sticker will tell you the parameters of the required power supply (12 V and 0.5 A), the device model, its MAC address, PIN code, serial number, default IP address and more. Ventilation grilles occupy most of the bottom.

The side walls also contain ventilation holes, along with a decorative gray stripe running across the front panel of the router, on which, in addition to information about the manufacturer and model, the following light indicators are located: Power, WLAN, WPS, WAN, LAN1-4. The purpose of all indicators is standard, but it is worth noting that the blinking of the WPS LED informs the user about the operation of the process of the same name (Wi-Fi Protected Setup), which allows you to connect wireless clients in semi-automatic mode.


On the back side there are Fast Ethernet network ports (WAN, LAN1, LAN2, LAN3 and LAN4), WPS and Reset buttons, power connector. A fixed antenna is also attached here.

Functions CPU runs a Ralink RT3050F SoC chip. The RAM is represented by the EtronTech EM63A165TS-6G module, operating at a frequency of 166 MHz and having a volume of 32 MB.

Block diagram of the module random access memory presented below.

For the flash memory, we used a 4 MB Spansion S29GL032N chip, the block diagram of which we also provide for our readers.

The strengths of the tested devices are listed below.
- Support for up to four wireless networks simultaneously.
- Intuitive interface.
- Good data transfer rates in the wireless segment.
- Bandwidth control capability.
- Support for 802.1X MD5 authentication.
- Acceptable price.
Unfortunately, we cannot fail to point out the shortcomings of the models under consideration.
- Low data transfer rates when using NAT/PAT.
- Incorrect time zones for Moscow and some other Russian cities.
- Inability to specify NTP and VPN servers Cyrillic name.
- Inability to disable telnet access to the device.
- Lack of utilities for RT-G32 rev. C1 on the manufacturer's website.
At the time of this writing, the average price for the ASUS RT-G32 rev.C1 and RT-N10 rev.B1 models in online stores in Moscow was 1250 rubles.