Yealink W52P - is a wireless VoIP DECT system that consists of a base and a portable DECT handset. It is possible to connect up to 5 additional handsets (Yealink W52H) to one base station. Each handset can have a separate SIP account. Maximum amount simultaneous conversations on one base - 4. The communication radius of the handset and base is up to 50 meters indoors and up to 300 meters in the line of sight.
Phone specifications
Phone specifications
- Supports 4 simultaneous calls
- Supports 5 W52H handsets
- Supports 5 SIP accounts with independent configuration
- Supports 6 Yealink RT10 repeaters to increase base coverage area
- Flexible configuration of routing/permissions for incoming/outgoing calls on connected handsets
- Supports DECT CAT-iq2.0 standard. Support for functionality at the level of the CAT-iq 2.0 standard (HD Voice, Multiline, Conference, Over-the-air software update, etc.). backward compatibility not available with DECT products from other manufacturers.
- 12 numeric buttons, 5 navigation buttons, 6 programmable buttons
- Displaying a picture/photo of the caller
- Fully Russified: has Russian menu, web interface, input text messages and contacts in Russian
- Keyboard with Russian alphabet
- Phonebook: 100 entries (stored in the handset), 500 entries (stored in the database), export/import address book, remote address book (XML), blacklist, call history (100 entries), speed and speed dialing, dialing rules
- Keypad lock, changeable logo on the phone screen, volume control, ringtone selection
- Call holding and waiting, call forwarding and transfer, DND mode, conference calling, call pickup, intercom calls (including group intercom call: Paging), hotline, auto answer, emergency call
- Voice mail
- Control and configure the phone from the keyboard, via the Web interface or remotely
- Centralized installation, configuration, configuration updates and software via Autoprovision function (TFTP/FTP/HTTP/HTTPS/PNP/DHCP)
- Updating handset software via DECT (OTA - Over-The-Air)
- TR069 protocol support
- Support for Yealink RPS (Redirection and Provisioning Service) service
- Special features for BroadSoft, Genesys, etc. platforms.
Network characteristics
- SIP 2.0 protocol support (RFC3261)
- Transport: UDP, TCP, TLS
- NAT transverse support: STUN mode. Call modes: Peer-to-Peer, SIP Proxy
- 3 network modes: DHCP/static IP address/PPPoE
- OpenVPN support (Attention! Products intended for countries participating in the Customs Union do not have this functionality!)
- 802.1x, LLDP support
- VLAN support (IEEE 802.1p/q tagging), TOS (layer 3)
- Supports in-band DTMF, out-of band RFC2833 DTMF and SIP INFO
- Support for encryption and identification standards (MD5 and MD5-sess)
- SRTP support (Attention! Products intended for countries participating in the Customs Union do not have this functionality!)
Working with voice
- HD sound: HD handset speaker and speakerphone; HD codec G.722
- Sound range from 50Hz to 7kHz
- Support for wideband codec G.722, support for standard codecs G.711(A/μ), G.726, G.729AB, G.723.1., iLBC
- Supports VAD (Voice Activity Detection), CNG (Comfort Noise Generator), AEC (Echo Cancellation), NLP (Noise Cancellation), AGC (Automatic Microphone Gain Control), AJB (Adaptive Voice Buffer)
- High-quality speakerphone with echo cancellation
physical characteristics
- Coverage: 50m indoors, 300m outdoors
- frequency range 1880-1900 MHz
- 10 hours talk time, 100 hours standby time
- Color 1.8" LCD screen with a resolution of 128x160 pixels
- Energy saving mode ECO mode/ECO Mode+
- 1 x RJ45 10/100M port
- PoE support (Power over Ethernet, 802.3af) Class 1
- 2.5mm headset jack
- Mini-USB port for updating handset software
- Screen and keyboard backlight
- Table or wall mount
- 3 indicators on base: 1 x power, 1 x network, 1 x handset
- Charging cup power supply: DC 5V/600mA
- Base power: DC 5V/600mA
- Tube dimensions (H*W*D): 144mm*50mm*24mm
- Base dimensions (W*H*D): 153mm *108mm*45mm
- Black color
- Temperature: -10 ~ +50°
- Humidity: 10~95%
There are more VoIP DECT systems on the market for home use than for corporate use. Yealink W52P is a representative of enterprise-level wireless VoIP DECT systems supporting up to four simultaneous calls to the base, up to 5 handsets per base, power over Ethernet (PoE), Russian language in the web interface and the phone’s on-screen menu. The system includes a base station and one cordless handset. An optional Yealink W52H cordless handset can be purchased separately.
The Yealink W52P wireless phone system has all the necessary enterprise functions such as hold, transfer, call forwarding, 3-way conferencing, Power over Ethernet, paging and intercom. The device operates via the SIP protocol; the supported codecs, in addition to the standard u711 a/u law and G.729, include the high-quality wideband codec G.722 (HD Voice). The system also has autoprovision capabilities and supports centralized corporate directories.
Based on this system, it is impossible to build a microcellular distributed DECT system with support for perimeter roaming, in other words, the handset is registered and operates on a specific base. The system has big number settings, despite this, basic setup characterized by simplicity. Up to 5 independent SIP accounts can be registered on the base, each of which can be assigned to a specific Yealink W52H handset or handsets. Just like other DECT systems, outgoing and incoming routing between handsets and SIP accounts can be flexibly configured. Registration and re-registration of new handsets on the base is just as simple. The number of simultaneous calls through the database is four; in most cases, this number will be sufficient; in this regard, the system is a leader compared to competitors in its class.
Usage diagram

Up to 5 handsets are registered for each base (BASE from 1 to N), then the base is connected via Ethernet to a switch with or without PoE (Switch/PoE Switch) depending on the task, the switch can be connected to a router with NAT address translation functions and firewall (Router/Firewall), SIP accounts of the base can be connected to an IP telephony provider, to an IP PBX located at the client or virtual - located on the side of the IP PBX service provider. For handsets, outgoing and incoming routing through SIP accounts is configured. Subscribers can move with handsets in a coverage area of up to 300 meters outdoors, and up to 50 meters indoors.
Let's look at the characteristics of the product in more detail.
General characteristics of the phone
Supports 4 simultaneous calls
Supports 5 handsets
Supports 5 SIP lines with independent configuration
Flexible configuration of routing/permissions for incoming/outgoing calls on connected handsets
Supports DECT CAT-iq2.0 standard
12 number buttons, 5 navigation buttons, 2 program buttons, 6 function buttons.
Display a picture/photo of the caller.
Fully Russified: has a Russian menu, web interface, input of text messages and contacts in Russian.
Keyboard with Russian alphabet.
Phonebook: 100 entries (stored in the handset), 500 entries (stored in the database), export/import address book, remote address book (XML), blacklist, call history (100 entries), speed and speed dialing, dialing rules .
Keypad lock, changeable logo on the phone screen, volume control, ringtone selection.
Call holding and waiting, call forwarding and transfer, DND mode, conference calling, call pickup, intercom calls (including group intercom call: Paging), hotline, auto answer, emergency call, auto redial mode.
Control and configure the phone from the keyboard, via the Web interface or remotely.
Centralized installation, configuration, configuration and software updates via the Autoprovision function (TFTP/FTP/HTTP/HTTPS/PNP/DHCP).
Support for SNMP v1/2 protocol, TR069 (optional).
Support for Yealink RPS (Redirection and Provisioning Service) service.
Special features for BroadSoft, Genesys, etc. platforms.
Network characteristics
SIP 2.0 protocol support (RFC3261).
Transport: UDP, TCP.
NAT transverse support: STUN mode. Call modes: Peer-to-Peer, SIP Proxy.
3 network modes: DHCP/static IP address/PPPoE.
OpenVPN support.
Supports 802.1x, LLDP.
Support VLAN (IEEE 802.1p/q tagging), TOS (layer 3).
Supports in-band DTMF, out-of band RFC2833 DTMF and SIP INFO.
Support for encryption and identification standards (MD5 and MD5-sess).
SRTP support.
Working with sound
HD sound: HD handset and speakerphone; HD codec G.722.
Sound range from 50Hz to 7kHz.
Support for wideband codec G.722, support for standard codecs G.711, G.726, G. 729AB, G.723.1., iLBC
High quality speakerphone with echo cancellation.
physical characteristics
Coverage: 50m indoors, 300m outdoors.
10 hours talk time, 100 hours standby time.
1.8’’ color display 128x160 pixels.
Energy saving mode ECO mode/ECO Mode+.
1 x RJ45 10/100M port.
PoE (Power over Ethernet, 802.3af) Class 0 support.
Headset jack 2.5mm.
USB port for updating handset software.
Screen and keyboard backlight.
Mount on table or wall.
3 indicators on the base: 1 x power, 1 x network, 1 x call.
Charging cup power supply: DC 5V/600mA.
Base power: DC 5V/600mA.
Dimensions: 144mm x 50mm x 24mm.
Base dimensions: 153mm x 108mm x 45mm.
Temperature: 10 ~ +50°.
Humidity: 10~95%.
Packaging, equipment, appearance.
The system is supplied in a cardboard box on the side indicating the model, product image, bar code, as well as serial number and base MAC address.


Inside the box, the base, power supplies, handset and stand are neatly packed and wrapped in soft film.

Package Included:
Installation instructions – 1 pc.
Quick user guide – 1 pc.
Warranty card – 1 pc.
Promo cards
Tube – 1 pc.
Base station – 1 pc.
Rechargeable battery - 2 pcs.
Belt clip – 1 pc.
Charging stand – 1 pc.
Power adapter: input: AC 100~240V, output: DC 5V, 600mA – 2 pcs.
Network cable (patch cord) – 1 pc.

Please note that the kit includes a clip for attaching the handset to your belt, which is very convenient. The kit includes everything you need to get started.


There are three indicators on the base, the first one, next to which a handset is shown, determines the operating mode of the station; if it flashes quickly, the base is in paging mode; if it flashes slowly, the base is in the mode of registering new handsets; if it is constantly on, all handsets are on the base registered. The second indicator, next to which there is a network icon, serves to indicate the connection to the network; if it blinks, the network is unavailable; if it is constantly on, the network is working normally. The third indicator shows the system status; if it is blinking, the base software is being updated or the base is in the process of rebooting; if it is constantly on, the base is ready.
The only button on the body serves two purposes: the first - when pressed quickly, the base will call up all registered handsets, so they can be found, the second - when pressed for two seconds, the base will go into registration mode for new handsets and Yealink RT10 repeaters. Up to six repeaters can be connected to one base, which triples the operating area of the tubes, for example, when working indoors - up to 300 hundred meters. An important feature of using repeaters is the ability to simultaneously connect up to six repeaters and up to five handsets to one base, i.e., as is often the case with other vendors, the use of repeaters does not reduce the number of handsets connected to the base. While in the coverage area of the repeater, you can have up to two simultaneous conversations, and when moving between the coverage areas of the repeaters, the handset registration automatically switches without breaking the connection (handover function).

The base has two connectors: RJ45 for connecting to a network via Ethernet and a 5 Volt connector for connecting a power adapter.

Each Yealink W52H handset comes with a stand used to charge the handset; there is a charging indicator on the base; if you place the handset on the stand and the indicator lights up, the handset is charging. On the back of the stand there is a socket for connecting the power adapter that comes included.

The handset is made of black plastic with a silver plastic insert around the edge, and has a 1.8-inch color LCD screen with a resolution of 128x160 pixels.

The keyboard on the handset is Russified. The tube fits well in the hand.

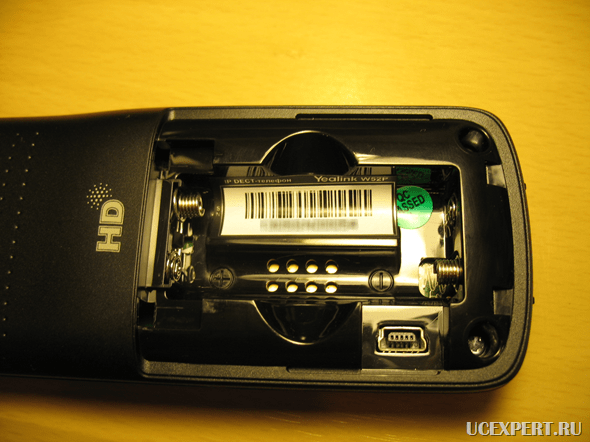
Battery compartment for two rechargeable batteries type AAA. Next to the compartment, under the cover, there is a mini-USB connector; it is necessary to update the handset software. To update, you need a computer, a cable with a mini-USB connector that is connected to the computer, specialized software is installed on it, and then new firmware is loaded into the handset through this application.
For phones with older builds, it will be possible to update the handset software over the air (i.e. via the WEB interface, as is now happening for the base). Users will get this opportunity next year, 2014. This procedure was made possible thanks to the handsets’ support of the DECT CAT-iq2.0 standard, which allows media data to be transmitted over the air. Handset support for working with a remote address book is also possible thanks to this standard, not supported by many competing DECT handsets.
The handset is supplied with two metal hydride (Ni-MH) batteries with a capacity of 800mAh.

Rear panel of the handset with attached belt clip.

The handset screen is quite large, but taking into account the resolution of modern mobile phones, the large graininess is striking, but for the tasks that the phone solves, this resolution is sufficient. You can specify an arbitrary handset name on the screen, in the example UCEXPERT, the limit is 8 characters, the number 1 at the top right on the handset means the serial number of the handset on the base, there can be 5 of them in total. 
Phone menu view, 6 icons in total.

This is what the “Functions” menu list looks like.

Listing of contacts loaded into the phone. Names are in Russian, entries can be added independently in Cyrillic.

A list of outgoing calls, on one screen, without scrolling down, information about three calls is placed.

Conversation status, the screen displays the phone number and subscriber name (Display Name in SIP), in in this case they are the same.

Incoming call to number 10.

In general, working with the handset leaves a pleasant impression, but the screen could have been made with a slightly higher resolution.
Initial setup
After turning on the base and handset, the handset will automatically register to the base; if you need to register an additional handset, hold the button on the base for 2 seconds "Paging", then, on the handset, press "OK", then select "Settings", then “Registering a Handset” And “Register handset”, then select the desired base and press "OK". The handset will indicate successful registration.
By default, the database operates in DHCP client mode. If you need to set a static IP, click the button "OK" on the handset, then select "Settings", then "System" –> "Net", The default PIN code is 0000, and press "Ready". Now you can mode Static IP/DHCP/PPPoE and edit settings.
Connect the network base using an Ethernet patch cord.
To view the current IP, click the button "OK" on the handset, then select the menu "Status", then "State of the system", the current IP settings, software version, base MAC address and other system parameters will be displayed.
It is worth noting that you can configure a large number of database parameters through the handset, but it is more convenient to use the web interface, which we will now consider.
Web Interface Overview
Below we will look at some of the web interface tabs.
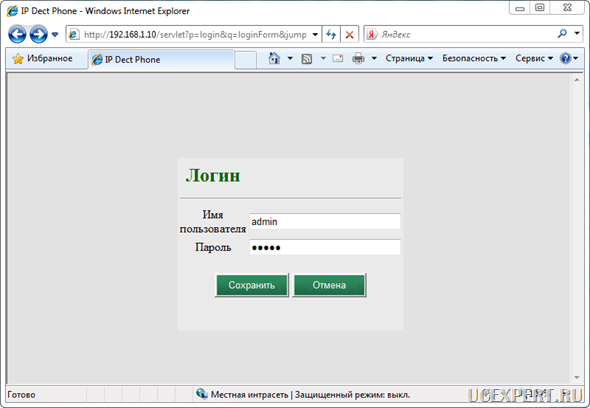
In my case, the database received an IP address via DHCP equal to 192.168.1.10. To access the web interface, you need to open a web browser and enter the IP address in the address field:
http://192.168.1.10
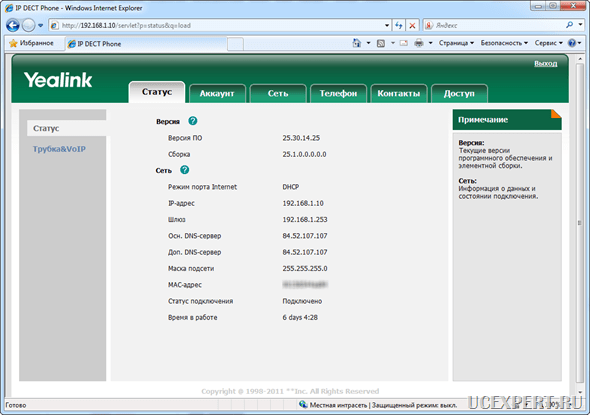
“Status” tab, “Status” item
“Status” tab, “Handset&VoIP” item
The menu displays registered DECT handsets, and the VoIP status menu displays registered SIP accounts. In this case, one handset with the name UCEXPERT and two SIP accounts 100 and 101 are registered.

“Account” tab, “Basic” item
IN this menu basic setup of SIP accounts of the base is performed, for example, in my case, I register extension number 100 on a virtual IP PBX on the SIP server site using a non-standard port 9966 instead of the usual 5060. To register a SIP account behind NAT, there are no additional settings no need to indicate.

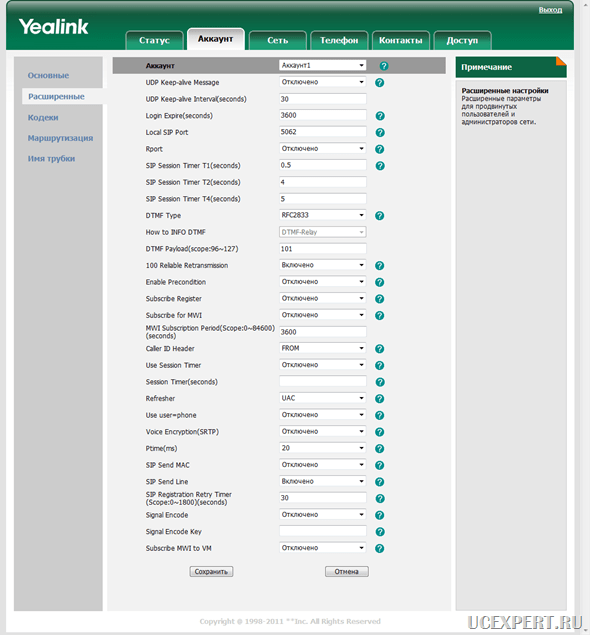
“Account” tab, “Advanced” item
At this point you can fine-tune your SIP account, for example, change the local SIP port, check availability SIP servers, SIP re-registration time, DTMF type and other parameters.
Tab “Account” paragraph “Codecs”
Here you select the allowed audio codecs as well as using the buttons "Up" And "Down" the priority of their choice is selected. For example, in local network, if all terminals support the G722 (HD Voice) codec, it is better to use it, the sound quality will be significantly higher, for external calls use the standard G711 or narrowband G729

“Account” tab, “Routing” item
Here you configure the binding of SIP accounts to the handset, by default the first handset is tied to the first SIP account, the second to the second and so on, incoming and outgoing calls will come and go according to these rules, if you need to configure the base so that one handset can make and receive calls from several SIP accounts at once, you need to check the boxes for these accounts.

“Account” tab, “Handset name” item
A very useful item that allows you to specify a name for the handset that will be constantly displayed on the screen, for example, I have a name specified UCEXPERT, this name will appear on the handset when it is registered to the base where this setting is made. Limitation - the handset can display a maximum of 8 characters, you can enter more, but the name will not fit entirely on the screen. There is also a problem with the display of some letters in Cyrillic, for example the letters K and E, this is solved by replacing these letters with the same type in Latin. In the sign, in the name of handset 2, the letter E is not displayed, instead there is a question mark.

Handset name UCEXPERT on the handset display.

“Network” tab, “Basic” item
Here you can change the main network settings.

“Network” tab, “Advanced” item
The base supports VLAN, VPN connection, QoS, web access parameters, the range of RTP ports is also indicated here, it is not logical to place it here, since this setting relates to VoIP.

“Phone” tab, “Settings” item
Setting time and synchronization via NTP.

“Phone” tab, “Functions” item
Here you can specify settings for each of the 5 lines of SIP accounts, for example, busy forwarding - I have it configured to send to mobile number, the same thing if there was no answer for 12 seconds. Key combination codes are also configured here to quickly enable forwarding modes. Additionally, the mode can be configured "Do not disturb" – DND and Anonymous call, when enabled, most IP telephony operators will not miss the call.

“Phone” tab, “Update” item
Here you can view the current version of the base firmware, update it by downloading new firmware via a web browser, reset it to factory settings, or reboot the base.
A very useful function for debugging - “PCAP Magazine” allows you to dump traffic on a network interface and download it to your computer for further analysis using a network analyzer, such as Wireshark.

“Phone” tab, “Autoprovision” item
This tab allows you to configure automatic download configurations. There is a document on the network that describes in detail the work of Autoprovison.

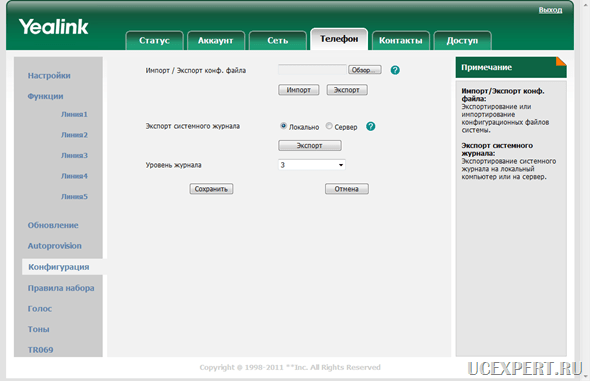
“Phone” tab, “Configuration” item
“Contacts” tab, “Contacts” item
Here, for each of the five lines, you can manually download a pre-prepared list of files in one of the .csv or .xml formats, the template for which the file should be created can be downloaded here. An obvious inconvenience is that every time there are changes in the book, it must be loaded again for each line.

“Contacts” tab, “Deleted address book” item
This option allows you to centrally view contacts from a pre-loaded file in a specific format, then uploaded to a web server..xml,
Name, and update period, default update period is 1440 minutes. The obvious disadvantage is that you need a web server.

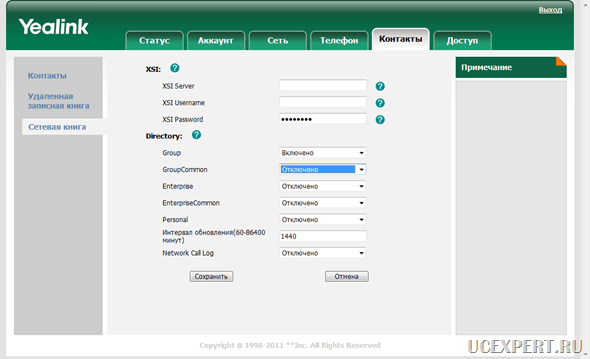
“Contacts” tab, “Network book” item
Allows you to connect an XSI directory; to be honest, I have never encountered this method of connecting a network directory before.
On last tab "Access" You can change the base PIN code and password to access the web interface.
Positive features:
Good workmanship and good equipment
Supports 4 simultaneous calls and 5 handsets Yealink W52H
Russian language support in the web interface
Availability of PoE (Power over Ethernet)
Energy saving modes ECO mode/ECO Mode+
Negative features:
A bit overpriced, especially for the optional Yealink W52H handset. Let's hope that the situation will change.
There is no support for auto-provisioning and a corporate directory when working with Yeastar IP PBX
Detailed instructions for the phone are in English only
The handset name cannot contain more than eight characters. Problem with some letters in Cyrillic (for example, the letter K will be a question mark)
Still, the positive traits compensate for the negative ones. The phone turned out to be quite good, it is distinguished by stable operation, quality workmanship, good equipment, support for the Russian language and availability technical support they do it in Russian good option for organizing wireless telephony in the office if roaming is not needed between bases, which increases the cost of the solution by an order of magnitude, if not by orders of magnitude, for example, such as Polycom KIRK.
Description and appearance Yealink W52P
Yealink W52P is a wireless IP phone that operates over the SIP protocol and supports the DECT CAT-iq2.0 standard. It consists of a base station and a cordless handset. The base station can support up to 5 Yealink W52H handsets, allowing you to make 4 calls simultaneously. The device allows you to connect 6 repeaters, which will significantly expand the communication coverage area. Connecting 5 SIP accounts with independent configuration greatly increases communication capabilities for offices. Thanks to support for PoE technology, the base station does not need to be connected to the mains. The device is completely Russified.
Base station
The base station is made of black matte plastic. There are 3 LED indicators on the front side:
- operating status of the tubes;
- connections to a local network;
- operating status of the base station.


In the center there is a button for registering and searching for handsets and repeaters.
At the end of the case there is an RJ-45 connector for connecting to a local network and a connector for the power adapter.
The rear panel has a ventilation grill and holes for wall mounting.
Handset

The handset is made of matte black plastic with a silver insert along the contour. The 1.8-inch color LCD display has a resolution of 128x160 pixels. Below the screen are:
- 2 menu control keys;
- speakerphone key;
- key voicemail;
- call answer key;
- end key.
Between these keys are navigation keys. Below is a digital dialing keyboard with Russian and English alphabets.
At the bottom of the front side of the handset there are redial and mute keys, between which there is a microphone hole.

On the side of the handset there is a jack for connecting a headset. On the sides there are holes for a clip that allows you to wear the handset on your belt. At the bottom of the tube there are connectors for charging from the stand.

Under the cover on the back of the handset there is a compartment for two AAA batteries. To update the handset software, there is a USB connector next to the battery compartment.

Charging stand
The small charging stand is also made of matte black plastic. It is also included with each additional handset. Yealink W52Н. On the top side of the stand there is a recess for installing a handset with connectors and a handset charging indicator. At the back there is a socket for connecting the power adapter.


Contents of delivery:
- base station;
- handset;
- handset charging stand;
- 2 batteries;
- clip for attaching the handset to a belt;
- 2 power adapters;
- network cable;
- CD;
- installation instructions;
- quick user guide;
- warranty card.

Installing and configuring Yealink W52P phone
Connecting a base station
There are 2 ways to connect power: connecting to a 220V network via a DC 5V adapter and connecting via PoE. When selecting the power connection, be sure to consult your system administrator. In lines that support PoE (Power over Ethernet), connecting a power adapter is strictly prohibited.
Using an Ethernet cable, we connect the “Internet” port of the base station to the local network switch.
Connecting the charging cradle and handset
The charging supply is connected to a 220V network via a DC 5V power adapter. Before starting work, you must install 2 Ni-Mn 1.2Vx2800mAh rechargeable batteries included in the delivery kit into the handset. Recharging the batteries on the charging cradle, the charging status is displayed in top corner LCD screen of the handset.
Registering handsets
After turning on the base and handset, the latter is automatically registered with the base.
If you have additional Yealink W52H handsets, you need to register them manually: hold down the “Search” button on the base for 2 seconds, then press “Ok” on the handset and then you need to go to Settings/Handset registration/Register handset, select the desired base and click “Ok”. The handset number and name are displayed in the upper right corner of the LCD screen.
Phone setup
Basic phone parameters can be configured directly through the handset, but it is more convenient to use the web interface.
By default, when configuring network settings, the phone is configured to automatically receive network settings from the DHCP server. Therefore, when you connect it to the network, it is automatically assigned an IP address.
If you need to specify a static IP address, you must enter the main menu of the on-screen interface by pressing the “Ok” button, go to the Settings / System / Network menu, enter the PIN (default PIN code is 0000) and click “Ok”, select the connection type and deposit necessary settings. For the changes to take effect, you must click “Save”.
In order to view the assigned IP address, you need to enter the menu and select the “Status” tab, go to “System Status”, where you can see the following information:
- Current IP address of the phone;
- Phone MAC address;
- Software version.

Status
- software version;
- network settings;
- registered handsets;
- status of SIP registrations.

In the “Handset&VoIP” tab, you can also register additional handsets by clicking on the “Start Paging” button.

Account
The next tab is “Account”, in which SIP parameters are configured.
This phone supports up to 5 independent SIP accounts. In the account field, select one of the SIP accounts and enter the registration data. If the phone is not included in a corporate PBX, then the data received during registration with any SIP operator will be suitable for using the phone. If the phone is connected to corporate network, then you need to use your PBX data.

Setting up a SIP account:
We configure all SIP accounts in the same way. To switch the accounts (lines) from which you plan to make calls, use the keys located to the right of the phone screen.
We made minimal settings for the phone to work correctly, which took us no more than 5 minutes.
For more detailed settings, let's look at a few more tabs.
In the “Account” tab there are several more tabs: advanced, codecs, routing and handset name.
The “Advanced” tab specifies the basic parameters for setting up a SIP account:
- anti caller ID (you can hide your number when making calls)
- synchronization with server
- ability to reject anonymous calls
- enable/disable missed call history
- auto reply
- ringtone
The “Codecs” tab contains all the audio codecs that are supported. this model phone. Here you can specify which audio codecs you want to use and which not. Use the “up” and “down” buttons to select the priority of using codecs.

In the “Routing” tab there is a menu that is necessary for distributing incoming and outgoing calls between handsets registered on this base.

In the “Handset Name” tab, you can change the names for each of the 5 handsets that are supported by the base.

After filling out each insert, you must save the settings made by clicking on the “Save” button.
Net
Using the “Network” tab, you can configure network parameters, including Internet port modes (dynamic or static IP address) and PPPoE.

In the “Advanced” tab, you can configure VLAN parameters, QoS for SIP and voice packets, local RTP port, define ports for web access, etc.

Telephone
The next tab is “Phone”, in which the general setup phone, assigning functions for each line, dialing rules, setting up voice parameters. The “Settings” tab is a menu for configuring language settings, synchronization settings, and time data.

Using the “Functions” tab, you can set standby modes, configure transfers, and enable call history. And also for each line, set up independent forwarding rules, conditions for “do not disturb” mode, anonymous calls and a number for voicemail.


You can reboot the phone, update, and reset to factory settings by clicking on the corresponding buttons in the “Update” tab.

In the “Configuration” tab you can also import/export configuration file, export system log.

In Dialing Rules, you can create replacement rules and pre-register the city code. The specifics of the replacement can be read in the field on the right - “Note”.


Contacts
In the “Contacts” tab, you can record contacts, set up groups, and import/export a list of contacts in .csv format. “Deleted Notebook” allows you to display a deleted notebook. It is enough to specify a link to the notebook file and the name of the book, which will be displayed in the list.


You can change the password, base PIN, and download trusted and server certificates in the “Security” tab.

Advantages
- Elegant design.
- The backlit color display allows information to be read in low light.
- Quick registration of additional handsets.
- Easy setup.
- HD audio provides high quality sound.
- By supporting PoE technology, the issue of supplying a 220V network to the base is resolved
- The “Note” field on each tab of the web interface helps with installation and clarifies all unclear points in the setup.
- The base station supports up to 5 W52H cordless handsets, 4 simultaneous calls and up to five SIP accounts with independent configuration.