To edit the blog code we will use text editor Notepad++. Be sure to install this program on your computer. Below I will list the main functions and features of Notepad++.
Advantages of the Notepad++ text editor:
- This text editor is provided absolutely free of charge;
- It is possible to cancel the action. That is, let’s say: you corrected the code, then it throws an error, and you don’t remember what and how it happened. To return to the reverse position, you just need to press "Edit"->"Cancel" or CTRL+Z until you are satisfied with the state of the blog;
- You can work with other files at the same time, which is very convenient;
- There is syntax highlighting (each type of element is colored in its own color, you can also click on the opening tag, as a result the program will provide you with a closing tag);
- Plugin support;
- This text editor provides many more features and conveniences for your work.
I think the above advantages convinced you to install it on your computer Notepad++. If this is the case, then you first need or, then install it on your computer. Let's run the program, it will look like this (I opened the index.php file of the theme of my future blog):

Here:
- Line number
- Opening tag
- Closing tag
- File encoding.
Now I’ll show you how to collapse the “inside” of a tag. To do this, click on “-” (shown as number 2 in the figure above). As a result, you can easily find out where the closing tag is. The picture below shows the result after collapsing (note that instead of “-” there is now “+”): 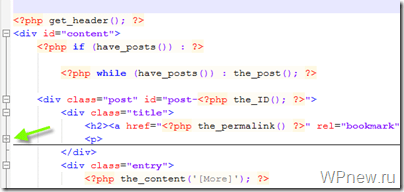
Changing WordPress theme file encoding to UTF-8 (Russian)
So that there are no problems with encoding on your blog (Russian language can be represented by crackers - more about them below). Let me give you an example.
On the right side of my topic there are headings in English: 
To the word " Categories"translate into Russian, we need to remember which theme file is responsible for the right side of the blog. This file is called sidebar.php, open it with a text editor Notepad++. We find in this file the word that needs to be translated (for convenience, you can click CTRL+F and in the search field you need to type the required word: 1 - word to search, 2 - click to search, 3 - search result): 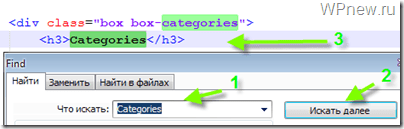 Now, in order to translate this word into normal Russian, we need to redo encoding in UTF-8, and only then translate the word. And if you don’t change the encoding, you get this (note what happened in the picture below. This is the case when I changed the word in the theme file Categories on Categories, these signs are the kryakozyabrs):
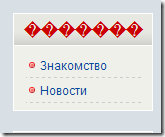
So how can you make sure that instead of these signs a normal Russian word comes out? With the program Notepad++ it's quite easy and simple. What we need to do is just open the file we need (in in this case I open sidebar.php), change the encoding to UTF-8 and only then translate the word.
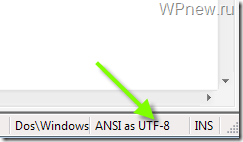
To convert the encoding to UTF-8, go to Notepad++ in the "Encodings" section and select "Convert to UTF-8 without BOM": 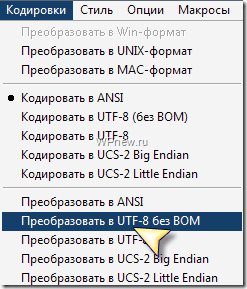 As a result, you should see the following in the lower right corner:
 Now save the file ( CTRL+S) and admire the result:
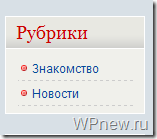
I want to tell you that each file needs to be converted to UTF-8 only once and simply saved. And, while I am writing new lessons, I recommend that you slowly start translating into Russian what has not yet been translated in your topic.
Now, if you suddenly see cracks on your blog, you will know what the problem is, and if you forgot something, this post will help you.
Many versions from the developer do not support Russian and do not display Cyrillic characters correctly.
With the help of several simple ways you can fix this problem and work in notepad with the Russian menu and correct display of characters.
Setting up localization during installation
Notepad is a popular open source text editor.
The application is designed to work in and allows you to easily highlight code syntax for more than 20 groups of programming languages.
Also, the editor can be used as a standard notepad for creating notes without formatting.
A special feature of the application is that its basic version can be expanded with new functions.
Users can install additional language modules, preprocessors and various plugins.
If you need Notepad to display menus and all tabs in Russian, download the installer latest version programs with .
Follow the instructions:
- If any version of Notepad++ is already installed on your PC, uninstall it;
- Start the installation process of the latest version of the editor you downloaded earlier;
- Select the directory where the program files will be moved;
- In the “Components” window, check the “Localization” box;
- Wait for the installation to complete.
Localization allows you to automatically determine the region in which the user is located.
The application then automatically downloads the necessary plugins with languages and the necessary encoders.
As a result, you receive software with a Russian interface and the ability to register on the page.
Setting up encoding and styles manually
Often programmers and web developers who use Notepad complain about incorrect display of the Cyrillic alphabet in the code.
This prevents you from creating a normal interface for a future program or website. Instead of familiar Russian letters, strange symbols appear.
There are times when, when the Russian keyboard layout is turned on, the text in the notepad stops being printed. It can only be copied from another editor and pasted into a Notepad document.
Incorrect display of the Cyrillic alphabet in the program can have several reasons:
- Font support problem;
- Encoding failed.
In the first case, solving the problem is very simple. The fact is that the application has selected one of the fonts installed on the PC, but does not support it.
Therefore the entered text does not want to be displayed. Also, the font itself may not support Cyrillic characters.
To resolve the issue, you need to adjust the styles. Follow the instructions:
- Restart the program;
- Click on the “Options” tab at the top of the notepad window;
- Select an item "Define Styles";
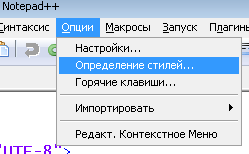
Fig.3 – “Options” menu
- In the window that opens, find the “Language” field. In it, click on the Global Styles element to see all the available styles that support almost all languages;
- Now in the “Style” field, select the “Default Style” option. Using this style usually does not cause problems with the Cyrillic/Latin alphabet.
- In the “Font Style” column, select “Lucida Console” - the optimal font for displaying program code.
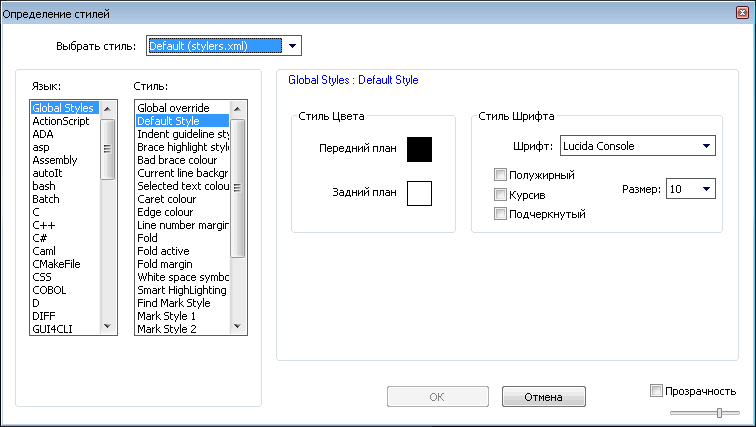
Fig. 4 – “Style Definition” tab
To configure the encoding and convert the already described text, the program has a separate tab called “Encodings” or “Encoding”.
To set the encoding with Cyrillic and Latin support for the entire file, click on the item “UTF-8” or “UTF-8 without BOM”.
To remove incorrect display of previously printed characters, select them and click on "Convert to UTF-8" or "Convert to UTF-8 without BOM".

Fig.5 – encoding setting
Russifiers for Notepad and changing the language in the program
Russifier is a special software module that allows you to change the program interface language to Russian, even if the developer did not provide such a function.
The cracker can be installed both during the software installation process (the localization function described above) and after installation.
Users can separately download modules for specific applications. You can also install a plugin in Notepad to change the language.
It will not only be able to adapt the interface for a Russian-speaking user, but will also allow text to be correctly displayed in the program code.
You can download plugins from the official resource of the application developer.
In order not to increase , programmers create modules for different languages as separate programs.
As a rule, such software is used in older versions of notepad.
The latest versions of the application easily support more than 30 languages. You can set the language of your region using the application settings:
- Launch the program and select the "Options" tab;
- Open the settings menu;
- In the new window, go to the “General” tab. Here you can configure the interface language, display of tabs and other options of the main window;
- Save your changes. If nothing has changed in the interface, you should restart the text editor.

Fig.6 - language change
Russian-language analogues of the program
Aptana Studio is a popular Notepad analogue. Aptana is a simple and user-friendly integrated development environment (IDE).
Syntax and error highlighting is available for more than 20 programming languages. The interface resembles a mixture of a standard editor and Visual Studio.

Fig.7 – Aptana main window
EmEditor is a text editor for users who care that the Russian language encoding is always displayed correctly and without glitches.
The application is available for everyone Windows versions. A special feature of the program is support for Unicode and large files.

Fig.8 – EmEditor window
Thematic videos:
Setting up Notepad++
Notepad in Russian - setting the language in text editor
Today we will find out in which editor and in what encoding you need to save Text Document for correct display of Cyrillic alphabet.
An example of a problem with displaying the Cyrillic alphabet
Standard application Notebook Windows saves text encoding by default Cyrillic Windows 1251. But from time to time a problem arises: if a document that was created in Notepad is opened in Notepad++, Russian characters may not be readable:
For correct display you have to manually select the Windows-1251 encoding:

Now the characters read:

The pun is this. Application Notebook thinks it saves in ANSI encoding:

But if you open the file in Notepad++ and select ANSI...
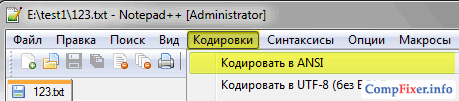
...we will still get abracadabra instead of Russian letters:
What needs to be done to ensure that a document with Cyrillic alphabet opens normally in all text editors
1. Open the document in Notepad++. Select the encoding so that Russian characters are displayed correctly:
2. Select Convert to UTF-8 without BOM And Save:
