While using the operating room Windows systems 10 in autorun inevitably accumulate unnecessary programs. Such programs are loaded with Windows 10 and continue to work in background, constantly consuming system resources computer.
In this material, you will learn how to disable autorun programs in Windows 10 and get rid of these useless computer resource drains.
Disable autorun programs using Task Manager
Starting with Windows 8, Task Manager has a large number of new features. Among other things, it appeared new inset called “Startup”, with which you can enable or disable autorun programs.
So, first you need. This can be done in several ways. For example, you can click right click Click on the taskbar at the bottom of the screen and select “Task Manager” from the menu that appears.
You can also open the Task Manager using the keyboard shortcut CTRL+Shift+Esc or by searching in the Start menu.

Once you have opened the Task Manager, you need to go to the Startup tab. The programs added to Windows 10 startup will be displayed here.

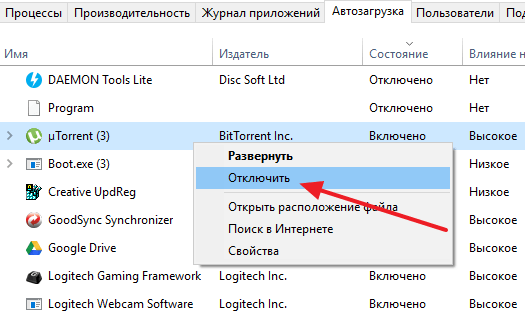
Here you need to pay attention to the “Status” column. If the state of the program is “Enabled,” this means that it starts when Windows 10 starts. If the state is “Disabled,” this means that the program does not start. For convenience, the list of programs in the “Startup” tab can be sorted by the “Status” column. Then programs with autorun enabled and disabled will not be confused.

In order to disable autorun of a program in Windows 10, you need to right-click on it and select “Disable” in the menu that opens.
Disable autorun programs through Services
It should be noted that some programs can be added to Windows 10 startup in a different way and then they will not appear in the Startup tab in the Task Manager. For example, a program can run as a service. To go to the “Services” tab in the Task Manager and click on the “Open Services” link at the bottom of the screen.

After this a list will open Windows services 10. To make it easier to work with this list, sort it by startup type so that automatically started services are at the top of the list.

After that, double-click on the service whose startup you would like to disable. As a result, a window with service settings will appear in front of you. Here you need to select the startup type “Disabled”, click on the “Stop” button and save the settings by clicking on the “Ok” button.

This way you will disable autoloading of the program through services. It should be noted that you need to disable services very carefully. If you mistakenly disable a system service, this may lead to unstable operation of the entire system.
Programs to disable autorun programs
You can also resort to specialized programs specifically designed to manage startup programs. One of best programs this kind is free utility.

This program checks everything possible ways autorun programs and displays a list of all programs that are loaded along with the Windows 10 operating system.
There are several ways to disable autorun of a flash drive in Windows 10.
Via Control Panel
Open the Control Panel by clicking on the button Start - Windows System Tools - Control Panel.
How to disable autorun of a flash drive in Windows 10
Go to Control Panels - Hardware and Sound - AutoPlay.
 Disable autorun Windows flash drives 10
A window will open in which at the very top put a tick next to the item Use autorun for all media and devices. Then in the Removable media item you need to select the item from the pop-up list Take no action and click the Save button. Now the Control Panel can be closed, and autorun of the Windows 10 flash drive will be disabled.
Through the Local Group Policy Editor
First, launch the Local Editor group policy, and to do this you need to press two keys on the keyboard at once WIN+R. A window will open in which you need to enter the command Gpedit.msc and click OK.
 How to disable autorun on Windows 10
 On the left side of the editor, expand the path Computer Configuration - Administrative Templates - Windows Components - Autorun Policy Disabling autorun. You need to change the state of this item, and to do this, double-click on it with the left mouse button.
 How to remove autorun on Windows 10
 A window will open in which you place a dot next to the Enabled item and click OK. After this, the editor can be closed, and autorun of the Windows 10 flash drive will be disabled.
Via Registry Editor
First, launch the Registry Editor. Press two keys on the keyboard at once WIN+R. A window will open in which you need to enter the command regedit and click OK.
 How to disable autorun in Windows 10
 The Registry Editor will open in which you need to expand on the left side HKEY_CURRENT_USER - Software - Microsoft - Windows - CurrentVersion - Policies - Explorer. Click on last point, and then on the right side find the item NoDriveTypeAutoRun. You need to change the value of this parameter, and to do this, move the cursor over it and press the right mouse button. A menu will open in which you need to select Edit.
 Disabling AutoPlay in Windows 10
 A window will open in which, in the value field, delete the old value and then enter the new value. 000000FF and click OK. After this, close the Registry Editor and restart the computer. After the reboot, the changes made in the editor will take effect and autostart of the Windows 10 flash drive will be disabled.
Autorun (not to be confused with autoload) is a good and useful feature Windows operating systems. It takes on some tasks and automates certain processes that the user would otherwise have to do themselves. You just need to connect the removable device to your computer and Windows will automatically perform some tasks. For example, it will open a photo application, launch a media player, or open Explorer. In this article we will talk about how to enable autorun for a flash drive, external drive or any other device, as well as how to turn it off and why to do it.
How to enable automatic startup in Windows 10 Settings
The section for automatically starting connected devices has a separate section in Windows 10 Settings. Go to it to enable autostart or repair the system in case of malfunctions. For example, if autostart disappeared.
Click Win+I(this is the fastest way to open Settings) and go to Devices - Autostart.

There is a single switch here that is responsible for enabling or disabling autorun.
A little lower, the system will prompt you to set default actions for certain devices. This could be a removable storage device (USB flash drive or disk), a memory card, or, for example, your smartphone, as in the screenshot.
You can select one of the proposed actions from the drop-down menu. By default, the system asks the user for the required action every time. If you want to change your preferred action or have the system constantly ask you, you need to change these parameters.

When setting the parameter Ask every time Windows will prompt you for a specific action with the connected device. The selection menu will appear as a standard notification.
From here you can disable autostart for a specific type of device. This is useful if you need autostart for certain devices, but do not want to allow other types of devices to autostart. For example, you can prevent the launch removable media, but allow your phone to autostart. In this case, for an individual device, you must select from the drop-down menu Take no action.
Enable AutoPlay in Windows 10 Control Panel
Classic Control Panel allows you to customize AutoPlay a little more precisely because it provides options for additional devices and file types. Also look there if the autostart of a flash drive or external drive has stopped working.

How to reset startup settings in Windows 10
This is a feature that doesn't exist yet. modern application Windows Settings 10, so you need to go to the classic Control Panel for it. You will need a reset if you need to roll back the settings to standard, or if autorun does not work for you.

How to disable autorun from a flash drive in Windows 10
IN modern world cloud storage and fast Internet connections, flash drives are gradually losing their relevance, but are still widely used. This means that the risk of running into some kind of malicious infection through someone else’s USB drive is still high. To reduce it, it is recommended to disable autorun of removable media in Windows 10. This can be done using several methods of varying degrees of complexity.
Note: Disabling autorun does not protect you from viruses and malware. Always use standard Windows antivirus, or solutions from third party developers. In this case, disabling autorun will only be an additional preventive protection.
Disabling AutoPlay via Windows 10 Settings
How to disable autorun via Windows 10 Control Panel
Disabling automatic startup via Registry Editor
Like all other settings, you can disable autorun with a simple tweak to the operating system registry.
note: Editing the registry requires your account having Administrator rights. If there are none, you will need a password for the Administrator profile.
Warning: editing the registry is always associated with certain risks of damage software computer. Use other methods to disable autorun of a flash drive if you are not sure that you can return the registry to its previous state.

How to disable autorun through Group Policy Editor
note: Like Registry Editor, Group Policy Editor requires proper permissions from the user account. You will need either an Administrator profile or a password for one.

Thus, autorun can be either enabled or disabled on your Windows 10 computer.
Good afternoon, dear readers, new and old 🙂, today I want to consider the issue of flash drive autorun and how to disable it. We will consider OS Windows, in my case this is version 8.1, but the steps taken are also suitable for Windows 10 and 7, for now it’s all the same, unless small software messes up in the future. Of course, autorun is a very useful function that helps the user quickly gain access to the connected device, but it also carries the other side of the coin in terms of reducing security, since your flash drive may have a virus or a malicious Trojan that starts launching as soon as The usb device opens, below we will look at how to defeat it.
How to enable flash drive autorun
Why autorun of a flash drive is bad, for example, I already described above, viruses, but earlier I told you how to make sure that there are no viruses on your USB devices, it will be interesting to read. Previously, before 2010, in all Windows editions at that time, it was enabled by default, and users were raking in viruses and Trojans, this could not last long and Microsoft, under the yoke of the user community, took the right measures and released an update. which disables autostart of devices, as well as in subsequent versions of the OS.
If you still want to enable autorun of a flash drive or other devices, then this is a simple matter. I remind you to do this using Windows 8.1 as an example. Right-click on the start menu and select Control Panel, in Windows 10 everything is the same, in the seven just start > control panel.

In the window that opens, look for the icon that says Autorun, it is responsible for turning it on and off.

As I told you, it is disabled by default. You may notice that everything here is divided into categories
- Removable media
- Memory card
- DVDs
- Blu-ray discs
- CDs

Actions will be available differently everywhere, but there are some common ones
- Take no action
- Open folder to view files (Explorer)
- Ask every time

For drive media, as you can see, there is also import and playback

Please note that at the program and game point you should > ask every time, this is correct for security reasons. since you need to see which program has requested access from you.

disable autorun of the flash drive, absolutely the same, just uncheck the checkbox and select Do not perform any actions. In Windows 8.1 and even 10, you can configure these functions in another mode and disable autostart of flash drives and other devices. Press WIN+F so that a search window appears on the side, be sure to set where to look (Everywhere) and enter Autorun, wait a couple of seconds for the system to search for the equipment and select Autorun options.

It will open for you mobile version control the autorun of removable media, use the switch to set the on/off position and below set the default parameter for what needs to be done.

You can also get to the Computer and Devices menu using another method: hover your mouse over the right corner and wait until the side menu comes out, select Settings > Change computer settings > Computers and Devices 
As you can see, everything is very simple and I think you will no longer have a question about how to disable autorun of a flash drive or, on the contrary, activate it.
Disable flash drive autorun via registry
For fans of hardcore :), let me remind you that the registry is essentially a kind of Windows area in which its parameters are written, some such Notebook. With its help, you can also both activate and deactivate devices. Open the registry, you can use standard tools, but I prefer the JumpReg utility, its advantage is that it is free and allows you to go to the desired section in one click. The method is universal, works starting from Windows 7.
To solve the problem, we need access to these registry sections
HKEY_LOCAL_MACHINE\Software\Microsoft\Windows\CurrentVersion\Policies\Explorer\
HKEY_CURRENT_USER\Software\Microsoft\Windows\CurrentVersion\policies\Explorer\
Copy the path and paste it into the Jumpreg utility

It immediately sends you to the desired section and saves time on searching, this is especially useful for beginners, you can’t go wrong with the section, it’s almost like sappers, once you make a mistake and you can put everything away.

In both sections you need to create new parameter DWORD (32 bit) and call it NoAutorn for example

with hexadecimal value 000000FF.

It should look like this, after that you will disable autorun.

Disable flash drive autorun via policy editor
Yes, in Windows the registry has a graphical shell, unfortunately it is not available in all editions of the system; it is not available in the basic or initial editions, for example. You can open it, here’s how you press WIN+R, the Run window will open, write gpedit.msc there

The Local Group Policy Editor will open.

Go to Computer Configuration > Administrative Templates > Windows Components > Autorun Policies. The following items will be available to you:
- Disabling autorun
- Prevent autorun from remembering user selections
- Prohibiting autostart of devices that are not volumes

We select the option Disable autorun, it sets the behavior of the system for all devices or just a complete shutdown, so to speak.

Prevent autorun from remembering user selections, sets a policy for turning off phones and memory cards

This is where I end an already long article, the main thing is that I taught you about this issue.