Connection various devices connecting to a computer causes difficulty for many users, especially if the device must be installed inside the system unit. In such cases, the multitude of wires and various connectors is especially intimidating. Today we will talk about how to properly connect an SSD to a computer.
So, you purchased a solid-state drive and now the task is to connect it to your computer or laptop. First, we'll talk about how to connect the drive to a computer, since there are more different nuances here, and then we'll move on to the laptop.
Connecting the SSD to the computer
Before connecting the drive to the computer, you should make sure that there is still room for it and the necessary cables. Otherwise, you will have to disable some of the installed devices– hard drives or disk drives (which work with a SATA interface).
Connecting the disk will take place in several stages:
- Opening the system unit;
- Consolidation;
- Connection.
At the first stage, no difficulties should arise. You just need to unscrew the bolts and remove the side cover. Depending on the housing design, it is sometimes necessary to remove both covers.

For fastening hard drives V system unit there is a special compartment. In most cases, it is located closer to the front panel; it is almost impossible not to notice it. By size solid state drives usually smaller than magnetic disks. That is why they sometimes come with special slides that allow you to secure the SSD. If you don’t have such a sled, you can install it in the card reader compartment or come up with a more clever solution to fix the drive in the case.

Now comes the most difficult stage - directly connecting the disk to the computer. It takes some care to do it right. The fact is that modern motherboards have several SATA interfaces, which differ in data transfer speed. And if you connect your drive to the wrong SATA, it will not work at full capacity.

In order to use the full potential of solid-state drives, they must be connected to the SATA III interface, which is capable of providing data transfer rates of 600 Mbps. As a rule, such connectors (interfaces) are highlighted in color. We find such a connector and connect our drive to it.

Next, all that remains is to connect the power and that’s it, the SSD will be ready for use. If you are connecting the device for the first time, then do not be afraid of connecting it incorrectly. All connectors have a special key that will not allow you to insert it incorrectly.

Connecting an SSD to a laptop
Installing a solid state drive in a laptop is somewhat easier than in a computer. The difficulty here is usually to open the laptop lid.

In most models, the hard drive bays have their own cover, so there is no need to completely disassemble the laptop.
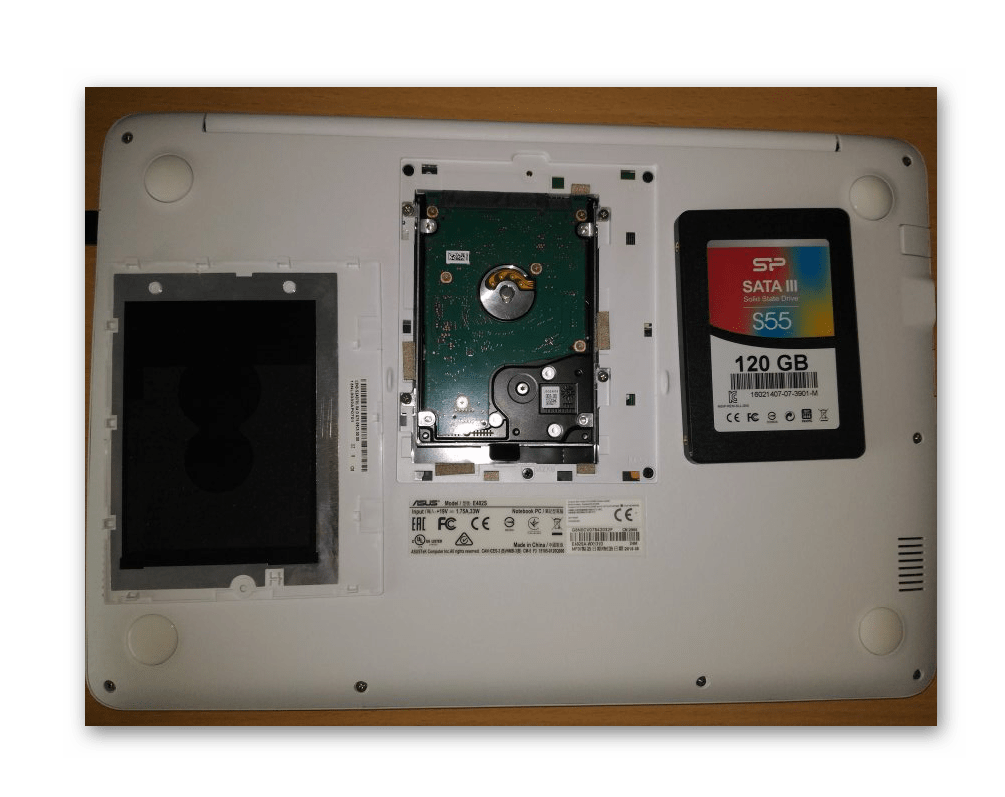
We find the required compartment, unscrew the bolts and carefully disconnect the hard drive and insert the SSD in its place. As a rule, all the connectors here are rigidly fixed, so to disconnect the drive, you need to move it a little to the side. To connect, on the contrary, slightly move it towards the connectors. If you feel that the disc is not inserted, then you should not use excessive force; perhaps you are simply inserting it incorrectly.

Ultimately, having installed the drive, all that remains is to securely fix it, and then tighten the laptop case.
Conclusion
Now, guided by these short instructions, you can easily figure out how to connect drives not only to a computer, but also to a laptop. As you can see, this is done quite simply, which means that almost anyone can install a solid-state drive.
Before you choose SSD drive for a laptop, the buyer should know their main features that should be paid attention to.
First of all, this is the disk capacity and its price - facts that influence the choice of any drive.
However, SSDs have their own characteristics that require taking into account other factors, approaching the purchase more responsibly than purchasing other computer elements.
Moreover, the price of such a device will be perhaps the most expensive among all laptop components.
Benefits of purchasing
Buying an SSD drive for a laptop is one of the critical actions to increase system performance and data processing speed.
On such a drive, access to information occurs much faster.
Replacement of obsolete HDD for more modern version will bring a greater increase in power than even increasing memory or installing a new processor.
Advantages of a solid state drive for a laptop:
- increasing the speed of data access, which will speed up the launch of programs several times;
- compact sizes of most devices (except for portable options), making it easy to select an SSD for both a large 17-inch laptop and a small netbook with a 10-inch display;
- light weight, especially important when used on a laptop computer;
- reduced energy consumption, which should increase the average battery life of your laptop;
- high level of reliability of SSD operation.
Among the disadvantages that are noted in solid-state drives, attention is paid to its relatively small resource: 3000–5000 cycles.
For ordinary home use this time is roughly equivalent to 7–8 years of work, more than the average user works with the same drive.
Comparative fragility of SSDs in this case doesn’t really matter - dropping the laptop itself is also undesirable.
At the same time, the relatively high price of the device is compensated by increased operating speed.
Features of choice
You should start choosing the right solid-state drive for you with the main indicator that immediately catches your eye when viewing various options in online stores.
This is the cost of the equipment, which today still exceeds the same parameter for conventional HDDs several times; it depends on the volume and manufacturer of the disk.
Price and volume
The cost of an SSD can seriously influence the choice of a user with limited financial resources.
The only available options today are 60–120 GB drives, the price of which is in the range of 2–4 thousand rubles, almost the same as a 500–1000 GB HDD costs.
However, if the laptop is used only for work and not for games, a 120 GB disk will be quite enough to accommodate the system and documents, and perhaps enough for backup.
When choosing a storage option large quantity Information is worth considering budget SSDs with a capacity of 512 GB.
The cost of a gigabyte is lower than that of other devices – at 20–30 rubles. instead of 40–80 rubles. for smaller or, conversely, new and larger drives.
It is worth paying attention to the 512 GB variants because of the increased data exchange speed.
Drives of this size (it can be not only 512 GB, some manufacturers produce 480 and 525 GB drives) work twice as fast as their 128 GB counterparts.
Size
When looking at SSD drives, you will notice that their sizes differ from each other.
And, if it is acceptable to buy a 3.5" drive for a desktop PC, for a laptop you should choose 2.5 and even 1.8-inch models.
Some of the most popular options today are the mSATA and M2 form factors, which are boards for SATA and PCI-E slots, respectively.
The dimensions of such disks are even smaller - width can reach only 12 mm, length - from 16 to 110 mm.

The only drawback of mSATA and M2 drives may appear if the motherboard The laptop does not have the appropriate slots.
But such outdated motherboards have not been produced for several years.
It is unlikely that you can significantly increase the performance of an old (before 2010–2011) laptop even with the help of an SSD drive.
Interface
Standard interfaces for connecting SSDs are PCI-E or SATA.
In terms of price to quality ratio, the best options are drives connected via the SATA III connector.
This interface will provide data transfer speeds of up to 6 Gb/s - more than any solid-state drive available today.

Speed
Reading and writing speed are parameters that will affect the speed of working with information.
Most SSDs read faster than write.
When the cache is full, the actual speed of the drive may drop - although not as noticeably as with older-style hard drives.
However, even inexpensive SSD drives operate 3–4 times faster than high-performance HDDs.
Therefore, when choosing a budget solid-state drive model (for example, a 512 GB option for 10 thousand rubles), you will still get a noticeable increase in performance.
Buying an analogue that costs 25–30 thousand rubles is not always justified for the average user, even with increased speed.
A compromise solution is to choose an option with less capacity but greater data transfer capabilities.
Resource
For a conventional solid-state drive, the number of rewrite cycles reaches 5000–10000. The higher this value, the longer the disk will last.
So, for example, for a frequently used small 60 GB SSD, the resource may decrease by 2-3 cycles during the workday.
A productive 512–1024 GB drive will last you approximately the same number of days as the number of cycles indicated in its technical specifications–3000 (over 8 years) or 5000 (13 years).
Although improper handling of the disk can reduce the resource much faster.

Manufacturer
Many manufacturers produce SSD drives, from Intel to SanDisk. Choosing a drive by brand is quite difficult.
But, if you need an inexpensive option, you should give preference to Crucial brands. Intel products provide high reliability.
And the fastest, although most expensive, are SSDs from Samsung, Western Digital and Corsair.

Controller
The type of controller affects disk performance. Budget options Phison models are used.
Expensive and fast drives are equipped with Marvell controllers, which provide a noticeable increase in performance.
Drives from the lower and middle price categories may have a SandForce SSD controller, which reduces data processing speed when the cache is full and disk space is reduced, but at the same time quickly records information.
Installing the disc
After the SSD drive has already been selected and purchased, all that remains is to install it correctly in the laptop.
If there is not enough space, you can replace the HDD already installed on the laptop with a solid-state drive (which can then be inserted instead of the drive using a special adapter).

Another option suitable when choosing a solid-state drive with the M2 form factor is installing the drive together with the HDD; There is enough space inside the laptop for this.
In this case, overpaying for a drive with smaller dimensions becomes justified.

The third option is to buy a special case to make the SSD external. Although you can buy such a drive in a design that is already suitable for connecting via a USB connector.
True, the second option will be more expensive and will not allow, if the opportunity arises, to install the disk inside the laptop.
Advice: External SSD should only be connected via USB 3.0 or 3.1 ports. The outdated interface 2.0 will not only not provide any increase in speed compared to the HDD, but may even reduce it.

After connecting the drive, you need to optimize it by setting software from the official manufacturer or other suitable applications.
For example, the Intel SSD Toolbox program will ensure that the disk firmware is constantly updated and its partitions are aligned. The AS SSD utility performs approximately the same task.

The interface of such optimization programs does not require much time to master - it is quite intuitive.
Green means the SSD is working normally.
Red warns about possible problems and you need to download the utility not to check, but to correct errors.
One such application is Parted Magic, whose task is to restore lost SSD settings and returning their values to factory settings.
SSD Operation
Right after SSD installation It is advisable to split it into several sections (just like a regular HDD).
One partition will be used for operating system And system files, the rest are for storing other information.
Another option is to store the bulk of the files on a regular hard drive, and give the solid-state drive to the OS and most frequently launched programs.
This optimization of SSD space will extend its service life.
If the drive is small (an economical purchase option), ranging from 60–128 GB, it is recommended to periodically empty it of unused files.
The disk should not be allowed to operate at the limit of its capacity - this affects both the speed of operation and the service life.
To remove unnecessary information, you should use the CCleaner program.
When using solid-state drives, it is worth knowing about the features of deleting information from it.
It is advisable not to simply remove unnecessary file built-in system tools, but also additionally clean the disk with a special utility - for example, Eraser, which can be called after installation from context menu Windows.

Another way to extend the life of an SSD, preventing premature failure of expensive equipment and loss of information, is to ensure uninterruptible power supply.
To do this, you need to ensure that your laptop battery has a sufficient charge level.
When connecting the device to the mains (for charging or in case of problems with the battery), it is advisable to use a UPS.
An unexpected power outage can erase information on the SSD, and short circuit in the electrical network, in 80% of cases the drive itself fails.
Increase the service life and effective cooling of the SSD - using special laptop stands and periodic cleaning of the case.
Firstly, it will not increase the speed, unlike HDD.
Secondly, by defragmenting the disk, you reduce the number of remaining rewrite cycles.
conclusions
Today's best choice for users looking to improve performance while saving money is the 60-128GB 2.5-inch SSD, suitable for most workloads.
If you have financial capabilities best option for your laptop – a disk with an M2 form factor and a capacity of 512 GB.
Today the requirements for wearable storage devices are: increasingly stringent requirements. In addition to the volume of built-in memory, as well as low weight and size, the requirement for data transfer speed has been added. Everything is logical: the higher the speed, the faster documents, photos, music, films will be copied.Moreover, the volumes of those same documents and media content have increased significantly. If previously a film of good quality “weighed” up to a gigabyte, today it weighs several gigabytes. The same with photographs: with an increase in the resolution of camera matrices, the volume of photographs has increased, and if there are hundreds and thousands of them, the copying process becomes painfully long.
Today, wearable storage devices face more demands from users than before. In addition to the light weight and size, as well as the volume of built-in memory, the requirement for data transfer speed has been added. Everything is logical - the higher the speed, the less time it will take to copy documents, photos, music and films. In addition, the volumes of those same documents and media content have increased significantly. If previously a film of good quality “weighed” up to a gigabyte, today it weighs several gigabytes. The same thing with photographs - the resolution of camera matrices has increased, which means that the volume of photographs has also increased, and if there are hundreds or thousands of them, then transferring them from a flash drive and back will become a real pain.
New realities and opportunities
With the advent of the USB 3.0 interface, it would seem that the data transfer speed should have increased 10 times compared to USB 2.0. After all, the theoretical throughput of the interface has increased from 480 Mbit/s to 5 Gbit/s. But this is just a theory. In reality, speeds depend on the drive itself more than on its interface. For example, ordinary flash drives with slow memory and a simple controller inside will never be able to show good speed, regardless of their interface. The same thing applies to laptop hard drives, which are often used as an external portable drive - the USB 2.0 interface is, of course, not enough for them, but they also cannot use USB 3.0 “to the fullest.” Maximum speeds for linear reading and writing in the case of a 2.5” HDD never exceed 100 MB/s.Available solid state drives (SSDs) connected via a USB 3.0 interface were expected to provide significantly higher read and write speeds. After all, unlike hard drives, the speeds of such drives are already limited by the throughput of the third generation SATA interface – 6 Gbit/s. That is, speeds of 500 – 550 MB/s in both directions. There are also plenty of external boxes with a USB 3.0 interface, so there is no problem making an external USB 3.0 drive from a fast SSD and a USB 3.0 box. However, there are doubts specifically about the SATA to USB 3.0 interface converter - how much speed will be reduced during conversion is the main question.

At the same time, renowned manufacturers have created fast flash drives that are based on the same SSD controllers and fast NAND memory as traditional SSDs. For example, latest generation promises us mind-blowing read and write speeds – up to 450 MB/s and up to 200 MB/s, respectively.

This is what Corsair promised us
We at the NICS Computer Supermarket are not used to taking anyone’s word for it, so we decided to conduct an experiment and understand what is better: buy a fast USB 3.0 flash drive or assemble an external drive from a real SSD and a USB 3.0 box.
Experiment
As an experiment, we used the same testing system that we use for hard drives and SSDs with the SATA interface. The stand configuration can be viewed.
The following components that were on hand were tested:
| Corsair Voyager GTX 256 GB | Samsung 850 EVO mSATA 120 GB + Espada PA6009U3 | |
| ATTO Disk Benchmark Read speed. Default settings, KB/s | 463962 | 150243 |
| ATTO Disk Benchmark Write speed. Default settings, KB/s | 347114 | 144320 |
| CrystalDiskMark 3.0 Sequential Read (1024 KB Block Size), MB/s | 232.6 | 156.7 |
| CrystalDiskMark 3.0 Sequential Write (1024 KB Block Size), MB/s | 129.3 | 157.4 |
| CrystalDiskMark 3.0 Random Read (512 KB Block Size), MB/s | 168.3 | 154.1 |
| CrystalDiskMark 3.0 Random Write (512 KB Block Size), MB/s | 127.3 | 147.8 |
| CrystalDiskMark 3.0 Random Read (4 KB Block Size), MB/s | 23.61 | 23.69 |
| CrystalDiskMark 3.0 Random Write (4 KB Block Size), MB/s | 34.88 | 36.34 |
| CrystalDiskMark 3.0 Random Read (4 KB Block Size, 32 Request Depth), MB/s | 25.8 | 25.9 |
| CrystalDiskMark 3.0 Random Write (Block Size 4 KB, Request Depth 32), MB/s | 36.82 | 38.96 |
| AS SSD Copy Benchmark ISO, MB/s | 68.27 | 66.98 |
| AS SSD Copy Benchmark Program, MB/s | 52.38 | 55.99 |
| AS SSD Copy Benchmark Game, MB/s | 65.26 | 63.15 |
As you can see, it is significantly faster than its competitor in sequential read and write operations. And since the main operations for external storage is the banal transfer of large data, then these characteristics are the most important. We also note that Corsair did not deceive, which is the sin of many flash drive manufacturers - the read and write speeds are really high. Transferring a gigabyte of data in 3 seconds is possible.
The conclusion is obvious - much faster than SSDs connected via USB using existing USB 3.0 boxes. In addition, “SSD designs” are much smaller and lighter, which is also very important for portable drives.

Conclusion
No matter how hard we try to get high SSD speed through existing USB 3.0 boxes - it didn’t work. But it turned out great. With a new 256 GB flash drive (just think about it!) you can transfer a lot of information at speeds that until recently seemed sky-high to us. In addition, it is much smaller in size and weight than an SSD installed in a box. Yes, it is more expensive, but it is made of metal, weighs little and reads and writes really quickly - today there is simply no alternative to this combination of advantages.
Terrible secret!
If a flash drive or portable external hard The drive is equipped with a USB 3.0 interface, this does not mean that the speed of reading and writing will increase radically or even increase at all. It all depends on the drive itself. At the dawn of USB 3.0, many manufacturers of flash drives did not change anything structurally at all, except for the interface. That is, “slow” was taken USB flash drive 2.0 with reading and writing speeds of up to 10 MB/s, the interface changed and a USB 3.0 flash drive went on sale. Of course, there was no increase in speed at all.
Now let's take a portable external hard drive as an example. Essentially, it is a 2.5” SATA drive + SATA -> USB 3.0 interface converter. If you remember at what speed any 2.5” HDD works for a laptop with a spindle speed of 5400 rpm, then numbers pop up around 85 MB/s for linear reading and writing. Simple mathematics will tell us that USB interface 2.0 is not enough to realize the capabilities of this drive, but in the case of USB 3.0 only a third will be used bandwidth, best case scenario.
Hello.
Sometimes it happens that a laptop or computer does not turn on, but the information from its disk is needed for work. Well, or you have an old hard drive lying “idle” and which would be quite nice to turn into a portable external drive.
In this short article I want to dwell on special “adapters” that allow you to connect SATA drives to normal port Computer USB or laptop.
1) This article will only consider modern drives. They all support the SATA interface.
2) “Adapter” for connecting the drive to USB port y - correctly called BOX (that’s what it will be called later in the article).
How to connect SATA HDD/ SSD drive laptop to USB (2.5 inch drive)
Disks from laptops are smaller than those from PCs (2.5 inches, on PCs 3.5 inches). As a rule, BOX (translated as “box”) for them comes without external source power supply with 2 ports for connecting to USB (the so-called “pigtail”. It is advisable to connect the drive to two USB ports, despite the fact that it will work if you connect it to only one).
What to look for when purchasing:
1) The BOX itself can have a plastic or metal case (you can choose either one, because in the event of a fall, even if the case itself is not damaged, the disk will be damaged. This means that the case will not save you in all cases...);
2) In addition, when choosing, pay attention to the connection interface: USB 2.0 and USB 3.0 can provide absolutely different speeds. By the way, for example, a BOX with USB 2.0 support when copying (or reading) information will allow you to work at a speed of no more than ~30 MB/s;
3) And one more important point- this is the thickness for which the BOX is designed. The fact is that 2.5 disks for laptops can have different thicknesses: 9.5 mm, 7 mm, etc. If you buy a BOX for the slim version, then you probably won’t be able to install a 9.5 mm thick disk into it!
BOX is usually disassembled quite quickly and easily. As a rule, it is held in place by 1-2 latches or screws. Typical BOX for connection SATA drives to USB 2.0 is shown in Fig. 1.
Rice. 1. Installing the disc in the BOX
When assembled, such a BOX is no different from a regular one. external hard disk. It is also convenient to carry and use for quick information exchange. By the way, it is also convenient to store on such disks backups, which are usually not needed, but if something happens they can save a lot of nerve cells :)
Rice. 2. When assembled, the HDD is no different from a regular external drive
Connecting 3.5 disks (from a computer) to a USB port
These wheels are slightly larger than 2.5 inches. USB power supply It's not enough to connect them, so they come with an additional adapter. The principle of choosing a BOX and its operation is similar to the first type (see above).
By the way, it is worth noting that a 2.5-inch drive can usually be connected to such a BOX (i.e., many of these models are universal).
Also, one more point: often manufacturers do not make any box for such drives at all - that is, you simply connect the drive to the cables, and it works (which is logical in principle - such drives can hardly be called portable, which means the box itself is usually not required).
Good day everyone, my dear friends. Today I want to tell you about how to connect HDD via USB to a computer or laptop. Personally, I had this question when I replaced it on my laptop, after which the old “hard” remained restless, although fully functional. Therefore, I hasten to please you. If you have such a device, then you can make an excellent mobile data storage out of it.
There is, however, one small condition. These methods are only suitable for more or less modern hard drives with an interface of at least SATA.
USB Box (containers, pockets)
Cam Box - This is (as you understand) a certain box (plastic or metal), inside of which there is a special slot for a particular disk. Naturally, it is worth noting that there are boxes for both large HDDs (3.5) and small ones (2.5), which go under laptops.

The HDD is simply inserted into the box, and after assembly it will be no different from a regular external one. hard drive. After that, you just need to insert into it USB cable and connect to your computer. This way you get double benefits:
- You bring an old device back to life and use it;
- You practically get an external HDD for free
On such media it will be possible to store any backup and archival copies, or use it for Everyday life.
All the fun will cost you an average of 300-500 rubles.
Adapter (SATA-USB)
The easiest and least expensive way is to purchase a special SATA-USB adapter. The adapter itself is a cable, at one end of which there is a connector for connecting a disk, and at the other end there is a USB port.

Well, I think you guessed what needs to be done in this case. Yes, it's simple. Connect the hard drive to the connector, and insert the other end into the USB port of your computer or laptop.
But it’s just worth considering that conventional HDDs (3.5) may not have enough power from one USB cable, so purchase a cable with two connectors and use them simultaneously.

Depending on the company and the quality of the product, such cables will cost you approximately 200-600 rubles.
Dock station
The most expensive, but very effective option is to purchase a docking station. These devices are somewhat reminiscent of old consoles like Dendy or Sega. The similarity is that instead of connectors for cartridges, there are connectors for HDDs. All you have to do is simply insert the hard drive into this station, and then connect it via USB to the computer.

There are such devices different types, and in many cases you will be able to work not only with one disk, but with several at once, even of different form factors (2.5 and 3.5).
The cheapest options with one device will cost you no less than 1000 rubles, or even more. More powerful stations cost 3 and 4 thousand rubles each.
As you can see, there are enough ways to connect a hard drive via USB to a computer, for every taste and color. So you no longer have to leave all your devices unattended.
Well, this is where I end my article. I hope you liked it, so don't forget to subscribe to my blog updates and also share blog articles on in social networks. Good luck to you. Bye bye!
Best regards, Dmitry Kostin