It simply won’t work, you need to know what equipment is available for pairing on an LG e400, g360, spirit phone or another model and on a personal computer.
For example, an LG phone model e612 on the Android 4.0 operating system with a Capacitive screen - 320x480 dpi can be connected to a computer via wifi, bluetooth or via usb cable, data cable.
Ideally, it should be like this, connected the usb cable or entered the wifi password or turned on the bluetooth and everything worked. In most cases, this is what happens.
If for some reason you are having difficulty with connecting phone to laptop or PC via wifi, bluetooth, usb, read the following instruction.
The following will be described: solving a problem when connecting a leon, G4 H818, G2 D802 32Gb phone or another model via usb, bluetooth connection setup and connection to PC, connection mobile phone via data cable, connect to the laptop via wifi.
How to connect phone L70 D325, L90 D410, L60 X145 or other model to PC
A small review and recommendations on how to connect an LG e400 phone on the Android 2.3 operating system with a multi-touch screen, capacitive - 240x320 dp to a computer, laptop, PC via usb, wifi, bluetooth to save recording music, files, overwriting photos, video shooting and many more on PC. The information for this article is collected from various sources and grouped into sections: connecting a phone to a computer via usb - suitable for many modern phones, connect phone to computer via bluetooth, for different models phones equipped wireless communication and connecting the phone L70 D325, L90 D410, L60 X145 to the computer via a data cable.
In order to connect the phone to the computer, there are several ways:
The easiest one is through usb cable, after connecting, a new removable disk should appear on the computer, as if you had inserted a USB flash drive into the usb port. In order to have access to phone data: Contacts, messages, calendar and others, you need to install a special program developed by the phone manufacturer. With this connection, errors and problems are possible, which will be described in more detail below.
Loading phone data from a flash card. Everything is simple here. We take out the flash card from the phone, insert it into the computer, it appears new disk in "My Computer" with phone files. In order for everything to go smoothly, you need to enable the "Save everything to a flash card" setting on your phone, and your computer must have a slot for inserting a flash card in the format you need MicroSD, Memory Stick PRO Duo or another.
Connect to laptop or computer via bluetooth. It is necessary that both devices are equipped with a bluetooth module. You can connect to the phone through a special program or Windows tools. Before connecting, you need to activate, turn on both bluetooth modules on your phone and PC and go through the process of identifying and pairing devices. Read more about this here.
If the phone is very simple or outdated and does not have USB port and flash cards and there is no bluetooth module, then there is only one way to connect - via a DATA cable. Consider whether it is worth messing with the connection via a data cable. The fact is that the connection is not always successful and it is not always possible to squeeze something out of such low-capacity phones today. Nevertheless, there is such a way, and after successfully connecting the data cable to the phone and computer, one more software condition is necessary. You will need to find a program that supports your phone model. Almost all well-known mobile brands Nokia, Samsung, Apple, Motorola, Sony Ericsson, HTC and others? have their own special licensed software that will help you connect your phone to a PC. The program must be included in the CD for your phone or it can be downloaded from the website of the cell phone manufacturer.
Problems when connecting phones, tablets on the Android platform.
Question:“I bought a smartphone with Android. I turn it on, connect the phone to the computer via USB cable. The sound of connecting a new device is heard in the speakers of the computer and on the smartphone, there is no new disk in the system. The drivers are all installed, there are no problems with the cable or phone either. What to do?"
Answer: The problem is not connecting the phone to the computer may be due.
Faulty cable;
- Faulty, not configured computer;
- Faulty, phone not configured.
1. The USB cable should not be long, short, short, not bent, contacts not damaged. It is best to find a cable that has already been tested on another phone and use it when connecting your phone.
2. The computer should initially work without problems and errors. Always used to identify connected devices, printers, cameras, flash drives, has the necessary installed drivers and programs. The computer must be completely restarted. Start - Shutdown - Restart.
3. The phone must be rebooted before connecting - turn it off completely and boot from the black screen. If this does not help, you need to turn off the phone again, remove the battery, SIM card, flash card from it. Then put everything in place: battery, SIM card, flash card, cover, pull out of the phone and computer usb cable and insert it. Turn on phone.
More fine tuning connecting phone to pc:
Connect android smartphone to the computer via USB and wait for the characteristic sound from the speakers, which makes it clear that the connection has occurred. In the Windows tray at the bottom, a message will appear that the device is connected and a description of the connection: connecting or connected, or searching for a driver.
Go to settings android phone and check the item: Settings (Settings) - Applications (Applications) - Developer Tool (Developer Tools). The USB debugging item must be disabled.
After these steps, a connection window will appear on the phone screen. With options: USB connection – Removable drive, Connect in phone mode. Selects the desired option. For a simple volume of files, download, download music, video, games, you need to select the item - Removable disk. In this mode, some phone functions will not work.
After that, Windows will give a message that an additional Flash drive is connected and it will be possible to work with files. But be careful not to accidentally delete system files from your phone. installed programs without them, the phone will not work.
Turn off your phone properly. is necessary in the lower right corner of the tray, click on the connection picture and select the command "Disable flash drive". After disconnecting the phone from the laptop, PC, Android may slow down a little for a while, until operating system will not index new phone files.
Work with file system when connecting the phone to the PC, it can be in user or administrator mode. In root administrator mode, access to all system files smartphone. The user is not given such rights, no matter what is spoiled. About how to get ROOT access for an Android phone, you can read here.
Question 2:
Description of the problem:
Previously, when connecting to a PC, a notification automatically popped up on the phone about the choice of connection: Only charging, Disk drive. Today, for the first time, the phone did not give it away. It just starts charging without any notification. What I did: rebooted the phone, rebooted the computer, through "Settings / Connecting to a PC" also set everything up, turned off the antivirus. I'm looking for advice from you people.
Answer 2:
If you have installed the program on your phone or computer, the Task Killer program (quick closer, application remover), you must remove it from your phone.
- For the HTC phone, install the latest version of the HTCsync program.
- Turn off the phone.
- We disassemble the phone (remove the cover, battery, SIM card, flash drive) and assemble it back.
- Turn on the phone.
- Connect usb cable.
- A selection window appears on the phone (Charging, Drive, Other).
- Select Drive.
- Connecting to PC.
How to connect phone to computer via Bluetooth
To connect you need:
Enable Bluetooth in the phone, if necessary, set the mode - "Visible to all" in the "Bluetooth" menu.
- Turn on Bluetooth on the PC, the Bluetooth logo should appear in the tray.
- Or through this Bluetooth logo, select the "Connect" command.
- Or connect to pair your phone with a computer through a special program. For Nokia phone- Nokia PC Suite. For Samsung - Samsung PC Studio.
- When connecting through the phone manufacturer's program, you need to go to the program settings. For Nokia PC Suite, select the Manage connections tab - type Bluetooth connectivity- click the "Settings" button.
- As a result, a password entry window should appear on the phone and computer, enter, for example, 0000.
If the connection fails, click the "Search for devices" or "Search again" command.
Connecting the phone to a computer via a DATA cable using proprietary software and drivers from phone manufacturers.
For phones, smartphones Samsung - program Samsung PC Studio.
Samsung PC Studio allows you to connect your phone to personal computer and provides the ability to control the phone over the network. Samsung PC Studio app can do transfer and editing personal information and media files Samsung phones. And also, the program has a connection wizard, a contacts, messages and files manager, and a phone synchronization manager with a computer. In some cases, the program requires DirectX 9.0 on Windows.
Key features of Samsung PC Studio:
Backup and restore phone information: contacts, calendar, files via PC.
- Sync calendar contacts and notes to format Microsoft programs outlook.
- Using your phone as a modem.
- View and rename mobile phone files.
- Create, view, delete and edit contact information on PC.
- View, delete, copy SMS messages on PC. Create and send SMS from PC.
- Convert music to a format supported by the phone.
- Save, view and play images and video files from phone to PC.
- Image editing to create phone desktop backgrounds, MMS images and download them to your phone.
- Download and install programs, applications and games on your phone.
Software for synchronization of Nokia phones, smartphones - program Nokia PC Suite.
Nokia, like other phone manufacturers, requires its own original DKU-type data cables for connection for some models of its phones. Connecting the phone to a PC through such cables is possible only through the official, proprietary software - the PC Suite program. The Nokia PC Suite application is a package of programs through which you can change and edit images, ringtones, polyphony, edit and change phonebook entries, work with messages, use your phone as a modem, and most importantly, of course, copy and download files to your phone via PC.
Connection of Siemens phones, DES, SiMoCo, MPM programs.
For Siemens phones many communication programs can be used - DES (Data Exchange Software), SiMoCo (Siemens Mobile Control) or MPM (Mobile Phone Manager). This phone manager is a multifunctional application with which you can successfully copy and save information on your Siemens phone.
Connecting Motorola phones.
The universal programs listed above are also suitable for Motorola phones, I would especially like to highlight the program for synchronizing Motorola phones with a PC - MPT (Mobile Phone Tools) and ME (MobilEdit).
Programs for all phones.
The latest versions of Nokia PC Suite support connection to almost all models Nokia phones, but there are problems with finding and purchasing original DKU data cables on store shelves. To solve this problem, there is a MobiMB program, through which you can connect your phone to a computer not through proprietary cables CA, FBUS and DLR. This program is similar to PC Suite and can also connect the phone via Bluetooth and IrDA.
That was theory, now practice:
1. Install all the necessary software, programs, drivers from the phone's CD or download the software from the phone manufacturer's website via the Internet.
2. We reboot the computer.
3. Insert the cable into the phone and computer port.
4. Open the program (for Nokia) - Nokia PC Suite.
5. Select the connection we need, in our case the serial port.
6. press the "Advanced" button and select the correct COM port.
7. In the program, our phone should appear in the list of phones.
If the phone does not appear in the list of connected phones, then either the wrong COM port is selected, or there are problems with the drivers, or there is no cable.
In this case, you can try connecting your phone to the computer through another program, such as MobiMB.
Logic of the connection process on different programs and phones via data cable will be the same, the difference will be only in the name of the program menu items.
To connect Motorola phones through the MPT (Mobile Phone Tools) program, you can suggest this setting. If the program does not detect the phone the first time. Then in order to connect the phone, press F6 and select "Communication Settings". Check the boxes next to "Activate reception" and "Activate transmission" and click the "Change Modem" button. After that, the program will prompt you to select a phone model. After that, the program will try to find the phone, and when it is found, everything will work.
detailed instructions about how to connect LG g360 phone on Symbian OS platform on a screen with a resolution of 320x240, color TFT type to a PC via wifi bluetooth, via wi-fi, bluetooth, bluetooth, via data cable. Program for connecting phones LG l5, optimus l7 dual black white p715, t370, e612, e400, g360, spirit, leon, G4 H818, G2 D802 32Gb, L70 D325, L90 D410, L60 X145, nexus 7, Magna H502, h324, g3s, x135, d724, g4c, x145, h422, 5, g4s, g3 stylus, kp500, dual, t300, e615, optimus l9, p705, l3, gs290, e, t375, p970, t500, e405, s367, p500, 500, t, gx500, p, g, gx200, kf300, 615, e455, 3, 300, 4, gt540, a290, optimus l7 ii, optimus pad v900, nexus 4 to a computer, laptop.
The popularity of the Odnoklassniki social network is known to everyone. AT social network you can come in from mobile devices: phone or tablet. LG. Read more about how to do this here... After buying a new phone, the problem immediately arises of transferring the phone book with contacts to it. You can solve this problem by copying contacts to the new LG manually or via a SIM card.Smirnov Dmitry Connoisseur (308), voting 2 years ago
So it goes. I connect this TV to a computer for different needs there) (main FIFA14)) During use, there is a noticeable delay in image transmission. Annoying horror! turns out, I clicked, delay, execution. Is it normal? and why could this be?
Huowkutmas Fuberynvmb Oracle (57451) 2 years ago
A feature of additional processing (non-switchable enhancers) of the TV signal.
Lord shade Enlightened (38739) 2 years ago
Heruvilius Guru (3398) 2 years ago
There are a lot of different post-processing in modern TV sets. Smoothing, MotionCare and more. You need to turn off all these improvements, then there will be no delay. Only after the game they will need to be turned on, otherwise the quality of the analog image will kill your eyes. =)
Martin Alekseevich Artificial Intelligence (175331) 2 years ago
via HDMI? delay? I do not believe
Kim Enlightened (28699) 2 years ago
(1) We connect the computer and the TV with a cable.
Immediately turn off the computer and TV from the network. After we connect the connectors Computer HDMI and TV cable:
Simply insert one end of the cable into the HDMI output of the computer, respectively, the other end into the HDMI input of the TV.
IMPORTANT!
You cannot connect a similar and more advanced DVI output computer to HDMI input
TV (as well as vice versa). Both connectors must be the same. Otherwise, the sound will disappear, the image will go astray or blurry.
(2) Turn on both devices.
First turn on the TV, after the computer (it’s more convenient). When the TV is turned on, while loading WINDA on the TV screen should blink several times -
than declares an external connection to it (hence, so far so good).
We switch the TV to HDMI mode - so that it receives signals not from the antenna,
but from external device(in this situation - from the video card of the computer connected to it via the HDMI output).
(3) Set up the video card.
In principle, if the computer is not connected to the TV for the first time, this step is not needed -
vidyuha is most likely already configured initially, and the image will already be visible on the TV. However, if the computer is connected to the TV for the first time,
the video card still needs to be configured. Clicking right click on the desktop,
then follow the path:
Properties - Characteristics - Optional. Depending on the version of the Operating System and the desktop interface, the path to the video card may differ. Our task is
just go to the properties of the video card (video adapter, adapter). If our vidyuha is from the Ge-Force series (from Nvidia), then after clicking on Advanced, go to the tab
Ge-Force**** (name of our graphics card model). click on item
Nview (left). then click on Apply. After that, the desktop image should appear on the TV screen. If our vidyukha from the RADEON series
(or each other series from ATI), after clicking on Advanced, we will have to follow a simple instruction of 2-3 steps to set up a TV connection to a computer. We just execute all the manuals that appear on the screen, and that's it - the TV will show the computer desktop.
How to setup?
How to connect a TV via LAN to a computer using LG as an example
Most modern smart TVs are equipped with at least a LAN port to connect it to the Internet through a router. At the same time, on TV you can not only surf the Internet, but also watch movies from computers connected to the same network. But not every apartment has a router yet, but you want to watch movies and get on the Internet from a TV set. What to do? You can connect the TV to the computer via the LAN connector directly. For this we need a network cable.
Comment: There may be a slight complication here #8212; regular #171;straight#187; an ethernet cable may not work, although modern network cards can somehow #171; turn over #187; cable logically. Then you will need to try the reverse LAN cable (the so-called #171;Cross-over#187;).

We turn on one end of the network patch cord, we include it in the computer's network card:
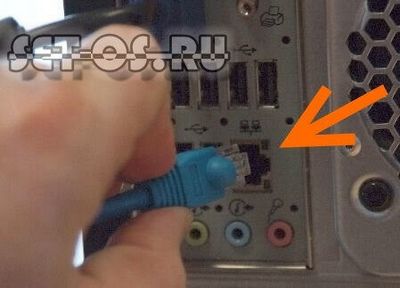
Second #8212; to the LAN port of the TV:

We check whether the devices are linked by indicators. After that, we proceed to connect the TV to local network. Let's start with network board computer.
Settings on the computer:
There are two scenarios here:
First#8212; it's just to connect your TV via LAN to your computer without internet access. In this case, you need to network computer register a static IP address #8212; let it be 192.168.1.2 with mask 255.255.255.0:

On the TV, you will also need to register IP from the same subnet # 8212; for example, 192.168.1.3.
Second#8212; is connecting a TV through a computer to the Internet. To do this, your computer or laptop must be connected to the Internet via WiFi or a USB modem. Then we just use the built-in Windows mechanism ICS#8212; Internet Connection Sharing. It allows you to allow access to the global network to local clients. For this in network connections select the one through which you are connected to the Internet and right-click on it. The connection properties window will open in which we are interested in the tab #171;Access#187;:

Check the box #171; Allow other network users to use this computer's Internet connection#187;. Below you need to select #171; Local Area Connection#187; or #171;Ethernet#187; and press the OK button. In this case, IP addresses do not need to be written #8212; neither on network card, nor on TV #8212; everything will be assigned automatically.
TV settings:
On TV, everything is done very simply. As an example, I will consider the LG TV. On other brands, despite the external difference in the menu, the meaning of the actions is the same #8212; just do the same.
We go to Settings and go to section Network :

Choose an item Network configuration. A special configuration wizard will open:
![]()
Then it all depends on which of the options you have chosen and configured on your computer. If we just connect the computer to the TV via the LAN port, then click on the button # 171; Set up connection # 187; and enter the IP address 192.168.1.3 with a mask 255.255.255.0 .
If you took the second path using the ICS mechanism, then simply click on #171;Next#187;. Automatic network connection setup will start:

Click on #171;Close#187;. That's it #8212; You have successfully connected your TV to your computer via LAN.
This is also interesting:
Connecting a TV to a computer via Wi-Fi
 Many people know that you can connect a computer to a TV using various cables type HDMI or VGA. However, it is possible to do this and wirelessly using Wi-Fi.
To perform this task, you must be able to establish a Wi-Fi connection with the TV. This means that the TV must have a built-in Wi-Fi adapter. It is worth noting that most modern Smart TVs can do this. You can also connect a PC to a TV that does not have a Wi-Fi module. You can perform similar actions on any Windows operating system.
Playing PC Videos on TV via Wi-Fi
This method is the most popular for connecting a TV to a PC. In addition to the fact that the TV must have a Wi-Fi module, it must be connected to the same router as the PC on which the various files to view. If the TV supports WiFi Direct then you don't need a router. You can just connect to the network.
After that, you need to set up a DLNA server on your PC. To do this, you need to set in the settings existing network"Home". Among the available directories are "Video", "Music", "Documents" and "Images". To grant access, you need to right-click on the directory and specify "Properties", where to go to the "Access" section.
To quickly provide full access, you must go to the OS explorer and select "Network". If the notification "Network discovery and general access to files are disabled", you must click on it and follow the recommendations. If such a notification does not appear, and PCs and servers are displayed on the screen, this may mean that all settings have already been made.
After turning on DLNA, you need to go to the TV menu and select an item to view the connected gadgets. For example, on a Sony Bravia TV, you need to press the Home key, and then go to the desired section to view its contents on a PC. LG has a SmartShare item where you can view the contents of all available folders. In this case, there is no need to install such a utility on the PC. On other TVs, the situation is almost the same.
In addition, with a DLNA connection running, you can right-click on a video file on your PC, where you need to select "Play on TV". Selecting this item will start broadcasting video from PC to TV.
It is worth noting that if the TV is capable of playing MKV files, then the "Play to" function will not work for them in the seventh and eighth Windows versions. They will also not be displayed on TV in the menu. To get out of this situation, you can simply rename these files on your PC to AVI.
Additional monitor from TV
This section will describe how to broadcast any picture from a PC to TV, and not just individual files. In this case, the TV will act as an additional monitor.
To do this, you can use Miracast and Intel WiDi. It should be noted that these technologies are absolutely compatible with each other. You don't need to use a router to make a connection like this because everything goes straight through.
If the laptop has an Intel 3 CPU, a wireless module, and has integrated Intel HD Graphics, then the computer should work with Intel WiDi on Windows 7 and 8. Sometimes you need to install the Intel Wireless Display utility, which can be downloaded from the official resource.
If Windows 8.1 was originally installed on the laptop and there is a built-in Wi-Fi module, then Miracast technology should work on it. If the system was installed independently, then the technology may or may not be supported. In other versions of the operating system, this technology will not work.
In addition, the TV must also support this technology. Some time ago for TVs it was necessary to buy a Miracast adapter, however, today many TVs have a built-in module or receive support when updating the firmware.
To connect your TV to your PC, you need to go through a few steps. The first step is to activate Miracast or WiDi technology on the TV. You can do this in the settings. As a rule, this function is activated initially. In some cases, there may not be such a setting. Then you just need to turn on the Wi-Fi adapter. On TVs brand Samsung this option is called "Screen Mirroring", which is located in the options.
In the case of WiDi, you need to run the Intel Wireless Display utility and find an additional monitor. When connecting, you may need to enter a security password, which will be displayed on the TV screen.
To use Miracast, you must go to the Charms bar. After that, you need to specify "Devices", and then "Projector". Next, you need to click on "Add a wireless display". If there is no such item, then the computer does not support Miracast. In this case, you can try updating the Wi-Fi module drivers.
It is worth noting that with WiDi, there may be problems connecting a PC to a TV. There are no problems when using Miracast.
Wi-Fi connection conventional TV without wireless adapter
If you use a regular TV without Smart TV, but with HDMI, you can try connecting it to a PC wirelessly. However, this requires a special device.
Among these gadgets, one can note the Google Chromecast, which allows you to receive broadcasts from any device and broadcast them on your TV. In addition, you can use Android Mini PC. This device resembles a USB stick, but connects to the TV's HDMI port. With it, you can fully work on the TV in the Android system.
This article describes the most best options for wireless connection TV to PC. There are other ways. Among them are the use of a Wi-Fi adapter or the use of separate Miracast modules.
How to connect LG to computer?

To connect a TV to a computer, you can use various types cables (HDMI, DVI, VGA, S-Video, etc.). You can connect your phone to a computer or laptop via Bluetooth and infrared, or by connecting devices via a USB cable. However, progress does not stand still and connection technical devices also possible through various programs, apps and options that unlock more options. Today we will talk about the LG brand.
How to connect LG TV to computer
Many modern models LG TVs (with built-in Smart TV function) have SmartShare technology, which allows you to access computer content (videos, photos, etc.) and view content on a large screen.
- To use this application, you need to connect your LG TV and computer to the same network. Devices must be connected using a router in any way (both wired and wireless).
- The next step is to set up file distribution from a computer. This setting will allow the TV to access the folders on the computer. For customization, a standard windows player media.
- Go to the start menu and search for the player.
- Open Windows Media and click on the "Stream" tab.
- Next, you need to check the following boxes: "Allow control" and "Automatic playback permission".
- Then go to the TV menu using the remote control, select "Smart Share".
- You will open the "Shared" folder, the contents of which you can view through the TV, as well as manage files.
How to add your folders to the player
In order for you to be able to view and manage your computer folders through your TV, you need to add desired content to the library".
- Open the player and go to the "Organize" section.
- Hover your mouse over the "Manage Libraries" section and click on the desired item (depending on what you want to add: "Videos", "Images", etc.).
- Then click the "Add" button, then select the desired folder and click on "Add Folder".
- Click the "OK" button.
If your LG TV does not have a built-in SmartShare function, then you can download a special program from the manufacturer, install it on your computer and configure file access as described above.
How to connect LG phone to computer
In order to connect an LG brand phone to a computer, we will also need special program called LG PC Suite.
In addition, to connect your phone and computer, you will need a USB cable, Bluetooth or infrared, and access to the Internet.
- Connect your phone to the computer using any of the listed methods (USB, Bluetooth, IrDA).
- Follow the link, select your phone model and download the application.
- Install the application on your computer.
- When installing the program required parameters tune in automatic mode based on your computer settings (country and language). If you want to change these settings, then open the "Settings and help" section, select the "Country and language" tab and change the settings.
- Next, go to the "User Support" section and click on the "Application Downloads" tab.
- Enter your phone's serial number (SN) in the corresponding field. The serial number can be found on a sticker located inside the phone under the battery. Or you can dial the command * # 06 # and the numbers of the number will be displayed on the phone screen (usually the serial number consists of 15 digits).
- After entering your serial number click on the "Browse" button.
- Next, a list of applications and programs available for your phone model will appear on the monitor screen. Click on them to download to your computer.
- Then disconnect your phone from the computer and install all downloaded files.
PC Suite mode
This mode allows you to synchronize your phone and computer and share different types of files.
- Go to your phone settings and turn off the removable disk feature.
- Then connect your phone and computer via USB and install the program on your phone.
Removable Disk Mode
This mode allows you to use your phone as an external removable device.
- Go to your phone settings and turn on the removable disk feature.
- Click on the additional menu button and select the "Notification area" tab.
- Click on the USB icon and click "Connect".
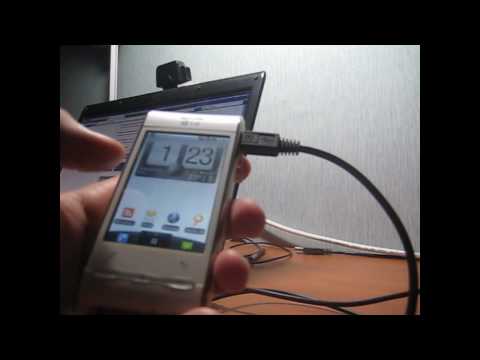
Welcome all! Today I will tell you how to connect your phone to a computer via usb. Let's first think about why we need it. Personally, I connect my phone to a computer just to download different music to my phone. Sometimes you can still use the phone as a removable media, that is, store the necessary information on the phone. Are we reading further?
Basically, most phones can be connected to a computer without additional software. If you connected the phone, and after that the computer wrote that the device was not recognized, then you need to install the program that comes with the phone on the disk. Well, I'll tell you more later.
How to connect phone to computer via usb?
To connect your phone to your computer via usb connection you need to follow these steps:
- Connect to phone micro usb cable, usually it is connected to where the charger is connected
- Connect the other end of the cable to USB on the computer
- After a couple of seconds, you will see a message on the computer with a sound notification that the device is recognized as a usb media
- If you have windows 7, then the software for the phone will be installed automatically from the Internet
- Go to My Computer and there you will see that another shortcut has appeared (phone)
How to install phone software on a computer?
If, after connecting the phone to the computer, it says that the device is not recognized, then you need to install software for phone (driver). In principle, the installation of the program is the same for each phone model. Therefore, I will tell you the sequence of your actions.
- Go to the official website of the manufacturer of your phone and download software for it there. You can simply enter your phone model into the search engine + the word download driver. In general, if all this is difficult for you, then you can simply indicate the model of your phone in the comment, and I will send you a link to the software for your phone by mail.
- After downloading the software, you will need to install it on your computer.
- After restart your computer.
- Next, connect the phone and everything will work. On some phone models, you need to run the program first, and then connect the phone. Otherwise, the computer simply will not see the connection between the phone and the computer.
That's like all the guys. Now you know how to connect your phone to a computer via usb. I'm sure you have questions for me, you can ask them in the comments at the end of this article. I always reply to everyone who reads my blog. I wish you all good luck and good!