Frequent users personal computers facing problems hard drive that affect the operation of the system. The main causes of hard drive failure are: bad sectors in HD D and faulty file system. In this material we will describe in detail HDD problem fixing process, and also describe methods for recovering information on hard drives, if it is faulty or completely out of order. I would also like to note that the problems associated with hard drive, special attention must be paid. For example, if the HDD becomes completely faulty, then you are unlikely to be able to recover information from it. That is, all your documents, personal videos and photographs, as well as other files may be lost forever.
Reading SMART readings from the hard drive
If files are not copied on your computer, programs freeze after opening, then possible reason this could be faulty HDD. Typically this behavior of the operating system is due to with bad sectors in the hard drive. To be sure that the problem is related to broken HDD sectors, not with malware, the first step is to confirm this guess. If the situation described above is observed on your computer, we will install the utility on it CrystalDiskInfo. This utility describes the status of all hard drives installed on your computer. You can download CrystalDiskInfo from its official website http://crystalmark.info. The utility supports Windows OS, from XP to Windows 10.
To check information about the hard drive, the utility uses self-diagnosis technology SMART. SMART technology is used on all manufactured HDDs. Below is an example of checking SMART readings using the CrystalDiskInfo utility in the hard drive WD1200JS. From this window you can see that the program has detected its status as " Fine" - this means that this hard drive is in perfect order and you should not worry about it.
In the following image in the testimony SMART utility CrystalDiskInfo detected the status of the screw with the message " Anxiety" This message means that the hard drive already has bad sectors or is overheating.

If you see the message " Bad", then this will mean that all the bad sectors on the hard drive have been reassigned and soon it will be completely covered.

In both cases, when the program detected messages " Anxiety" And " Bad", you should make a backup copy of all data on your computer, since the screw will soon become unusable.
One solution that can temporarily fix your screw is the utility Victoria. This utility can do REMAP BAD sectors , that is, it will reassign bad sectors to backup ones. In the next section we will describe in detail the process of REMAP BAD sectors using the Victoria utility.
Recovering a hard drive using the Victoria program
Utility Victoria created by a Belarusian programmer and distributed free of charge. You can download the utility on its official website hdd-911.com. The Victoria utility is distributed in two versions for Windows and DOS. In our case, we will download the Windows version. After launching the Victoria utility on Windows, we will be taken to such a window.

To fix the hard drive, we need to go to the “Tests” tab. On this tab we are interested in the area with the radio buttons Ignore, Erase, Remap and Restore, as well as the Start button. To fix it, we need to select the Remap radio button and click Start.

After these steps, the Victoria program will begin the process of repairing sectors, which can take quite a long time.

After reassigning the sectors, Victoria may be able to restore the bad sectors, and the CrystalDiskInfo utility will display the value “Good”. But a magical fix may not happen, since the reserve sectors may simply be absent and Victoria will not be able to help. In this case, there is only one way out - do a complete HDD replacement. In addition to screw treatment, Victoria also provides checking readings SMART on the " tab SMART».
I would like to note that all operations that you perform using Victoria are done at your own peril and risk. Using the utility, an inexperienced user can damage the hard drive and also deprive it of warranty service.
Fixing file system problems on your hard drive
Many users on Windows computers often experience problems related to file system errors NTFS. File system problems occur due to malicious utilities and various software. Also, file system problems most often occur due to inexperience the PC user himself. For example, incorrect handling of the utility Acronis Disk Director. To solve this problem, Windows itself will help us. Windows provides file system repair tool. In order to fix file system on a specific section, you need to go to its properties. In our case it is system partition operating room Windows systems 10. To run the fix we need to go to the “ Service».

On this tab there is a button Check that we will click.

After this action, a window will appear in which you need to confirm our actions.

After confirming the action, Windows will scan this partition.

After scanning, the system will display a message with the results of scanning the partition for errors.

Using this method, many users restored the operating system to normal operation without having to reinstall it. If the problems lie in the HDD itself, then no amount of checking the disk or reinstalling the OS will help in this case. The only option in this case is that you can resort to the Victoria utility or completely replace the screw with a new one, while reinstalling Windows.
Recovering disks using Acronis True Image 2016
The software is the ideal tool to create a full backup all local partitions, including the system one. This feature is used by many administrators around the world. The created backup of local disks can be restored in a very short time. For example, if the system is infected with a virus or the HDD is broken, in this case you will restore all OS disks in a short period of time. Find Acronis True Image 2016 is available on its official website www.acronis.com. By launching the program in question, we will be taken to such a window.

First of all, we will show our readers how to create a backup copy of local Acronis partitions True Image 2016. On the first tab “Backup” you can see that the entire computer is selected for backup. That is, a complete backup of all local partitions, including the system one, will be carried out. In the next block you need to select a backup location. In our case, this is local drive E. After selecting the type of backup data and where to save it, click the Create a copy button located in the lower right corner.

Depending on the amount of data saved, the creation time will depend backup copy.

Having completed backup, we will describe the process of restoring a computer. To do this we need to create boot disk or an Acronis True Image 2016 flash drive. You can do this by going to the “ TOOLS/BOOTABLE DRIVE CREATION WIZARD" Below is the wizard that should open.

In this wizard, we will select the first option and continue. In the window that appears, select where we will save the boot drive: into the image or to a flash drive.

After saving the boot drive, the wizard will display a final window.

Having created a bootable USB flash drive or optical disk with Acronis True Image 2016, you can begin data recovery. To do this, let's boot from bootable flash drive when the computer starts. After booting from the boot drive, we find ourselves in the Acronis True Image 2016 menu. Select the first item in this menu, after which we find ourselves in the main Acronis True Image window.

In the program window, go to the “” tab and find the backup copy of the entire system we previously created.

Now to restore system disk with Windows and local disks, press the button Disk recovery.

In the wizard that appears, select the item “ Recover disks and partitions" and continue.

In the next window, select all local disks and continue the wizard.

In paragraphs " Destination"For the first and second disks, select the original HDDs. If there are many hard drives installed in the system, be careful not to mix up the screws. In the final window, click the Proceed button.

The backup recovery time depends on the size and speed of the HDD. In our case it took 10 minutes.

The example shows how easy it is to make a backup copy of your entire computer, so if you master the Acronis True Image 2016 software package, you can easily restore its functionality in cases where the system is infected or the hard drive is broken. Also, after mastering the program, you will not have questions about how to recover data from a hard drive.
Data recovery using Recuva
There are cases when reinstalling Windows or when using Acronis software, users mistakenly erase all information from the hard drive. If this is exactly the situation you have, then you shouldn’t be upset, since all the information can be found restore. A free utility will help us with this task. Recuva. You can download the utility on its official website www.piriform.com. After launching the utility, the user is taken to a wizard that will help you restore all your data. Below is the sequential work of the master.

The example shows that data recovery using Recuva is a fairly simple process and almost any PC user can handle it.
Let's sum it up
From this article it can be emphasized that hard restoration disk, the task is not very simple, but depending on the situation, even regular user PC. I would also like to advise laptop owners to handle it as carefully as possible. For example, if the laptop is dropped or receives a strong impact, the HDD may be damaged. In addition, if you yourself have identified the problem screw, then do not be afraid to open the laptop case yourself or desktop computer, since replacing the HDD is a fairly simple task. And we, in turn, hope that our material will be useful to our readers and will allow you to restore your hard drive.
Video on the topic
Hello friends, in this article we decided to tell you how to restore laptop to factory settings. Let's start with the manufacturer Toshiba (who is interested, you can read a separate article -), the second we will consider the Sony laptop, the third HP pavilion. Separate articles are written for laptops, and,. Well, then we will try to supplement the article with information on products from other manufacturers; judging by your letters, this topic is of interest to many of our readers.
- Good day, I wanted to ask you how to restore a laptop to its original factory settings? I know that these settings are located in a hidden partition of the hard drive, but I carelessly deleted this partition and now when I try to roll back to factory settings I get an error. I have not created recovery DVDs and in general, I have never had the opportunity to restore a laptop to factory settings. What is the way out of my situation?
- Hello admin, please explain what I should do. Toshiba laptop, it has hidden section, also drive C: and drive D:. I didn’t touch the hidden partition, but on drive D: I deleted everything, and now I can’t roll back to factory settings, they say Toshiba laptops use a hidden partition and some other folder HDD RECOVERY, which is located on the disk, to restore factory settings D:. What should I do now?
- I bought a Toshiba laptop, the instructions for the laptop say, if you want to roll back to factory settings, press the F8 key, the recovery program will start. I pressed it, but it starts Additional options downloads and that's it... And then what to do? And another question, when you first started it, a message appeared - We recommend that you create a resuscitator media on a USB flash drive or DVDs, using the Recovery program, it will help you restore the contents of the computer to the original factory state, even in the event of serious damage to the computer. Explain how to use this resuscitator media in case of problems?
- Hello, tell me how to restore a Hewlett-Packard (HP) laptop to factory settings if the laptop does not boot at all. When loading Windows exits with an error.
- Admin, answer this question. All laptop manufacturers include them special program RECOVERY, located in a hidden partition, using this program you can roll back your laptop to factory settings in case of serious problems with the operating system. Question – Is there any alternative to this program?
How to restore a laptop to factory settings
When does the thought of restoring our laptop to factory settings occur to us? That’s right, when we no longer understand what’s going on with it, and most importantly, the laptop itself doesn’t understand what’s happening to it, due to dozens of unnecessary partitions created on it, four installed operating systems, thousands various programs and three antiviruses.
- Note: Before performing a factory reset, you can copy all data from the C: drive and desktop using .
Many users may notice that in such a situation you can reinstall Windows with all programs, drivers and everything. But I, in turn, will notice restore laptop to factory settings, for an inexperienced user, much easier. Then you won’t have to worry about finding and installing drivers for all devices, you’ll just need to install it again necessary programs that's all. The only thing that confuses many people in this situation is that many have never tried restoring the laptop to factory settings even once in their lives. To introduce you to this restoration is the purpose of our article; I hope after reading it, you will have a better idea of how this can be done.
I have to restore factory settings on various laptops quite often and I want to say that the recovery mechanism itself is almost the same on all laptops, but of course there are always nuances that are better to know in advance.
First rule. During a factory reset, network adapter The power supply must be permanently connected to the laptop.
You reboot the laptop and press a certain key on the keyboard when loading, then the factory reset program starts, this is where you need to be careful. The factory reset program may offer you the option of restoring just the C: drive or restoring the entire hard drive. If you select drive C:, then only it will be restored to factory settings, and the remaining partitions with your data will remain untouched. If you choose to restore the entire hard drive to factory settings, then all the partitions you created, with all your files, will be deleted and your laptop will be in the same condition as at the time of purchase.
Where is the laptop factory reset program located?
Usually in a hidden section of the laptop, which is called the “Recovery Partition,” the volume is up to 20-plus gigabytes. You can see it if you go to Computer Management->Disk Management. It is advisable not to delete this partition, otherwise you will not be able to restore the laptop to factory settings.
Owners of a Toshiba laptop need to know that in addition to the hidden RECOVERY partition, they also have a HDD RECOVERY folder located on the D: drive; this cannot be deleted either.
Note: Friends, if the hidden partitions on your laptop are not deleted, but the factory reset program is not working, read our article -.
Why create laptop recovery DVDs?
As soon as we bought the laptop and turned it on, on the screen, immediately after the working Windows desktop, a service window from the laptop manufacturer appears asking you to create laptop recovery DVDs. That is, we will create this same hidden partition with factory settings, but on DVDs. This is done in case the hidden section of the laptop, for some reason (usually due to the user’s fault), becomes damaged or is deleted completely.
To create recovery DVDs, you usually need 3 blank CDs. If there are serious problems with your laptop, for example, you cannot load the operating system at all, and your hidden partition has been deleted, we can restore the laptop to its factory state using previously created recovery DVDs.
Hotkeys for restoring laptops to factory settings
ASUS – When the ASUS splash screen appears, press F9
Acer - Alt+F10
HP pavilion - when turning on the laptop, press the esc key. Enter the start menu, then press the F11 key
Samsung - F4
Sony vaio - F10. New Sony VAIO laptops use a special button Assist, try pressing it when loading. Loading VAIO Care, select from the menu Start troubleshooting (Recovery) -> Select keyboard layout Russian -> Diagnostics -> VAIO Recovery Tools -> Windows 8 -> Run the Recovery Wizard(System recovery in step-by-step mode).

Toshiba - F8 or on the latest models 0 or even sometimes you need to press Fn+0
Packard Bell - F10
Dell inspiron - when the dell splash screen appears, press Ctrl+F11
Fujitsu Siemens - F8
LG-F11
Lenovo-F11
So, first we restore the Toshiba laptop to factory settings, press F8 when loading (if you have one of the latest models of Toshiba laptop, then immediately when you turn on the laptop, press and hold 0), a window appears Additional download options. Choose Troubleshooting your computer and press Enter.

Selecting language settings.


We select the Toshiba HDD RECOVERY recovery tool or it may be called Toshiba Recovery Wizard.

In the next window, we are warned that drive C: will be restored to its original state, that is, everything will be deleted from it and its state will be restored to the state at the time of purchase of the laptop, drive D: will remain untouched.


You cannot interrupt the operation, so make sure that the AC adapter is connected to the laptop. Click Yes and start the process of restoring the laptop to its original factory state.

A factory reset process is in progress.


The software and drivers are being installed.


Choose a username and password for your account. We set the date and time, they are usually correct by default. If you wish, you can register your laptop to extend the warranty.

First Windows startup. That's all
How to factory reset a Sony laptop
Press the F10 key when loading and enter the Manager Windows boot, select using the keyboard Launching VAIO Recovery Center.


A window appears in front of us, in which we can familiarize ourselves with the recovery options.
For example, we choose Recover drive C: and in the next window we read information about what will be restored.


Disk C: is restored to its factory state, everything is reinstalled software, but not software installed after purchasing the computer, it will have to be installed again. This program deletes all files on the C: drive, but does not affect files on other partitions.

If you and I choose Completely restore the system, then everything on the C: drive and all other partitions will be deleted. After recovery everything disk space will occupy drive C:


How to restore an HP laptop to factory settings
If the laptop does not boot at all due to system errors and you want to restore its original settings, then, in order not to lose your data, you can load it from any Live CD, then transfer important files to a portable hard drive, then restore the factory settings, since restoring the factory settings will delete all your data from the laptop.
Press the key when turning on the laptop Esc.

We enter boot menu As you can see, the F11 key is responsible for restoring factory settings - System Recovery. Press the F11 key.
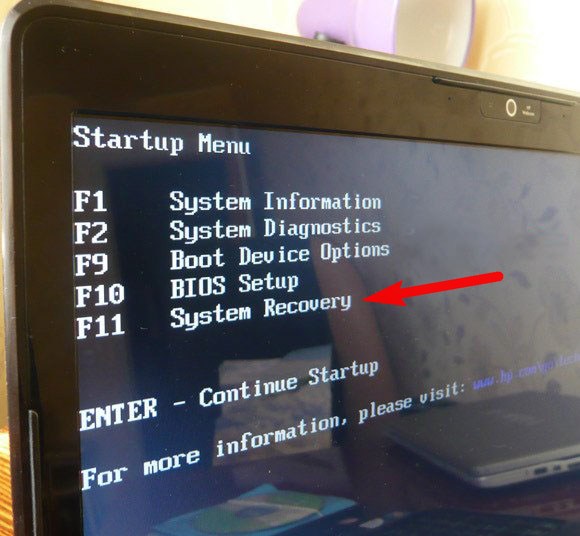
A window appears HP Recovery Manager. Here we need the item " Restoring the system to its original condition when shipped from the manufacturer».

Click on “ Restore without creating a backup copy files" and click Next.

Now you need to turn everything off external devices: printer, scanner, mouse, click Next and the process of restoring the HP laptop to factory settings will begin.
Is there an alternative to the laptop's built-in factory reset program? Yes there are, these are programs and and they have much more opportunities.
Winchesters Seagate Barracuda very popular among personal computer users. Many discs last for 5-10 years and have excellent “health” at this age. By the word “health” I mean both the functioning of the hard drive itself, its speed and stability, and the performance of its self-diagnosis and recovery system S.M.A.R.T.. Often, over many years of operation, the self-diagnosis system indicators S.M.A.R.T. have changed since the beginning using hard disk. In these indicators, the hard drive itself remembers such parameters as: the maximum temperature of the hard drive, the operating time of the hard drive (hours of operation), the number of turns on and off, the number of head parkings, etc. However, the most undesirable indicators that may appear during long-term work hard disk is number of bad sectors.
Reasons for appearance bad sectors there are different ones. The main reason is time. Over time, areas with unstable reading of recorded information may appear on a disk, even of very high quality, especially if this information was recorded a very long time ago and the disk has not been used for a long time. Among the reasons may be the low quality of the hard drive platters themselves, poor-quality assembly, or the use of cheap materials in the manufacture of the HDD by the manufacturer.
However, there are times when bad sectors appear not because of the hard drive itself. I mean cases when the power is turned off while information is being written to the disk, or there is a defect in the SATA cable, or errors in the SATA controller on motherboard computer, or unstable operation of the PC power supply (voltage surges along the 5V and 12V lines). In these cases, the self-diagnosis system can find on the surface of the hard drive from several pieces to several thousand so-called "software bads", i.e. areas where information cannot be read, because The checksums do not match the information itself that is written in these blocks. The diagnostic system often identifies them as unstable or bad and changes the system parameters S.M.A.R.T. not for the better. System S.M.A.R.T. It may even replace these blocks with good ones and display them in its indicators as Reallocated (moved), although the blocks themselves may be very good. This happens quite often, but not always.
The photo below shows a screenshot of the Victoria program with indicators S.M.A.R.T. problem disk. You can see more than a thousand sectors that have already been moved and hundreds that are preparing to move.
So what can we do to try to get the S.M.A.R.T numbers back? back to normal? We can reset the S.M.A.R.T. or transfer bad sectors to a hidden area of the self-diagnosis system, the so-called P (Slip) list. This operation does not guarantee that after resetting the indicators, these indicators will not appear again after a few days or weeks. If the disk really has bad sectors, the self-diagnosis system will identify them and mark them after using the disk for some time. So you most likely will not be able to make “candy” out of a truly “dead” hard drive.
This guide outlines the procedure for resetting S.M.A.R.T. for hard drives Seagate Barracuda 7200.11, Seagate Barracuda 7200.12, Seagate Barracuda ES, Seagate Barracuda ES.2. On other hard drives Seagate Barracuda I haven't checked, maybe the procedure is similar.
First, we need to get an RS232-to-TTL adapter. You can assemble an adapter based on the MAX232 chip as shown in the diagram:
Note on the diagram: If it is possible to connect to a stabilized voltage of +5V, then the circuit can be simplified by removing the 7805 stabilizer with two capacitors from it.
Alternative RS232-to-TTL adapter circuit:
Alternatively, you can use the USB programmer on the CH341A as USB adapter in TTL. It will allow you to connect even to a computer without a COM port. The connection will be made via USB, which is more convenient. It is possible in our store with delivery throughout Ukraine by delivery services.
Attention! Everything you do next is done at your own peril and risk. This can lead to both loss of information and failure of the hard drive itself!
1.) If the hard drive has a “SATA I operating mode” jumper installed, then remove this jumper in advance, which switches the drive to SATA I operating mode.
2.) Connecting the controller 232-to-TTL to the COM port. (If you are using a USB converter or programmer on CH341A as 232-to-TTL adapter, the driver must already be installed in advance. I will not describe the driver installation.)
3.) Launch the HyperTerminal program (included in Windows XP). If you have Windows Vista, Windows 7, Windows 8 or newer installed, then HyperTerminal is not included in the standard package. You can download the English version of HyperTerminal from our website. Launch HyperTerminal and enter the name of the connection. Specify any name for the connection, I entered " 1 ".
4.) In the hyperterminal, select the COM port. I have COM3, yours may be different. It all depends on how you connected the adapter 232-to-TTL.
5.) Setting the port speed 38400 , flow control - No, the rest is by default as shown in the screenshot below.
6.) Before connecting the controller 232-to-TTL to the hard drive, I recommend checking the operation of the HyperTerminal and adapter combination 232-to-TTL. To check the functionality, connect the Rx and Tx wires to each other and type something on the keyboard in the HyperTerminal window. The window should display the entered characters - an “echo” of the terminal. Each character you enter must appear on the screen (return via Tx-Rx). If there is no “echo”, it means your device is not working or the COM port is configured incorrectly. In reality, it looks like this: we connect the cable - we launch the terminal - we configure it to the desired port - we try to print something - there is silence in the terminal. It means something isn't working. If we close Tx-Rx and try to print something, what we printed appears in the terminal. Conclusion - “echo” works and we are all ready to connect the HDD drive.
7.) We connect the controller with three wires 232-to-TTL to the hard drive. We connect Tx and Rx as shown in the photo (GND does not need to be connected, but in this case unnecessary symbols - garbage - may appear in the HyperTerminal). I connected all three wires.
8.) We supply power to the hard drive. As a result, you should have a connection like this:
9.) In HyperTerminal we see a similar message:
Rst 0x20M
(P)SATA Reset
10.) Press once CTRL+Z and patiently wait for an invitation in the form:
Note: To see a list of commands and descriptions for them for your hard drive, you must enter /C and "Enter" and then Q and "Enter". Don’t forget to go back to the mode after viewing the commands T team /T.
11.) We are recruiting /1 Press “Enter” (go to level 1). We observe on the terminal:
F3 2> /1
F3 1>
12.) We are recruiting N1 Press “Enter” (clearing SMART and removing the “CC” lock). We observe on the terminal:
F3 1> N1
F3 1>
13.) We are recruiting /T Press “Enter” (go to the root level). We observe on the terminal:
F3 1> /T
F3 T>
14.) Disconnect the hard drive power connector (everything else is on) for 10 seconds. The hard drive stops completely in 8-10 seconds.
15.) Turn on the power connector for the hard drive. The disk spins up. We see the message:
Rst 0x20M
(P)SATA Reset
16.) Click Ctrl+Z. We observe on the terminal:
17.) Type a command to transfer defects from the G(Alt) sheet to the factory P(Slip) sheet m0,2,3,22 and press “Enter”. And then m0,2,3,22
F3 T> m0,2,3,22
After some time (from half a minute to several minutes) Screw will write a long message like this:
F3 T> m0,2,2,22
Max Wr Retries = 00, Max Rd Retries = 00, Max ECC T-Level = 14, Max Certify Rewrite Retries = 00C8
User Partition Format 4% complete, Zone 00, Pass 00, LBA 00004339,
User Partition Format Successful - Elapsed Time 0 mins 30 secs
18.) You can skip this point. Now you can completely format the entire disk. The formatting process can take from half an hour to several hours. We are recruiting m0.8,2.22 and press “Enter”. We observe on the terminal:
F3 T> m0.8,2.22
This option will help return the system to the state recorded at a certain point in time - the restore point. If saving such points is configured and enabled, then the system state will be recorded to the hard drive before installing updates, drivers and applications.
Returning Windows to a restore point will save all personal files, but drivers and applications that appeared after the point was created will need to be reinstalled.
To start Windows recovery, click right click to “Start” (Win + X) and go to “Control Panel” → “System and Security” → “System” → “System Protection”. Click "Restore" → "Next" and select the desired restore point.
Another path option: “Control Panel” → “All Control Panel Items” → “Recovery” → “Run System Restore”.
If the restore point is not found, it means that system protection is disabled, and you will have to use other methods.
To avoid troubles in the future, enable the creation of restore points. To do this, in the same “System Protection” menu, select the system drive, click “Configure” and enable system drive protection.
2. Return the computer to its original state
If there are no restore points or going to them does not help, try returning the system to its original state. You can roll back while saving the files or completely delete everything and . Also, some computers - often laptops - have an option to restore factory settings.

In Windows 8 and 10, you can start restoring to its original state by going to Settings → Update and Security → Reset your PC → Get Started.
In Windows 7, to do this, go to “Control Panel” → “System and Security” → “Backup and Restore” → “Restore system settings or computer” → “Advanced recovery methods” → “Return the computer to the factory-set state.”
3. Restore Windows using a disk
A recovery disk is useful, for example, for rolling back to a saved point or returning to its original state if Windows fails. An ordinary flash drive, external hard drive or DVD can serve as such a disk.

The recovery disc should be written in advance and stored in case of system failure. Under Control Panel → All Control Panel Items → Recovery, click Create a recovery disk. In the menu that appears, select the “Perform a backup” option. system files to a recovery drive" and you can use the USB drive not only to fix errors and rollback, but also to reinstall Windows.
You can create a recovery DVD in Windows under “Control Panel” → “System and Security” → “Backup and Restore” → “Create a system recovery disc.” The same method works in newer versions of the system, only the name is different: “Backup and Restore (Windows 7)” instead of “Backup and Restore”.

To correct errors, boot the system from disk. In the recovery environment that opens, click Troubleshoot. Start going back to the system restore point in the menu " Extra options» → “System Restore”.
4. Restore Windows using a full system image
Another option for restoring Windows is to roll back to a previously created system image. The image is written to a hard drive, DVD, or network share.
Unlike rollback to original state or restoring from a point, using a full image preserves all files, applications, settings and drivers installed at the time it was created.

The most appropriate moment to create such an image may be when everything is installed on the system and required applications, but there is nothing superfluous. This way you can continue working immediately after recovery.
To create a full system image, in the Control Panel, select Backup and Restore (Windows 7) → Create a system image. (In Windows 7: Control Panel → System and Security → Backup and Restore → Create a system image.)
In the menu that appears, you can choose which of the existing partitions and files to include in the system image and on what media to burn it.

With a complete system image at your disposal, you can quickly return Windows to the state you want. You can start image-based recovery when you restart the computer: “Diagnostics” → “Advanced options” → “System image recovery”.
In those days when mechanical hard disks with spinning platters were the standard, you could just give your old hard drive to a friend, hear “Thank you”, and that was the end of it. With modern solid-state drives, things are not so simple.
In many cases used solid state drives no longer as fast as the new ones, although still faster than the most modern ones hard drives. The biggest problem with selling an SSD after a long period of use comes from the inconvenient characteristic of NAND flash memory: previously written cells must be erased before new data can be written to them. If an SSD is forced to reuse cells to store data instead of using new ones, performance drops sharply.
To avoid this problem with NAND flash memory, modern SSD controllers use a number of techniques, including creating additional capacity that users cannot use, a technique known as over-provisioning. There is also a command called TRIM, which tells the SSD when blocks of memory are no longer needed and can be merged and erased.
Sounds good, doesn't it? But there is one problem.
Not all garbage collection (as the erasing of used cells and merging data in NAND memory is called) is created equal. The build can be inconsistent, and some older operating systems—Windows XP in particular—don't even support the TRIM command. Thus, the most frequently used NAND cells may remain on the SSD longer than you suspect.
In Windows 7 and 8, users don't have to worry about all this. The performance of modern SSDs should not noticeably deteriorate for many years, perhaps longer. But there are several scenarios where these idle cells can hit SSD performance, such as long-term use in an environment without TRIM support (for example, in XP), after the disk is almost full and large amounts of data have been deleted, or simply by changing partitions and formatting.
Yes, simply deleting files, changing partitions and formatting the drive does not work the same as on an HDD. These operations take place over high level than those where garbage collection is carried out. In fact, due to the complete lack of utilities that perform a full garbage collection, there is only one way to return an actively used SSD to a pristine state so that it becomes as good as new - the ATA secure erase command.
Secure erase
The feature, built into every ATA-based drive (SSD and HDD) since 2001, erases everything on the drive and marks the cells as empty, restoring any modern SSD to factory performance.
Once upon a time, it was possible to trigger secure erase only through utilities command line, such as HDparam in Linux or HDDerase in DOS, developed at the University of California at San Diego. But now many manufacturers of solid state drives and hard drives provide free utilities, such as OCZ's ToolBox, Samsung's Magician, or Seagate SeaTools, which provide secure erase capabilities.
Although the command itself is standard, many utilities only work with drives from their own company. If the manufacturer does not provide a secure erase command, you can use the DriveErase utility included with Parted Magic.
Additionally, secure erase is not routine for most users. technical maintenance. If you are using Windows 7 or 8, you do not need to apply it unless you need to clean up the disk. If you're using XP, only perform secure erase when you really notice a drop in performance. Evidence of this is short-term hangs of the interface or freezes when saving files.
Here's how to recover your SSD step by step.
If you have data on your drive that you want to save, back up to another storage device. If we are talking only about files, you can simply drag them onto a flash drive or external HDD, or use a backup program.
If you have a working operating system that you would like to save, you need to use a disk imaging program such as Acronis True Image or R-Drive Image, which copies everything. Do not use Windows program System Recovery, if you are restoring data on a different disk. It will not recover smaller drives, and sometimes struggles even with similarly sized drives that have plenty of free space.
Before you begin, disable all other drives and boot from your flash drive to perform the erase procedure to avoid accidentally overwriting the wrong drive. Parted Magic is excellent choice, since the program works as a bootable flash drive. If unplugging your other drives seems like a daunting task, make sure you select the correct drive to erase. Secure erase is irreversible.
Now run the secure erase feature. The exact method depends on the program. A guide to erasing using Parted Magic is easy to find online. Some SSDs use an advanced version of secure erase by default, which even removes service data.
The secure erase process will take only a few minutes on a modern SSD. On hard drives it may take several hours.
Once the process is complete, partition and format the drive if you intend to use it again. Parted Magic provides a convenient full-fledged editor for this task, but you can use Windows utility Drive Management (Control Panel > System and Security > Administration > Create and format hard sections disk) to solve the same problem. Most often, users create a single partition and format it in NTFS.
You can then return the copied data back to the blank disk and enjoy high speed performance.