“...formerly known as MadOnion.com...” It's done! The entire progressive part of humanity has finally waited for the appearance of the new 3DMark. Hot Finnish guys from the company Futuremark Corporation, formerly known as Madonion.com, formerly known as Futuremark Corporation, made you wait very long - only two years :). Throughout this time, users have used 3DMark 2001 as a benchmark for the performance of their gaming machines, and reviewers have used it as one of the tools to analyze the strengths and weaknesses of gaming accelerator architectures.
What explains such popularity of the creation of the team formerly known as Madonion.сom? :)
The answers lie on the surface: firstly, this set of tests is able to evaluate the most important aspects of the performance of any video card for gaming applications, from the old GeForce2 MX to the ATI RADEON 9700 Pro.
Secondly, at the time of its release, 3DMark 2001 was the only test package capable of adequately assessing the performance of video cards with the new features of the newly launched DirectX8.
Thirdly, the game tests included in 3DMark 2001 were created in accordance with different genre directions, not only using the most modern trends and currents in game development at that time, but also with an eye on the near future. As a result, the tests were so difficult that even the most powerful video cards of the time produced alarmingly low results.
Fourth, based on the results of 3DMark2001 testing, you can get a final score in “parrots”, compile an official report and post it on the MadOnion.com statistics page, or compare the results of your system with the results of countless other users.
And last but not least, not only professional programmers, but also talented designers worked on the test scenes. As a result, the picture on the screen, not only in Demo mode, but also in synthetic and game tests, attracted attention for a long time. The pearl of the test package, the Nature scene, created as a demonstration of the capabilities of the most modern video cards, had a simply destructive effect on the psyche of an unprepared person.
So, 2 years have passed, two generations of game accelerators have changed and DirectX 9 has appeared. What has it become? new package from Futuremark?
3DMark03
3DMark03 is a suite of tests designed to measure the performance of modern gaming video cards. Like 3DMark 2001, the previous creation of the Finnish guys, the new 3DMark03 is a full-fledged set of game and synthetic tests, as well as, of course, a stunningly beautiful demo created based on game tests:

More details about each test will be provided a little later, but now I would like to immediately say about one most unpleasant innovation. The point is that, as in previous versions 3DMark, 3DMark03 has two levels of functionality: for those who downloaded the test for free, and for those who bought it or paid for a key that upgrades 3DMark03 to the Pro version. The most unpleasant thing is that the limited functionality of the free version is simply puzzling. How, pray tell, can I use the test package if it is forbidden to even change the resolution, not to mention everything else? Watch demo? Beautiful, of course, there are no words, but after downloading 180 MB for some reason I want more!
However, let's not talk about sad things...
Game tests
GameTest 1: Wings of Fury


This test reflects the performance of video cards in a typical Futuremark flight simulator: an armada of B17 bombers, accompanied by P51 fighters, is heading deep behind enemy lines. But on the way they are met by enemy forces in the form of several dozen Me109s, and a battle ensues. The realism of the battle from the tactical side, as well as the realism of the damage inflicted by on-board weapons, of course, does not stand up to criticism, but that’s not what we’re talking about now :)…
In general, an interesting situation has developed with simulators: while the graphics in other 3D games are becoming more and more complex, games in this class, as a rule, lag significantly behind the same, for example, shooters in terms of using the power of 3D accelerators.
This interesting situation played into the hands of the developers from Futuremark: while processing databases with user reports, they discovered (and this is not surprising) a huge number of “old” systems with video cards that, at best, only support DirectX 7 functions.
When developing 3DMark03, they took this point into account and created a test that does not require video cards to have hardware support for DirectX 8 and DirectX 9 functions. The idea of a flight simulator fits perfectly here.
The test uses classic multitexturing, maximum amount There are four simultaneously applied textures. Moreover, multi-texturing is only required when rendering aircraft: this is a base color texture, a specular map, an irradiance map, and a specular intensity map that determines which parts reflect light more intensely and which less. All other objects - earth, clouds, smoke, etc., have only one texture layer.
The most significant load on the accelerators in this test is imposed by numerous effects of flames, smoke trails, clouds, etc. To draw them, Point Sprites (if hardware support is available) and traditional “quad particles” (a pair of triangles with a common edge) are used.
To process geometry, in the case where the video card has hardware support, vertex shaders version 1.1 are used.
GameTest 2: Battle of Proxycon


The Battle of Proxycon test scene demonstrates another class of 3D games - first-person shooters.
The action takes place on a spaceship: enemy paratroopers land on the landing deck and move deeper into the ship. A shootout ensues between them and the defenders...
First-person shooters (FPS), in a tradition dating back to Quake and Unreal, are at the forefront of 3D technology. In order to create a sense of reality for the player, it is no longer enough, as in simulators, to meticulously recreate the physical model of the behavior of an aircraft from the Second World War or to achieve a perfect match virtual image real prototype. In an FPS, the first thing that matters is what the world around you looks like, because that’s what the player will interact with.
It is not surprising that the Battle of Proxycon test places higher demands on the video card: it requires hardware support for DirectX 8 functions.
The most impressive feature of the test is the dynamic shadows. To create dynamic shadows, a stencil buffer is used. All geometry processing is done using vertex shaders version 1.1, but in the case where the accelerator does not have appropriate support, this work will be assigned to the central processor. However, support for pixel shaders version 1.1 is required: with their help, textures are applied, normal maps are used to simulate relief, shadows, diffuse and specular reflections of light sources are calculated.
Accelerators that have hardware support for pixel shaders version 1.4 receive a significant advantage in this test: if with pixel shaders version 1.1, to display most objects, one pass of the accelerator is required to initialize the Z-buffer and three passes for each light source (stencil-buffer calculation, alpha buffer and specular/scattered reflections of light), then with shaders version 1.4 and higher, only one pass is required for each light source.
In this test, you can enable Post Processing, that is, processing of the constructed image to obtain additional cinematic special effects. The first effect, “Depth of Field” is a “blur” of objects that are not in the camera’s focus. Second, no less beautiful effect, “Bloom”, simulates a blurry halo around the bright areas of the image.
In addition to demonstrating the triumph of modern graphics technology, Game Test 2 replicates other actions performed by real game engines: collisions of characters with each other and with the environment are calculated in real time in accordance with the laws of physics.
Summary information on the Battle of Proxycon test scene looks like this: on average there are about 250,000 polygons in a frame (when using pixel shaders version 1.4 - about 150,000 due to fewer accelerator passes), 80 MB of video memory are spent on textures, 6 MB on vertex buffers MB, another 1 MB of video memory for index buffers.
GameTest 3: Troll's Lair


The Troll's Lair test shows the future of RPGs as developers from Futuremark see it.
The action takes place in an old castle. A pretty girl, armed with a magic sword, explores the interior of the room and suddenly accidentally discovers a secret door that opens a corridor to the dungeon. The two trolls never expected the hapless adventurer to appear...
This test also uses the capabilities of DirectX 8-compatible accelerators. The test differs from the previous one in fewer textures, but big amount polygons. For example, polygon models were used for the main character’s hair, and to give realism appearance Anisotropic lighting was used for the curls.
This test also uses vertex shaders version 1.1, pixel shaders version 1.1 or 1.4, the scene contains dynamic shadows, normal maps, etc. Just like in Battle of Proxycon, you can enable Post Processing effects here. To calculate character collisions in real time, as in GameTest 2, the licensed Havok “engine” is used here.
The summary information for the Troll's Lair scene looks like this: on average there are about 560,000 polygons in a frame (when using pixel shaders version 1.4 - about 250,000 due to fewer accelerator passes), 64 MB of video memory is spent on textures, 19 MB on vertex buffers, for index buffers - 2 MB of video memory.
GameTest 4: Mother Nature


Mother Nature is the most difficult test in the 3DMark03 suite. To run the test, it requires hardware support for pixel and vertex shaders version 2.0.
Just as the Nature test from 3DMark2001 showed the new capabilities of DirectX 8, Mother Nature from 3DMark03 demonstrates what can be achieved using the capabilities of the new generation of DirectX9-compatible accelerators. There is no plot in this scene - just a beautiful summer day in nature. Sun, sky, stream, grass, sand, funny turtle :)…
The tree foliage and grass in this test are done differently compared to the Nature test from 3DMark2001. If earlier these were textures depicting entire tree branches and “tufts” of grass, now each blade of grass and each leaf is a separate object. The animation of the leaves - swaying in the wind - is specified using the vertex shader version 2.0. The animation of the blades of grass is set using the vertex shader version 1.1.
The water surface is rendered using pixel shader version 2.0. The shader uses wave, normal, reflection, refraction, transparency, and cube reflection maps to simulate the reflection of distant objects from the water surface. Another feature provided by DirectX9 is used to display the sky - increased accuracy data presentation.
When rendering the earth's surface, pixel shaders version 1.4 are used, using information from base textures, light maps, textures simulating surface microstructure, and normal maps.
The summary information for the Mother Nature scene looks like this: on average there are about 780,000 polygons in a frame, 50 MB of video memory is spent on textures, 54 MB on vertex buffers, and 9 MB on index buffers.
Synthetic tests
CPU Test

This test uses two game scenes - Wings of Fury and Troll's Lair. To provide the central processor with a decent amount of work, all vertex processing is implemented programmatically. In addition, for CPU Test the resolution is set to 640x480, and in the Troll’s Lair test dynamic shadows and the use of pixel shaders version 1.4 are disabled. This is done to reduce the influence of video card speed on the processor speed measurement results.
Fill Rate


This test has changed only in appearance since 3DMark 2001, but the essence remains the same. In Single-Texturing mode, the accelerator outputs 64 planes with one texture on each at the highest possible speed. In the Multi-Texturing mode, a smaller number of planes are drawn, but at the same time, the accelerator displays each plane with the maximum possible number of textures. The total number of texture layers should be 64, so if the accelerator, say, supports a maximum of 6 textures in one pass, then it will draw 10 planes with six textures on each, and apply the remaining four texture layers to the 11th plane.
Vertex Shader


The Vertex Shader benchmark measures the execution speed of vertex shaders. With the help of vertex shaders, characters are skinned, of which there are as many as 30 in the scene. Each model has approximately 5500 polygons and is rendered using pixel shaders version 1.1 in 4 passes. As a result, this results in an impressive figure - 660,000 triangles per frame.
Pixel Shader 2.0


This test shows the speed of rendering animal models using 3D procedural textures defined using a complex pixel shader version 2.0.
Ragtroll


16 crazy trolls take turns throwing themselves from a great height...
The Ragtroll test shows how efficiently it is possible to distribute calculations between the graphics chip and central processor. Character skinning is performed by the graphics chip using vertex shaders version 1.1, while the physics of collisions with obstacles is calculated in real time by the central processor.
Sound Test
Tests sound subsystem allow you to check the correct operation of 3D sound algorithms, such as positioning in three-dimensional space, Doppler effects, etc., and evaluate the drop in speed when turned on large quantity 3D sound sources.
Instead of a conclusion
Instead of a conclusion, I would like to remind you that this short review includes only those, frankly speaking, not very rich testing capabilities that are available in the free version of 3DMark03. A more detailed study of the capabilities and features of the test package will be published in the near future. In the meantime, as food for thought, here are the results of running the test in the default mode (1024x768, Pixel Processing: None, Texture Filtering: Optimal, Vertex Shaders: Optimal, Repeat Tests: Off, Fixed Framerate: Off) on a system with the following configuration:
Processor – Intel Pentium4 2800 MHz
Motherboard – ASUS P4S8X(SiS 648)
Video card – ATI RADEON 9700 PRO 128 MB
RAM – 512 MB DDR
Software – Windows XP, DirectX 9, Catalyst driver 3.0.
So, the results:
3DMark03 Score: 4629 3DMarks
GT1 - Wings of Fury: 155.47 FPS
GT2 - Battle of Proxycon: 30.44 FPS
GT3 - Troll's Lair: 28.07 FPS
GT4 - Mother Nature: 27.06 FPS
CPU Score: 464 CPU Marks
CPU Test1: 52.48 FPS
CPU Test2: 8.12 FPS
Fill Rate (Single-Texturing): 1494.40 Mtexels/sec
Fill Rate (Multi-Texturing): 2267.69 Mtexels/sec
Vertex Shader: 14.89 FPS
Pixel Shader 2.0: 41.06 FPS
Ragtroll: 19.95 FPS
I guess there's a lot to think about :).
So, there is more ahead detailed review and testing of modern gaming accelerators in the Pro version of 3DMark03. Stay with us!
There are many various programs to test CPU performance and stability, but one of the most popular ones is 3DMark. The main advantage of this program is the ability to check not only the processor, but the system as a whole, including the graphics card, RAM and other parameters. The test is performed under conditions similar to games, so the program allows you to most accurately assess how well the system will perform in games.
The 3DMark program is paid, but the developer provides several free tests as a demo version. They will be quite enough for testing the processor and video card. This article will explain how to use 3DMark. Moreover, we will focus on the free version.
Unlike other programs, you will not be able to install 3Dmark from the official website as there is no download link. There is only the option to buy the program. However, you can download a demo version of the program from Steam. To do this, of course, it is necessary that Steam is already installed on your computer.
Select the first version found and scroll down a little on the page that opens. There will be a button on the right Download demo version, this is what you need:

The program is quite large, so downloading may take a long time, depending on your Internet speed. When the download is complete, the program will appear in your Steam library:

From here you can launch it.
How to use 3DMark
1. Russification of the interface
By default the program is delivered on English language. However, you can also enable Russian in the settings. To do this, open the menu Options and at point Language select Russian:
Now the program will be in Russian.
2. Run the first test
Immediately in the main program window you are prompted to run a set of Time Spy tests. This is a small scene in which a man walks around a museum with a special magnifying glass that allows him to look into the past and looks for weapons. You can watch the full scene here:
To run the test simply go to home page and select Launch or Run:

First you will see the demo scene itself:


Then two graphics tests and a processor test will run, during which the current FPS and frame number will be displayed at the bottom of the screen:

After testing is completed, the utility will give you an overall rating of your computer for all tests:

It can be compared with the ratings of other users on the Internet:

3. Run other tests
In addition to the Time Spy test, you have access to several more scenes in the free version. This:
- TimeSpy— DirectX 12 performance testing;
- FireStrike— DirectX 11 performance testing;
- Night Raid— DirectX 12 test for computers with integrated graphics;
- Sky Driver— DirectX 11 test for computers that cannot achieve high scores in the FireStrike test;
- Cloud Gate— DirectX 11 and DirectX 10 test for laptops and regular home PCs;
- Ice Storm Extreme- For mobile devices and tablets;
- Ice Storm- for budget smartphones.
You can run any of these tests from the tab Tests:
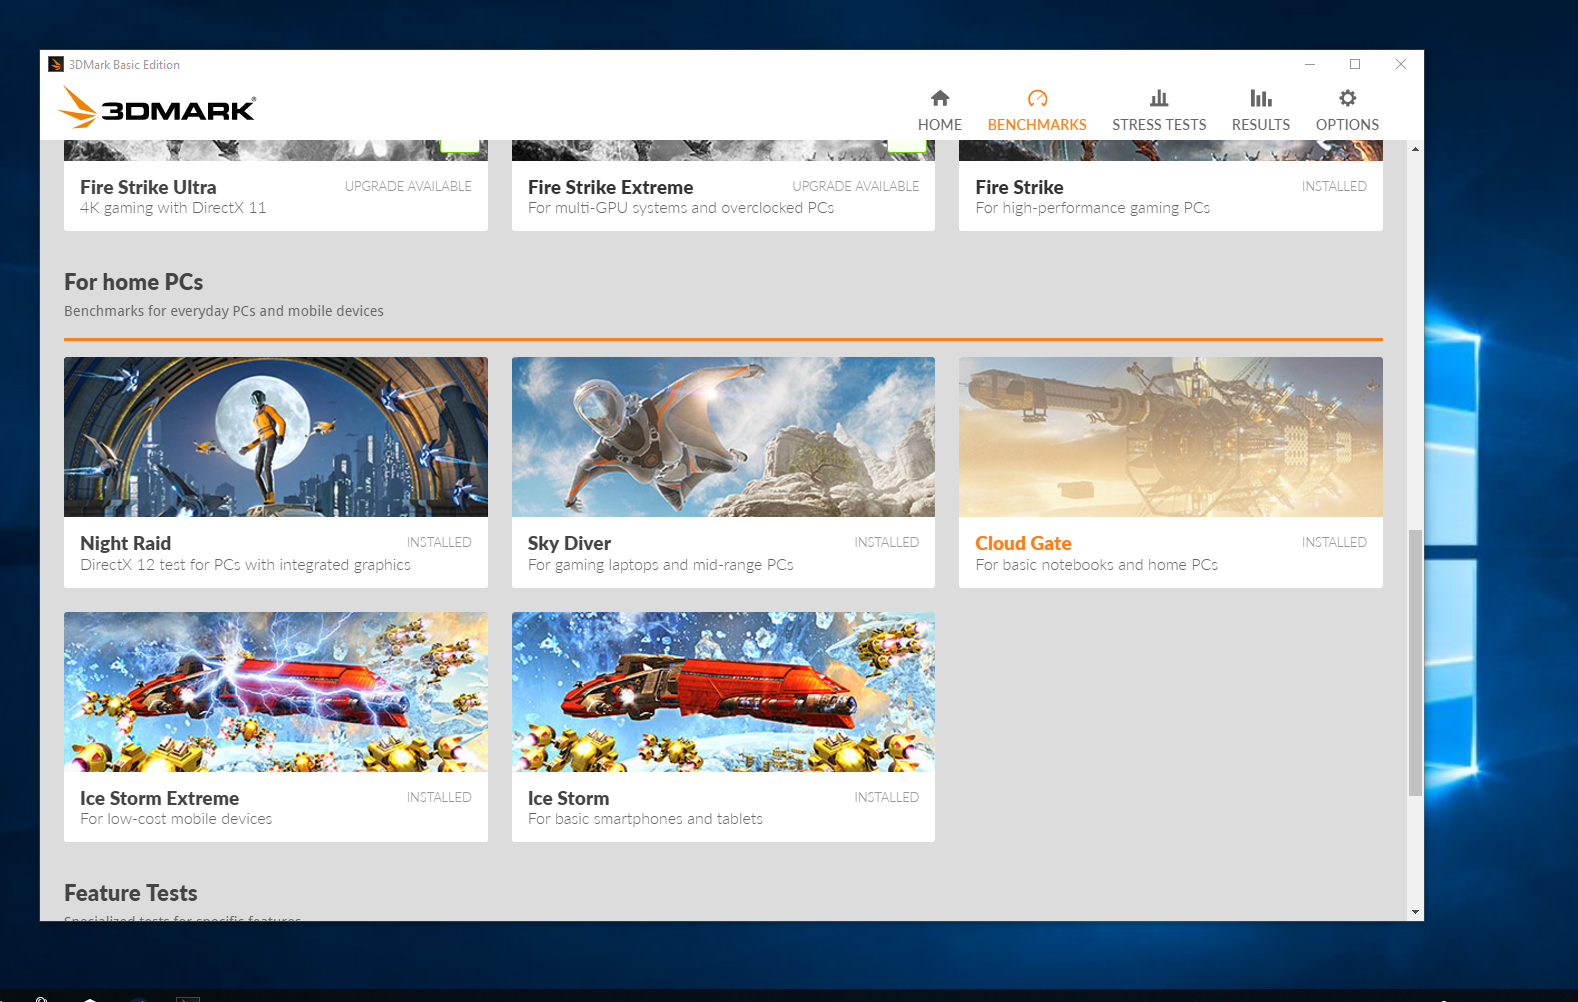
Just open the test you want and click the button Launch:

The paid version also has settings that allow you to disable the demo video, as well as select the tests you want from the set. Basically, these tests check the 3dmark video card, but the processor is also quite loaded.
4. Stability tests
You can use stability tests to check your computer's stability after building a new computer or after overclocking. But they are only available in the paid version on the tab Stability tests:

You don't have to use 3DMark for these purposes; you can use the same AIDA64, which has a free trial period, or Prime95, which is completely free.
5. View results
Also in the free version you can see the results of the 3dmark test at the last scan. To do this, open the tab results:
conclusions
In this article, we looked at how to use 3DMark to test the performance of the processor and video card. As you can see, the free version of the program is quite enough to understand what your computer is capable of. And if you need more, then you can use other free ones
This article was submitted to our second competition.
The article was written for trained readers. If you're looking for a system setup guide or overclocking tips, this is not the place for you. On the agenda is the task of obtaining a truly maximum result in one single test - 3DMark 2001SE. It is assumed that you are quite experienced in overclocking your system, so this article provides only specific tips for increasing the test result. Working on the resulting system will be problematic, but even using only part of the listed subtleties and tricks, you can increase the result by an average of 500-700 “parrots”.
advertising
At first, this material was intended as a guide to setting up RivaTuner, but I soon realized that the main subject of the article was not performance in general, but specifically achieving the maximum result in 3DMark. This is where it dawned on me that there is not a single Russian 3DMark Tweaking Guide, and therefore it is my duty to fill this annoying gap in domestic hardware journalism. Starting from my own observations and advice from other ModLabs team members, I gradually began to collect a variety of tips & tricks from various sources. As a result, the information provided was collected bit by bit on a variety of overclocking forums for quite a long time and it is simply impossible to list the names of the people who contributed to this guide. However, most of the advice was given by real 3DMark gurus, who are included in the TOP-100 for Online Result Browser. I would especially like to note the contributions of bowman1964, mackenz, jason1570, MrIcee, OPPainter, nvidiaguy, Macci, DigitalJesus. Unfortunately, there is not much information on the systems on Intel based and ATI, but I continue my search and in the near future I hope to please the owners of the fastest video cards today. By the way, about video cards. Minimum " system requirements"Many tips for setting them up - GeForce 4 Ti, in some cases - GeForce 3. However, it’s unlikely that anyone would even think about doing similar things on GF2MX and similar cards...About the fate of the crackdown in Russia
A small lyrical digression. The attitude towards dispersal in our country (I mean the entire territory of the former USSR) has developed an ambivalent attitude. On the one hand, there is probably no such number of overclockers per 1000 computer owners anywhere in the world. Overclocking has truly become a popular pastime, allowing you to save money on the purchase of components (and our people will never pass up a freebie). But on the other hand, the number of people doing overclocking professionally throughout the country can be counted on one hand. In almost two years of working on my own site (and therefore daily viewing dozens of overclocking and modding sites), I have only once seen a message about overclocking from Russia bypass major English-language overclocking sites - this is news about our own overclocking of the Celeron 2400 to 3600 MHz (by the way, the current record for stable processor frequency in the CIS, according to the website database). The results of overclocking using liquid nitrogen were published only once, there is no data on water chillers and phase-change systems, rare cases of installing Peltier modules... It's a shame for the country, gentlemen overclockers! Don't you really want to be among the first?
By the way, in the West there are dozens of teams of hardcore overclockers who compete in benchmarks with online services (primarily 3DMark 2001 and 2003) and simply ratings (the SuperPI benchmark, extremely popular in Asia, VR-Zone OC Rating, Holicho's MAXV3 Rating and PC-Zone MAXWCPUID Rating for overclocking records. The so-called "3DMark Teams" are especially famous, such as VR-Zone 3DMark Team, GamersHQ 3DMark Team, Xtremesystems.org 3DMark Team and Team Finland. Almost all the top steps in the 3DMark2001 and 3DMark03 ratings are occupied representatives of these teams.
Therefore, I bring up for discussion in the forum the idea of creating such a team here. You can learn more about the idea, express your thoughts on this matter and express a desire to join such a team in the corresponding forum thread.
3dMark is one of the most common tests/benchmarks of video cards in the PC world. This test is produced by the company Furthermark, which has been a leader in the production of various PC tests and benchmarks for several years now. In addition to the test program (benchmark) 3dMark, company Furthermark announced to the world computer community a comprehensive computer test PCMark, mobile device test 3DMark Mobile and others. In this article ABC PC will tell novice users how to use the benchmark 3DMark, as well as how to test a video card.
How to install the 3DMark video card test
Installing a test (benchmark) 3DMark is no different from installing regular programs and is performed using the installation wizard.
The first window, as usual, is informative and tells you about the video card test being installed. Next, select the installation path and wait until the process of copying files is completed and the necessary entries are made in the system registry.
After installing the program, you will be asked to enter the purchased license code. If you have not yet purchased the program, you will be able to use a limited version that does not allow you to record video card test results or change benchmark settings. When everything is ready, click Next and launch the program using the shortcut from the Desktop.
First, let's decide why test a video card at all? Test the video card with a benchmark 3DMark possible for various reasons:
It is necessary to identify a defect or check its presence
It is necessary to compare test results on different configurations or with/without overclocking
I just want to show off the level of my video card or watch beautiful cartoons
We have listed the main needs for testing a video card in a test/benchmark 3DMark. You can start testing your video card.

To run the video card tests by default, just press the button Run 3DMark. After that in full screen mode All the necessary tests of the video card will be launched, after which the results window will open. Number of points, in fictitious currency 3DMarks, will show how well your video card coped with the results of all tests.

To view more detailed statistics, click the button Details.

Detailed statistics provides a complete report on the scores of various tests 3DMark, of which the tests of the video card itself are GameTests, A CPU Tests- processor tests, respectively.
So, the most useful purpose of a video card test is 3DMark All that remains is to check for manufacturing defects in the components. That is, with the help of this video card test, we can easily determine the presence of graphic garbage or so-called video card artifacts, that is, defective graphics memory of the video card. If your graphics card is faulty, you will notice strange colored stripes or dots on the screen while you are taking the test. Be vigilant, and if you have the slightest problem or suspicion, take the video card to service center. Freezes when testing a video card in 3DMark also indicate its malfunction, so do not go far during testing.
Setting up the 3DMark video card test
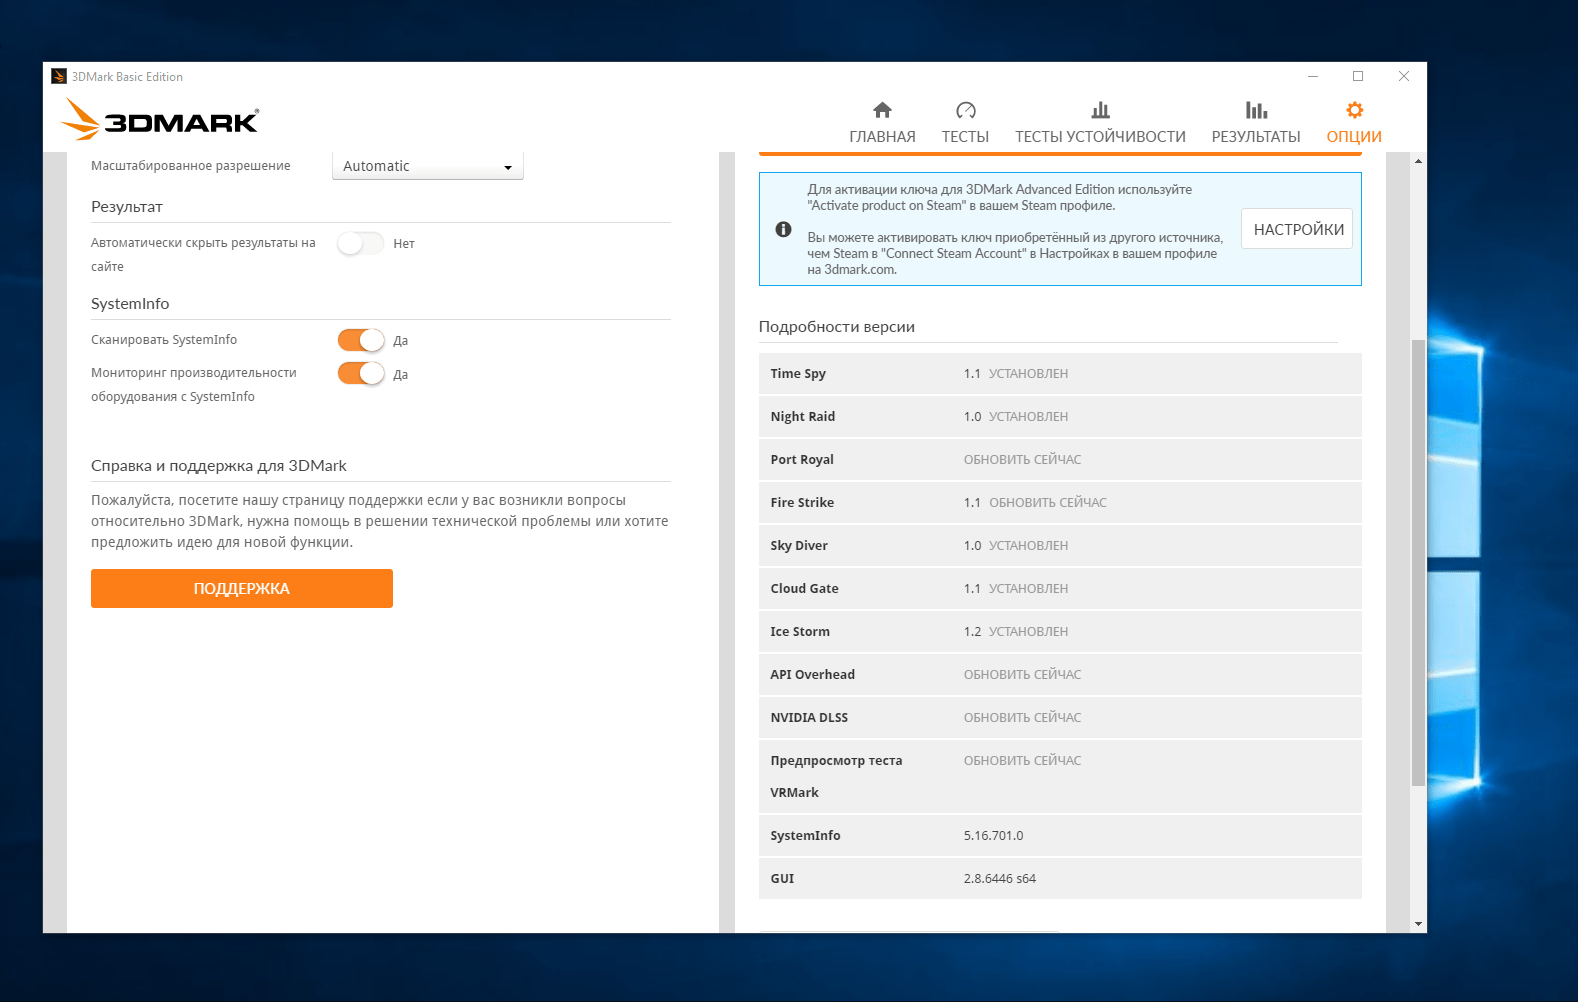
We have considered only default testing, but sometimes you need to independently set the program to perform only the necessary tests. To do this, we need to purchase a licensed version of the program.
Please note that the program window is divided into 3 columns: Tests, Settings, System.
The first column shows information about the selected video card tests, which you can always change by clicking the button Select.

In the window that opens, tick the required tests and click OK. Done, now 3DMark perform only the previously noted video card tests and will show the results specifically for them.
Second column, Settings, will allow you to configure video card testing, click Change.

In this window you can change screen resolution, turn on or off texture filtering and antialiasing, but these settings are not for novice PC users, so we recommend leaving them at default.
Usually, in reviews of video cards (sometimes motherboards and processors) we show the test results in graphics applications. And naturally, our readers may have questions: how do we get these results and why is this necessary? Veterans of overclocking (and not only) are unlikely to be interested in answers to these questions, but beginners or people who are encountering some test packages for the first time may be helped by our descriptions of the programs in which testing takes place. We will try to explain to you, step by step: what programs are needed for this, how to run the test and how to view the result.
Yes, but why carry out testing? For example, to know how different the performance of video cards based on different chips is, or how different the performance of identical video cards is, but from different manufacturers. Are these video cards ready for the games of both today and tomorrow, and also find out how productive the system is as a whole.
Since we always present results in reviews starting with synthetic tests, then, perhaps, we will start with such applications. We will not describe the theory, so as not to simply copy information from Russian-language sites, but will completely devote the article to practice, focusing on the main parameters and settings of test packages.
So, the main measure of performance in synthetic applications today is a series of 3DMark test packages from Futuremark Corporation, namely:
The first of them is quite old, but has not yet lost its relevance, 3DMark2005 is used in almost all tests, and the last one is 3DMark2006, this is an updated and expanded 3DMark2005. But unlike the 2005 version, 3DMark2006 takes graphics quality to a more advanced level, showing the capabilities of games of the near future and, perhaps, in a year or two it will become the de facto standard in the field of testing the graphics subsystem, especially taking into account full support for dual-core processors. We will not consider 3Dmark2001SE in this article, since it is highly processor-dependent and does not provide an accurate assessment of the video subsystem.
Now let's look at how to download these programs and how much it costs (meaning the cost of test packages). All 3DMarks are free to download (Free version), but have limited functionality. Thus, you cannot change settings, select each test individually, or view the full Demo. But you have the opportunity to run all the basic tests. If you need more extensive capabilities of these packages, namely change testing settings (resolution, anti-aliasing, etc.), select each of the tests, then in this case you will have to pay from 14.95 to 19.95 dollars (depending on the program - latest version, as a rule, more expensive than their predecessors). And all this is only for individual use for non-commercial purposes, i.e. Houses. And in order to be able to use 3DMark as a testing tool in your laboratory or in production (for example, when testing computers), you will have to fork out and buy 3DMark 2005 Business for $240 or 3DMark 2006 Professional, but for $490! 3DMark2003 available for only $14.95.
Naturally, we would not be able to describe this software without having a license for it, so Futuremark Corporation kindly provided full versions 3DMark packages for our tests.
Let's start with 3DMark03 or 3DMark2003, whichever is more convenient for you. By downloading this application(about 178 MB), or by installing from an installation disk (sometimes supplied with video cards from some manufacturers), you can start testing. But remember that the 3DMark2003 program must be version 3.6.0 (if you have old version package, then the update can be downloaded, otherwise your result will not be counted. :)
So, everything has been downloaded and installed, which means you can proceed to launching the program. If you are using the Free version, the program window will look like this:

The "Details..." button is responsible for information about your system: what processor, video card, operating system etc. To run the test, just click "Run 3DMark". The only drawback is that all tests are used, even those that have absolutely no effect on the final result (parrots :)). Also, in this version it is impossible to change the settings that are set by default, namely: resolution 1024x768, trilinear filtering, antialiasing disabled.
After passing all the tests, you will see this window with the result:

"Online ResultBrowser" allows you to place your result in the ORB online database, which contains the achievements of overclockers from all over the world. We will look at how to place your result in ORB in the second part of this article, but now let’s move on to “Details…”. By clicking this button you can view the result of each test separately.

The main tests are Game Tests with the 3DMark Score result obtained after passing them. This is exactly the result we indicate in our articles about video cards. For processor tests, CPU Test is used with the CPU Score result, but it is not objective enough. When testing platforms, still use Game Tests in conjunction with CPU Test. The remaining tests have no practical significance for us yet. Perhaps we will talk about them in more detail, expanding the theoretical part, but that will be another story. For now, let's return to the main points of testing with the 3DMark2003 package. In the free version, in the result window there is an inactive "To Excel" button - it becomes active if you use the Pro version of 3DMark2003 and allows you to transfer the results to Excel program, subject to its availability in the system. If you are not satisfied with the basic features, you will have to pay the required amount to receive a code that allows you to upgrade Free version up to Pro version. After receiving the code, click the "Register..." button in the main window, enter the password, and you are the happy owner of 3DMark2003 Pro.

After registration, you can choose any test you need, you can change the settings so that the test is repeated several times, you can even loop it if you want to test the “strength” of your hardware. To select tests, click "Select..." and select what you need. Selection of all tests – “Select All” button, reset – “Clear” button.

By clicking "Change...", you can select the resolution that your monitor supports (modern video cards support 2048x1536 and even more, so everything will depend on your monitor), antialiasing, and filtering mode. When choosing anisotropic filtering, do not forget to specify maximum value– from 1 to 16. Recently, in our articles we are increasingly using resolutions of 1024x768 and 1280x1024 (this resolution will be very interesting for users of LCD monitors with a diagonal size of 17" and above), and to load the video subsystem - antialiasing (AA) 4x and anisotropic filtering (AF) 16x.

Here you can select how many times you can repeat the test (Repeat each test) or repeat it endlessly (Loop all selected tests). After changing the settings, you can always restore them to their original settings using the "Defaults" button.
We have covered the main points about this program, now you can move on to the next package - 3DMark2005.
Download the 3DMark05 application version 1.2.0 (about 283 MB), if you have an older version, then you need to update it to the same version 1.2.0. After installation and subsequent launch of the program, a registration window will appear - if you paid for the Pro version ($14.95), you can enter the code, if not, click “Continue”.

The long-awaited 3DMark2005 window appears, but the annoying hint will interfere every time you start the package, so you will have to close it each time (in the registered version the hint can be disabled).

The structure of the main window has remained virtually unchanged compared to 3DMark2003 - a "Graphs..." button has been added, designed for plotting graphs. As in the previous version - free program, does not allow you to change any settings, all tests are run with default settings (the same as in 3DMark2003). Let's run the test.

The result window is almost identical to the previous version. Let's look at Details:

In 3DMark2005, everything unnecessary is already disabled (of the additional ones, only CPU Tests remain) - the test completion time has now become shorter. As before, the main test for video cards is Game Tests, for the processor - the less objective CPU Test.
Now let's look at the registered version.
Selection of tests:

Test settings:

Changing resolution, texture filtering, anti-aliasing - everything is here. Additional settings you can leave it as default. In 3DMark2005 we test in the same way as in 3DMark2003. And, given the similarity in the settings of these test packages, we think that it is not worth describing them in detail.
With each version of 3DMark, the size of the installation file becomes larger and larger, and now it takes up 580 MB. We install, launch and, if there is an activation code (Advanced version - $19.95), then enter it in the appropriate window.

If you do not have the code, then click "Continue". Next is a prompt that needs to be closed every time you load the application, and if you register 3DMark2006, the prompt can be disabled. The main window of this test package has undergone some changes compared to 3DMark2003 and 3DMark2005.

"Results" already has a separate column listing the results of test subgroups. A game was also added (the "Game..." button) based on the CPU test, but only for the Advanced version. As in previous free versions 3DMark – no changes to settings, only what is set by default: resolution is now 1280x1024, trilinear filtering, antialiasing disabled.

Now, after passing the main tests, in addition to the final result, you will be provided Additional Information for each test subgroup.
The "Submit Your Results..." button is equivalent to the "Online ResultBrowser" in the 3DMark2003 and 3DMark2005 packages. The inactive "To Excel" button becomes active after registering 3DMark2006, and, as in previous versions, allows you to transfer the results to Excel.
By clicking "Details..." you can view the results for each test.

If you register 3DMark2006, you will be able to select each test individually, but unlike 3DMark2003 and 3DMark2005, in this application the final result is calculated along with the processor test. You should not disable tests before Feature Tests, otherwise you will not get the final result.

Test settings will appear if you click the "Change..." button in the main window.

Here, as in previous packages, basic settings are collected, such as: resolution, anti-aliasing, texture filtering. You can also choose how many times to repeat the test (Repeat each test) or loop it endlessly (Loop all selected tests). When testing in this package, we leave all settings at default, and only to increase the load on the video card we use anti-aliasing (AA) 4x and anisotropic filtering (AF) 16x.
So, we have looked at the basic testing methodology with 3DMark programs; it remains to say a few words about setting up video card drivers. When testing all video cards based on chips, both nVidia and ATI (or other manufacturers), we adjust the “performance” in the driver to “high quality”.


We hope that the steps described above will help you in testing with synthetic packages 3DMark2003, 3DMark2005 and 3DMark2006. In the next part of this article we'll look at how to put your score (and maybe even your record) into an online database