The hosts file is responsible for establishing a correspondence between the domain and the site's IP address. Contacting the host has priority over sending a request to the DNS server, and the file is stored on the computer and controlled by the administrator, which makes it an important element of security Windows operation. In some cases, users are faced with the need to restore hosts file To original state. You can delete unnecessary entries from it in two ways: manually and automatically, using special software.
Manual recovery
Typically, restoration of the hosts file is required after malicious applications add new entries to it. A typical attack looks like this: you open Odnoklassniki or VKontakte, and the site reports that your account is blocked and asks you to send an SMS to confirm your login. As a result, money is withdrawn from the phone, and you later find out that instead of VKontakte, the hosts file redirected you to a fake page.
But the host has nothing to do with it: it only turned out to be a tool in the hands of a malicious software. Therefore, after cleaning Windows antivirus you need to start restoring hosts.
Another option is to go to C:\Windows\System32\drivers\et and simply open hosts via Notepad. Inside you will see a lot of text on English language. You need to make sure there are no extra entries in the host. By default, the text should end with the line "# ::1 localhost". Everything after it should be deleted, especially if you yourself did not enter anything into the file.
However, this cleaning may not be complete, so we strongly recommend that you match the contents of your host with the information provided on the support page at https://support.microsoft.com/ru-ru/kb/972034. On Windows 7, the contents of hosts should look like this:
To make sure there are no extra entries, delete the old host and create a new file:

Now the old host will not function, and there will definitely be nothing unnecessary inside the new one, so you don’t have to worry about the safety of your money and personal data.
Automatic recovery
If manual recovery seems complicated, you can fix the host using special utilities. For example, technical support Microsoft in an article about fixing the hosts file on different Windows versions offers to download the Fix It utility, after launching which unnecessary entries will be deleted without user intervention. 
Another way is to use antivirus program AVZ. This powerful tool research and Windows recovery, but we will consider only one of its functions - clearing the hosts file.
The hosts file is designed to match domain names (sites), which are written using symbols, and the corresponding IP addresses (for example, 145.45.32.65), which are written as four numerical values. You can open any website in your browser not only after entering its name, but also after entering the IP address of this site.
IN Windows request to the hosts file has priority over requests to DNS servers. At the same time, the contents of this file are controlled by the computer administrator himself.
Therefore, quite often malware tries to change the contents of the hosts file. Why are they doing this?
They do this to block access to popular sites, or to redirect the user to other sites. There, at best, he will be shown an advertisement, and at worst, a fake page of a popular resource will be opened ( social network, service window Email, online banking service, etc.), asking you to enter your account information to log into the fake site.
Thus, due to the user's carelessness, an attacker can gain access to the user's data and cause damage to him.
Where is the hosts file located?
The hosts file is located in the folder with the Windows operating system, usually the “C” drive on the user’s computer.
The path to the hosts file will be like this:
C:\Windows\System32\drivers\etc\hosts
You can manually go through this path, or immediately open the folder with the host file using a special command.
To quickly access a file, press the “Windows” + “R” key combination on your keyboard. This will open the Run window. In the "Open" field, enter either the path to the file (see above) or one of these commands:
%systemroot%\system32\drivers\etc %WinDir%\System32\Drivers\Etc

This file has no extension, but can be opened and edited in any text editor.
Standard contents of the hosts file
In the Windows operating system, the "hosts" file has the following standard contents:
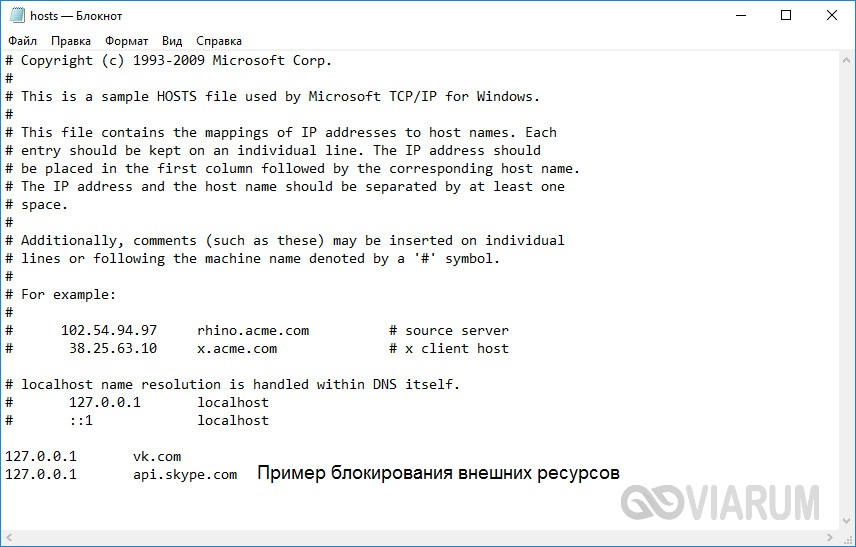
# Copyright (c) 1993-2009 Microsoft Corp. # # This is a sample HOSTS file used by Microsoft TCP/IP for Windows. # # This file contains the mappings of IP addresses to host names. Each # entry should be kept on an individual line. The IP address should # be placed in the first column followed by the corresponding host name. # The IP address and the host name should be separated by at least one # space. # # Additionally, comments (such as these) may be inserted on individual # lines or following the machine name denoted by a "#" symbol. # # For example: # # 102.54.94.97 rhino.acme.com # source server # 38.25.63.10 x.acme.com # x client host # localhost name resolution is handled within DNS itself. # 127.0.0.1 localhost # ::1 localhost
This file is similar in content to operating systems ah Windows 7, Windows 8, Windows 10.
All entries that begin with the hash character # and continue to the end of the line are largely irrelevant to Windows because they are comments. These comments explain what the file is for.
It says here that the hosts file is designed to map IP addresses to site names. Entries in the hosts file will need to be made according to certain rules: each entry must begin on a new line, the IP address is written first, and then the site name after at least one space. Next, after the hash (#), you can write a comment to the entry inserted into the file.
These comments do not affect the operation of the computer in any way, you can even delete all these entries, leaving only an empty file.
You can download the standard hosts file from here to install on your computer. It can be used to replace the modified file if you don't want to edit the hosts file on your computer yourself.
What to pay attention to
If this file on your computer is no different from this standard file, then this means that there are no problems on your computer that could arise due to modification of this file by malicious programs.
Pay special attention to the contents of the file, which are located after these lines:
# 127.0.0.1 localhost # ::1 localhost
Additional entries can be inserted into the host file, which are added here by some programs.
For example, in this image, you can see that the program has added some entries to the standard contents of the hosts file. Between the commented lines, additional entries were inserted to perform certain actions. This was done so that during the installation of programs on my computer, this utility cut off unwanted software.

There may be additional lines of this type: first, “a set of numbers”, and then after a space, “site name”, added in order, for example, to disable advertising in Skype program, or block access to a site.
If you yourself have not added anything to the hosts file, and do not use the program mentioned in this article (Unchecky), then you can safely remove incomprehensible entries from the hosts file.
Why do they change the hosts file?
The hosts file is modified in order to block access to a certain resource on the Internet, or in order to redirect the user to another site.
Typically, malicious code is initially executed after running a program downloaded from the Internet. At this point, changes are automatically made to the properties of the browser shortcut, and quite often additional lines are added to the hosts file.
To block a site (for example, the VKontakte site), lines of this type are entered:
127.0.0.1 vk.com
For some sites, two versions of the site name may be entered with “www” or without this abbreviation.
You yourself can block unwanted sites on your computer by adding a similar entry to the host file:
127.0.0.1 site_name
In this entry, the IP address (127.0.0.1) is the network address of your computer. Next comes the name of the site that you need to block (for example, pikabu.ru).
As a result, after entering the site name, you will see a blank page from your computer, although address bar browser will display the name of this web page. This site will be blocked on your computer.
When using redirection, after entering the name of the desired site, a completely different site will be opened in the user’s browser, usually this is a web page with advertising, or a fake page of a popular resource.
To redirect to another site, entries of the following type are added to the host file:
157.15.215.69 site_name
First there is a set of numbers - the IP address (I wrote random numbers here as an example), and then, after a space, the name of the site will be written in Latin letters, for example, vk.com or ok.ru.
The way this method works is something like this: bad people deliberately create a fake (fake) website with a dedicated IP address (otherwise this method will not work). Next, an infected application gets onto the user’s computer, and after launching it, changes are made to the hosts file.
As a result, when a user types the name of a popular site in the address bar of the browser, instead of the desired site, he is redirected to a completely different site. This could be a fake social network page that is designed to steal user personal data, or a site with intrusive advertising. Very often, from such a fake site, there are redirects (redirections) to many other specially created pages with advertising.
How to edit the hosts file
You can change the contents of the host file yourself by editing it using text editor. One of the most simple ways To be able to change the file, open the hosts file in Notepad, opening the program as administrator.
To do this, create a shortcut to the Notepad utility on the Desktop, or launch the application in standard programs, which are located in the Start menu. To start, first click on the program shortcut right click mouse and then select in context menu"Run as administrator" item. After this, the Notepad text editor window will open.
C:\Windows\System32\drivers\etc
After opening the "etc" folder, you will not see the "hosts" file, since Explorer will be selected to display text files. Select the All Files setting. After this, the hosts file will be displayed in this folder. You can now open the hosts file in Notepad to edit it.
After editing is complete, changes to the hosts file. Please note that the file type when saving should be “All files”.

Conclusions of the article
If the malicious program has changed the entries in the hosts file, you can replace the modified file with a standard one, or edit the contents of this file, removing unnecessary entries from there.
How to change the hosts file (video)
Problems with the Internet connection are one of the most common consequences of a computer being infected with a virus. In this case, the sites either do not open, or instead of one site the user ends up on another, and this behavior can be observed even after the virus is removed. Cause? Change malware system settings and files, among which one of the most important is the hosts file.
Why is the hosts file needed and where is it located?
You've probably already heard something about this file; it seems to be used to block sites or something like that. Yes, it does contain such functionality, but it was originally used for other, more important purposes. By the way, did you know that the hosts file is present not only in Windows 7/10, but also in Linux, Mac OS and Android? This versatility is not at all accidental, because the hosts file appeared at the dawn of the Internet.
Actually, there was no Internet in the full sense of the word then, and if there was anything, it was small local networks. As now, computers in them communicated through IP addresses, which were understandable to machines, but not very convenient for users. Then the IT people decided to implement access to computers by name, which they did, but IP addresses did not go away; hosts still needed digital, not analog addresses for messages.
A solution was found very quickly. For every computer in local network a special Hosts file was sent out with a list of host names and their corresponding IP addresses. When one computer addressed another by name, the latter was matched with its digital address, and thus a connection was established. At first everything was wonderful, but there were more and more resources, the list in the Hosts file grew, and sending it to a PC became more and more problematic. A new solution was needed, and one was also found. The correspondence table was transferred to the then already formed Internet, forming a domain name system, and the Hosts file became largely unnecessary.
However, the developers did not remove it from their operating systems. It is still present in most operating systems, still establishing a correspondence between the IP address and the domain of the site and, as before, a request to it has higher priority over access to DNS servers, but its contents have now become much poorer, limited to two entries, and even then inactive. Currently, hosts are used mainly for banner exchange networks, automatic redirection from one resource to another, as well as speeding up access to sites.
In earlier versions Windows file the host was located in the %windir% folder, starting from NT its permanent location is listed as C:/Windows/System32/drivers/etc. In rare cases, the HOSTS file is located in a different folder; the path to it can be determined in the registry editor by expanding the branch HKEY_LOCAL_MACHINE/SYSTEM/CurrentControlSet/services/Tcpip/Parameters and looking at the value of the DataBasePath parameter.

How to change the hosts file: opening, editing and saving
So, we know where hosts is, now let’s see what can be done with it, and why it might need to be changed at all. In fact, the host file is ordinary Text Document, just without extension. You can open it with any text editor, the same standard Notepad.

There are also special utilities like HostsEditor, but their use in most cases is perhaps unnecessary. The contents of the hosts file are presented brief information about its purpose and two examples of use. The syntax of entries is very simple. The IP address comes first, followed by the hostname a few spaces later. For example, IP 38.25.63.10 will correspond to the address x.acme.com, and IP 127.0.0.1 or::1 (for IPv6) will correspond to the address of the local computer (localhost).

Please note that all lines are preceded by a # sign, this means that the line is commented out, that is, it is inactive, which is the same as if the file were empty. It will start working only when you add new entry. Let's give an example of how to change the hosts file in Windows 7/10 and use it to block a website, redirecting the request to the local computer. Let's say we want to restrict access to the VKontakte social network. To do this, add the following line at the end of the file:
127.0.0.1 vk.com
We save the HOSTS file like any other text file, restart the browser and try to access the site. As a result, you will receive the error “Cannot access the site.” It works very simply. When a user goes to vk.com, the browser first accesses HOSTS and looks for a match between the host name and its IP address, and, having found it, goes to the specified IP address, ignoring DNS server services, since accessing the host file is a priority.
Of course, on local computer There is no social network, so the browser returns an error. This way you can block any resources by registering them in HOSTS in a column. Another example of using a host file is redirecting to another site on the Internet. Everything is the same here, only instead of the local IP address 127.0.0.1 the address of another site is written. By the way, viruses often do this by changing HOSTS and adding redirects to phishing resources.
This is why it is so important to know what the default hosts file should look like. If you haven't edited it and there are uncommented entries in it, this should be a cause for concern. However, anti-spyware utilities can also change hosts by writing into it the addresses of blocked unreliable resources. Changes can also be made by keygens used to bypass activation of licensed software.
How to recover a deleted or modified hosts file
Above, we looked at the basic principles of how the file works, and at the same time learned how to edit it. Alas, not everything goes so smoothly. Often there are complaints from users that the host file cannot be opened, and if it is possible, it cannot be edited or the system automatically deletes added lines from it. The main reason for this is that the user does not have the appropriate rights.
Editing must be done with elevated privileges. How can I open the hosts file as an administrator if there is no corresponding option in the context menu? Very simple. Go to location executable file Notepad or another text editor, right-click on it, and select “Run as administrator” from the menu.

In the editor interface via the menu File – Open find and open the hosts file, only remembering to select “All files” instead of “Text documents” in the standard overview window.

In Windows 8.1 and 10, a modified host file can be cleaned by system security tools, in particular, the built-in Windows Defender. To prevent this from happening, hosts must be added to the exclusion list. Launch Defender, go to the Settings tab and select Excluded files and locations on the left.


Specify the path to the hosts file and save the settings.


The system will no longer check it, therefore, the changes you made will not be canceled.
In Windows 10, exceptions are made from the Security Center component Windows Defender called from the system tray.
We also cannot rule out problems when trying to save an edited file. The reason is the same - lack of rights. Solving this problem is not difficult. Since the system does not allow you to save the edited file directly to the etc folder, save it to your desktop (remove the extension, if assigned).

Rename the original file to hosts.old, and then copy the new modified hosts file from your desktop to the etc folder.


There is a more radical way, for example, hosts can be edited directly by booting from any LiveCD with a built-in file manager.
And one last thing. What to do if the hosts file has been changed or deleted? Is it possible to somehow restore it? Deleting this file will not affect the operation of the system in any way, unless you changed it for some specific purpose. As for recovery, there are several solutions. The source hosts file, although it contains data, is essentially equivalent empty file. Create an empty text file on your desktop, remove its extension and move it to the etc folder, this will be your new hosts.
You can also take the file from another computer or virtual machine with Windows, there is practically no difference in OS versions. If you want to restore the contents of the original hosts, you can manually delete all uncommented lines or use the free healing utility Dr.Web CureIt! – it is capable of restoring the host by resetting its contents to the default state.

Very often, either after a virus attack, after which, for example, a social network needs to restore access to your page, or after unsuccessful editing, you have to restore the default content. To do this, you need to know what the contents of the original hosts file are. The situation is complicated by the fact that each operating system from Microsoft is different, although the basics remain the same. Below is the original contents of the hosts file for some currently popular operating systems. Windows systems, which I will list in descending order of their popularity (personally, I think that the most popular system is the most new system. Those who believe that Windows XP is immortal and Windows 7 is the best creation of Microsoft seem to me to be backward in development. I don’t want to offend anyone, I’ll only be glad to hear that I’m wrong).
For those who don't know, the Hosts file is used to translate domain names into network . More details about this file written in the article, the link to which I provided just above.
Original Hosts in Windows 8
#
#
#space.
#
#
# For example:
#
#102.54.94.97 rhino.acme.com #source server
#38.25.63.10 x.acme.com #x client host
#127.0.0.1 localhost
# :1 localhost
127.0.0.1 localhost
Original Hosts file in Windows 7
# Copyright © 1993–2009 Microsoft Corp.
#
# This is a sample HOSTS file used by Microsoft TCP/IP for Windows.
#
# This file contains the mappings of IP addresses to host names. Each
# entry should be kept on an individual line. The IP address should
# be placed in the first column followed by the corresponding host name.
# The IP address and the host name should be separated by at least one
#space.
#
# Additionally, comments (such as these) may be inserted on individual
# lines or following the machine name denoted by a ‘#’ symbol.
#
# For example:
#
# 102.54.94.97 rhino.acme.com # source server
# 38.25.63.10 x.acme.com # x client host
# localhost name resolution is handled within DNS itself.
# 127.0.0.1 localhost
# :1 localhost
Orinal Hosts file in Windows Vista operating system
# Copyright © 1993–2006 Microsoft Corp.
#
#
#space.
#
#
# For example:
#
127.0.0.1 localhost:1 localhost
Original Hosts in Windows XP
# Copyright © 1993–1999 Microsoft Corp.
#
# This is a sample HOSTS file used by Microsoft TCP/IP for Windows.
#
# This file contains the mappings of IP addresses to host names. Each
# entry should be kept on an individual line. The IP address should
# be placed in the first column followed by the corresponding host name.
# The IP address and the host name should be separated by at least one
#space.
#
# Additionally, comments (such as these) may be inserted on individual
# lines or following the machine name denoted by a ‘#’ symbol.
#
# For example:
#
# 102.54.94.97 rhino.acme.com # source server
# 38.25.63.10 x.acme.com # x client host
127.0.0.1 localhost
Using the templates provided, you can easily replace the current contents of the Hosts file with its original contents. In addition to the above files, I would like to clarify a little what is what here. The main content of the original Hosts file in Windows is a commented manual for using this file in English. In addition to describing the functionality of the Hosts file, there are also various examples of how to use it for its intended purpose. And if you still haven’t figured out where the comments are and where the functional part of this file is, then get acquainted: the sign # is special character, which means that everything on this line after this sign is comments. This means that in almost all original Hosts files the really working part is the last line indicating the loopback interface, which is one of the and pointing to the computer itself. Based on this, you can completely remove all comments from the Hosts file without losing its functionality. That is why the title of the article is The original hosts file in Windows, but not Correct Hosts for Windows. After all, the correct Hosts file will be any nonsense like this:
# Before you is the most correct of all
# the most correct Hosts files, which
# ever existed on computers
# on which it has ever been installed
# operating system from a well-known
#Microsoft Corporation!
127.0.0.1 localhost
# As you can see, comments are everywhere!
# And here,
# and there. But this makes the hosts file
# doesn't get wrong!
The inconspicuous hosts file in Windows operating systems can cause a lot of trouble for computer users who are not aware that the simplest changes in this file can completely change the operation of sites requested through browsers. This opportunity has been adopted by various scammers on the Internet, who, by making changes to the hosts file, block the work of the most popular sites among users, such as Vkontakte and Odnoklassniki. To restore their operation, just open the hosts file and delete unnecessary entries from it.
As the comments to previous articles on our website called and VKontakte showed, many users have problems opening the hosts file. And the point here is not only that many users lack computer knowledge. Also, attackers are improving their methods by keeping the real hosts file hidden and leaving its fake counterpart in plain sight. In addition, in operating systems Windows Vista and Windows 7, it is important to open the file correctly in order to be able to save changes made to it.
Let's look at how to correctly open the hosts file in the form of simple step-by-step instructions.
- On Windows Vista and Windows 7 operating systems, sign in with . Otherwise, it will be impossible to save changes made to the file.
- In the search field that appears in Windows Vista/7 just above the Start button after you click it, enter the command
notepad %systemroot%\system32\drivers\etc\hosts
and press the Enter key on your keyboard. - As a result of the previous action, the hosts file will open in the Notepad test editor, which you need to carefully review and delete unnecessary entries.
- When viewing, be sure to pay attention to the presence of horizontal and vertical scroll bars in the window, as there are cases where malicious entries are taken away from the visible part of the screen by numerous spaces or line breaks. If scrollbars are detected in open window, then move the sliders and look carefully at the screen so as not to miss lines that block the operation of sites.
If for some reason the previous method seems complicated to you, then you can open the hosts file and in the usual way. You just need to do a few extra steps.
- Login with .
- hidden files on the computer.
- Go to the folder C:\Windows\system32\drivers\etc\
- Right-click on the hosts file icon and select “Open” from the context menu that appears.
- In the window for selecting the program with which to open the file, select “Notepad” and click the “Ok” button.
- Review the file and remove anything unnecessary from it.
- If there are two hosts files in the folder, this means that one of them is false. To determine the real one, you need to open both files. The one in which additional records will be found will be the real one.
- After clearing the hosts file, delete the false file and make hidden files invisible again.