Hello, friends! I bring to your attention an article in which I will show you how to make a backup copy of all partitions of the hard drive of a new laptop with installed Windows 8 in a programme Acronis True Image 13. I would like to say that in this program you can make a backup copy of any partition of your hard drive separately or all partitions together (as you wish).
In the second part of the article, we will look at restoring a laptop from this backup copy in case it fails to load due to any errors. Program True Image 13 is paid, but nevertheless, letters with requests to do it detailed review(especially when working with new laptops and hard drives GPT style(GUID Partition Table)) comes from you a lot.
This is what they say on the official website of the program!
Creating a backup copy of a laptop hard drive in Acronis True Image 13
Note: A full backup of your laptop's hard drive or simple computer can be done not only using Acronis True Image 13, there are several more free ways. For example, or, if interested, follow the links and read the articles. It will be very great if you play it safe and periodically use at least two methods to backup the hard drive of your computer or laptop.
In this article we will talk about the Acronis True Image 13 program, which, in my opinion, deserves a special mention on our website and here’s why.
I am sure you will be interested in our new articles about Acronis True Image.
Firstly, Acronis True Image is specially designed to create backup copies of operating systems and restore from these backup copies, under the most unfavorable circumstances, for example, you can recover even when your computer or laptop does not boot.
Secondly, Acronis True Image 13 is compatible with the new Windows 8 operating system.

Acronis can create a backup image of all or any partition of the hard drive (including Windows) of your computer or laptop, netbook separately and restore it (them) in place if necessary.
For comparison, if you use the built-in laptop to create a backup Recovery program, then using it you can only backup all partitions of the hard drive together and restore them together, which will entail the loss of all information on the computer, laptop, netbook.
If you use built-in tools to create a backup image Windows archiving 8 and Windows 7, then the created image cannot be renamed and transferred anywhere, and the hard drive after creating the image cannot be further divided into partitions, since after this there is a high risk of not being restored from the backup image.
Using Acronis True Image, you can create a backup copy of anything and transfer it anywhere; when restoring, Acronis will definitely find its backup.
Acronis True Image can transfer your operating system to another partition of the hard drive or even to another hard drive and even to another computer. The backup copy can be divided into parts and renamed. Once upon a time, many years ago, I became acquainted with this program and still work with it, do not consider this as advertising. Imagine, you install an operating system, then install about a hundred programs into it for working with text, video, graphics, the Internet, accounting, and so on, almost every program has its own installation features, and it sometimes takes you several days to do everything. And in the end, you create an archival backup of everything that you may have to work with for several years and then work calmly without fear that your operating system will crash or become inoperable for some reason. You can restore it at any time using the program... Acronis True Image 13 Nowadays, most computers and laptops are sold with Windows 8 installed and the UEFI interface instead of the BIOS, therefore, the hard drive on such devices has a new style of placing GPT partition tables (GUID Partition Table). Works stably with such devices latest version Acronis True Image 13 program. But even if you don’t have new computer and the hard drive has an outdated MBR partition table, then Acronis True Image 13 will handle it even better.
On the official website http://www.acronis.ru/ you will find more information about the program. Choose "For Home"

and you can download and install for free trial version program with which you can create archive image operating system, consider all its capabilities, but only one thing cannot be restored from a backup image. To do this you will have to purchase the program. Creating a backup image in Acronis True Image 13 In the main program window, select Backup and Restore.

Backup disks and partitions.

Look carefully out the window Managing my laptop's disks, you can see two hard drives, the first Disk 0 has four partitions:
The first partition: System, hidden, capacity 1.00 GB, healthy (Recovery partition), this is the service partition of the laptop.
Second partition: Unnamed, hidden, volume 260 MB OK (Encrypted (EFI) system partition) belongs to the operating system.
Third partition: volume 687 GB, installed operating system Windows system 8, that is, drive C:
Fourth partition: Recovery, hidden, capacity 10.75 GB, Good (Recovery partition), this partition contains files with the factory settings of your laptop.


Acronis True Image 13 offers to include all existing laptop partitions in the backup image. If you just bought a laptop or computer, then my advice to you. First of all, create a complete backup image of all partitions of your laptop’s hard drive, as the program suggests. To do this, it is best to switch to disk mode, but before that we look at what will be included in our backup image.
Click Switch to disk mode.

We tick the hard drive of our Toshiba laptop, now we need to select the location of the image to be created, click “Browse”.

In the left window, select our portable USB hard drive My Passport (E:), left-click on it and click OK. Give the name of the backup copy in Latin or leave it as default, in my case – TOSHIBA MQ01. Click OK.

If you now click the Archive button, the process of creating a backup image of the laptop will begin, but before that, let's select the Backup Options button.

I want to say that they are configured optimally by default, but still some points are worthy of attention. For example, you can split the backup into several parts. I'll set this option to "Automatic"

Be sure to check the box "Archive in sector-by-sector mode"

And "Check the backup after it is created." Click OK.

Archive.

The process of creating a backup copy of the entire laptop hard drive begins.

After successfully creating a backup archive, we look at where exactly our backup image was created on the portable hard drive USB, folder E:\My backups\TOSHIBA MQ01.

Creating bootable media for Acronis True Image 13
Now be sure to create bootable media. The natural question is why. Friends, you need to create bootable Acronis True Image 13 media in case of an emergency. For example, your laptop will not boot due to errors and even our article will not help you restore it. Then we boot from bootable media (CD or flash drive) and restore our laptop from the backup image. How to do this is described in detail later in the article. But first, let's create bootable media.
In the main program window, click on the Create bootable media button.


I select the drive and create a bootable disk with Acronis True Image 13. If you want to create a bootable flash drive, connect it and it will appear in this window. Further.

Get started.


Bootable media has been created.

Recovery process using bootloader Acronis disk True Image 13
You can restore Windows 8 using Acronis True Image 13 from a running system, run True program Image 13 and select restore.
Caution: If you backed up only the C: drive, then all data on it will be replaced by the data from the backup copy. If you have created a backup archive of your entire hard drive, then all the information on your hard drive will be replaced with the data from the backup copy.


But usually, recovery using Acronis True Image is resorted to in extreme cases, that is, when the laptop does not boot at all and without boot disk programs are indispensable.
Let's imagine this situation: our laptop won't boot! This can happen for many reasons. For example, we were experimenting with creating new partitions on our laptop and accidentally deleted the service partition with files Windows boot 8. Or you decided to reinstall Windows 8 on Windows 7, but something didn’t work out for you and now nothing will load on your laptop except errors on a black screen. Or maybe you successfully reinstalled Windows 8 on Windows 7, but after using Windows 7 for a while, you decided to return the laptop to its original factory state.
For example, as an experiment, I deleted all partitions on the laptop hard drive

and now I will perform a recovery operation. I want to keep you from such experiments, no need to abuse your laptop unnecessarily.
Note: To restore from a backup archive, first of all you need to enter the UEFI BIOS of our laptop and disable the option " Secure Boot" (There is no need to disable the UEFI option! ),

otherwise, when you boot your laptop from the Acronis True Image 13 boot disk, you will receive an error. If you don't know how to do this, read our article ".
So, we boot our laptop from Acronis True Image 13 boot media (CD or flash drive). If you don’t know, follow the link and read.
For example, my laptop can be booted from disk if immediately after turning it on, I frequently press the F-12 key. Appears boot menu. I choose a DVD-ROM with an Acronis True Image 13 boot disk.

Select True Image

Sorry for the quality of the photos, but I carry out the operation of creating a backup archive, as well as restoring from it, on a real laptop, and not on virtual machine. So it's all for real.
Disk recovery.

Review.

We find the backup archive of Windows 8. It is located on our portable USB hard drive My Passport (E:), in the folder My backups\TOSHIBA MQ01


Select it with the left mouse and click OK.


Check the box "In sector-by-sector mode"

Check the box for "Disk 1" and all other partitions

Check the "Restore disk signature" option and click Next.

The program shows what will be restored and in what order. Get started.

The process of restoring our laptop begins.

Recently my friend asked me to explain to her how to do backup data. She's a humanitarian, so she wanted options that didn't require any customization. Since she is not a stupid person who likes to understand the problem herself and make decisions, I decided to collect the basic principles for her and describe the pros and cons of certain options (as I see them). I decided to publish it here in case some of you find it useful - to help a friend or relative. I would be very glad to receive comments on how the text could be made simpler and clearer.
Basic principles
1. Regularity and frequency
Data backup should be as regular as taking pills. It is for this discipline that you can thank yourself if some kind of collapse suddenly occurs. Sometimes losing even just a few working days due to a failure to backup can be very painful. It’s possible to answer the question of how often you can make backups by understanding the data for what period of time would be least painful for you to lose. One of optimal options- backup data once a week on weekends.Separateness
It is advisable that the data be saved to a separate external HDD(or other media) were stored in a separate location from the main data. The principle is quite obvious - if a problem occurs, it will be localized in one place. For example, if the hard drive on your computer fails, the backup disk will function perfectly. However, there is a balance to be struck between ease of access and security. Having a hard drive next to your computer significantly increases your motivation to use it for its intended purpose. And at the same time, this is not the most safe option for very important data that cannot be lost under any circumstances. That is why there is a distinction between data backup and data archiving.Double check
As soon as the first backup copy of your data is made, you must immediately check that this data can be restored from it! This means not only that the files become visible. You need to open several files to choose from and check that they are not corrupted. It is advisable to repeat such a check once every certain period (say, once a year).Discrimination
The best practice is to differentiate data into categories. The category could be their importance to you, the frequency of updates, or simply the topic.Often backup programs create so-called “images”. They look like one single file. So, it is better to save various data in each such image.
What is it for. Data of different importance requires different handling, this is obvious. You will probably want to store your important documents more carefully than, say, a collection of films. By dividing the data by update frequency, you can, for example, save time spent on backups. Topic - what data is desirable to recover together in one step? A striking example of two types of backups that should be done separately:
Data backup
This Word documents, photographs, films, etc. The same applies to this, but is often forgotten - bookmarks in the browser, letters in mailbox, address book, calendar with meetings, configuration file banking application, etc.System backup
We are talking about the operating system with all its settings. Such a backup eliminates the need to reinstall the operating system, make all the settings, and install programs. However, this is not the most necessary type of backup.Where to make a backup
1. External hard disk. You can often buy it straight out of the box. There are laptop ones - such disks are small in size, but more expensive. Regular hard disks You can buy a 2 TB one relatively cheaply - then you won’t have to worry about disk space for a long time.Fairly reliable (as long as you don't drop or shake excessively)
+ Relatively inexpensive
You must remember to connect the backup disk yourself.
-Not very convenient to carry (does not apply to laptop drives)
2. USB stick - suitable as an additional tool when you would like to transfer data from one computer to another and/or have it at hand. Also, if you don’t want to store the data itself on your computer.
There is one big but - a flash drive has a limited number of records, so if you store data from an application on it that will write intensively, then the flash drive (usb stick) will quickly die out. In addition, in my personal impression, they break quite often. A friend of mine, buying the most expensive flash drives, which were positioned as “unbreakable”, received a broken flash drive within a month or two. To be fair, I must say that I still haven’t had a single flash drive break; some have been working for 5 years already. However, I wouldn’t store data on a USB stick alone.
Mobile storage
+Takes up little space
+Very cheap
Unpredictable reliability
3. Data storage on a remote server (or in the cloud).
There are pros and cons:
The data will be available not only at home, but also at work and while traveling.
+Local separation of main data and backup copies (for example, if, God forbid, a fire happens, the data survives)
+There is no need to connect a hard drive for backup; as a rule, everything is done completely automatically.
It is advisable to encrypt the data, since it is unknown who can access it
-A large amount of traffic is wasted (if it is limited, problems arise)
-Often you can only store data up to 2 GB for free. So, such a backup is an additional expense item
List with good description services can be found
How to backup
Here is a list of applications that are worth paying attention to (in my opinion) when backing up to your hard drive.
Popular among the free ones
1. Genie Backup Manager - very convenient program, but is a little slow when working
2. Handy Backup - simple interface, works quickly.
Additionally
Often in the settings of backup programs there is an option to make an incremental or differential backup. The practical difference is quite simple. With differential backup, you can save on the space it takes up. But there are only two recovery options: data in the state when a full backup was made + data at the time when a differential backup was made.Incremental backup allows you to roll back to any point in the past when the backup was made. However, especially if changes in data occur frequently, the space will be consumed quickly.
But what to do if you don’t want to buy the same Acronis, you’re too lazy to tinker with all sorts of clonzillas, and make a complete clone of the system disk for the purpose of, say, transferring it to a new one (or HDD), or maybe, let’s say, putting it on a shelf as a static backup?
Let's get a look.
How to make a full copy of a disk - SSD or HDD
Well, let's figure it out. We will talk, as you understand from the subtitle, about the HDClone program, which has free version, supports the Russian language, is incredibly easy to use, and also has pleasant functionality.


When you first start, they will unobtrusively tell you that you can get more goodies if you buy one of the extended versions of the program. You can safely ignore this information (or study it on the developer’s website) and click the “Close” button.
The main window of the program is simple, concise and provides access to its functionality. The functionality in the free version is simple:
- Disk cloning (we will consider this);
- Creating a disk image;
- Creating backups (including backups not of the entire disk, but of partitions);
- Testing tool;
- Sector-by-sector disk browsing tool.
Everything is done extremely simply and literally in two clicks, but let’s still consider, for example, creating a complete copy of one disk to another (let’s say we need to transfer Windows from HDD to SSD), for which we click on the appropriate button.
In the first step, we will be asked to select the source disk or partition that we want to copy.
It is logical that at the second stage they will be asked to select the disk (or partition) to which we want to make a copy.
Now you will be prompted to configure partitions. Most often, this is not necessary and a tick is enough" Resize partitions proportionally", but if suddenly you need some adjustments, you can do it here.

It goes without saying that a warning will appear stating that the data on the disk where cloning will be performed will be completely deleted. It is worth taking it seriously so as not to lose anything valuable.
Next, if you did everything correctly (however, even if you did it incorrectly), the disk cloning process will begin. During it, you will be reminded once again that there are paid versions that allow you to copy faster:

Time, of course, is money, but with such a process and difference, I still choose money, especially since while the process is going on, you can do other useful things.


At the end of the process, you will be asked to adjust the partition (this is indeed necessary). If you don’t understand, then you can use the automatic option, but for those with hands, there is a manual setting.

At the end you will be able to see the result, as well as see some details. At this point the process can be considered completed.

Additional functionality
What else? Well, perhaps I’ll say that in the main window of the program, in the lower right corner, you can call up the settings menu (by clicking on the wrench icon) and create a bootable USB/CD/DVD media, which is no more difficult to manage than the program itself, and also look at the instructions and do other little things.
The SpeedTest section, as mentioned, allows you to test disks for the speed of the media in sequential and random reading (although in my opinion, this is not enough and it is better to use it).
Well, DiskView will allow you to look indecently deeply, right into the very sectors of any HDD/SSD media. If, of course, you know why it is needed.
That's probably all for now.
Let's move on to the afterword.
Afterword
This is such a wonderful tool that, it seems to me, will be useful to anyone who cares about their data and/or who has ever faced the need to move from disk to disk (to the same SSD).
As always, if you have any questions, thoughts, additions, etc., then welcome to comment on this article.
Good day.
Very often, many instructions, before updating drivers or installing any application, recommend making a backup copy to restore the functionality of your computer or Windows. I must admit that I often give the same recommendations...
In general, Windows has a built-in recovery function (if you haven’t disabled it, of course), but I wouldn’t call it super-reliable and convenient. In addition, it should be noted that such a backup will not help in all cases, plus add to this that it restores data loss.
In this article I would like to talk about one of the methods that will help you make a reliable backup copy of the entire partition hard drive with all documents, drivers, files, Windows OS, etc.
So, let's begin…
1) What do we need?
1. Flash drive or CD/DVD
Why is this? Imagine, some error occurred and Windows no longer boots - a black screen just appears and that’s it (by the way, this can also happen after a “harmless” sudden power outage)…
To run the recovery program, we need a pre-created emergency flash drive (or a disk, just a flash drive is more convenient) with a copy of the program. By the way, any flash drive will do, even an old one with 1-2 GB.
2. Backup and recovery software
In general, there are quite a lot of programs of this type. Personally, I suggest going with Acronis True Image...
Acronis True Image
Key benefits (in terms of backups):
- - quick creation of a backup copy of the hard drive (for example, on my PC, the system partition of the hard drive with Windows 8 OS with all programs and documents takes up 30 GB - the program made a complete copy of this “good” in just half an hour);
- - simplicity and ease of use (full support for the Russian language + intuitive clear interface, even a novice user can handle it);
- - easy creation bootable flash drive or disk;
- - the backup copy of the hard drive is compressed by default (for example, my copy of a 30 GB HDD partition was compressed to 17 GB, i.e. almost 2 times).
The only drawback is that the program is paid, although not expensive (however, there is a test period).
2) Create a backup copy hard section disk
After installing and launching the Acronis True Image program, you should see something like this window (a lot depends on the version of the program you will use; in my screenshots, the program is from 2014).
Immediately on the first screen you can select the backup function. Let's launch... (see screenshot below).
The disks on which we will make backup copies (here you choose yourself, I recommend choosing system disk+ the disk that Windows has reserved, see screenshot below).
Specify the location on another hard drive where the backup will be stored. It is advisable to save the backup copy to a separate hard drive, for example, to an external one (nowadays they are very popular and affordable).
The copy creation process will begin. The creation time varies greatly depending on the size of the hard drive you are making a copy of. For example, my 30 GB disk was completely saved in 30 minutes (even a little less, 26-27 minutes).
While creating a backup copy, it is better not to load your computer with extraneous tasks: games, movies, etc.
Here, by the way, is a screenshot of “my computer”.
And in the screenshot below is a 17 GB backup.
By regularly making a backup copy (after a lot of work has been done, before installing important updates, drivers, etc.), you can be more or less calm about the safety of information, and indeed, the performance of your PC.
3) Create a backup flash drive to run the recovery program
When the disk backup is ready, you must create another emergency flash drive or disk (in case Windows refuses to boot; and in general, it is better to restore by booting from a flash drive).
And so, let’s start by going to the backup and restore section and clicking the “ create bootable media«.
Then we will be asked to indicate the medium where the information will be recorded. Select a flash drive or disk.
Attention! All information on the flash drive will be deleted during this operation. Don't forget to copy everything important files from a flash drive.
That's all. If everything went without errors, after 5 minutes (approximately) a message will appear stating that the bootable media was successfully created...
4) Restore from backup
When you want to restore all data from a backup, you need to configure the BIOS to boot from a flash drive, insert the flash drive into the USB and restart the computer.
Disk backup- this is the creation of an exact logical (sector-by-sector) copy of the hard drive in the form of a file. Programs for hard drive backup must be able to create copies of boot and virtual disks. Handy Backup allows you to automate all operations to save your hard drive as a file.
What is disk backup: key features of the HDD backup program
The program should be able to select any hard drive for backup, including drives connected via a network, via a USB interface, or local ones. The program must also be able to create backups of virtual disks.
![]()
Automation of the hard drive backup procedure
Hard drive backup should be automated whenever possible, including automatic start backup tasks once at a certain time or when connecting an external hard drive USB drive, as well as starting missed tasks.
![]()
Secure storage of disk backups
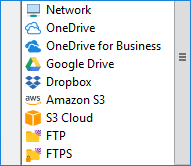
A hard drive backup may contain dangerous or important information, so the program must be able to protect it by encrypting HDD backups. In addition, the program must support various storage media, for example, Yandex.Disk clouds, Dropbox or FTP server.
Benefits of Handy Backup
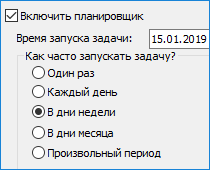
Managing the launch of hard drive backup tasks according to schedule
Launch your tasks at a specified time with intervals from months to minutes, or when a system event occurs, for example, creating an automatic backup when connecting a USB HDD drive to PC.

Hard drive backup security tools
Built-in algorithms for encrypting data and transmitting information over encrypted channels (including support for the SFTP and FTPS protocols, as well as calling external encryption programs).
"Hot" and silent hard drive backup
The program uses the VSS service to receive data for disk backup without stopping its operation. In addition, the program can be run in "silent" background as a Windows service.

Network drive backup
Video tutorial on creating a hard drive backup and restoring it
This video describes how to create a backup and hard restoration disk using the Disk Image plugin and the HBDR utility. The Handy Backup interface is shown in English language, but for Russian the steps are similar. The interface of the Handy Backup Disaster Recovery utility is available only in English!
Attention: This video instruction assumes that the Handy Backup software is already installed on the computer, and the Handy Backup Disaster Recovery utility is already installed on the USB drive. If this is not the case, please download and install Handy Backup and Disaster Recovery before starting, according to the video instructions.
Handy Backup provides convenient and secure automatic hard drive backup. Try it now by downloading a 30-day free version of the program with a full set of features!