You have installed the “SBC++ Electronic Reporting” program at your workplace and now you want to start studying it. What do I need to do? First, launch it (if the program does not start automatically) and configure it.
If there are several users of the program, then youyou can define their rights and limit access toparity. General principles for describing access zones, creatinguser groups and inclusion of users in opi groupsranks in Chapter 5 of SBSiS++ Administration (Bypower\Administration of SBS++).
Taxpayer setup
One of the stages of setting up the program is setting up your organization’s card and installing certificates for responsible persons. After the main program window appears, the Creation Wizardtaxpayer:
Choose how to use the program and configure your organization, following all the instructions in the wizard. All steps of the wizard are intuitive for the user: fill in the required fields and use the “ button to move from one step to another. Next>" Only some steps of the wizard may require additional explanation. We will dwell on them in more detail.
Registration with a telecom operator (Tensor)
So, if you indicated that reporting is submitted via communication channels (maximum information), then use the button to indicate your telecom operator from the proposed list. Click " Next>", complete the basic settings and proceed to filling out the information required to register your organization with the telecom operator:
Why is registration necessary?
By registering with the operator, you receive:
- Full information about your organization - the program automatically creates a card of your organization with the mandatory details already filled in, a list of government inspections and a list of responsible persons. All this information is provided by you when you connect to the SBS++ Electronic Reporting system.
- Licenses to use “SbiS++ Electronic reporting”.
- CIPF installation program (cryptographic information protection systems, for example, CryptoPro CSP, Signal-COM CSP).
Fill in all required fields (details of your organization)
2) and indicate activation code, which is specified in the contract for connection to the SBS++ Electronic Reporting system.
When specifying the code, be sure to respect the case indicatednew letters.
When moving to the next step (button " Further"") the system will check the connection with the telecom operator, and the computer obligatorBut (!) must be connected to the Internet.
If the connection is established and registration is successful, then click “OK” in the message and begin installing the CIPF. Along with the installation program, you also receive a serial number for using this version of CIPF, which is indicated in the message and saved in the wizard window.
Installation of CIPF in SBIS
Go through all the steps of the CIPF system installation wizard and restart your computer.
As soon as the computer restarts, be sure to setthose readers. In case of using Signal-COM CSP this
no need to do this, the readers are configured automaticallychesically In the case of other CIPF, this must be done (details
features in the application “Installing and configuring crypto programstoprotection").
After the reboot, the SBS++ Electronic Reporting system will start automatically, and you will continue through the wizard from the step you left off before rebooting the computer. In the next steps, check that the details of your organization received from your telecom operator are filled out correctly.
Responsible persons and inspections for the organization
Make sure that the information about the responsible persons in your organization and the directions of delivery are correct. To do this, click on the name of the person responsible and go through all the steps Responsible Creation Wizardsfaces.
The list of inspections for your organization is generated automatically based on the license issued to it - only these inspections will be allowed to submit reports via communication channels. Such inspections have an icon. For each direction of submission to the tax office, the method of submission is indicated. The submission method depends on how reporting processing is configured at your tax office (through a telecom operator, interaction with the State Registration Office without a telecom operator, etc.) and is set in your organization’s card on the telecom operator. This field is always editable if necessary.
License information is always available for viewing in program in the menu "Help/About the program "(tab "Licenses
taxpayer").
Here you can add other inspections to which you plan to submit reports electronically or in paper form.
Registration of a power of attorney for the transfer of electronic reporting
If you are registering an organization and want to assign your reporting to another organization, then click " Issue a power of attorney fortransfer of reports to the state. authorities via communication channels"and complete the document:
After filling out the power of attorney, be sure to print the completed document and confirm it with a signature on both sides.
After this, a record of the executed power of attorney will appear in the wizard window, indicating its validity period.
Installing certificates
The next important step in the program will be installing certificates
for those in charge of your organization: without them you will not be able to submit
reporting to state inspections via electronic communication channels.
If you have issued a power of attorney to transfer reports, then
you do not need to receive certificates, they are received by
the organization you trust to send your reports
sti. Complete your organization's registration and proceed to
setting up an accounting scheme (section "Setting up accounting schemes »).
So, certificates are issued on hard copy at the company’s office when connecting
application to the “SbiS++ Electronic Reporting” system, or are received in
office of your organization via electronic communication channels.
1. So, in the list of responsible persons in your organization (Fig. 3-5) (from the ru-
manager or chief accountant, depending on who
issued or need to obtain a certificate) click the button " By-
receive a certificate" Will start Certificate Request Wizard:
Taxpayer setup
Rice. 3-8 – Certificate Request Wizard
2. If you received the certificate on media, then in the start window
tera indicate the option " Install from media" and click "Yes-
3. If a certificate is planned receive via communication channels in the office
your organization, then you definitely need to contact
company office where they connected to the SBS++ Electronic
reporting” and arrange a call for an installation engineer.
Atobtaining a certificate via communication channels performed
request to a certification authority (CA). Request and follow-up
installation of the certificate in the program is carried out only before
a trusted representative of the CA (system installation engineer) and obliga-
preferably in the presence of the employee for whom the request is made
there is a certificate.
4. Insert the certificate media you received at the office
company when connecting to the system and click " Next>».
Rice. 3-9 – Option for installing a certificate from media
1. Select " Load from file"if the file with the certificate (file with
extension “.cer”) you received by email, please indicate
file location and click " Open».
2. Select " Load from container"if you received the certificate
on the media. Insert the media into your computer and remove it from the secret list
keys, select the one you need (click<Enter>).
3. Click the button Ready" Information about installed certificates
reflected in the master:
Setting up accounting schemes
Rice. 3-10 – Information about the installed certificate
If your organization is connected to reporting to the Pension Fund and
you have installed a certificate for the head of your organization
tions, then repeat the procedure and install the certificate for
chief accountant.
Setting up accounting schemes
After successfully registering your organization in the system, for convenience
control and successful submission of reports you will be asked to configure
accounting scheme:
Chapter 3. First launch and setup
Rice. 3-11 – Start setting up taxpayer accounting schemes
Complete the setup following the detailed instructions of the wizard.
Based on the specified system of taxation and taxes, automatic
skiy, the taxpayer’s calendar is formed, it reflects the
we, rented out specifically by your organization (more on this in a moment)
Main window
Main window
Rice. 3-12 – Main program window
So, the program has set up an account card and an accounting scheme for your organization.
organization, the necessary certificates have been obtained. The main thing in front of you is ok
but programs are its “control center.” While in it, you can perform
Understand all basic operations with reports and their sending via communication channels.
Reporting registers
On the left side of the window there are buttons for quickly going to the report registry -
ties (Federal Tax Service, Pension Fund, etc.).
Taxpayer calendar
The main element of the window. Tax information is displayed here.
taxpayer and lists the reports that the taxpayer must submit
before the specified date:
Chapter 3. First launch and setup
Rice. 3-13 – Dates for submitting reports in the calendar
Deadlines for submitting reports are determined by law and are specified in
calendar in a special way:
? In red overdue dates are indicated (report due date -
due date or payment has already expired).
? Orange the current date is highlighted (deadline
reporting).
? Black regular dates are highlighted (before the deadline)
There is still time for submitting reports or making payments).
Help on regulatory documents
You can quickly access the help system, which includes
The most necessary regulatory documents are available: codes (tax
vy, civil and labor), chart of accounts, collection of regulations on
accounting and other documents that may be needed
accountant not only when preparing regulated reporting,
but also in everyday work with the SBS++ system.
Main window
Click " Regulations» in the main program window to
get the necessary information:
Rice. 3-14 – Fragment of help on regulatory documents
A help window will open: use the search or just go to
2. Following the prompts of the Installation Wizard, select the folder where you want to install the program, your region, and, if necessary, integration with 1C if you generate reporting in 1C. Once the steps are completed, the installation of the program will begin.
3. After installing the program, click “Finish”, and the “SBIS ++ Electronic Reporting” program will begin to launch.
4. After launching the program and registering the modules, the Taxpayer Creation Wizard will appear. Following the Wizard's prompts, step by step fill in the Taxpayer Identification Number (TIN) and KPP of your organization, as well as the activation code (specified in the contract). After entering the activation code, you need to establish a connection to the Internet, if it has not yet been established, click Next, and the program activation process will begin.
5. After activating the SBiS++ program, the serial number of the CryptoPRO CSP program will appear and its distribution will start. In the Installation Wizard, you must enter the program serial number, leave the remaining settings as default by clicking “Next”, after which the CryptoPRO CSP program will be installed. After installation, the program will require a reboot. In most cases, a reboot is not required, so you can click the "No" button
6. Following the further prompts of the Taxpayer Creation Wizard in the SBS++ Electronic Reporting program, enter the details of your organization, full name of the manager and full name of the chief accountant.
7. Insert the media with digital signature.
8. Next to the full name of the head of your organization, click “Get a certificate”, after which the Certificate Installation Wizard will launch, where you need to select “Install from media” and add a certificate from your digital signature media.
9. After the Taxpayer Creation Wizard, the Accounting Scheme Setup Wizard will open, where you need to, following the Wizard’s prompts, select the taxation system of your organization and the taxes to be submitted.
SBS++ update
The SBiS++ program includes an auto-update function, which periodically checks for new versions and, if a new version is detected, automatically downloads.
Auto-update can be turned off/on in the "SbiS++ Electronic Reporting" program by going to the Tools - Workplace Configuration menu and selecting the "Updates" tab in the window that opens.
You can check for new versions manually by going to the Tools - Update program menu.
Also, when automatically updating the program, you will be asked to update not only the program itself, but also the help system, address classifier, as well as the CheckXML and CheckXML UFA PF reporting verification programs.
If necessary, you can download and install the program update yourself. To do this, you need to follow this link, select the desired update (Electronic reporting or Authorized accounting), download it, run it, following the prompts of the Update Wizard, select the folder in which the SBS is installed, and install the update. After installation, the program will launch and module registration will begin. Upon completion of module registration, the program will be updated.
Setting up digital signature when renewing
After receiving a new digital signature certificate, you need to install it in the SBiS. Insert the media with digital signature.
1. In the SBS++ program, go to the Counterparties - Taxpayers menu.
2. Open your organization’s card and go to the Responsible Persons tab.
3. In the “Certificates” table, double-click on an empty row, which will open the Certificate Installation Wizard.
4. Select “Install from media”, click “Next”, and click “Upload certificate”, then select your certificate.
5. After that, click “Done” and save your organization’s card.
6. Try delivering mail. If delivery is successful, then the signature is installed correctly.
According to the order of the Federal Tax Service of the Russian Federation dated December 6, 2011 No. ММВ-7-3/909@ “On amendments to the annexes to the order of the Federal Tax Service dated November 17, 2010 No. ММВ-7-3/611@” the electronic format of reporting on Form 2-NDFL.
To generate a set of certificates, go to the Federal Tax Service register and follow these steps:
- Click “New report, 2-NDFL” and select “Information on income of individuals” (catalog “2-NDFL”). The Set of Information Generation Wizard will start.
- In the first step, indicate the organization for which you are generating a set of certificates and the tax office to which it will be submitted.
- Here you can change the OKATO code (by default, the code specified in the organization’s card is entered). This is relevant for individual entrepreneurs whose OKATO code at the place of registration of the individual entrepreneur differs from the code at the place of business.
- If, along with a set of 2-NDFL certificates, you need to send a register of submitted certificates to the tax office, check the “Generate accompanying register” flag and indicate its number.
Attention! When submitting a set of certificates for signature, a letter will be automatically generated to the tax office with an attached register file.
Click Next.
- Click the “Add Employee” button to select the employee for whom you want to generate income information. In order to generate a certificate for a third-party individual who performs periodic work in your organization under a civil law agreement (for example, under a rental agreement), click “Add an individual.”
The “2-NDFL” form will open, into which data on the organization and the selected employee will be entered.
- Click the “Add Employee” button to select the employee for whom you want to generate income information. In order to generate a certificate for a third-party individual who performs periodic work in your organization under a civil law agreement (for example, under a rental agreement), click “Add an individual.”
Features of filling out the certificate
When filling out the certificate, pay attention to the following points:
- In the title of Section 3 " Income taxed at the rate of _%» indicates the tax rate in respect of which the section is being filled in (this is 9%, 13%, 15%, 30%, 35% or the rate specified in the relevant double taxation agreement). The section itself contains information about income received by employees/individuals by month of the tax period.
Attention! If during the tax period an organization paid an employee income taxed at different rates, then in the section heading you must tick all the required rates and click “Apply”. In this case, sections 3 - 5 are completed for each tax rate.
- « Status" If an employee or individual is a non-resident, this must be reflected in the certificate (status equal to 2).

- To fill out mandatory and optional deductions and income of an individual, click the " Edit income, standard and property tax deductions».
- When resending not accepted kit, the old certificate numbers are retained, but the new date of completion is indicated.
Additional features of SBS++ "Tensor"
- When submitting information about the income of individuals, one of the requirements of the tax office is the mandatory sorting of persons alphabetically in the file with certificates. But sometimes it happens that the numbering of certificates in the file is confused and needs to be corrected. This is why the operation “ Renumber certificates».
As a result of this operation, renumbering is carried out both within the register of certificates and within the certificates themselves.
Please note that:- Only certificates in an unclosed and unsent package can be renumbered.
- When re-sending an unaccepted set, the certificate numbers are not allowed to be changed.
- Most tax inspectorates require along with a set of certificates register of certificates. Since reporting for 2011, it has undergone changes. A printed version of the register (in accordance with Appendix No. 1 of the Order of the Federal Tax Service of Russia dated September 16, 2011 No. ММВ-7-3/576) is generated by clicking “Print register”
- For the convenience of checking the completion of certificates, you can use pivot table(a report that displays the total amounts for file 2-NDFL).
- If necessary, you can Move certificates from one set to another. For this:
- Make sure both sets are open for editing
- Go to the package to which you want to transfer information, on the Employee List tab, click Transfer information
- Select the desired set, use the Spacebar to highlight the information you want to transfer
- Click Move

Instructions for working with the SBiS++ program
for clients – Accounting
Edition: 01/11/2014.
Latest version of this file available on our website: http://assistentbuh.ru – Technical support – Download – Documents
Instructions | Page |
|
Connecting new subscribers | ||
Connecting a new company | ||
We create an application for a new digital signature | ||
Replacement of digital signature | ||
Procedure for replacing a previously issued digital signature | ||
License renewal | ||
How to update your license information | ||
Personal Areaonline.sbis.ru | ||
How to register in your personal account online. sbis. ru | ||
How to log into your personal account online. sbis. ru | ||
Connecting a new subscriber in your personal account | ||
We create an application for a new digital signature | ||
How to create a container for digital signature | ||
How to install a certificate in a container | ||
How to connect/change delivery direction | ||
Installation, reinstallation, transfer of the SBIS program | ||
How to enter the serial number of the CryptoPRO license | ||
How to install (connect) an electronic digital signature for a taxpayer | ||
SBIS updates | ||
How to update the SBIS program from the update distribution kit | ||
EDS, crypto-pro | ||
How to view digital signature parameters | ||
How to make a backup copy of your digital signature | ||
How to install (connect) an electronic digital signature for a taxpayer | ||
We create an application for a new digital signature | ||
How to install CryptoPRO | ||
Others | ||
How to install/update CheckXML and CheckXML-UFA |
Where to contact in case of questions and problems
1. (3, - technical support – Accounting"
2. sbis 54.ru - you can send a request to technical support - Accounting"
3. forum .sbis .ru - forum for the SBIS program, administered by the developer
4. (3federal technical support from the SBS developer (Yaroslavl)
How to enter the serial number of the CryptoPro license
2. In the left window, expand the “License Management” item and right-click on CryptoPro CSP – All tasks – Enter serial number
3. Enter the serial number. The user and organization may not be specified.
Where to see the validity period of the CryptoPRO license
1. Go to the Start menu and launch the CryptoPro PKI program
2. In the left window, expand the “License Management” item and look at the number:

How to make a backup copy of your digital signature
2. Go to the Tools tab and click Copy container.
3. Click Browse and select the key (container) you want to copy, then proceed to the next window (Next button). You may not be able to understand from the name of the key which company it belongs to; in this case, first determine which container you need using the instructions How to view digital signature parameters.
4. Enter a name for the key copy (in Latin letters) and go to the next window, where you need to select the media on which the key copy will be created:

5. After which you will be asked to enter a password - you do not need to enter a password, just click OK.

6. After this, you will return to the main CryptoPRO window, which means that the copying procedure is completed.
7. Make sure that the copy was successfully created (see the instructions on How to view digital signature parameters).
How to view digital signature parameters
1. Go to the Start menu and open the CryptoPRO CSP program
3. Click Browse, select the container you are interested in from the list, then go to Next:

4. Basic information about the certificate is written in the Subject field (you can view it in a more convenient form by clicking Properties – Composition – Subject)
How to see which digital signatures are present on the computer
1. Go to the Start menu and open the CryptoPRO CSP program
2. Go to the Service tab, click View certificates in the container.
1. Click Browse, after which you will be shown a list of all digital signatures detected on your computer.
How to install/update CheckXML and CheckXML-UFA
1. Download the CheckXML distribution
a. Let's go to http://ereport.sbis.ru, go to the section Support/download(on the right side of the site), look for the distribution kit at the bottom of the page and download it.
2. Install the distribution
a. Launch the downloaded file. During the installation process, you will be offered a path where to install the program - remember it.
b. You may need administrator rights for installation - ask your administrator.
3. Register the path to the installed program in SBIS
a. Open SBIS, go to the menu Service/Task Configuration– bookmark Pension Fund parameters.
b. We see the field “ Location of the verification program", on the right, click the button with an ellipsis and select the directory where CheckXML was installed. Save.
4. That's it, CheckXML is installed, you can check your reporting.
Notes:
1. If you have VLSI installed on the server, all these actions must also be carried out on the server.
2. You can view the installed version of CheckXML in the CheckXML verification protocol, in its first line (go to the Pension Fund section, select the report, click Check).
How to update your license information
1. Go to the Counterparties/Taxpayers menu and open your company (if you have the Authorized Accounting tariff, then Counterparties/Senders).
2. In the window with company parameters at the bottom left, click the “Taxpayer Creation Wizard” button.
3. Complete the wizard to the end, in the second step by checking the “Update license information” checkbox. If at some step the program asks you to fill in something, fill it in.
4. Upon completion of the wizard, be sure to make sure that the program for which you updated the license information has changed.
How to download and run Ammy Admin (remote assistance)
1. Go to the website sbis 54.ru (the section Technical Support Assistant - Accounting will open)
2. Go to the Download section, find AmmyAdminv 3 and download it to your computer (for example, by right-clicking on it and selecting Save As). It is better to download the program to your desktop so that you can always find it quickly.
3. Find the downloaded file on your computer and run it.
Attention!– when downloading or launching, a warning window from the antivirus may appear; in this case, you must allow the antivirus to download or run this file.
How to install (connect) an electronic digital signature for a taxpayer
1. If you have your digital signature on a flash drive, insert it into your computer. If the digital signature is on the computer (Register), then there is no need to insert anything.
2. Open the taxpayer’s card (menu Counterparties – Taxpayers – Company), go to the Responsible Persons tab and open the line with the manager (click on it 2 times).


Note . You may already have a previously installed certificate. If this is a certificate for electronic reporting, then it is better to delete it (using theDelete), and if for FSRAR, then leave it.
3. Click the mouse on the tabular part and click the Insert button. The Certificate Installation Wizard will launch, which you must complete.


Select the certificate we want to install. The list will contain all the keys that were found on the computer. You can select the desired key either by expiration date, full name, or container name.

After selecting the key, information about the certificate to be installed will appear. We complete the master.


How to log into your personal account online. sbis. ru
You have several ways to log into your personal account.
1. You can access your personal account from the SBIS program - click on the SBIS Online banner, after which the browser will open and you will automatically be taken to your personal account.

2. Also, you can go to your personal account at http://online.sbis.ru and log in using the certificate:
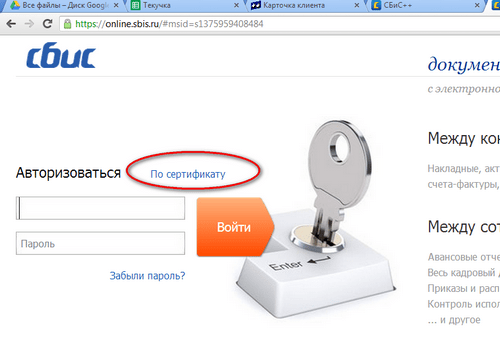
a. If the browser prompts you to install a crypto plugin, you must agree and install
b. When logging in using a certificate, you will be asked to select the digital signature to use to log in. Select a valid signature for the manager.
3. If you do not have a certificate or an installed SBIS program, then you can log into your personal account (online .sbis .ru) using your login and password.
c. To do this, you must first go through a simple registration procedure - on the main page, click Connect, fill out the fields and confirm your registration by clicking on the link in the letter requesting confirmation of registration.
Transferring SBS from one computer to another
Procedure for transferring an SBS++ program from one computer to another.
1. Prepare digital signature keys. Make sure you have a copy of your digital signature keys on removable media. If the keys are in the registry (that is, you do not use a flash drive when working with the program), then copy the keys from the registry to the flash drive (see instructions for copying keys).
¾ Change the legal address in the company card (Counterparties – Taxpayers – Your Company – General tab – Legal Address)
¾ Update the checkpoint, FSS subordination code, Pension Fund registration number in the company card
¾ Check which government agencies are listed on the State Inspectorate tab. If the ones you need are not there, add them (in the table section, right-click – Edit – Create record). If there are unnecessary ones, delete them by selecting them with the mouse and pressing Delete on the keyboard.
¾ If you have moved to the jurisdiction of another UPFR, do not forget to renew the EDI agreement with them.
If the company name has changed:
¾ Change the name and full name in the company card (Counterparties – Taxpayers – YourCompany – General tab)
¾ Install a new digital signature according to the instructions “How to install (connect) a digital signature for a taxpayer”
If the manager's last name has changed:
¾ Add a manager with a new last name to the employee directory (Counterparties - Employees)
¾ Install a new digital signature according to the instructions “How to install (connect) a digital signature for a taxpayer”
Step 7
Check for correctness
Run the system check protocol (Service – System check protocol). It must show that there are no errors.
Step 8
Create a backup copy of your digital signature
How to sign documents using EDI
1. Log in to your personal account on the website online .sbis.ru (how to do this - see the corresponding instructions)
2. Go to the Documents section.

3. Select the desired document. You can immediately approve/reject it, or look at the content first (to do this, you need to click on it).

4. In the detailed view, you can sign, reject, save or print the document:

5. Attention!!! If the “Print” button is not active, then you can print the document either by opening it in Word/Excel, or in the following way:
a. Hover over the gray box and a printer icon will appear on the right. If you click on the printer, the document will be saved as a pdf file (Adobe Acrobat Reader), from which it can be printed.

How to install CryptoPRO
1. Go to the website cryptopro.ru, go to the Downloads section:

2. Log in to the site as user “123”, password “123”
3. Scroll down the page and proceed to download CryptoPRO CSP R 3

4. Download and run the distribution. Follow the default settings until the installation is complete.
5. Attention! During the installation process, the program will ask you to enter your serial number. You don’t have to enter it, the program will work for free for 3 months. During this period, you need to contact the manager, receive a serial number and enter it.
Adding a new company in the SBIS program
The instructions describe the procedure for adding a taxpayer to the SBiS program, provided that you already have a generated digital signature.
For licenses: Basic, Light, Corporate.
When adding a company, you will need to enter the following data into the program; we recommend preparing it in advance:
o INN, KPP, OGRN, legal address
o Registration numbers of the Pension Fund of Russia, FSS, code of subordination to the FSS
o OKOPF, OKPO, OKATO, OKFS, main OKVED
o Passport details of the manager, his place of birth, registration, SNILS
o Passport details of the accountant, his place of birth, registration
Begin!
If you have the digital signature for the new company on a flash drive, then insert it into your computer.
Open the directory of taxpayers (counterparties – taxpayers) in SBIS and click Add. The wizard for creating a taxpayer will start, which you must bravely complete to the end:


When you click Get a certificate, the Add Certificate Wizard will start:


Select the required certificate:

Information about the downloaded certificate will be displayed, after which we finish working with the wizard:

You are returned to the Create Taxpayer Wizard:

After this, the program asks a little more about the taxation system, what taxes you pay, whether you are a small business, etc. You must reach the end of this survey, after which the company will be finally added to the program.
How to register in your personal account online. sbis. ru
Go to the website http://online.sbis.ru (we recommend using the Google Chrome browser)
Click "Connect":

If you are not sure whether you have an electronic signature, then select “NO” in the next step.
After clicking the “Register” button, you will be sent an email confirming your registration.
How to install a certificate in a container
If, when creating an application, you inserted a flash drive and wrote the container onto the flash drive, then insert it into the computer.
1. Log into your personal account on the website online .sbis .ru
2. Go to the Electronic Signatures section:

3. Click on the previously generated application (it will have the status “Certificate is ready. Load it into the digital signature key carrier”):

Click first on it, and then on OK:

If the operation was successful, then the process of generating an electronic digital signature is completed. Now you can begin the actions for which you created a new signature.
How to create a container for digital signature
1. Log into your personal account, go to the Electronic Signatures section. Your application now looks like this:

2. Click on it and follow the instructions on the screen.

Select the media on which the key will be written (flash drive or registry):

The key generation process will start:

Move the mouse within this window until the green slider reaches the end.
After this, you will be asked to enter a password - do not enter anything, just click OK:

That's it, the container is formed.
Connecting a new company
Procedure
Step 1 | Send a completed registration card for each connecting company |
Download from our website: http://assistentbuh.ru section Technical support – Download – Documents – Registration card |
|
Step 2 | Pay your bill |
The manager will send you an invoice as soon as he receives your registration card. The invoice is sent within 4 hours from the moment the registration card is received. |
|
Step 3 | Apply for an electronic signature*** |
If you paid for the work of an engineer to add a company, call and the engineer will help you do everything. If you do it yourself: ¾ Register on the website online .sbis .ru (only for new clients, according to the instructions “How to register in your personal account”, p. 28) ¾ Fill out an application for an electronic signature according to the instructions “Creating an application for a new electronic signature”, page 14 *** The application can be submitted without waiting for payment, i.e. immediately after receiving the invoice |
|
Step 4 | Notify the manager that you have submitted an application for digital signature |
You can either write a letter to the manager or call. |
|
Step 5 | Form a container and come to our office. |
Wait for the manager to check your applications and invite you to our office. Form a container for an electronic signature according to the instructions “How to form a container for an electronic signature,” p. 30 After forming the container - come! Where to come: Dimitrova Ave. 7, office. 310, right entrance with columns Have with you: ¾ Passport ¾ Seal or power of attorney |
|
Step 6 | Add your company to SBIS |
If you paid for the work of an engineer to add a company, call and say that you have returned from our office and are ready to begin the installation. The engineer will call you back and do everything. If you do it yourself: ¾ Install the digital signature certificate into the container (instructions “How to install a certificate into a container”, page 29). ¾ Add a company to SBiS according to the instructions “Adding a new company in the SBiS program”, p. 20 |
|
Step 7 | Check for correct installation |
Open SBS, open your company card (menu Counterparties - Taxpayers - Your Company). On the State Inspectorate tab there should be all the UPFRs and the Federal Tax Service Inspectorate to which you surrender. The FSS should not be there, it is always there by default and for everyone. Send any report to the test tax office (in the report, select “Test tax office”) or send a letter with the subject “test” to your real tax office (they won’t be upset). |
|
Step 8 | Conclude an agreement on electronic document management with the Pension Fund of Russia |
Download the application form and agreement from our website (www.assistentbuh.ru – Technical support – Download – Documents) and take it to your UPFR. When you pick up the signed agreement, enter its date and number in the SBiS program (Counterparties - taxpayers - Your Company - State Inspectorate tab - double-click on UFR and enter the date/number) |
|
Last changes to this file
Version from 01/01/2001
· In the instructions for adding a delivery direction, a method for adding it through the SBIS program has been added
· Completely redesigned instructions for adding a new subscriber
· The instructions on the procedure for replacing a previously issued digital signature have been completely redone
· The steps for creating a container and beyond have been removed from the instructions “Creating an application for digital signature.”
· The instructions “Create an application for digital signature” clarify the requirements for scans of documents in the application
VLSI is a special service that accountants often use. Thanks to the program, there is no need to personally present documents and reports. Instead, you can simply send an electronic copy.
Features of the VLSI personal account
A VLSI personal account without a license only provides the opportunity to receive and approve documents from counterparties and submit zero reports. However, after purchasing a license, the number of possibilities increases greatly:
- Document flow in electronic form with government agencies, counterparties, clients;
- Checking the company's reporting, including the status of sending documents;
- Distributing tasks to employees with different access levels and checking the progress of these tasks;
- Organization of work through CRM.
Having a personal account in the system makes it possible to independently change the organization’s details if they change.
Registration as an individual entrepreneur
An individual entrepreneur on the main page of the site must select “Registration”, after which he is given the opportunity to go through the procedure by electronic signature or by filling out the following fields:
- Name of the organization;
- Email.
There is no need to fill out the checkpoint; in the name of the organization, the entrepreneur indicates his own full name and individual entrepreneur, separated by a comma. As a result of successful registration in the system, a letter with a link for further actions should be sent to the specified email.
Registration as a company
Registration of a legal entity occurs in the same way as an individual entrepreneur: either by electronic signature or by filling out the appropriate fields. In the case of companies, the “KPP” column must be filled out. The “Company Name” field is filled in using the Alfa, LLC template. Where Alpha is the actual name of the company, and LLC is the form of organization.
Registration of an individual
For registration of individuals there is a separate item “Registration of a good person”. In a new window, the future user is given the opportunity to register using an electronic signature, mobile phone or via a social network.
When registering via mobile phone, to confirm the action, you must enter the code that was sent to your phone via SMS in the registration field. Registration through social networks takes as a basis the email to which the profile is registered. A link to confirm registration will be sent by email.
Authorization in your SBIS personal account
Authorization in your personal account for legal entities and individual entrepreneurs is carried out using a login, which becomes the INN and password, which are specified in the system settings when you first log in. If in the settings the participant has created a link to a social network, instead of standard authorization on VLSI, he can click the icon of the appropriate social network and log in using its login and password.
Authorization by certificate
Authorization using a certificate is available only on those devices where the application is installed. In this case, you do not need to enter your login and password each time for the system to recognize the user. Authorization will take place using a key (certificate) that is located in the application memory.
Personal account SBiS++
VLSI++ is a VLSI application that runs on both computer and mobile device. It allows you to work on several simultaneously  organization. In each organization, you can create several profiles for employees who will also work through the application. The program allows you to configure the access level. When purchasing this application, participants receive free document management with government agencies, as well as an electronic signature, for six months.
Reporting in the service
Registration in the service makes it possible to send reports to the tax office, pension fund and other government bodies. At the same time, the system contains a form for document registration. In the “Reporting” section there is also a “Calendar” column where you can see the dates by which the report must be sent to a particular organization. Omissions in document flow are also indicated there.
There are other services in the service that allow you to check your statements. In fact, VLSI makes the work of an accountant easier by providing hints at every stage of his work.
Checking details
VLSI is a huge database that not only transmits documents to the relevant organizations, but also checks them. The verification concerns the details. If an accountant made a typing error when compiling a report, the report will be returned to him indicating the incorrect information.
Before each delivery, the details are checked and contractors are searched according to the specified parameters. This reliably protects the organization from typos in official documents, as well as from working with unregistered organizations.
How to delete your SBIS personal account?
It is impossible to delete your SBIS personal account. You can only delete the reporting of an organization, individual employees in a profile, or the program itself. The personal account itself. You can ask a question about stopping work in technical support.