- 1. System unit - how to choose components?
- 2. Installation of the processor, random access memory and cooling systems.
- 3. Applying thermal paste to the processor
- 4. Installation motherboard into the body
- 5. Connecting the case controls to the motherboard
- 6. Installing the power supply
- 7. Installation of drives
- 8. Installing a video card
- 9. Laying cables and completing work
Each of us has at least once encountered a situation where, having trusted a sales consultant, we chose a ready-made personal computer, and after a few months we realized that for the same money we could have purchased a much more productive option. To ensure that a similar story does not happen to any of our readers in the future, we have prepared instructions on how to assemble a computer yourself.
This process actually turns out to be much simpler than many non-technical users assume, but it still has a number of nuances, which we want to dwell on in detail in our material. We’ll start with a brief reminder of what a computer consists of and how not to make a mistake in choosing components.
System unit - how to choose components?

When a buyer enters a computer hardware store and sees the entire breadth of selection of motherboards, processors, video cards and others components, it seems to him that to connect all these devices together you need to have at least a doctorate in technical sciences. But not everything is so bad, computer hardware manufacturers took care of us and many years ago accepted single standard– Advanced Technology Extended, which unifies the entire hardware of the computer.
Selecting components is the most difficult task when assembling a PC, much more labor-intensive than connecting them together, but this material is dedicated to the latter task, and you can find a comparison of the characteristics of video cards and processors in our other publications.

The basis of our entire future system is the motherboard, as its name suggests. It has virtually no effect on performance, but is responsible for the proper operation of all components of our computer.
The entire process of assembling a PC essentially consists of connecting components using connectors and wires to the board, and therefore you should first evaluate what kind of computer you would like to have as an output and, based on this, choose a motherboard with a certain number of RAM cells suitable for desired processor socket and so on. Also important characteristic The form factor of the motherboard determines the dimensions of the case you will need, so be careful and when purchasing a large E-ATX board, do not expect to fit it into a compact case.
Installation of the processor, RAM and cooling system.
To build a computer at home, we suggest starting with an “open bench” rather than immediately installing your components into the case without knowing whether the system works or not. The process is as follows: we connect all our parts to the motherboard, update the board firmware, install the operating system and test the resulting assembly for errors and conflicts. If they are not identified, then we are happy to install it all in the housing.
Let's start the process by installing the heart of our future PC - the processor. We must remember that the two market leaders in processor production - AMD and Intel - fundamentally use different socket designs; the former have the contact pins on the processor, while the latter prefer to place them in the socket.

For installation AMD processor you need to lift the metal lever, insert the legs into the holes provided for them, and then return the lever to its original position. Thus, we will close the processor contacts with the socket contacts and securely fix this position.

When installing Intel, you should lift the lever and the clamping cover, and after installing the processor, do these steps in reverse order. Both types of processors should be installed in a strictly defined position, which is indicated by arrows on the processor itself and the motherboard socket.

As for cooling the processor, you need to remember that they are all installed differently and the only reasonable action would be to strictly follow the instructions. For example, AMD has a passion for fasteners using plastic lugs, while Intel generally does not use this design solution. In general, most processor coolers are quite universal, and therefore can work with chipsets from both companies, but be careful when choosing - there are also models that are loyal to only one brand.

Do not forget that many coolers can be installed in two positions, which determines which wall the heated air will exit through - the back or the top. Therefore, before installation, weigh the potency of both options and your body and choose the most productive one.

After we have secured the radiator and installed the fan on it, all that remains is to connect the power connector to the corresponding connector on the board, called CPU_FAN. More expensive motherboards can provide two similar connectors designed for two coolers at once.
So, to complete the initial work, all we have to do is install the RAM modules into the DIMM slots. Each stick has a security key that prevents you from inserting it the wrong way around; also, you will not be able to insert memory of one type, for example DDR3, into a slot on the motherboard that is not intended for it. Thus, installing RAM is the simplest process in the assembly algorithm personal computer.

Most processors have a dual-channel set of RAM, and therefore it is recommended to insert an even number of sticks. It must be remembered that a fairly large processor cooler may block the RAM slots on some motherboards, and therefore it is worth thoroughly studying their compatibility before purchasing.
Applying thermal paste to the processor
Many beginners make a common mistake and think that assembly consists solely of assembling parts a la a construction set. No less important for the performance of the processor than itself and the cooling system is thermal paste, which helps their tandem demonstrate maximum performance. As a rule, a small layer is already applied to the fan base, so this is not necessary during first assembly.

However, if it is missing, simply add a couple of drops of the composition and spread them in an even layer over the area of the heat distribution cover of the CPU. On the contrary, excess will reduce the thermal conductivity between the processor and the cooler, which will negatively affect the performance of the computer. If you decide to assemble a computer with your own hands, then at least do not harm it.
Installing the motherboard into the case
The main line when choosing a case for you should be the one that is responsible for the supported form factors of the motherboards. The following are the maximum possible sizes of installed components - believe me, when the time comes for wiring, you will thank yourself for choosing the most comfortable case in which you can install all the desired hardware without unnecessary manipulations.

To install the motherboard, you first need to tighten the external and internal threaded mounting nuts. As a rule, all the bolts and nuts come with the housing, they are standardized, so it is unlikely that you will need to look for something unique to install your assembly. Having secured the plugs and tightened the nuts, you can move on.
Connecting Case Controls to the Motherboard
The panel of a standard case is usually equipped with on/off buttons, as well as USB ports and a headphone jack. As a rule, these interfaces are located at the bottom of the motherboard, and therefore we find them and connect them to the case.

The set of wires is very standard:
- PWR_SW is responsible for the on/off button;
- RESET_SW activates the reset key;
- HDD_LED (“plus” and “minus”) activates the drive activity indicator;
- PWR_LED (“plus” and “minus”) is responsible for the operation of the computer status indicator.
Installing the power supply
It's time to install the power supply and connect the cables to the motherboard. All connectors have keys that will prevent incorrect connection, so even an inexperienced user can handle it. Each connector speaks for itself, and if it says SATA on it, then it is probably intended for a device with the same interface.

Recently, the power supply compartment has been located at the bottom of the case for better ventilation, so make sure that the wires are long enough for components located in the part of the video card remote from the unit. After installing the unit, we stretch two main cables - a 24-pin cable to the motherboard itself and an 8-pin cable to the processor. When purchasing a power supply, we advise you to immediately purchase a bundle of nylon ties so that your bundle does not get confused between PC parts.

Installing drives
There are several drive form factors: 2.5-inch, 3.5-inch and solid-state drives with an M2 connector. The latter are installed on the motherboard itself, but the first two must first be installed in the case.

Installing a drive into a slot with a slide is as simple as installing RAM, and therefore we will not dwell on this point in detail. All that remains is to connect cables to them from the motherboard and power supply unit, which have a SATA connector.

If you want to install an optical drive, then the algorithm is the same - we fix it in the 5.25-inch bay, remove the front plug and supply power.
Installing a video card
Since we set out to assemble a PC correctly, we cannot do without a paragraph dedicated to the video card. It is installed last and the power cables are pre-wired for it. The graphics accelerator needs to be installed in the very first PCI Express x16 port, but modern video cards take up two or even three slots, so access to the downstream port will be blocked.

After these procedures, all that remains is to remove the two plugs on which the radiator will be installed, and also tightly screw the video card to the motherboard and the back cover of the case. The number of power cables will depend on the power of the video card and in extreme cases you will have to add cables to the power supply or use adapters.
Laying cables and completing work
The entire list of components is combined into unified system, so it’s time to put the finishing touches on it. If the assembly is standard, then you just need to choose what to connect the coolers to: motherboard, reobass or power supply. After this, you just need to carefully lay the remaining cables and tie them with nylon ties, and then close the housing cover.

After that, we connect a monitor and other peripherals to the system unit, install the operating system and use the brand new assembled computer.
We hope that our material on how to assemble a computer yourself will help you save money and choose the most successful combination of elements, without paying attention to the tricks of computer equipment sellers!
A gaming computer can be considered a computer that is capable of playing all modern games, providing an acceptable level of comfort from this entertainment. But user requirements differ, so very few fall into the category of gaming PCs. different devices. For many users, it is enough that games play smoothly, the game world is displayed correctly and there are no control problems. Professional gamers (who make money from gaming) and those who spend a significant portion of their leisure time playing games have more stringent requirements for PC performance.
This material will tell you how to assemble a gaming PC with your own hands, both for users who just need a smooth rendering of the picture on the screen, and for gamers for whom the quality of graphics is paramount. Of course, for these two categories of buyers, both the performance of the components and their cost will differ significantly (up to ten times). But the general recommendations on how to assemble a gaming PC with your own hands will be similar for everyone.
Assembling a PC on your own is, first of all, a solution that allows you to select the optimal configuration for the needs of a particular user. Also, setting up your own computer is a way to save money. The question of how to build a cheap gaming PC interests many users. Unfortunately, the performance of a computer largely depends on its cost. Therefore, it is now impossible to assemble a completely cheap (for example, for 10-15 thousand rubles) gaming PC.

Where to begin
Budget is a key factor when choosing components. Therefore, first of all, you should decide how much money will be allocated for the purchase. It also matters that you need it yourself system unit, or and peripherals(monitor, acoustics, keyboard, mouse).
IN model range Each manufacturer has several sockets (processor sockets). Each of them requires a motherboard with its own connector. If the CPU is equipped with Socket 1155, then the motherboard must have the same. In addition, you should consider the compatibility of the board with specific models processors. As a rule, board manufacturers publish lists of supported CPUs on their official websites.
The requirements for the board itself are determined based on the number and capacity of RAM sticks that will be installed, the number of connected drives (HDD, SSD), their interfaces (SATA, PCI-Express or M.2) and overclocking capabilities. The future upgrade also matters: if one is planned in a couple of months or years, you need to choose a motherboard with big amount interfaces and a fresh chipset (for example, MSI H61M-P31/W8 for Intel, ASUS M5A78L-M LX for AMD). If the computer is taken to long term, and “pumping” of its components is not provided, you can save a little on the system board.

An advanced motherboard is needed if an upgrade is planned
Video card
The GPU in a gaming computer is just as (if not more) important than the CPU. It is the video card that is responsible for processing the three-dimensional image and displaying it on the display. However, you can’t just pick up and install a powerful video card and save on other hardware. Information for subsequent processing by the graphics processor is prepared by the “CPU + RAM” combination, which, in turn, receives data from the drive (HDD and SSD).

A weak processor will not allow you to unleash the potential of a gaming video card
The “weak link” (regardless of whether it is the processor, video card or hard drive) will drag the system down, becoming a bottleneck. An analogy can be drawn with a logistics terminal: no matter how high its throughput, no matter how many cars are ready for loading, if there is a lack of loading equipment and labor, expanding the capabilities of the terminal itself will not help speed up its work.
Tandems of the “inexpensive” type Intel Core i3 (or similar AMD FX 4xxx series) + Geforce GTX Titan X” are thus extremely inefficient and a waste of money. The “ceiling” of such processors is video cards of the Geforce GTX 750 Ti class. Such a chip will not reveal the potential of a more productive GPU.
To assess whether the combination of the selected processor and video card will have the optimal balance of capabilities, you can compare their prices. The cost of the GPU should exceed the price of the CPU. In the budget category (Intel Core i3, AMD FX 4xxx and 6xxx series) the difference is 10-30%, and in the niche of more expensive devices it can reach 100%. That is, if you plan to buy a processor for 8,000 rubles, then there is no point in installing a video card for 15,000 or more. But the GeForce GTX 980, costing up to 50 thousand, will be optimally combined with an Intel Core i7 CPU for 25-30 thousand.
You can install 2 video cards if the motherboard supports SLI technologies (for Nvidia GeForce) or CrossFire ( AMD Radeon). In the budget segment, such a solution looks pointless (1 GPU for 15 thousand will be more productive than 2 for 8 thousand). In the top class, connecting two video cards allows you to achieve an increase in performance that cannot be realized in other ways.

Two video cards in SLI will increase the performance of your gaming PC
If you plan to upgrade your PC, you can purchase a motherboard that supports two video cards and get a GeForce GTX 960-level GPU. For now, the capabilities of this video card are enough to play all games, and in a year you can pair it with another one of the same kind to improve performance.
It should be remembered that to work in SLI/CrossFire, video cards must be, if not identical, then built on the same version of the graphics processor.
RAM
When choosing RAM, the main thing is to take into account the compatibility of generations and operating frequencies. For example, sixth generation Intel Core i7 processors (and motherboards compatible with them) work with DDR4 RAM sticks, and AMD FX 8xxx - DDR3.

DDR4 memory is faster, but not supported by all processors
The amount of RAM is limited by the wallet and the number of slots on the motherboard. RAM is a resource that can never be enough (thanks to software developers who, after switching to 64-bit Windows, do not bother themselves with excessive efforts to optimize memory consumption). Therefore, whether to install 8 GB of RAM or 32 is up to users to decide.
When selecting RAM sticks, it is recommended to install them in pairs or triplets. In this case, the chips operate in two or three-channel (depending on the CPU model and motherboard) mode. In this case, the speed of data exchange theoretically increases, respectively, by two or three times. Two 4 GB modules will work faster than 1 8 GB module.

Drives
Hard drives are gradually losing ground under the pressure of rapidly reducing prices, gaining capacity and becoming more reliable SSDs. Since it is impossible to build a powerful gaming PC without a high-speed drive, a gaming computer cannot do without a solid-state drive. Capacity of 256 or 512 GB is enough for Windows installations and games, and for multimedia content (music, movies) you can simultaneously install a capacious HDD of 2, 3 or more terabytes.

The capacity of modern HDDs has already reached 10 TB
The first step is to determine exactly the tasks for which your future system unit will be used. If you plan to purchase gaming equipment, then special attention should be paid to the video card, and for a graphics workstation, the processor power and the amount of RAM play a fundamental role. The least demanding in terms of performance are office systems. You don't even need to add an external video card, because the built-in one will be enough. First you need to select a processor. This element affects the overall performance of the entire system, and the more cores there are (and the higher their operating frequency), the faster operations will be performed.
Next, the PC configurator will help you select a motherboard. It must be compatible with the CPU and support RAM of the required frequency. Pay attention to the presence of all the necessary slots and connectors, as well as the size of the motherboard itself (ATX, micro ATX, mini ATX, etc.). Typically, any of them already has a built-in network and sound card. The online store website builder will automatically select suitable options after you select a processor, and will exclude those that are not suitable. A gaming computer must be equipped with an external video card. If you want to regularly play modern games and forget about upgrading your system for a long time, then you shouldn’t save. This also applies to the amount of RAM; it will not particularly affect the cost of the PC, but will significantly affect performance. From volume hard drive depends on the amount of information that you can simultaneously store on your computer. But to increase system performance, it is recommended to additionally install an SSD drive. It will contain the OS, programs and applications.
For comfortable work With external media Data system unit, if desired, is equipped with optical drive and a card reader. One of the important elements of the system unit is the power supply. Its power should be selected after calculating the total amount of electricity consumption by the components. In addition, leave a reserve of 100-200 W for reliable operation under increased loads on the processor and video card. The designer will not let you make a mistake when choosing a power supply, as he will take into account the components you have chosen and will provide only suitable cases with power supplies.
Power Configuration gaming computer provides for the presence additional system cooling, which is selected automatically depending on the selected processor. All that remains is to assemble everything into the case. It can be very simple and straightforward if you plan to install the system unit under the table, where no one will see it, or it can have neon lighting and a window on the side that allows you to observe the operation of the system (gaming options). This is a matter of taste, but keep in mind that the case for a gaming PC should be spacious and have good ventilation so that the components do not overheat at peak loads.
Having difficulties?
For the convenience of clients, it is possible to send the resulting configuration for printing. And if difficulties arise, then you should use the help of our engineer, who will tell you which components are best to use to obtain optimal technical characteristics.
Having decided to build a computer with us, you receive the best prices and service. We guarantee fast but careful delivery of your system unit.
Are you planning to get a new computer? You have 2 ways - buy ready-made or assemble it yourself. The advantages of the first way are obvious: bring it, connect it and use it. No extra hassle. Convenient, but... if you decide to do this, you will most likely overpay. And inside the sealed system unit there may not be what you expected. For example, cheap "noname" hardware sold to you at a class price High End, or a slightly adjusted defect, which, at best, will fail before the expiration of the warranty period. And at worst - immediately after its completion.
Assembling a computer from separate components is a troublesome, but smarter way. Firstly, such a purchase is 10-25% cheaper. Secondly, you will know exactly what your iron “pet” is made of. And thirdly, you can handle this on your own, even if you have no idea about the compatibility of the parts. Online configurator services will come to your aid, and this article will teach you how to use them.
Before starting assembly, check for yourself:
- What tasks will the new PC be used for?
- What budget do you have?
The most economical option is office class computer. The range of tasks for which it is intended is small. This is working in undemanding applications, the Internet, listening to music, watching videos on YouTube, simple games. Such a machine (turnkey kit) will cost approximately 15-25 thousand rubles. It usually includes:
- Inexpensive motherboard.
- Inexpensive processor, like an Intel Celeron with a built-in graphics core, so you can save on a video card. Or plus a budget video card.
- Box cooler.
- HDD(HDD).
- 2-4 GB of RAM.
- Case with built-in power supply, peripherals.
Mid-budget option - multimedia PC. These are most often purchased for the home. Multimedia computers are used for a variety of tasks, excluding heavy games and particularly resource-intensive applications. The cost of assembly is 30-60 thousand rubles. As a rule, it contains:
- A motherboard based on a modern chipset with a large set of slots and USB (optimally with support for USB 3.1).
- Modern processor Intel Core i3-i7 or AMD equivalent.
- Cooling system ( CPU cooler+ 1-2 case fans).
- Multimedia or gaming class video card.
- SSD+HDD (the first one is for operating system, the second is for data storage)
- 8-16 GB of RAM.
- Power supply 500-650 W.
- Multimedia monitor.
- Housing, peripherals, expansion boards.
Expensive option - gaming pc. The price of a computer for gaming on average starts from 60,000 rubles, the upper threshold is not indicated. Assembly usually includes:
- Gaming motherboard.
- Modern Intel processor Core i5-i7 or AMD equivalent.
- Productive system air or water type cooling.
- 1-2 gaming video cards.
- A discrete sound card (if the built-in audio sounds good, you don’t have to buy it).
- SSD+HDD.
- From 16 GB of RAM.
- Power supply from 550 W and more powerful.
- 1 or more gaming monitors.
- Case, gaming keyboard, mouse and other accessories.
Let us separately highlight servers and specialized computers, for example, for video editing, mining, etc. Their price can be anything, but it is usually quite high. The composition of the configuration is determined by its purpose.
How to allocate a budget when purchasing components
Start building the assembly of your future computer with the key and most expensive part. This is, as a rule, a processor, and when buying a gaming PC - a processor + video card combination. And sometimes - a monitor.
Secondly, we select:
- Motherboard.
- Cooler.
- Power unit. We determine the required power after selecting the remaining components, but we allocate funds in advance, since it is impossible to save on the power supply.
The third line is where you can save money. Of course, savings should in no way affect the quality of the devices. This category includes parts that you can postpone the purchase of if you don't have enough money. Or buy in smaller quantities than planned.
- RAM. If you can’t buy everything at once, you can get by with one module for a while.
- HDD.
- Expansion cards (sound card, TV tuner, DVD/Blu-ray drive, etc., optional for PC operation).
- Periphery. If you don’t have enough money for expensive gaming devices, you can use regular ones for a while. This is better than cutting the budget for a video card or power supply.
- Frame. The cost of system unit cases does not always reflect their quality. Some manufacturers increase prices only for decoration - lighting, unusual shapes, etc. If decoration is not the main thing for you, feel free to buy a case with a regular design. The main thing is that it is roomy (especially important for long video cards and tall tower coolers), with a convenient location of the compartments (the power supply is at the bottom, the disk shelves are across, there is a compartment for cables), as well as with an ergonomic placement of buttons and connectors on the "muzzle".
Assembling a computer using the online DNS store configurator
Let's figure out how to use the online configurator using the computer store DNS service as an example. The choice fell on it, since it has a device compatibility check and everything else is very simple and clear. For example, let’s assemble a gaming system unit with a minimum configuration.
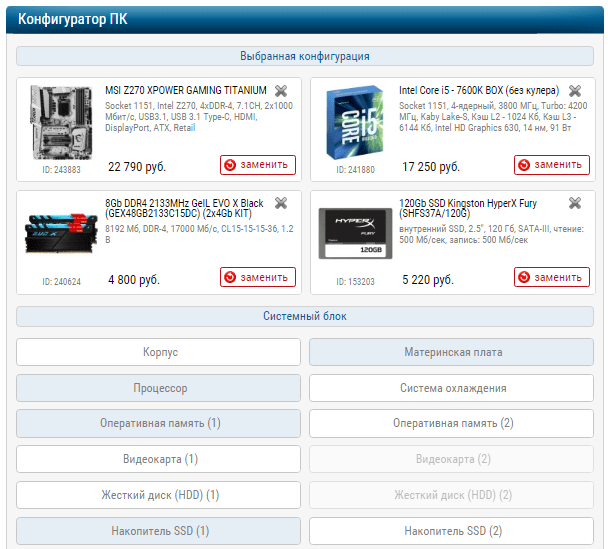
Let's start with choosing a processor. To do this, go to the service page and click the “Add” button in the first line.

In the left column next page CPU characteristics are collected, on the right - products from the store’s assortment are listed. We select an Intel brand processor with a free multiplier (for overclocking). After we noted the parameters of interest, the service automatically found suitable models. Having selected one of them - Intel Core i5-6600K without a cooler, click “Included”.

- For a gaming computer.
- GPU manufacturer - NVIDIA.
- GPU model - GeForce GTX 1080.
- Memory capacity - 8 GB.
They may be different for you. In general, when choosing components for a gaming PC, focus on system requirements the most resource-intensive game you are going to play on it. Then you can't go wrong.
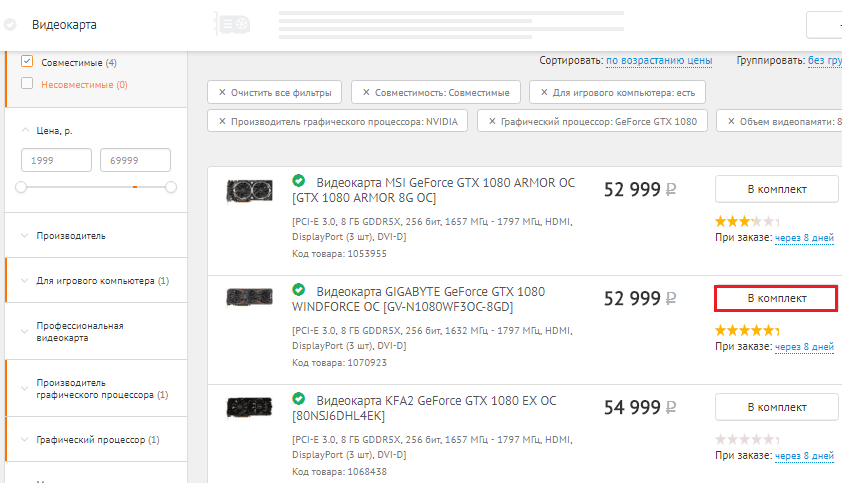
Our choice fell on the GIGABYTE GeForce GTX 1080 WINDFORCE OC. We add it to the kit and move on to selecting the motherboard.
In order for the service to display only those motherboards that are suitable for the selected processor, at the top of the filter table (characteristics) we put the “Compatible” label.
From the rest we noted:
- For a gaming computer.
- Form factor - ATX (full-size).
- Based on the Intel Z270 chipset.
- With USB 3.1 type A and C ports.
Next to the name of each product there is a short list of its characteristics. To open the full description, just click on the catalog line.

I went to the kit Gigabyte board GA-Z270-Gaming K3.
We noted:
- Tower type.
- Copper base.
- 4-pin connection connector.

The choice fell on DEEPCOOL GAMMAXX 200T.
The next components are RAM and SSD. Let's take 2 planks Kingston HyperX FURY Red 16 GB and solid state drive Plextor M8SeY 512 GB.
Finally, let's select a power supply. The total power consumption of our assembly is 352 W (to find out, click on the button shown in the screenshot at the top of the page).

It is advisable that the rated power of the power supply exceed this value by at least 25-30%. We got almost 2 times more, and that's not bad.
There are no compatibility issues with our build. When they are, the first button on the panel (with puzzles) turns red. The hardware is optimally selected, the only thing missing is the system unit case. But we will buy it sometime later, since the price of all this stuff was as much as 124,993 rubles.

You can save your build in personal account on the DNS website (registration is required) and there, if you want, make a purchase. But we do not advise you to do this right away, since similar configurator services are also available in other stores, where prices may be lower, the assortment may be richer, and delivery times may be shorter. Let's get to know them.
Regard store configurator
Close
Computer prices
Today, consumers are increasingly less likely to buy a ready-made personal computer (system unit), to which they must subsequently connect a monitor, keyboard and mouse. Increasingly, the choice is being made in favor of laptops and monoblocks (all-in-one systems). If the user wants to get something special, then most likely he will prefer to assemble the computer from individual components himself. However, this does not mean that traditional systems are already completely dying out, there are still quite a lot of them on sale and, if you wish, you can choose a very good system for yourself at an affordable price, without wasting time on assembly.
The choice of a personal computer depends on what exactly you need it for. This will directly affect the cost - an inexpensive system for solving everyday problems will cost much less than a high-performance monster that can easily run the latest games. Therefore, choosing a personal computer should begin with determining what exactly it will be used for.
By the way, recently the so-called. nettops are systems characterized by very compact size and low performance. Their undoubted advantage is their small size; such a computer can even be hung from the back by the monitor, freeing up a lot of space on the desktop. In most cases, having purchased a nettop, the user only needs to connect a monitor, keyboard, and mouse to it and start working.
The disadvantages of nettops are no less obvious - there is practically no possibility of an upgrade; at best, the user can only increase the storage capacity and RAM (by the way, this problem is also typical for all-in-one PCs). However, systems with low performance become obsolete more slowly, and given the low cost, in a few years it will be possible to simply replace an outdated computer with a new one.
As for monoblocks, these systems will allow you to reduce the number of wires on the table to a minimum, especially if you use wireless keyboard and a mouse. When choosing here, special attention should be paid to the diagonal of the monitor and its resolution. After all, if you make a mistake in these criteria, you can correct it later only by buying another computer; it is impossible to simply change the monitor.