There are two ways. The first way is to first draw a table in Excel and then fill it out. The second way is to first fill in the rows and columns, and then build a table in Excel.
How to create a table in Excel using the first method
In Excel, go to the “Insert” tab and click on “Table”.
Creating tables in Excel
A window called “Create Table” will open. You need to move the cursor to the place where the table is created and by clicking the left mouse button (without releasing it) select the area for creating the table in Excel. Having selected the area, you need to release the mouse button and click the “OK” button in the window called “Creating a table”. The selected area will immediately look like a table without a line. At the top of it, all columns will be named Column. These names can be changed to any others.
 Selecting table borders
 Selecting boundaries is done as follows: you need to go to the tab called “Home”. By going to this tab, you need to select the table again and click on the triangle near the square. A drop-down list will open in which you need to select “All borders”.
 It is very easy to make such tables in Excel for beginners
 After this, the Excel table will be ready.
How to make a table in Excel using the second method
In Excel, by retreating a few lines from the top edge and by retreating 1 column from the left side, we begin to fill the future table with text.
 How to create a table in Excel
 Having finished entering the text, you need to move the cursor to the upper left cell of the future table. Press the left mouse button (without releasing it) and select the entire area filled with text. Release the mouse button and click on the triangle near the square.
 How to insert a table in Excel
 A drop-down list will open in which you need to select “All borders”.
 The table is ready
 After this, the table will be ready, so you can create a table in Excel of any size.
To highlight some cells in the table with bold lines, you need to left-click on the desired cell and if there are other cells nearby that need to be highlighted in bold, then select them too. Then, releasing the mouse button, you need to click on the triangle near the square.
Numerical information that is placed in tables is considered more receptive and understandable for a person than if it is written without a table. Therefore, various financial reports contain more tabular data, and conclusions, recommendations, etc. are written in the text part. With help Microsoft Word you can easily and quickly create tables of various types and place not only numbers, but also text in their cells.
To make a table in Word, just follow these simple steps:
Find the tab “ Insert" and click on it.

Next, click on “ Table" and the menu " Inserting a table».

As you can see in the image, this menu has the following functions:
Insert table – allows you to enter the required number of columns and rows that you need for your table. You can also adjust the width of the columns.

After you click " OK"A table like this will be automatically created for you.
Draw a table – allows you to manually draw the required number of rows and columns on the sheet.

Instead of the usual arrow, your cursor will change to a pencil. As you will see in the image below, the future created area will be highlighted with italic lines, and after you release the left mouse button, it will become normal. A very convenient way to create individual cells in any part of the tables.

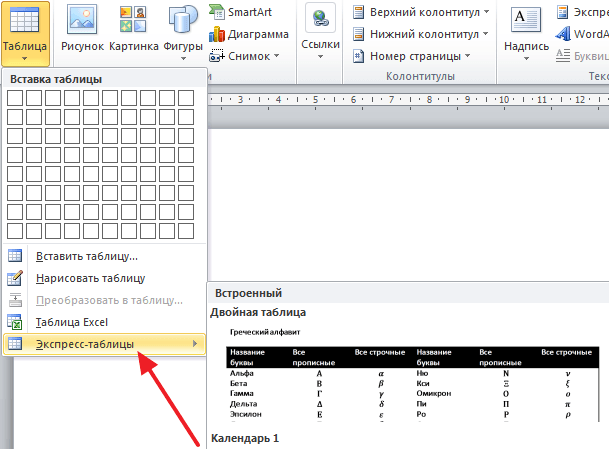
Express tables is a selection of template tables in Microsoft Word 2007. There are not many of them, so Express Tables have not gained more popularity among users.

Excel table - inserts a table from the Microsoft Excel spreadsheet editor into the area you select.
Word text editor is the most advanced program for working with text. With this program you can create any text documents, including tables. In this material you can learn how to make a table in Word 2003, 2007, 2010 and 2013.
How to make a table in Word 2007, 2010 or 2013
First, let's talk about how to make a table in new versions of Word. Starting with Word 2007, Microsoft company uses the so-called ribbon interface in its office programs. This interface consists of tabs. Each tab has a number of buttons and functions that the user can use after opening the tab. In order to make a table in Word 2007, 2010 or 2013, you need to go to the “INSERT” tab and click on the “TABLE” button. After this, a menu for creating tables will open.
At the very top of the menu that opens there will be a square of cells. Using this square you can quickly create a table. To do this, just select the required number of cells with the mouse and press the left mouse button. After this, a table of the size you have chosen will appear on the page in Word.

The only limitation this method creating tables is the size. Using mouse selection, you can create a table with a maximum of 10 by 8 cells. To create a larger table, click on the “TABLE” button and select “ INSERT TABLE».

After this, a small window will appear in which you can specify the number of columns, the number of rows, and also set up automatic selection of column widths. After entering all necessary settings you need to click on the “OK” button and a table of the size you need will be created on the page.

You can also create tables with styles using the “TABLE” button. To do this, select the menu item “ EXPRESS TABLES» and in the menu that appears, select a table with a suitable style.
Another very useful feature These are Excel tables inside a Word document. In order to make an Excel table in Word, click on the “TABLE” button and select “EXCEL TABLE”.

After selecting this item on Word page A small window with an Excel table will appear. In such a table you can work in exactly the same way as in Excel program. You can create formulas and use all other functions of the Excel spreadsheet.

You can also make the table manually. To do this, click on the “TABLE” button and select “ DRAW TABLE" After this, the pencil tool will appear, with which you can create the outer border of the table.

Further editing of the table can be done using the tools that are located on the “DESIGN” and “LAYOUT” tabs.
How to make a table in Word 2003
If you are still using text editor Word 2003, then in order to make a table you need to open the drop-down menu “ TABLE – INSERT – TABLE».

After this, a small window will appear to select the number of columns, rows and configure automatic selection of column widths. After making all the settings, you need to click on the “OK” button and the table will appear in the document.

You can also create a table using the button on the toolbar. But, when using this method, the maximum table size will be 4 by 5.

The adjacent button allows you to create an Excel table inside a Word document.
You can also draw the table manually. To do this, select the menu item “ TABLE – DRAW A TABLE»

To further edit the table, you need to open the “Borders Panel”. To do this, click on the corresponding button on the toolbar.

This panel contains buttons for drawing tables, filling, sorting values in the table, as well as other tools for working with tables.
How to create a table in Word? Now I just can’t imagine how you can work without such a necessary and useful program, like a Word text editor. How much easier our life has become. How did we even live without a computer and such useful programs?
Reports can be done literally on the fly. Almost any report contains a table and . Creating a simple table in Word is quick and easy. But there are also very complex tables, looking at which many people simply get lost. At first it seems difficult. In fact, creating such tables is not difficult, and even interesting. You will see this for yourself.
Today we will look at:
- how to create a table in word in the simplest form,
- how to create a complex table header,
- how to merge cells,
- how to split a cell,
- how to color the cells.
How to create a table inWord
The table consists of columns and cells, which allows you to organize your data. A table can contain text, numbers, a picture, etc., but cannot contain another table.
But if you wish, you can draw a small table inside the cell.
How to make a table inWord 2003
If you need to insert a table into a document, then place the cursor in the place where it will be located and select the item in the menu Table – Insert – Table.

The window “ Inserting a table».

In the text field " Number of columns" set the required number of table columns, and in the " field Number of lines"—the required number of lines.
In area " Auto-fit column widths» select one of the options described below:
- Constant + Auto– columns of equal width.
- Constant + required size(in the window where “Auto” was originally placed) - the columns will be the width that you specify.
- By content– the width of the columns will be according to the largest contents of the cell.
- By window width– the width of the table will be the entire page with columns of equal width.
Using the button " Autoformat"You can select the format of your future table and click " OK».
Note:
To quickly insert a table, click on the “Add table” button in the standard toolbar, select the required number of rows and columns with the mouse and click once.

How to make a table inWord 2007-2010
Go to the tab Insert, and click on the icon Table.

In the drop-down window, place the cursor on the upper left cell, click the left mouse button, and without releasing it, select as many cells as you need to make columns and rows. Now release the mouse button and the table frame is ready.
If you need many more lines than shown, you can do this later or select “ Insert table", and in the window that opens, indicate the number of rows and columns you need.

If you often create tables, you can set the initial parameters and check the box next to “ Default for new tables" Then all these settings will be saved, and next time you will only need to press the “ OK».

If you select " TableExcel", then you will have exactly the same table as in Excel.

Can choose Draw a table, but for tables that will be placed on several sheets, I would not recommend doing this. This method is only good for small tables inside a table.
Therefore, the point “ Draw a table“, I don’t advise you to choose. This is for very advanced users, and often such a table is very poorly edited, and if you want to transfer it to another computer, then you will be provided with hemorrhoids.
A very interesting point is “ Express tables“, but we will consider it in a separate article, because. this is a very big topic.

The most difficult thing in the table is creating a header like this:

But we will do it quickly.
I described in more detail about editing and creating complex tables in the article.
How to merge table cells?
Select the required number of cells and click right click mouse by selection.

How to split a cell into several cells
Right-click the cell you want to split and select from the drop-down menu Split cells.

In the window Splitting cells, specify the required number of columns and rows, and click the button OK.

How to color a table cell
Right-click on the cell you want to color and select from the drop-down list Borders and Shading.
This is how you can create a table in Word.
Word tables are used to structure page content. In addition, tables are used for calculations. Word uses technology to insert and create tables. Inserting and creating Word tables can be done using the button Table. The button is located on the tab Insert in the Tables group. Before inserting any object into Word document 2007, you need to place the cursor in the place in the document where it will be located.
When you click the Table button, options for all five methods of inserting and creating tables are displayed, a screenshot of which is presented in Figure 2.1.6.1.
Rice. 2.1.7.1
Let's look at the "Insert" and "Create" methods of table Word.
Inserting a table - the first method
In order to quickly insert a table, for example a 4x6 table, you need to select the required number of columns (4) and rows (6) in the Insert table area (Figure 2.1.7.1) and left-click on the selected area.
Inserting a table - the second method
This method is carried out using the "Insert Table" dialog box. To use this method, you must select the “Insert table” command from the list (Fig. 2.1.7.1). Then in the dialog box that appears (Fig. 2.1.7.2), select the number of columns and rows, select the width of the columns and click OK.

Rice. 2.1.7.2
Inserting a table - the third way
Insert a table from a collection using the Inline dialog box. To do this, after clicking on the item Express tables(Figure 2.1.7.3) you need to select the required table template (style) in the "Built-in" dialog box.

Rice. 2.1.7.3
Creating or drawing a table - the first way
Creating a table can be done using the mouse pointer, which takes the form of a pencil after clicking on the "Draw table" command. Drawing (creation) is done in free form. First, you can draw a rectangle indicating the outer boundaries of the table, then draw lines of rows and columns in the rectangle (for example, Figure 2.1.7.4).

Rice. 2.1.7.4
To delete a line in a drawn table, click the Eraser button on the Design tab in the Draw Borders group and click the line you want to delete. To exit Eraser mode, click the Eraser button. To exit the drawing mode, click the "Draw Table" button on the Design tab in the "Draw Borders" group.
Creating a table - the second method
This table creation method allows you to convert text into a table. Word 2007 converts text to a table when there are delimiters, such as commas or tabs, in places where the text should be divided into columns.
For example, in the following list with two words and rows as delimiters, semicolons are inserted to create a table with two columns and rows. A screenshot of the dialog box for creating a table from text is shown in Figure 2.1.7.5.

Rice. 2.1.7.5
You can easily nest tables in a Word 2007 document. For example, to place two tables side by side. First, a table is created with two cells, and then tables are inserted into those two cells.
After inserting, creating or selecting a table, contextual tools appear on the Ribbon of the application window under the general name “Working with Tables”, which are divided into two contextual tabs Design and Layout. The general name of the contextual tools is displayed in the title bar (Figures 2.1.7.6 and 2.1.7.7).
The ribbon on the Design tab is shown in Figure 2.1.7.6.

Rice. 2.1.7.6
The ribbon on the Layout tab is shown in Figure 2.1.7.7.

Rice. 2.1.7.7
After you've inserted or created a table, click one of its cells to begin entering text or inserting an image. To edit and format tables, you can use the tools located on the Layout and Design tabs, which are activated when you select a table or place the cursor in one of its cells.
To create a new table style, on the Design tab in the Table Styles group, click on the button Extra options, and then select Create Table Styles. The Create Style dialog box will open, allowing you to create a new style.

Rice. 2.1.7.8
Additionally, editing and formatting tables can be done using context menu and a pop-up mini formatting bar that appears every time you select an object.
Calculations in a Word table
You can create a formula to perform calculations on numbers in a Word 2007 table. The Formula dialog box can be opened by clicking on the Formula command in the Data group on the Layout contextual tab.

Rice. 2.1.7.9
An example of a calculation in the table is shown in Figure 2.1.7.10. To add two numbers, you need to place the cursor in the cell to the left of the numbers, open the Formula dialog box and execute the =SUM(LEFT) function. To use other functions, click on the button that opens the Insert function list and select the required function.

Rice. 2.1.7.10
You can embed a working document into a Word 2007 document Excel sheet 2007 by clicking on the command " Excel table". In this case, the tabs and groups on the Excel ribbon will replace the tabs and groups on the Word ribbon. Additionally, you can insert an Excel 2007 worksheet into a Word 2007 document by copying and pasting, or as a linked object.