A modern person spends a lot of time at a computer, be it stationary equipment or a laptop, so it is advisable to create the most comfortable conditions for yourself when working on it.
In addition to external factors such as indoor lighting, a large role in ensuring comfortable and safe use play device settings.
For the most fine-tuning, a program for .
Introduction
What are these programs and what are they for? Such software provides quick access to all possible settings and computer screen settings. With it, you can adjust any monitor parameter optimally exactly “for yourself.”
Of course, access to most of the functions provided by such a program is can also provide the computer's own resources, for example, they can be accessed via Control Panel.
However, doing this through a special program, in fact, with one click, is much more convenient.
The functionality of such programs is quite wide - they help change the color, brightness, screen resolution, screen management, adjust the position of buttons, panels and shortcuts, etc. That is, such software “collects” all the possibilities for changing screen parameters to simplify access to them .
In addition, some software helps you configure more complex settings that cannot be changed using the computer’s own resources.
Why is it so important to carefully fine-tune your monitor settings? This is due to the fact that the main load when working at a computer falls on the eyes, and it is the screen that creates it. Thus, with careful adjustment of the monitor, this load can be reduced, which can potentially even help maintain good vision.
Main characteristics
Choosing the most optimal program is often quite difficult, since it is necessary to simultaneously take into account a whole variety of parameters.
To simplify and speed up this process, the summary table below shows the main characteristics of everything software included in the TOP, which may be of primary importance when choosing.
| Name | License | Multimonitor | Russification | Installation | Reference materials |
|---|---|---|---|---|---|
| UltraMon | Paid | Yes | Yes | Required | None |
| Nokia Monitor Test | Free | No | Yes | Not required | Present |
| Power Strip | Paid | Yes | No | Required | Present |
| UD Pixel | Free | No | Yes | Required | None |
| Is My LCD OK | Free | Yes | Not required | None | |
| InjuredPixels | Free | No, but suitable for TV use | Yes | Not required | None |
| Actual Multipal Monitors | Paid | Yes | Yes | Required | None |
Taking these parameters into account will allow you to quickly select the most suitable software for yourself.

UltraMon

The most functional and simple program of all those presented in the TOP. It is easy to work with and helps you make fairly fine adjustments to the monitor and change even the most insignificant parameters over a wide range. It is distributed for a fee, but has a trial period.
Particularly convenient for working with - it allows you to copy and move desktops from one monitor to another, copy them, stretch the taskbar across multiple monitors, etc. It also allows you to technical setup screens - change color, resolution and more.
The advantages of such software are as follows:
- “Tailored” for multi-monitor viewing;
- Simple controls and intuitive interface;
- Wide functionality.
- Paid license;
- The functionality is quite narrow, namely setting technical parameters;
- A large number of functions that are not required by the average PC user.
And here’s what users who have already worked with this program say: “I couldn’t find anything better than this program”, “It doesn’t have some of the functions that Actual Multipal Monitors has, but overall I’m happy with the software”, “It works stably, the functionality is sufficient for optimization screen management."
Nokia Monitor Test

This is a small and lightweight utility designed to configure monitor parameters (geometry, contrast, etc.) without changing its control systems. The name should not confuse you - the software is designed to work specifically with screens and .
It has high-quality Russification, and the help files installed in the utility will help you decide on the settings depending on the nature of your work and the volume of the load.
This will reduce eye strain when working at a computer.
- No need to install the program;
- Availability of reference materials for setup;
- Minimum load on the hardware and memory of the device.
- Narrow functionality;
- Lack of possibility of any adjustments other than “technical” ones;
- Works stably on most systems.
The opinions of users who are already actively using this program are as follows: “It’s a pity that it’s impossible to run X64 on Windows 8. I tried everything and nothing works”, “Allows you to properly adjust the monitor and evaluate all the main parameters of the picture. A set of tables is reference. Great program!”, “Helped to bring the monitor back to life.”
Power Strip

An application that allows you to configure technical parameters and control both one monitor and several at once. It is distributed for a fee due to its high complexity and wide functionality.
It differs in that it supports, including old ones.
It has 500 parameters for setting up the display and video card, both the simplest and the most complex. There is extensive and clear help for all complex and simple functions and parameters.
- Multi-screen mode support;
- Very wide functionality;
- It is equally convenient both in working with multi-screen systems and with simple ones.
- Paid software distribution;
- The need to install it;
- Quite a significant load on the memory and hardware resources of the computer.
And here’s what those who actively use it say about the program: “My favorite program,” “This program will allow you to open up new opportunities, so download it quickly,” “I’ve been using the program for a very long time, I consider it the most valuable of its kind.”
UD Pixel

Programs and utilities for fine tuning operating system, processor, graphics, memory, storage have always been popular. But now their relevance is growing. In the age of tablets and laptops, upgrading a desktop has lost its urgency.
Many people use platforms that are 3-5 years old. Such computers cope well with most tasks, but sometimes more is required of them: a new game is released or the next version of a resource-intensive program appears. This is where tweakers come to the rescue, eliminating the need to update your desktop PC.
How to increase processor performance?
The easiest, but most risky way to increase productivity central processor- acceleration. However, sometimes you can do without it. The fact is that for almost 10 years, CPU development has been largely focused not on achieving maximum performance, but on increasing efficiency.
As a result, in order to save energy, the OS and chips are configured in such a way as to minimize power consumption. One of the common methods is core parking. If the system considers the load level to be low, only one core is used. Needless to say, algorithms do not always work perfectly. If you need to guarantee high performance, it is better to disable this feature.
Disabling core parking - ParkControl
- License: Freeware.
- Developer: Bitsum Technologies.
- Size: 1.35 MB.
- OS: Windows.
- from our catalogue.

The ParkControl utility allows you to park (disable) cores without diving into the jungle of OS settings and rebooting the computer. The fact is that Windows does not allow you to control this function. By default, it is assumed that everyone needs it. The utility allows you to select a power saving profile, as well as define the conditions for parking cores, or completely disable the function.
Single CPU loader – enabling only one core
- License: Freeware.
- Developer: .
- Size: 6 KB.
- Requirements: .NET Framework.
- from our catalog
Support for multi-core software is still far from ideal. Some programs and games do not support it at all, while in others it is not implemented in the best way. It must be taken into account that in modern processors There is a turbo mode in which all cores are turned off except one, the frequency of which increases as much as possible. Sometimes there are cases when it is more profitable to force a program or game to run in single-core mode. This is where Single CPU loader comes to the rescue.

The utility works simply: the user is prompted to specify the path to the executable file of the program that needs to be launched. It will work in single-core mode. It should be noted that Single CPU loader may have problems running older applications written in the era of single-core chips.
Mz CPU Accelerator – allocation of processor resources
- License: Freeware.
- Developer: Michael Zacharias.
- Size: 1.3 MB.
- OS: Windows XP / Vista / XP X64 / Vista64 / 7 / 7 x64.
- from our catalogue.

Mz CPU Accelerator also allows you to increase application performance without increasing the processor frequency. The idea of the program is simple: the maximum computing resources should be received by the application whose window is active. Those that are carried out in background, minimum resources are allocated. At the same time, it is possible to configure exceptions by defining several programs that will have constant priority.
In the same way, you can make a “black list” for programs whose optimization is prohibited. In addition, like the Single CPU loader, it has the ability to force programs to run in single- or multi-core processor mode. The developer honestly warns that if the CPU is overloaded, you won’t get much effect from his brainchild.
Now let's turn to solutions that, one way or another, use hardware to increase productivity. Specialized programs come first here.
AMD OverDrive - setting up AMD processors
- License: Freeware.
- Developer: AMD.
- Size: 30.3 MB.
- OS: Windows XP / Vista / XP X64 / Vista64 / 7 / 7 x64.
- from our catalogue.
AMD OverDrive is a very well-known solution for optimizing system performance based on AMD processors. Its feature is ready-made profiles for overclocking, created based on the settings of world-famous overclocking specialists. You can try several balanced options, including tuning both the CPU itself and memory.

In addition, you can create your own profiles optimized for specific applications. Advanced users have access to advanced system settings.
The program is distinguished by an integrated testing and monitoring system. After applying certain settings, you can evaluate what exactly happened in the end and how well it corresponds to the task and whether it ensures the stability of the system.
ClockGen – overclocking your computer
- License: Freeware.
- Developer: CPUID.
- Size: 30.3 MB.
- OS: Windows XP / Vista / XP X64 / Vista64 / 7 / 7 x64.
- from our catalogue.
The program, like SetFSB, allows you to overclock your computer by manipulating the PLL chip. This component is responsible for generating frequencies for system bus, processor, random access memory,PCI.

The first thing to do is identify the PLL installed on the motherboard. This can be done by searching the Internet, as well as by reading the PLL frequencies using a program.
Having determined which generator is available on the computer, you need to select the desired profile. Next, you can set frequencies for the processor, memory, etc. ClockGen allows you to separately define parameters for PCI Express operation, i.e. By changing the bus frequency for the graphics accelerator, the user will keep the other settings intact.
And vice versa, when overclocking the processor and memory, you can leave the video card alone. It should be noted that it is often more profitable to use proprietary utilities from manufacturers for dynamic overclocking using PLL motherboards. They already know exactly which generator was installed. For example, ASUS AI Booster, .
Optimizing random access memory (RAM)
“Pills” that improve computer memory can be of general action. For example, utilities for overclocking the system bus. By increasing its frequency, they also contribute to the growth of RAM performance. But there are two more tricks that allow you to use RAM more efficiently.
The first one is suitable for almost everyone. It consists of completely clearing memory of unused data and making maximum capacity available to running programs.
The second one is better used on computers with a large amount of RAM. RAMdisk technology creates virtual storage of frequently used data in RAM. As a result, they are read faster, and the system and programs run with greater performance. This technique is similar to Intel technology for ultrabooks, when, along with hard drive a small SSD is installed on which the data necessary to boot the system is stored.
Windows Memory Speed Up - how to clear RAM
- License: Demo / $11.95.
- Developer: Potatoshare Software.
- Size: 625 KB.
- OS: Windows 2K / XP / Vista / XP X64 / Vista64 / 7 / 7 x64 / 8 32-bit / 8 64-bit.
- from our catalogue.
Windows Memory Speed Up allows you to implement the first memory management trick. The program monitors memory load and when you click the “Set up memory now!” button. clears it of unnecessary data. The capacity of free RAM increases, which should have a positive effect on PC performance.

In addition, you can set the memory to automatically clear when a certain load level is reached, for example, 50%. You can set it to clean at a certain time interval, for example every 5 minutes.
Windows Memory Speed Up has an intuitive and very nice interface, but it costs money. In demo mode, you can optimize RAM manually, automation is disabled.
Wise Memory Optimizer - free RAM cleaning
- License: Freeware.
- Developer: WiseCleaner.
- Size: 862 KB.
- OS: Windows XP / 2003 / Vista / XP X64 / 2008 / Vista64 / 7 / 7 x64 / 8 32-bit / 8 64-bit.
- from our catalogue.
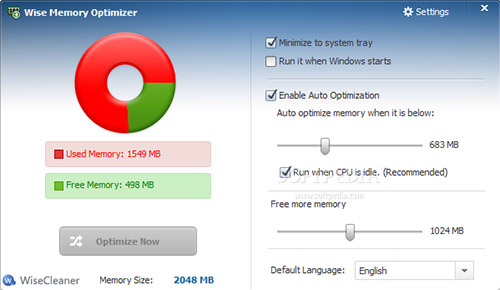
Wise Memory Optimizer also cleans memory, but does it for free. You can do this manually or automatically. In the second case, the user sets the load level at which cleaning should be done and the desired amount of memory to be released. Another setting is to run the cleaning process only when the processor is idle.
Memory Cleaner - simple cleaning of RAM
- License: Freeware.
- Developer: Koshy John.
- Size: 497 KB.
- from our catalogue.

Memory Cleaner clears memory of unused data and separately clears the system cache. The process starts manually and automatically at a certain RAM load or after a certain period of time. The automatic cleaning conditions cannot be adjusted. The load level is set to 80% and the frequency is set to 5 minutes.
MemOptimizer – advanced RAM cleaning
- License: Trial / $19.95.
- Developer: Pointstone Software.
- Size: 1.9 MB.
- OS: Windows XP / 2003 / Vista / 2008 / 7.
- from our catalogue.
MemOptimizer has advanced functionality compared to previous memory cleaning programs. Firstly, the program allows you to track the use of not only RAM, but also virtual memory. Secondly, it helps to monitor the CPU load.

Thirdly, it can be used to increase the priority of the application being executed by allocating more processor resources to it. Fourthly, and this is the most interesting thing, the program makes it possible to create special shortcuts for launching certain applications, for example, games. By launching a game using such a shortcut, the user will simultaneously clear memory and optimize the processor.
SuperRam – cleaning RAM in Windows 8 and 8.1
- License: Trial / $11.99.
- Developer: PGWARE.
- Size: 4.9 MB.
- OS: Windows XP / 2003 / Vista / XP X64 / 2008 / Vista64 / 7 / 7 x64 / 8 32-bit / 8 64-bit / 8.1 32-bit / 8.1 64-bit.
- from our catalogue.

SuperRam allows you to automatically and manual mode clear RAM. The automatic default settings suggest that when less than 18% of RAM is left free, the program will try to clean up 40% of the capacity.
In addition, SuperRam has a memory test. You can determine which tasks it copes with better and which ones worse, and derive an average rating. Finally, RAM usage statistics are kept here.
SuperRam's strength is normal Windows support 8 and 8.1.
RAMDisk – virtual disk in RAM
- License: Demo / $18.99.
- Developer: Dataram.
- Size: 6.9 MB.
- OS: Windows XP / Vista / 2008 / 7 / 8 32-bit.
- from our catalogue.

And here is the second way to optimize memory. RAMDisk is a kernel-level driver that allows you to create a virtual disk in RAM HDD. It can store frequently used data, including programs. This significantly improves PC performance.
The program supports WDM standards, so RAM disks can be assigned any letters, split into several, formatted, etc. - in a word, everything is the same as with a regular hard drive.
The RAM disk can be turned on and off at any time. First of all, using this program will speed up applications that heavily load the I/O system, and to a lesser extent - the processor and memory.
You won't be able to boot Windows from a RAM disk, but you can use it to host the system in a virtual machine, such as VMWare.
The free version of RAMDisk allows you to create virtual disks with a capacity of up to 4 GB, after payment - up to 32 GB. The program requires at least 512 MB of RAM and installation of the .NET Framework 4.0.
The same problems with the same limitations can be solved using Dataram RAMDisk.
How to overclock a video card
If a user needs to fine-tune or overclock a video card, in most cases he does not need to turn to Internet search engines. Just look into the accelerator box and pull out the driver disk - as a rule, it contains proprietary programs from the video card manufacturer.
If you didn’t buy the boxed version, you can look at the PC specifications and go to the website of the accelerator or laptop manufacturer. All companies offer solutions that can help you increase GPU and memory frequencies, optimize device settings, and do this with minimal risk.
Such programs often have a similar interface, since many of them trace their origins back to . Their main drawback is that they are tied to devices from a specific manufacturer and have a spectacular, brutal, but not very convenient design. One of these programs is MSI Afterburner.
MSI Afterburner - overclocking MSI video cards
- License: Freeware.
- Developer: MSI.
- Size: 21.9 MB.
- OS: Windows XP / Vista / XP X64 / Vista64 / 7 / 7 x64 / 8 32-bit / 8 64-bit.
- from our catalogue.

MSI Afterburner is designed for MSI video accelerators based on AMD and NVIDIA GPUs. the main task applications - give the user the opportunity to change the settings of the video card: memory frequency, processor frequency, supply voltage, cooler fan speed.
The program window is divided into two parts. On the left are sliders with which you can adjust frequencies and other parameters. On the right side is a hardware monitor that allows you to monitor GPU load and memory usage, as well as other data about system operation, in real time.
There are five buttons for multiple presets. You can create them for individual games or other tasks.
At first glance, Afterburner's capabilities come down to overclocking only. Actually this is not true. Some functions are hidden in the program settings. Here, for example, you can assign hotkeys for taking screenshots in some games, recording videos, and activating profiles. You can also configure monitoring display and driver and BIOS updates.
ASUS GPU Tweak – overclocking ASUS video cards
- License: Freeware.
- Developer: ASUS.
- Size: 21 MB.
- OS: Windows Vista/ Vista64 / 7 / 7 x64.
- from our catalogue.

ASUS GPU Tweak is a similar program from ASUS. In the main window you can change the frequency of the processor and memory, as well as control the fan speed. There are also five buttons for 5 presets. You can separately configure settings for 2D and 3D graphics.
The auxiliary monitoring window on the left contains information about the operation of the system. To obtain information about the installed video accelerator, you can use the branded version.
ASUS GPU Tweak allows you to update your video card BIOS and drivers via the Internet.
In the settings you can refuse to use the skin. The software will take on a familiar and understandable appearance, but will not be as beautiful. Along with screenshots, you can set up video recording during gameplay. To do this, specify the video parameters and assign hotkey for "shooting". There are hotkeys to activate overclocking profiles.
Gigabyte, Sapphire, Zotac and other brands of video cards have similar programs. One of the most useful features is the ability to create game profiles with optimal settings for this or that game. However, in ASUS GPU Tweak and MSI Afterburner, you need to select presets yourself. It's easier to use RadiT, however, the trick will only work with ATI accelerators.
RadiT - AMD Catalyst Profiles
- License: Freeware.
- Developer: Mr. Lolman.
- Size: 3.3 MB.
- OS: Windows Vista/7.
- from our catalogue.
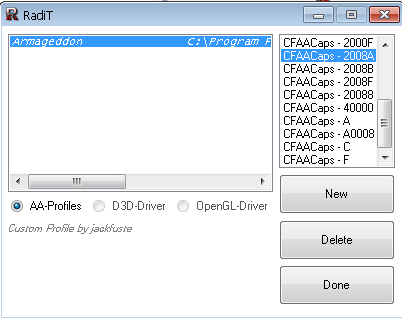
A small utility allows you to select and activate game profiles AMD Catalyst. Everything works very simply: you need to indicate to the program the folder where the executable file games and select a profile from the list, each of which is signed. Then, when you start the game, the selected settings will be applied.
Thanks to profiles, you can improve image quality by optimizing anti-aliasing. There is only one problem - the utility only works with AMD video cards.
PowerStrip - advanced graphics card setup
- License: Trial / $29.95.
- Developer: EnTech Taiwan.
- Size: 1.3 MB.
- OS: Windows.
- from our catalogue.

PowerStrip - powerful tool to control graphics of any platform.
The user can create profiles for each application. They involve settings for both the graphics itself and some other computer functions. For example, you can enable or disable forced display of images on multiple monitors, cancel power saving settings, screen saver settings, etc.
PowerStrip allows you to create profiles with display settings: resolution, refresh rate, color depth, etc. Color profiles make it possible to create presets with settings for gamma, brightness, and color temperature.
Finally, PowerStrip is also a tool for accelerator overclocking. You can change the frequencies of the GPU and memory, as well as the timings of the latter, which is not common. Energy management, system frequency control, etc. are also disabled here.
ATI Tray Tools - advanced configuration of AMD video cards
- License: Freeware.
- Developer: Ray Adams.
- Size: 2 MB.
- OS: Windows 2K / XP / 2003 / Vista / XP X64 / 2008 / Vista64 / 7 / 7 x64.
- from our catalogue.

ATI Tray Tools is another serious tool for getting maximum results. This time from AMD video cards. The program, along with overclocking the GPU and memory, allows you to dive into the jungle of 3D graphics, adjusting the parameters of antialiasing, anisotropic filtering, textures, shaders, etc. All settings can be saved in profiles and activated using desktop shortcuts.
It is possible to automatically activate profiles. Having created one or another preset, you can link it to an application, not only for three-dimensional games, but also for ordinary programs, for example, graphic editors.
Benchmarks are provided to check the operation of the video card after overclocking.
It is possible to adjust the rotation speed of the accelerator fans depending on its temperature.
And, of course, ATI Tray Tools will replace the standard ones Windows tools to control display settings. Switching between different resolutions with their help is more convenient than the default tools.
NVIDIA System Tools – setting up NVIDIA video cards and chipsets
- License: Freeware.
- Developer: NVIDIA.
- Size: 71.8 MB.
- OS: Windows XP / Vista / XP X64 / Vista64 / 7 / 7 x64.
- from our catalogue.

NVIDIA System Tools - a set of tools for managing graphics and NVIDIA chipsets. The latter is less relevant, since the company has left this market for several years now, and the system logic itself is gradually being integrated into the CPU and depends less and less on its settings.
As for GPU control, the utility allows you to configure various hardware profiles for the accelerator, including the frequency characteristics of the processor and memory, as well as the supply voltage and cooling level of the video card.
The tool also allows you to automate profile management according to custom rules. For example, when booting Windows You can load a profile by default, which sets the minimum frequencies for the accelerator, as well as the quietest control mode.
When the game starts, also automatically apply settings for maximum performance. Once the game application is closed, return to the default profile. In total, about a couple of dozen standard events and several reactions to them are offered.
The package also includes a utility for configuring PhysX, displaying system parameters and forcing profile loading.
Optimizing your hard drive (hard drive)
The best tweak for disk subsystem is hardware. There are two options. The first is to organize a RAID array, which most people will find difficult and expensive. The second is to install the operating system on an SSD, which in most cases is faster than a traditional hard drive. A half measure is to use a hybrid drive.
SSD Tweaker – SSD optimization
- License: Freeware / $12.95.
- Developer: Elpamsoft.
- Size: 450 KB.
- OS: Windows XP / Vista / XP X64 / Vista64 / 7 / 7 x64.
- from our catalogue.

In the case of SSDs, one of the main tasks of the tweaker program is not so much to increase the performance of the drive, but to help preserve it for as long as possible. Over time, SSD performance tends to decline. This is due both to the characteristics of the NAND flash memory itself, which underlies solid state drives, and with the fact that the OS is still focused on hard drives, so by default they either do not support or do not perform some vital procedures for SSDs. The necessary settings can be made in Windows manually, but why do this if you have an SSD Tweaker.
For SSDs, it is useful to reduce the number of accesses to the drive. This will have a positive impact on system performance and maintaining flash memory performance. If the amount of RAM allows, the program allows you to disable the cache, file access time recording, Boot Tracing, configure Windows Prefetcher, system recovery options and Windows indexing services. All this is in free version. By paying a few dollars you can get additional functions, such as enabling the TRIM cleaning algorithm, which can significantly reduce SSD performance loss over time.

The same operations can be done using proprietary utilities, such as and others. They offer TRIM activation for free.
HD Tune Pro – testing the hard drive (hard drive)
- License: Trial / $34.95.
- Developer: EFD Software.
- Size: 2145 KB.
- OS: Windows XP / Vista / XP X64 / Vista64 / 7 / 7 x64.
- from our catalogue.

HD Tune Pro is a well-known utility for working with SSDs, hard drives and USB drives. It is mainly intended for testing and monitoring drives. Here you can check the read and write speed. You can also monitor the technical condition of the hard drive, find out the number of errors and bad sectors.
There are also some tweaks in HD Tune Pro. Using the utility, you can increase the performance of the hard drive by raising its speed, or, conversely, optimize the operation of the drive so as to reduce noise as much as possible. Many may find useful function safe removal information from disk.
When trying to increase the performance of individual computer components and the system as a whole, you need to understand that the main thing is not getting maximum results, but ensuring stability in an accelerated manner. Here you cannot do without utilities such as GPU-Z, which allow you to view the current operating parameters of the central processor and graphics accelerator. They also have built-in benchmarks, with the help of which the stability of operation is checked. Finally, these utilities can also be used for overclocking.
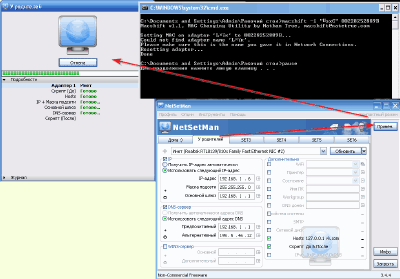
Free program for changing network settings. The program is intended for non-commercial use and in the free version allows you to create up to six profiles containing different network configurations.
Changing created profiles in NetSetMan (short for Network Settings Manager) is very easy - just select the tab with the desired settings and click the "Apply" button.
You pay in advance necessary settings into separate profiles, and then simply switch to the one you need when changing the connection method!
Key Features
NetSetMan allows you to change:
IP- computer address on the Internet.DNS- a system that associates domains with IP addresses.
Hosts - text file with instructions for redirection.
- IP addresses;
- DNS, WINS and SMTP servers;
- name and working group computer;
- Wi-Fi settings;
- network printers;
- entries in the Hosts file;
- some system properties (monitor operating mode, sound devices and power configuration).
In addition, NetSetMan can execute any BAT, JS or VB scripts, which allows you to change almost any settings accessible from the command line and/or thanks to third party programs!
Comparison with analogue
NetSetMan has a paid PRO version, but the differences between them are minimal. In fact, by paying €18, you will receive:
Proxy- an intermediate server between the computer and the Internet.- the right to use NetSetMan on a work PC;
- activate an unlimited number of settings profiles;
- functions of changing proxy server, network domain and home page browser.
Therefore, it seems to me that it would be more successful to compare NetSetMan with the application third party developers, called WinAgents HyperConf:
In fact, the WinAgents HyperConf program is a kind of analogue of NetSetMan for system administrators, since it is designed not only for automatically changing network settings, but also for maintaining these settings in working order.
And the license for it is sold for at least 10 cars. Therefore for regular user working with NetSetMan will be preferable.
Program installation
NetSetMan is installed like all programs: you download the archive, open it and run the installer, and then follow the wizard’s prompts.
During the first stages of installation, you will need to select the application language and accept the terms of the license agreement, after which you will be faced with the following choice:
There are three possible installation options here:
- Standard installation is the way NetSetMan will be implemented into the system like everyone else regular applications. That is, in the Program Files folder (by default), a directory with the program will be created, which will contain all the files necessary for work. In this case, the utility settings will be saved in the system registry.
- Update - allows you to install a newer copy of the program on top of the one you already have installed. This method will only be available if you have already used NetSetMan before.
- Extract files. This method allows you to simply unpack all program files into the directory you specify. In this case, nothing is written to the registry, and you can use NetSetMan as a portable application.
We'll probably finish installing the program in the standard way, although if you are a fan of portable software, you can complete the installation in a third way :).
Creating your first profile
After the installation of the program is completed, its working window will appear in front of us:
![]()
It consists of a menu bar (at the top), a row of buttons (to the right of the program name) and six tabs, which, in fact, contain all possible settings.
In order to create the first settings profile, you need to call the context menu of the required tab (for example, Set 1):

First of all, let's rename our tab to something convenient and understandable. To do this, click “Rename” and in the window that opens, enter a suitable name, for example, call the tab “Home” :).
After this, we will need to go to the context menu of the tab again and activate the “Get all current settings” item there.
This action will automatically fill in all fields with the settings that you currently use to connect to the Internet:

In addition, you can automatically fill in the required fields by clicking the arrow button located to the right of the required field (see screenshot above).
Working with the program
So, we have our first profile ready - it’s time to create another one so that you can switch between them.
I have a connection at home from a city local network, so as an example I will give the settings that I have to use if I want to connect to the Internet at my parents:

As you can see, for the Internet to work, it is usually enough for us to know our IP address and the IP of our DNS server (which in this case acts as a modem). However, there are also more complex cases that NetSetMan will help us deal with.
MAC address(English) Media Access Control) - unique device number on the network.The first such case is the problem of changing the MAC address network card.
Usually such a need does not arise, however, if you have to work in several local networks, where traffic is distributed via physical addresses network devices, then without this function you cannot do anything.
Officially, NetSetMan does not yet have such a feature (although the author announced its implementation in the next beta version), but it is possible to execute almost any script, which significantly increases the functionality of the program!
The script can be created in advance (and then simply opened), or you can write it directly in the window of a special built-in editor, to access which you need to activate the “Script” item in the desired program tab and click on the button to the right of the item name:

Let's look at working with scripts using a specific example. Default in Command line There is no function for changing the MAC address, but it can be implemented using a third-party console program - macshift.
This utility You will find it in the archive with the NetSetMan program. All you need to do is unpack the files "validmacs.h" And "macshift.exe"(third file is optional) to the root of the disk C:\ or to a folder C:\Windows.
Console(English) console) - window for entering text commands.Thus, you have the opportunity to change the MAC address of the network card through the console. Now the small matter is small - you need to write scripts.
The syntax of the macshift commands is very simple: macshift -i "Connection name" 2889-82-002B (required address).
We enter the line (changed to the MAC address you need) into any editor such as Notepad and save it as a BAT file.
Now all that remains is to open the created file in the NetSetMan script editor (see screenshot above). Moreover, the execution time of the script can be set both “Before” changing the settings and “After”.
Hosts file management
Next to the “Script” item there is the “Hosts” item. Activating it allows us to make changes to the same name system file, which is responsible for resolving and forwarding the addresses specified in it.
One way to use the edit function is this file There may be restrictions on access to some sites from your PC.
For example, I suggest “banning” the site vk.com :).
This can be achieved by assigning the local host address to the site (by default 127.0.0.1 ). We activate the “Hosts” item in NetSetMan and using the button on the right (with the ellipsis) we open the window for editing the system host file:

Now, following the syntax, on each new line we first write the local host address, and then, separated by a space, the address of the site to which we want to block access.
After generating the list, click the “Finish” button.
The most important thing is that NetSetMan does not touch the standard host file entries, but can both add and delete site addresses added through the program.
Thus, you can create a profile, for example, for your children, in which you can limit their ability to access certain sites!
Managing system properties
The last function that I would like to draw your attention to is “System Properties”. By activating this item in the NetSetMan window, you will be able, using a profile, to change not only network settings, but also some monitor, sound and power settings:

We've figured out the capabilities of NetSetMan, so it's time to try using the profiles we created. To do this, just go to the desired tab (profile) and click the “Apply” button. in the upper right part of the program window:
This will open a window in which all actions performed by the program will be displayed.
Above the list of actions is a progress bar for applying new settings, and above it is a “Cancel” button, which will change to a “Finish” button when the network configuration is complete.
Click the last one and you will have a completely reconfigured Internet connection at your disposal!
Additional tools and program settings
So, above we have already figured out the operating principle of the NetSetMan program and examined in detail some of its capabilities. Now it's time to get acquainted with some non-core but sometimes necessary functions. We'll talk about the buttons on the toolbar. There are only three of them:

- Profiles. This button opens the profile management window. Unfortunately, in the free version we cannot delete any of the six profiles, but we can rename them.
- The note. This button allows you to leave short entries(up to 256 characters) with comments to the active profile. Here you can, for example, insert the text of the script so that you can restore it if the file is lost (see screenshot above).
- Auto switch. This button opens a window in which we can configure automatic switching to a Wi-Fi profile when a signal from an open network is detected.
Without proper attention, we are left with only the menu bar.
The first item - “Profile” - activates a menu similar to context menu described at the beginning of the section about creating the first profile. Therefore, there is no point in describing it separately, and we move on to the second point - “Options”:

Here we have three sub-items:
- import;
- profile export;
- and the “Settings” itself.
For example, if you forgot to set the interface language to Russian or want to disable NetSetMan autostart, then you can do it here.
Also pay attention to the “Administration” tab. With its help, you can activate encryption of all data stored in the program!
The third menu item - “Tools” - contains some standard links to built-in system network connection management tools and more:

The last thing I want to talk about is the ability to work with NetSetMan in “Compact Mode”:

To switch to this mode, just click on the corresponding inscription in the right top corner. It is worth noting that you cannot edit profile settings in this mode, but switching the network configuration is much more convenient (at least in my opinion) :).
Advantages and disadvantages of the program
- simplicity of the interface;
- convenient system for changing profiles;
- expanding the functionality of the program by executing scripts;
- the ability to quickly automatically obtain current settings;
- Access the most popular built-in Windows features.
Flaws:
- there is no built-in function for changing the MAC address of the network card;
- There is no built-in task scheduler.
conclusions
If you are a modern laptop owner and often use it when traveling to access the Internet, then NetSetMan is an indispensable tool for you that will allow you to forever forget about the inconveniences associated with changing network settings.
If you yourself are not very good at configuration skills network settings, then you can always ask your friends or colleagues (for example, an office system administrator :)) to do this just once, and then always enjoy uninterrupted access to the Internet!
Afterword
IN modern world There are probably practically no people left who do not use computer technology in one way or another. Most people today have more than one PC at home... Moreover, the second computer is most often a laptop.
Of course, with modern capabilities for almost universal access to the Internet, laptops are still the most successful solutions for replacing a full-fledged office (and even multimedia) PC.
However, all the variety of options for connecting to the Internet has one (and sometimes very significant) disadvantage - the need to change the connection settings every time.
Let's say you use a laptop as a work machine at home, in the office and with friends. At the same time, at home you “sit” on an ADSL connection, at work on a “local” connection, and with friends on a “dedicated” connection. Your laptop also has Wi-Fi, which can be used to surf open networks...
And for each case, you have to go into Network Connections every time and tinker with the settings! Scary? Of course :) But today we learned how to rid ourselves of this nightmare once and for all with the help of a fairly simple, but practically irreplaceable utility, NetSetMan.
P.S. Permission granted to freely copy and quote. this article provided that an open active link to the source is indicated and the authorship of Ruslan Tertyshny is preserved.
Computer performance depends on both the power of the hardware components and the correctly configured operation of the operating system. There is little benefit from increasing the amount of RAM if it is filled with useless programs. Powerful processor will not speed up performance if limited to save battery power. Thin Windows setup can significantly optimize system operation without additional material costs.
What affects system performance
The performance of Windows 7 is determined by many factors, some of which are the result of trade-offs between power, usability and battery consumption, and others of which depend on how well-maintained the computer is. Therefore, to increase performance, it is necessary to configure the system to maximum performance and remove all obstacles to its normal operation.
Perhaps an experienced user will want to independently debug each element of the system and configure the computer to suit their needs. For others the best solution will take advantage special programs for fine-tuning the system (tweakers), which show problems in a convenient and understandable form and help eliminate them.
Optimization programs (free and paid)
Programs whose main purpose is to improve Windows operation 7, there are many on the market. There are universal large applications and small specialized utilities, programs with many customizable options and with one “red button”. Most programs have additional functions that are not directly related to performance, but are also important for the user, for example, protecting personal data.
Universal
As a rule, universal programs have a large set of optimization utilities, but are paid. Packages with limited functionality or outdated versions are distributed free of charge.
The Computer Accelerator program from the domestic developer AMS Software allows you to quickly and safely clean your computer of debris, fix system errors, manage autorun, and ensure the safety of your Internet browsing.
Computer Accelerator works for everyone Windows versions and is one of the leaders among programs for optimizing PC performance.
- Complete removal of debris. Safely removes unnecessary files that slow down your system.
- Finding and eliminating registry errors. The program scans your computer, quickly finds faults that interfere with the functioning of the system, and solves the problem in one click. Removes remnants of old keys, invalid extensions, missing DLLs, etc.

- Autorun control. The software allows you to quickly access the startup list. Here you can disable applications that start working with starting Windows, thereby slowing down this process.
Removing unnecessary software. Here you can completely uninstall applications that have not been used for a long time or were installed by accident, but at the same time take up disk space.

- System monitoring. The Computer Accelerator allows you to monitor the state of your PC and assess the degree of memory and processor load.
- Fast and safe work online. Using the program, you can speed up your browser by clearing the cache and cookies, and also erase the history of visited sites.

The Computer Accelerator interface is as user-friendly as possible. Even a beginner will not experience any difficulties when working with the program.
- The design of the Computer Accelerator is modern and attractive,
- the location of all tools is convenient and clear,
- Most problems can be solved by pressing one button,
- It is possible to configure the “Scheduler” so that the program itself cleans and optimizes the PC.
From computers supported by the program.
Collection of information
- Connection timeout(specified in seconds) - time during which the connection to the remote computer is expected (30 seconds by default).
- Poll timeout- time limiting the duration of information collection for a group of data. The option is set to prevent freezes in the collection of information on any of the groups. If your computer has low performance or has slow network connection, then the value needs to be increased.
- Number of threads- the number of simultaneous threads that poll remote computers using WMI. To speed up the process of collecting information, you can increase the number of threads to 50 or 100; to reduce the load on the server, on the contrary, reduce it to 5-10.
- Schedule - This setting allows you to automate the information collection process. Enable the "Scheduled data collection" option and configure the survey schedule.

- License information
- Agent settings
- Change Agent TCP ports by default allows you to increase the security of working with agents.
- Using a password. Set a password if necessary. The administrator module and agent passwords must match for successful operation.
- Usage IP filter. Enable filtering and add to the list the addresses of computers with the main program "10-Strike: Computer Inventory" installed, from which the agent is allowed to receive commands and provide information.
- User data from the registry
To obtain information about product serial numbers, please follow the link " Configure receiving serial numbers from the registry". This option is only available for products that store serial numbers in the registry in unencrypted form . Information obtained from the registry allows you to control the license purity of programs and operating systems installed on network computers. At adding The new template requires you to enter the path and name of the registry key responsible for storing license information (for example, serial number). Using the buttons " Change" And " Copy"You can adjust existing templates, as well as create new templates based on old ones.
Button " Import" allows you to import template information from a cfg file. We plan to post template files on our website to account for some popular programs. Using import, you can load downloaded templates into the program.
Button " Save to file..."You can upload templates to a cfg file. Using export, you can send us information about useful programs to be included in the template file licenses.cfg, supplied with the program by default.
Button " Send to developers" allows you to send a path configuration file to developers.
Option " Take licenses into account despite the absence of products in the list installed programs ".
In case of incorrect removal of the product, information about serial number may be saved in the registry. Therefore, the program usually checks the presence of the key in the registry with the list of installed programs. The option above allows you to detect all keys in the registry if necessary (to detect copied rather than installed products).
This section specifies settings for collecting information using a remote agent. Read about using agents.
To ensure information security when working with agents, the following settings are provided:
After installing agents on network computers, you need to specify the computers where information will be collected using the agent. Click " Specify a list of computers on which agents are used". In the dialog that appears, mark the computers.
The registry contains information about OS and program settings, security settings, etc. Once you know the path to the values of these parameters in the registry, you can configure their collection in the inventory program. In this section you can specify the following parameters. Click " Add" and specify the name of the parameter, its path in the registry and the value of the parameter.
The data collected in this section is displayed in the “Computer Card” data group tree node.
- Collecting information via SSH
The SSH protocol is used to collect information from Linux and MacOS. Use this section to set up an SSH connection. Specify your login, password and port. You can select computers for which polling via SSH will be used.
For each computer, if necessary, you can set your own connection settings (option " Set your SSH port and account for each computer").
Import data
This type of setting allows you to use the method of collecting information from clients through an open general access folder. When using the component 10-Strike Network Inventory Client
(Further " client") on network computers configured to dump information into this folder, when the program is loaded, the collected data is imported into a common database of computers. Along with the use of agents, collecting data from clients is also an alternative to polling via WMI.
Attention! Folder for importing data from clients And database folder x (see next parameter) must be different! When importing data from clients, the program transfers data files from the import folder to the database folder. If the option is enabled "Keep a change log", the program analyzes the difference between new and old files. Therefore, clients cannot directly dump data files into the database folder (see the next parameter)! The program may simply not see the new data.
- Import data from FTP
Clients located on other networks can collect information locally using the client and upload it to the FTP server. This section specifies settings for importing data from an FTP server.
Import data from FTP". The program will connect to the FTP server and read client files. Specify the settings for connecting to the FTP server. In the appropriate fields, specify the server address, port, username, password and directory. To check that the settings have been entered correctly, click " Test connection".
- Import data from E-Mail
Clients located on other networks can send collected information to E-Mail. This section specifies settings for importing data from E-Mail.
To configure import, enable the option " Import customer data from mailbox ". In the appropriate fields, specify the POP server address, port, username and password. To check the settings are correct, click " Test connection".
Custom fields
In this settings section you can enter fields with additional information about the computer (for example, the person in charge or his phone number, the date of the last repair or the warranty period). Data entry into the added fields occurs in the " Computer properties ".
Data filter
The list of installed programs may display programs whose presence in reports is not desirable. For example, system or MS Office updates may clutter the list. By default, the program tries to filter system updates according to certain characteristics stored in the register. However, some updates still appear in the program list. To disable the display of these unwanted packages, use " Filter installed programs" in the program settings.

Click " Add". Enter masks for program names for which you want to disable display. For example, " *update*" or " *(kb*".
Web interface
You can view program data on remote computers via a Web browser by connecting to the program's web server.
Enable the option " Enable web interface", specify the port and authorization parameters (login and password).
To do this, you need to set the web server settings in the program: specify the port and authorization parameters (login and password). The default port may be occupied by some other service or web-based program. In this case, select another unused port. To check that the web server is working and that the settings are configured correctly, open the web page. You can then save the settings by clicking " Apply settings".
Report options
In this section, you can set individual parameters for the generated reports: set up headers and footers, position text in columns, insert a company logo.
Background check
This settings section is designed to set methods for background detection of computer status. Based on the scan results, the computer's status is displayed in color in the list (gray computers are inactive, blue computers are enabled). Background scanning helps avoid connecting to switched off computers, loads less on the program and computer when collecting information, and saves the administrator's time.
- Background polling interval, in minutes- time interval between computer status checks (default 5 minutes).
- Timeout for connecting to remote computer(ms)- time to determine the computer state (default 500 ms).
- Checking using Ping (sending ICMP packets)- use the ICMP protocol for background checking.
- Checking connection to TCP port- use a TCP connection to a specified port for background scanning. The drop-down list contains ports for standard protocols. When using firewalls on a network, ping (ICMP protocol) may be disabled on network computers. Checking TCP ports allows you to quickly determine the state of your computer. Examples of open TCP ports on corporate computers local networks: 135 (DCOM), 139 (NetBios).
Backup
This section allows you to configure Reserve copy the entire inventory database and configuration files. This measure is necessary to avoid loss of collected data due to various reasons.
To set up backup, specify the location on your computer or other physical media where the program will save copies of inventory databases in ZIP format (field " Save in directory").
To automatically save configuration files or the entire inventory database, enable the options " Keep backup copy configuration files automatically" And " Save the entire database automatically". Set the backup frequency.
The program "10-Strike: Computer Inventory" is a remote survey and inventory of an enterprise PC over a network. Creating reports on hardware and software, monitoring changes, detecting problems, notifying the administrator. Easy to install and configure. Take control of your computer fleet!
Download the free 30-day version now and try it out.