Your smartphone or tablet runs on the Android 9 operating system, you need to save a screenshot from the screen, but you do not know how? On this page you will find information how to take a screenshot on a smartphone with android 9, perhaps the information is suitable for other versions of Android. The screenshot function on the phone allows you to take a picture of everything that is on the screen and save this file, which you can view, edit, transfer, send or perform another action at any time. There are two generally possible options that allow you to save a screenshot from the screen on Android 9 Pie, and depending on the phone or tablet, there may be other ways that the manufacturer of your device has added, unless of course it works on a pure version of Android.
Let's see the first way how to save a screenshot from smartphones on Android 9 version. This method should work on almost all Android devices, regardless of OS version.
To take a screenshot, you need to simultaneously press the following two buttons on the phone, the "Volume Down" button and the "Power / Lock" button and hold both buttons for several seconds without releasing. (For those who do not understand how a screenshot is taken, we immediately press the volume down button and the power button.)
If everything is done correctly, you will hear a click like from a camera and see a notification about saving a screenshot.
And if it didn’t work out, then perhaps you didn’t press the buttons at the same time or didn’t hold it long enough, try several attempts, usually it doesn’t work the first time.
The second method also allows you to take a screenshot on a phone with Android 9, as well as on some other versions of Android.
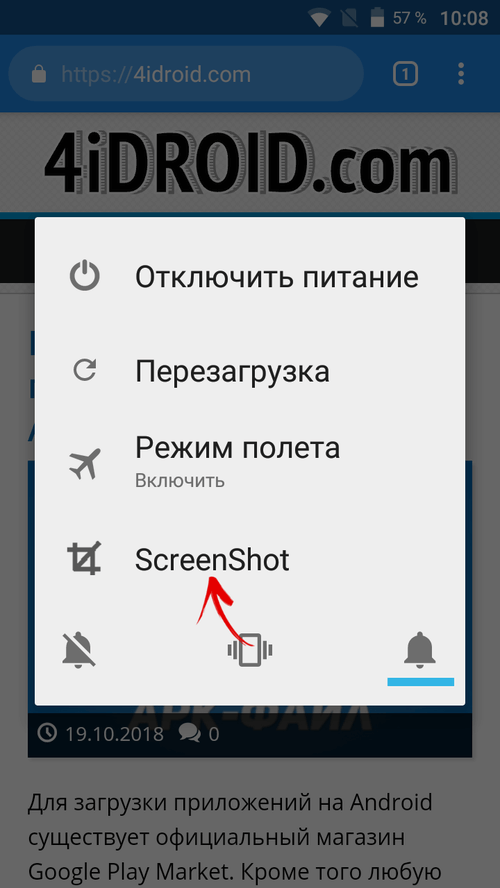
Press and hold the "Power / Lock" button on the tablet or smartphone for a while, after which a menu with options should appear, usually in this menu there is a "Turn off", "Restart" or "Screenshot" button, on some models there are other items. To take a screenshot in the menu, you need to click "Screenshot" after which the screen from the screen will be saved on the device.
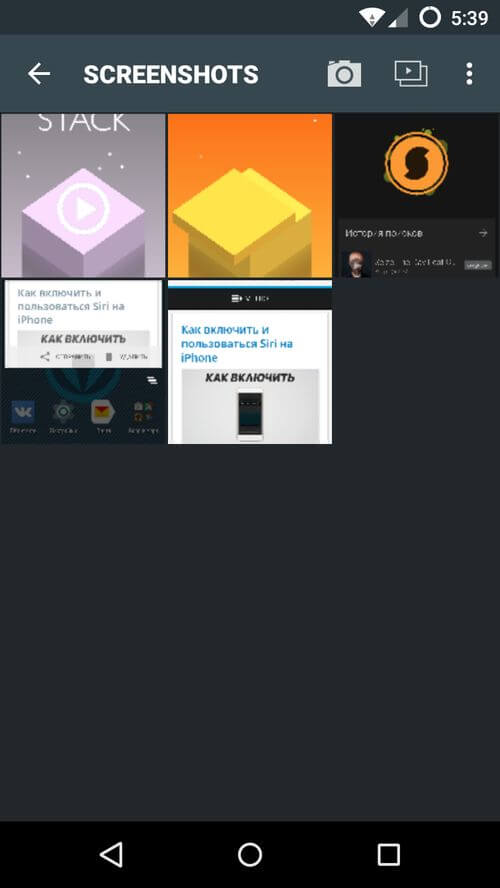
See the saved screenshot on the phone in the gallery, where there are other photos, but the screenshots are in the pack.
- We will be glad if you leave a review or share useful information.
- Thank you for your responsiveness, mutual assistance and useful advice on the topic of the page!!!
In such cases, they talk about a screenshot. But first, let's figure out what it actually means. The word "screenshot" in translation literally means "screen shot" (from the English screen - "screen" and shot - "snapshot").
Now that the meaning of the term is clear to us, we can move on. So how do you take a screenshot on your phone? Here, of course, much depends on the model of the latter. After all, the number of them in the world is simply colossal. Therefore, let's look at how to take a screenshot on the phone in relation to various popular phone models.
Taking a screenshot of the Samsung screen
Taking a screenshot on a Samsung phone is actually pretty easy. To do this, you need to find the power button (usually, this is the button that turns the phone on and off) and the home button (usually this is the central button at the bottom of the phone). We hold these two buttons at the same time for a couple of seconds and that's it - you did what you intended, and the image is saved in the phone's memory. Very often, the characteristic sound of the camera shutter can still be heard.
But this is not the only way. Many manufacturers include this feature in various phone menus. Thus, if you hold down the "home" button, the "recent programs" button or the "back" button, a menu will open in which you can select the function of interest and take a picture.
LG phone
How to take screenshot on LG phone? The algorithm of actions is almost the same as for the Samsung phone. Only the key combination is different. You need to hold down the volume key and at the same time the power key, this will make the camera shutter sound and a pop-up notification will appear.
You can also use the Quick Memo program, which allows you to quickly create notes and take screenshots. Simply expand the quick settings menu by swiping up and down. Find the QMemo + program, click on the icon - and immediately get what you want. In addition, before sending it to friends, you can draw something on top of it.

Snapshot on Iphone
For all Apple products, the process for creating this kind of snapshot is the same. You need to hold down the power key and the home key for a couple of seconds. By the way, if you hold these buttons for a longer time, you can turn off the phone. The resulting picture can be found in the "Camera Roll" folder, but if it is not there, then repeat the operation.

What to do with Microsoft Windows Phone
Smartphones running Windows Phone 7 did not support this feature. Reasonable question: how to take a screenshot on the phone in this case? The only option is to use third-party applications that allow you to do them.
In the newer version - Windows Phone 8 - this flaw has been corrected, and you can get such a picture by pressing the Windows touch key and the power key at the same time. However, for phones running Windows Phone 8.1, the developers have changed the key combination with which this can be done. You need to hold down the power and volume buttons at the same time.
How to save a snapshot
We looked at how to take a screenshot on various phone models, but we are sure that many are wondering not only how to save a screenshot of the screen on the phone, but also where you can find it later. So, as soon as you take a screenshot, it is automatically saved in the phone's memory. Depending on the phone model, they are stored in different folders in its memory.
For example, for a Samsung phone, it will be saved in the Screen Capture folder. For HTC phones, the photo is saved to the photo folder. On Windows Phone, the image can be found in the Photos app, in a special folder. And for LG smartphones - in the Screenshots folder.

You can also connect your phone to your computer using a special cable that should come with your smartphone and use it as a USB flash drive:
- Find your device in File Explorer and open it.
- Next, find the Pictures folder there, and the Screenshots folder will be in it. This is where all your pictures will be stored. You can copy, cut or edit them directly from there - as you please.
As you could understand from the above, this process is not so complicated, you just have to be patient and persevere, since not everyone can succeed the first time. It depends, as you may have noticed, on the phone model and its configuration, but in general, the principle remains the same.
We hope that this article was useful to you, and you found what you were looking for, and from now on you will be able to delight your loved ones and friends with cool pictures taken directly from your phone screen.
This article will discuss how to take a screenshot of the screen of an Android device, or, I think, it will be a little clearer, take a picture of everything that is on the screen. On computers, the "Printscreen" key is used for this purpose. On communicators and tablets from different companies, a screenshot is taken by a combination of various keys, but there are also standard key combinations built into the Android operating system and which work on almost all phones. The first step is to try out the standard set, since both keyboard shortcuts from both the OS and HTC work on my HTC Sensation XE.
How to take a screenshot on Android 3.0 and above
To screenshot the screen on this version of the operating system, you need to press the "Recent programs" button for 2-3 seconds. This method works mainly on tablets that have Android OS versions 3.0, 3.1 and 3.2 installed.
How to take a screenshot on Android 4.0 and above
In order to screenshot the screen on Android versions 4.0, 4.1, 4.2 and higher, you need to simultaneously hold down the "Power" and "Volume Down" keys for 2 seconds. When creating screenshots with a combination of these keys, all pictures are saved in the "sdcard/Pictures/ScreenShots" folder.
Creation of screenshots on communicators and tablets of certain companies (HTC, Samsung, ASUS)
The following button combinations are used to create screenshots on HTC communicators:
- for HTC Sense below 4.0 - simultaneously pressing the "Power" and "Home" buttons;
- for HTC Sense 4.0 and above, press the Power and Back buttons simultaneously.

All screenshots on HTC are saved to "sdcard/DCIM" folder.
Samsung phones and tablets use the TouchWiz shell and take screenshots by pressing the Home and Back or Power and Home buttons for 2 seconds.

On ASUS devices, you need to enable the ability to create screenshots, for this go to "Menu - Settings - Screen" and check the box "Screenshot". Next, create screenshots using the standard method for your operating system.
If you know any combinations of buttons for creating screenshots on other phones, then write them in the comments.
- How to uninstall an application (game or program) on the Android system
Below is an instruction on how to remove the programs and games you have installed. So let's get started. Removing apps from...
"> How to uninstall an application (game or program) on the Android system - 07/08/2013 - How to Russify Android
Step 1. Checking the availability of the language We go along the following path “Menu - Settings - Language & keyboard”. Click on the top one...
"> How to Russify Android - 05/10/2013 - How to set your ringtone for alarms, messages, reminders and system sounds
In general, everything is just to disgrace. Create a media folder on the memory card, audio in it, and 4 folders in it: / alarms, ...
"> How to set your ringtone for alarms, messages, reminders and system sounds - 03/01/2011 - How to install programs on Android?
All applications for the Android system have apk extensions. Attention: applications for the Android system need to be...
"> How to install programs on Android? - 17.02.2011
For smartphones running Android version 4.0 and higher, there are 2 methods for taking screenshots:
1. It is necessary to simultaneously hold down the volume rocker, in the volume down position, and the lock/power key of the smartphone for one second. After that, a specific sound will be heard and a notification will be displayed that will notify you that the screenshot has been successfully saved. This procedure is standard for all phone models.
2. It is necessary to briefly hold down the on / off key of the smartphone. After a period of 2-3 seconds, a menu should appear with a choice of several items: "Power off", "Restart", "Airplane mode", "Screenshot". Selecting the last item from the list will take a screenshot and save it.
Some smartphones and tablets, such as the Samsung Galaxy Tab 7.0, have a dedicated touch button for taking screenshots.
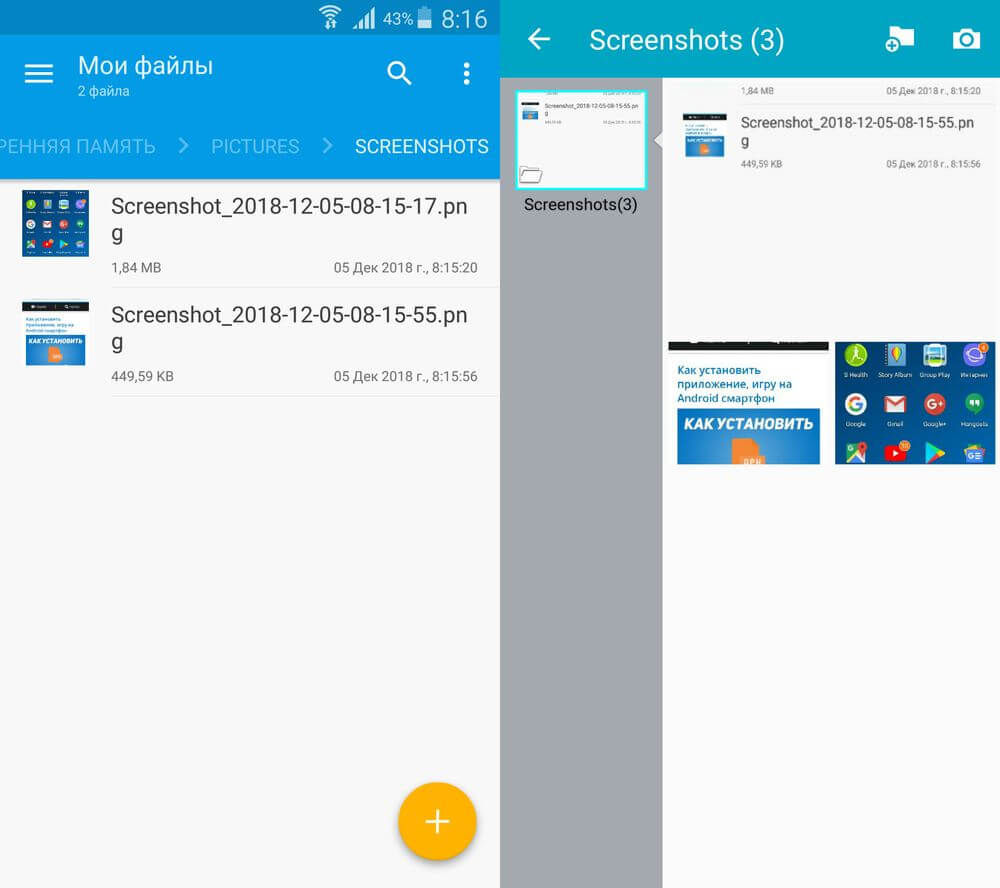
After a screenshot has been taken, you need to find its storage location in the device. By default, the path to these pictures should look like this: "Internal phone memory/Pictures/Screenshots". Although in some cases screenshots can be saved on a memory card with the same name. These options are device dependent, but mostly on Android gadgets, the screenshot path only follows the one described above.
In the event that the above tips are not suitable for creating screenshots, then below are ways to do this on popular smartphone models running the Android operating system.
On HTC phones, you need to press the on / off key and at the same time the "Home" button. After that, the pictures can be found in the photo folder.

You can take a screenshot on Samsung smartphones in the same way as in the case of HTC: on / off button + "Home".

For Sony Xperia smartphones, you need to hold down the volume down key and the on / off key.

On Huawei phones, a screenshot is taken by pressing the on / off button and the volume down button for a few seconds, and the folder with saved pictures is located along the following path: /Pictures/ScreenShots/.

Philips phones, like most smartphones, use the on / off key and at the same time hold the volume rocker in the volume down position.
The list of smartphones and ways to take screenshots can be endless, but the main methods for taking screenshots are all of the above. To search for a phone model and method other than this list, you can use thematic forums with the necessary information, where you can get an answer to your question.
How to take a screenshot on older versions of Android
In the event that the Android version below 4.0 is installed on the phone, then in each individual case the method will be different. The thing is that on older versions of Android, the screenshot function was simply absent. It was added by smartphone developers themselves to their devices. In order to learn how to take a screenshot on such devices, you need to refer to the instructions that came with the phone.
If the so-called root-rights are open on the smartphone, then you can use special programs to create screenshots. Such programs can take screenshots after a certain action, for example, you just need to shake the device to do this. Creating root access on a smartphone is associated with certain difficulties and can harm the device. So it is better to choose a method from the above methods in order to take a screenshot without much difficulty.
How often do we, users of Android devices, have to take screenshots: to save correspondence, show an area on a map, cut a fragment from a video, make a copy of a train ticket, capture an achievement in your favorite game, etc. In each of these situations, you will need to take a screenshot, so it is useful to know which button combination is used to take it.

If you need to transfer the screen to your computer, connect your smartphone or tablet to the PC via USB, go to the internal memory → "Pictures" → "Screenshots". Then select the desired images and transfer them to your computer.

Another standard way to capture what is shown on the display is to long press the power button to bring up a menu with available actions and select the desired option. Usually the list consists of the items: "Shutdown", "Reboot", "Airplane Mode", and in some firmware (more often in custom ones) there is also a "Screenshot". We are interested in the latter.
The feature also appeared on stock Android 9 Pie.

How to take a screenshot on Samsung Galaxy
On most Samsung smartphones and tablets, screenshots are taken as follows: press and hold for a couple of seconds lock key and home button to the sound of a camera shutter. An icon will appear in the notification area - the screenshot has been saved.

On the new models of Samsung Galaxy S8, S8 Plus, S9, S9 Plus, Note 8, Note 9, J8, J6 Plus, A6 Plus, A9 and others, where there is no Home button, the usual key combination is used to capture screenshots: "ON" + volume down.

On older devices like the first generation Galaxy S, press and hold for a couple of seconds home buttons And "Back".

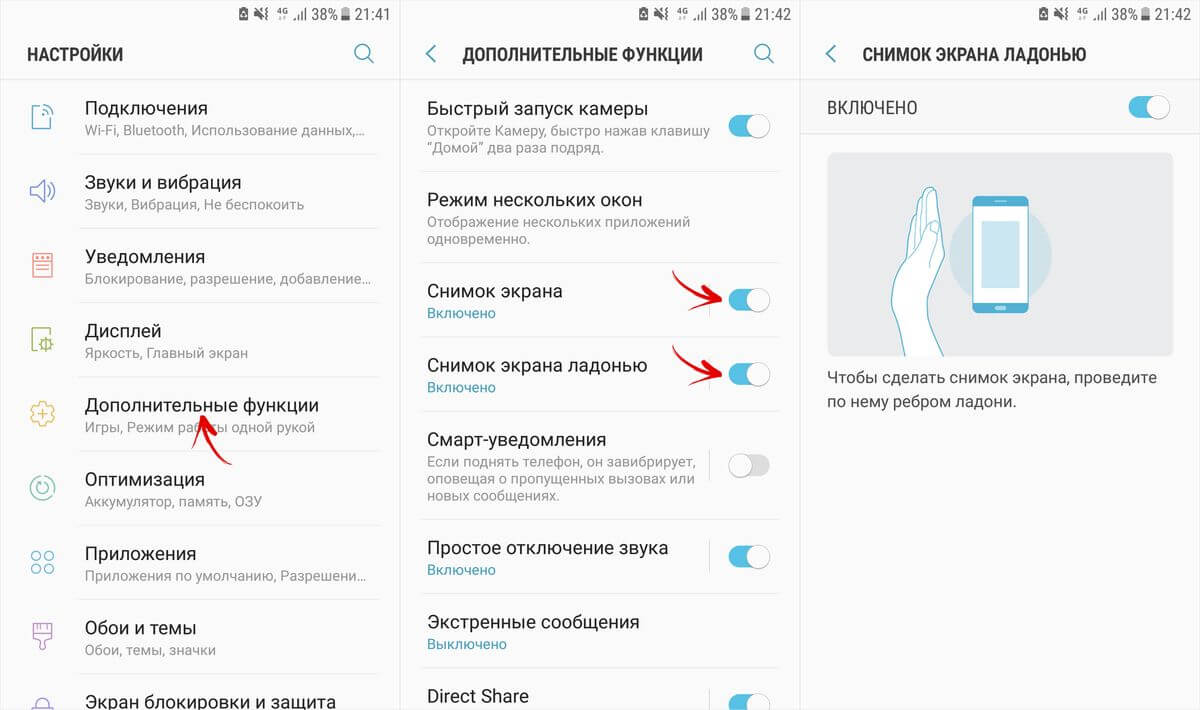
Samsung's current flagship smartphones and some mid-range models support the Palm-to-Screen Capture feature. On most devices, the option is enabled by default, but if not, go to "Settings" → "Additional functions" (depending on the model and firmware, it may be called "Palm control", "Gesture control" or "Movement") and activate the items "Snapshot screen" and "Screenshot with the palm of your hand." Now, to take a screenshot, swipe the edge of your hand across the screen from right to left or left to right.
On Samsung, screenshots are saved in the "Pictures" → "Screenshots" or "Pictures" → "ScreenCapture" folder. You can also view them in Gallery or Google Photos.
Ways to take a screenshot on Xiaomi
Xiaomi developers came up with 6 options for how to take a screenshot. Four of them are available only to owners of smartphones and tablets with MIUI 7, 8, 9 and 10, but as of the end of 2018, most Xiaomi mobile devices are running these firmware.
The first standard way is to press and hold the buttons for a second food And volume down.

Another option to capture an image from the screen using the keys is to quickly press the touch button "Menu" and hardware key Volume Down.

Starting with MIUI 7, the firmware introduced a screenshot function from . To use it, swipe from the top edge of the display to open the notification shade. Then swipe down a second time to fully open the quick settings panel. Click on the “Screenshot” item if the language is set to English, and the screen image will be saved.

Xiaomi smartphone users running MIUI 8 and above have two more ways to create a screen. The first is to swipe down the screen with three fingers. This gesture is set by default, and if you want to change it, go to "Settings" → "Advanced settings" (in older firmware instead of this item - "Advanced") → "Buttons and gestures" → "Screenshot" and select another option Or just disable the feature.


Also in MIUI 8, the Quick Ball touch assistant appeared. This is a useful feature that makes it easier to use a smartphone with a large display with one hand. To bring the Quick Ball to the screen, go to Settings → Advanced Settings (or Advanced) → Touch Assistant and activate the toggle switch. A translucent arc will appear on the side, clicking on which will open an interactive menu with available options. Among them there is an icon with scissors. Click on it to capture what is shown on the display. If you drag the arc, it will turn into a circle - its location on the screen can be changed by simply dragging. In addition, by going to the "Shortcut Functions" in the settings of the touch assistant, you can change the purpose and order of the buttons.

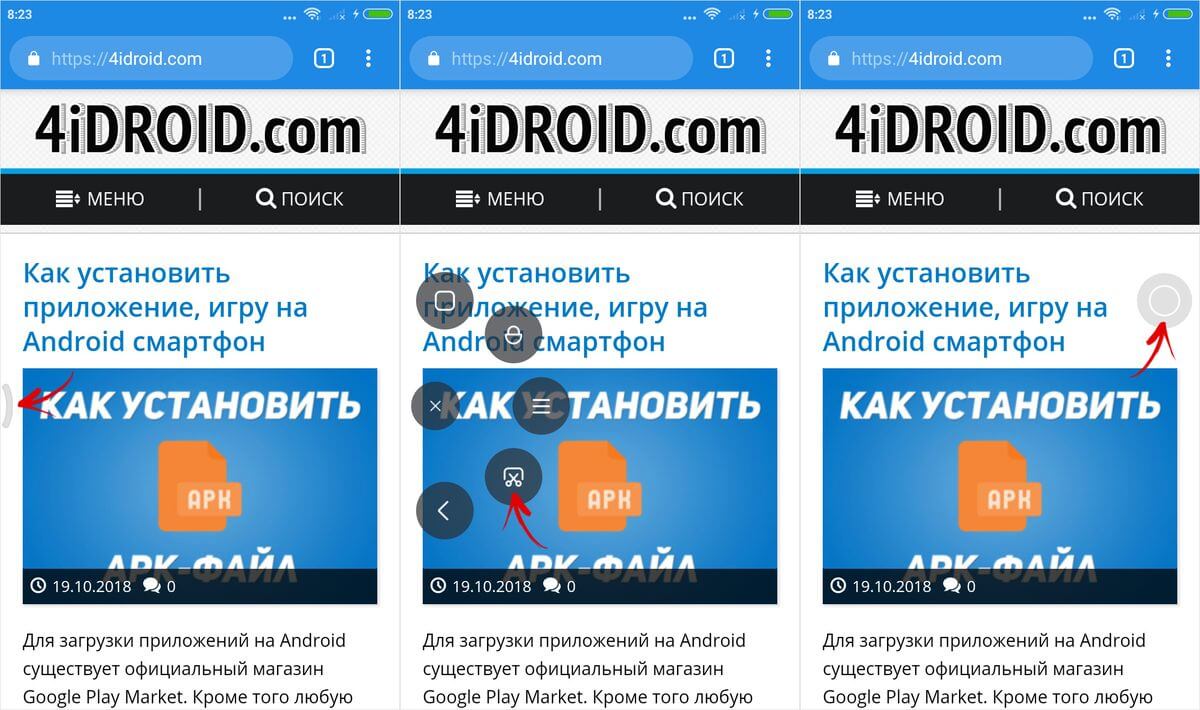
A thumbnail of the created snapshot will appear in the upper right corner of the display and will “hang” there for some time. Clicking on it will take you to a list of available options. To add text, outline, or crop the image, select Edit, make your edits, and click Save.

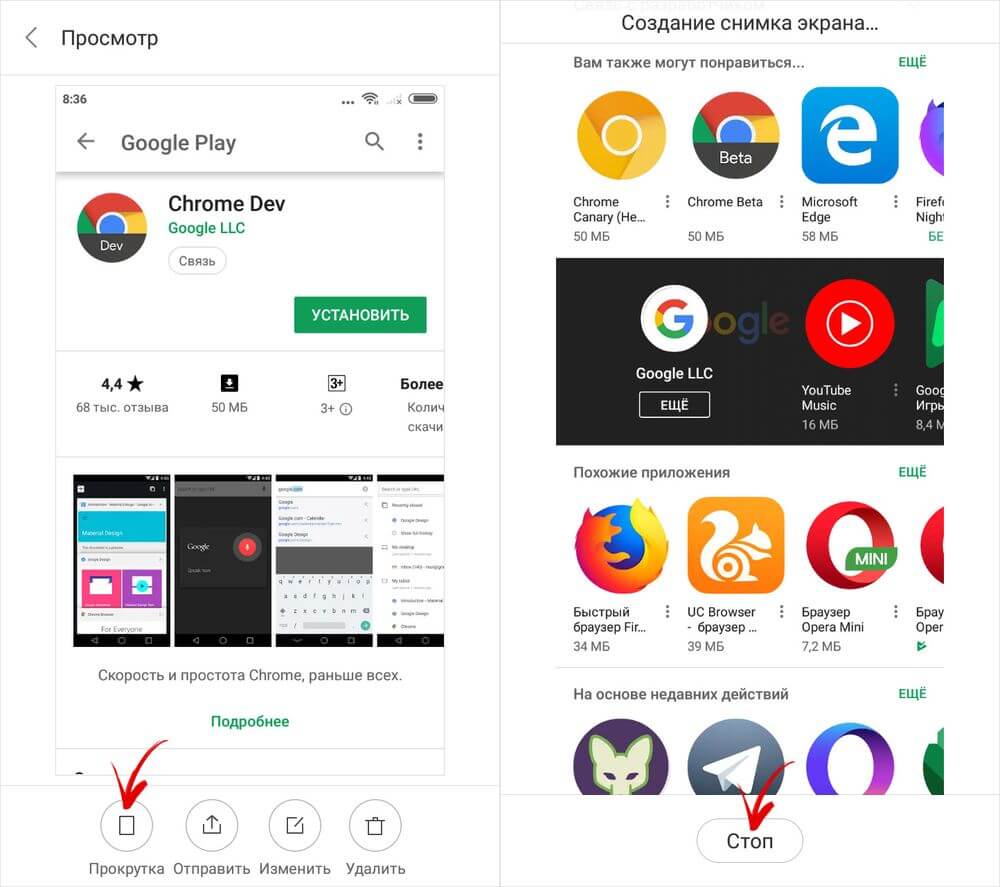
But the most interesting feature is the long screenshot. It is useful when you need to "screen" the contents of the screen along with what does not fit on it. After taking a snapshot, click on its thumbnail and select "Scroll" (or "Advanced" in previous versions of MIUI) from the list of options. The image will start to descend, and to crop it, click the Stop button. If you do not press it, the application will scroll to the maximum set by the developers. You can also scroll to the desired point manually. For some unknown reason, the "Scroll" feature does not work correctly in the Chrome mobile browser.

On Xiaomi, screenshots are stored in the "DCIM" → "Screenshots" directory in the internal memory and are displayed under "Albums" → "Screenshots" in the gallery.


Quick Memo on LG
On LG smartphones, in addition to standard screenshots, the Quick Memo function is available. First of all, it is intended for creating text and graphic notes. Also, using it, you can save and edit the image from the display: crop it to the desired size, apply your own drawings, delete fragments and add text.
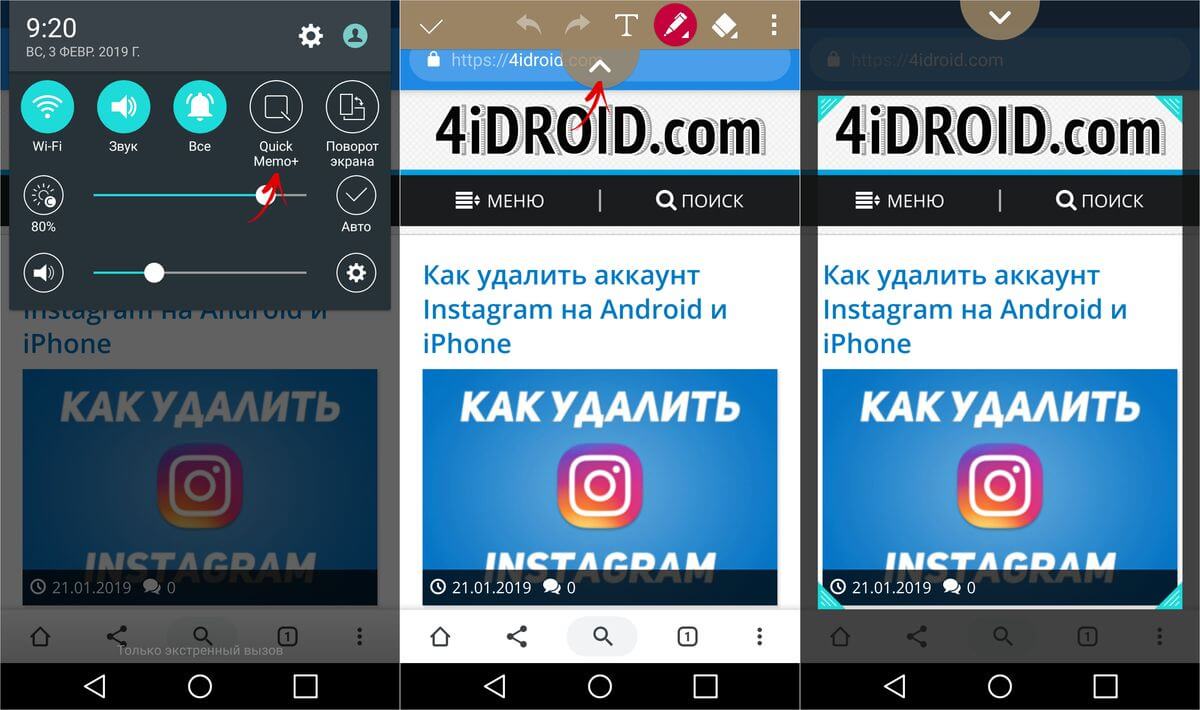
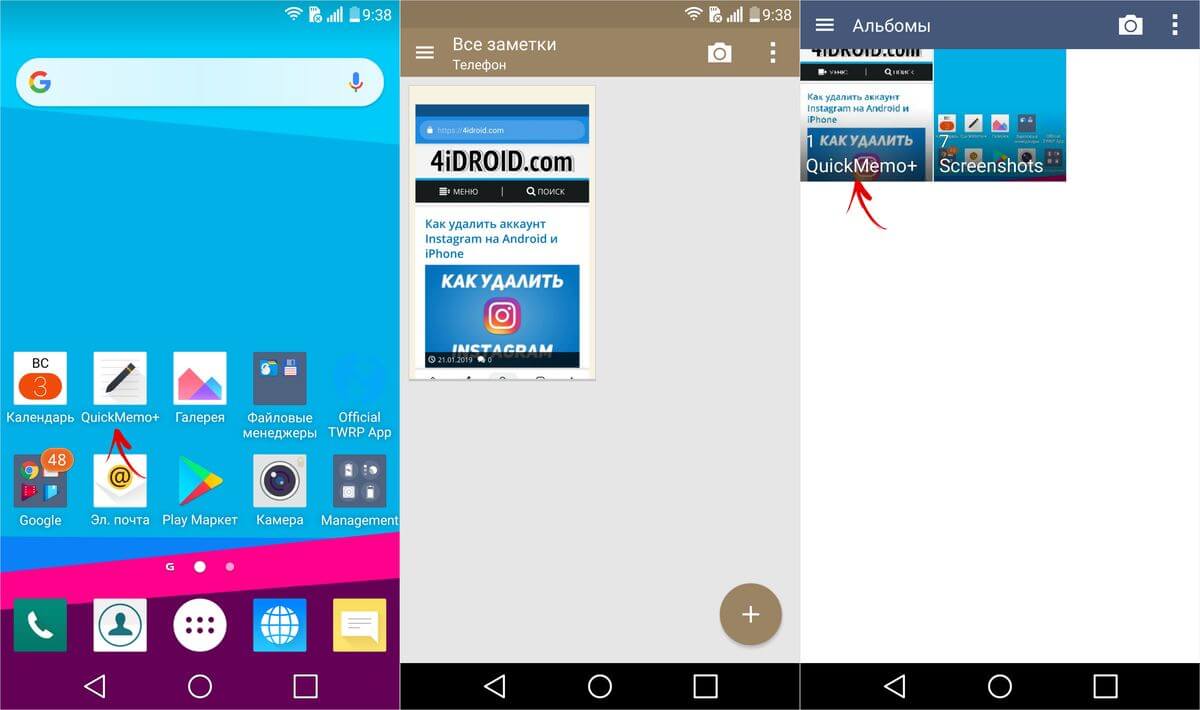
The Quick Memo app is not installed on all LG phones. Check if it is present in the menu and if the corresponding button is located on the quick settings panel (expanded by swiping down from the top edge of the display).

If not, scroll to the last option and select Edit. Check the "QuickMemo+" checkbox and, if necessary, move the item - this will change the location of the button in the notification area.

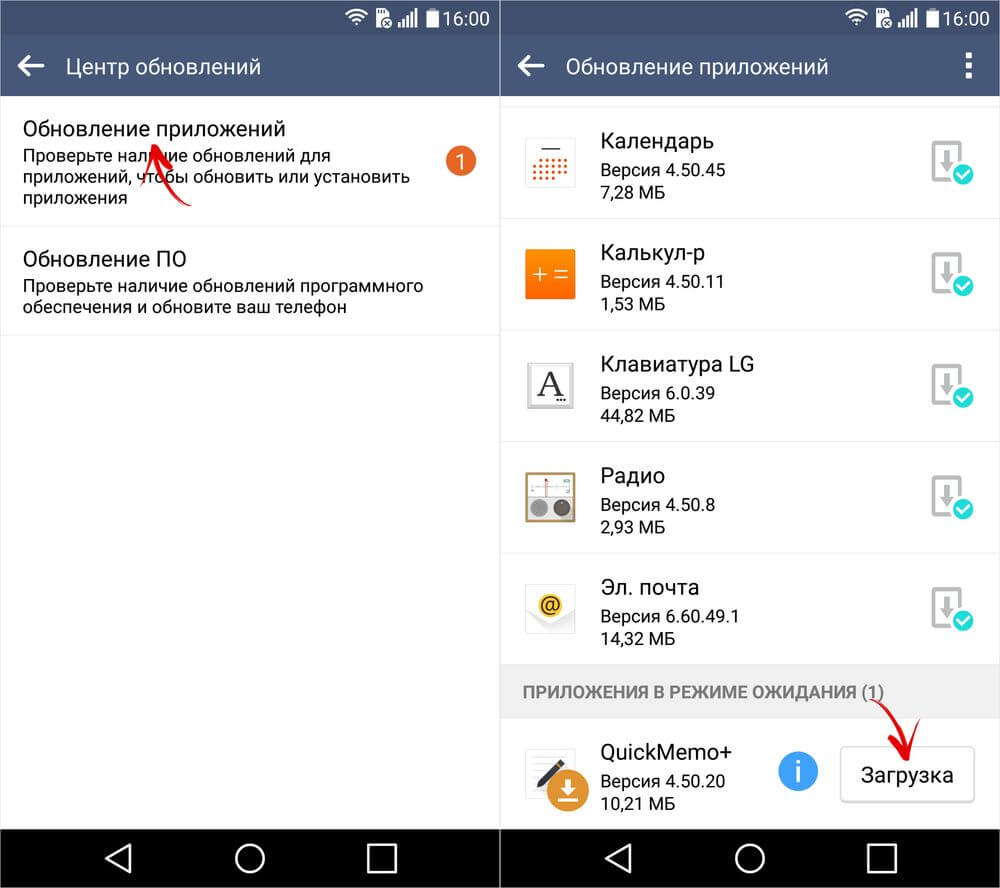
If there is no "QuickMemo+" in the Quick Settings panel editor, go to "Settings", open the "General" tab and select "About phone". Go to "Update Center" and click on "Application Updates". Scroll down to the "Idle apps" section and click on the "Download" button. After the installation of the program is complete, activate Quick Memo in the notification panel editor.

Now, to "screen" the information displayed on the screen, open the "curtain" and click on "QuickMemo +". You will immediately proceed to editing the picture and you can add text or a picture. To crop the image, click on the arrow in the center at the top, after which a window will open where you can set the frame.
To save the picture, click the checkmark in the upper left corner and select QuickMemo+ or Gallery.
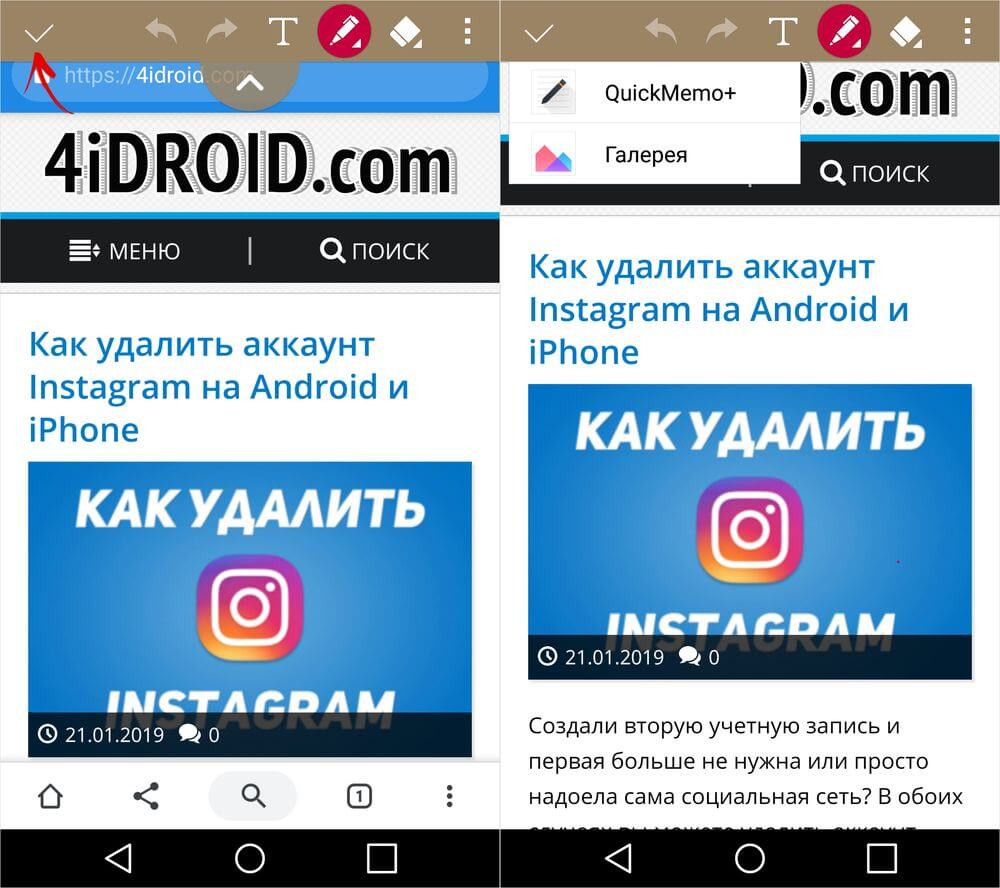
In the first case, a note will be saved, which will be available for viewing and subsequent editing in the QuickMemo+ application, and in the second case, a picture will be displayed in the Gallery in the QuickMemo+ folder.
Long Screenshot
The extended screenshot feature is available on Xiaomi, Huawei and Samsung smartphones running the latest firmware. But what if this option is needed, but the manufacturer of the mobile device has not added it to the system? In this case, use one of the proposed programs.


Screen capture apps
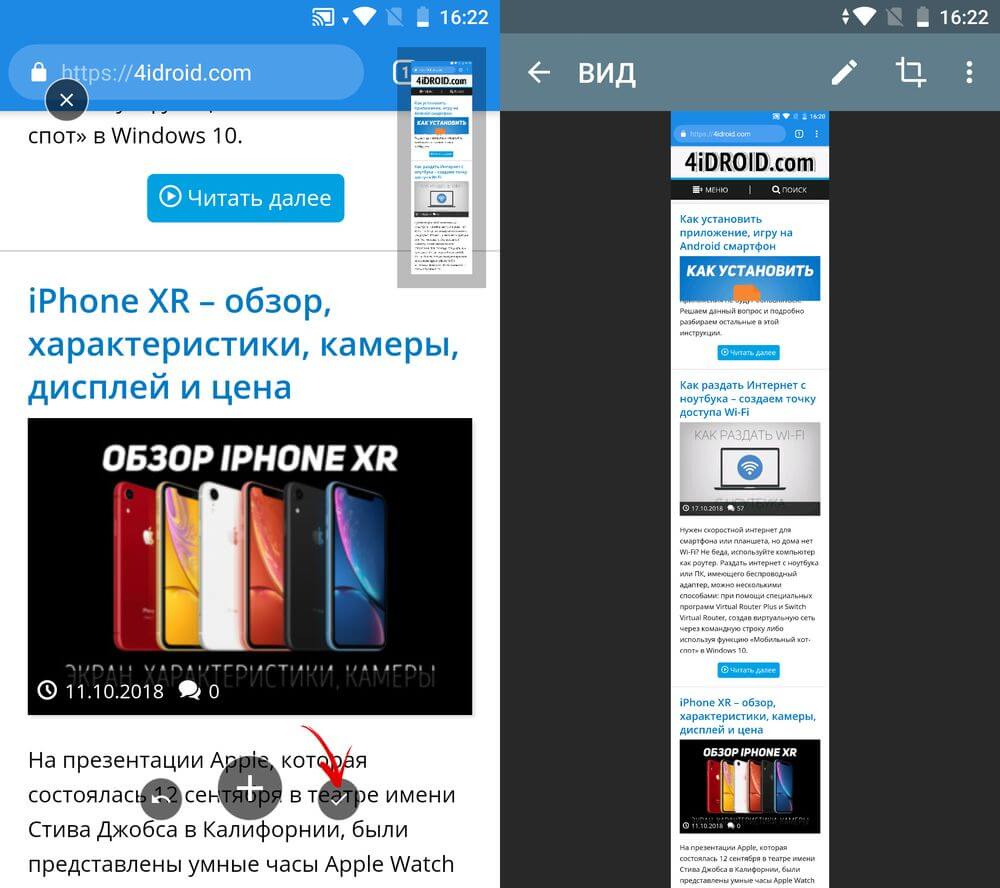
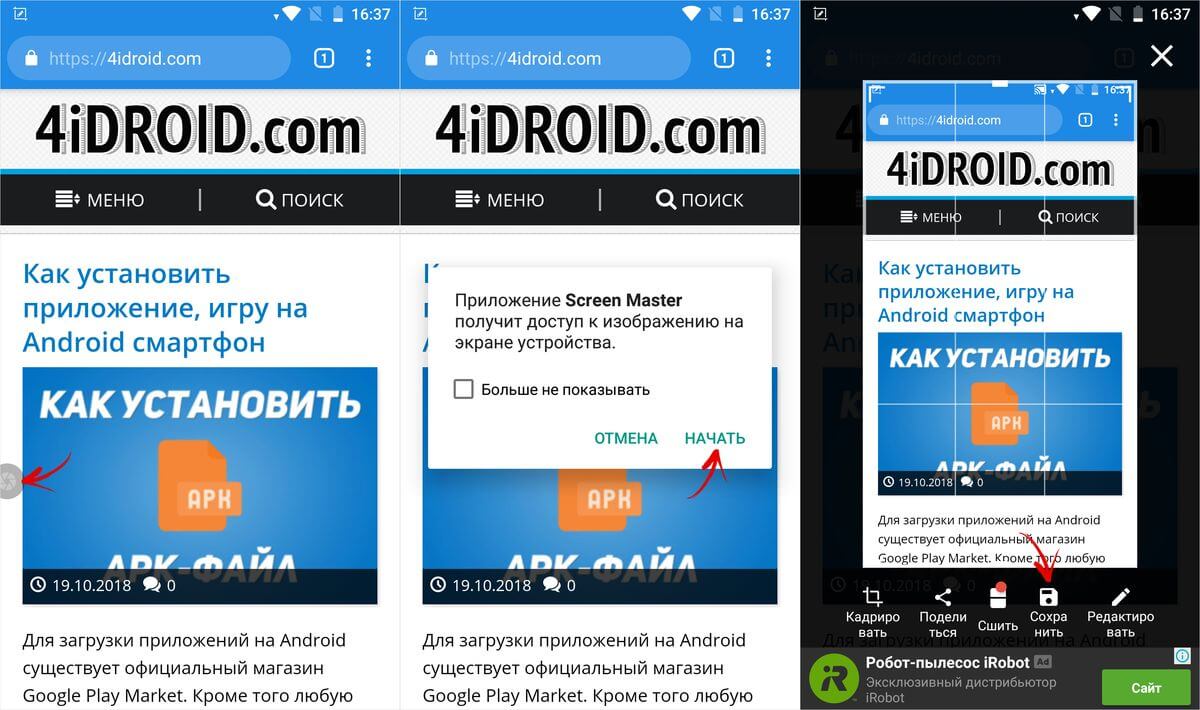
If the hardware volume buttons or the lock key do not work on the smartphone, programs that “can” capture screenshots will come in handy. For example, applications and Mobizen designed for support this feature. Download any of them, run and grant the necessary permissions, after which a “floating” button will appear on the side. Click on it and a list of available actions will open. Select the camera icon and click "Start" in the pop-up window. At the same time, a screenshot will be created.


There are other display capture apps available on Android that work in a similar way. For example, Screen Master displays a button on the screen, when pressed, a screen is executed. You can immediately crop or change the picture: add text, sticker, picture, and also create a long shot. And you will need the Screenshot Assistant program to assign Print Screen to a long press of the home button.

We use a computer
To take screenshots of the display on an Android device connected to a computer via USB, you need the ADB utility. Turn on, and connect your tablet or phone to your PC via USB. Go to the "platform-tools" folder and, while holding down the "Shift" key, right-click on an empty space. Select "Open Command Window" or "Open PowerShell Window Here".

The command to capture a screenshot is adb shell screencap /sdcard/screen.png . You can change the file name and path and exit, for example:
adb shell screencap /sdcard/pictures/screenshots/screen1.png
Paste the command into a running command prompt or Windows PowerShell and press "Enter" to execute. In PowerShell, add ./ before ADB commands. The image will be saved in the specified directory and will be displayed in the gallery.
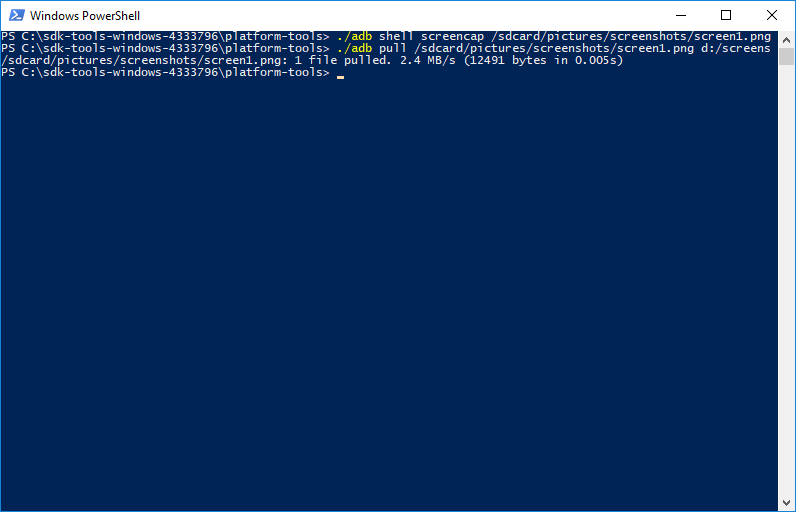
To send a file from a mobile device to a computer, run the adb pull command. For instance:
adb pull /sdcard/pictures/screenshots/screen1.png d:/screens
In this particular case, the "screen1.png" file, which is located in the "pictures/screenshots" directory on the smartphone, will be downloaded to the "screens" folder on the "D:\" drive on the computer. If you do not specify the path to download the file, it will be saved in "platform-tools".