Gone are the days when to install a system you needed a DVD, which in turn could get scratched and freeze during installation. Boot Windows flash drive 10, Windows 7, Windows XP to install the system on your computer will be faster and more convenient. Let's create bootable USB flash drive by using Rufus And . When installing the system, I recommend inserting the drive into the rear USB ports of the computer.
Let's start the procedure for PC with UEFI bios, (you can read the bios types) because They may not be suitable for old computers and laptops; for older PCs we will consider them below. Using Microsoft's own utility. Download Windows 10 Installation Media Creation Tool, run the downloaded program and select “Create installation drive”.
- There should be a checkmark, then it will automatically adapt to your system.
- You can manually select what you need; to do this, you need to uncheck the box in step 1.

- We indicate the medium that will be a USB device.

- You specify (select) the path to the device. We are waiting for the download and recording to finish. That's all!!!

Windows 8.1 installation drive
Download Windows 8 Installation Media Creation Tool similar situation. We do as described above with the tenth version.
Create a bootable USB flash drive for Windows 10 without programs
Let's look at the option without programs (suitable only for UEFI bios). You will need a downloaded distribution in ISO format and a USB drive formatted in FAT32.
- Select the windows image and click on it right click mice.
- In the context menu, click "connect".
- A disk like the one in the picture with Windows files and folders will appear.

- Circle (select) everything and right-click on the file or folder.
- Click "send" in the context menu.
- Select a USB device.

Create a bootable USB flash drive for Windows 10, 7, XP using Ultraiso
The seventh version is old, so we will create an installation windows media 7 using the UltraISO program. With this program you can also burn Windows 10 and XP to a USB flash drive. Download the program and install it.
- Open our downloaded image from Windows system 7, 8, 10, xp.
- Make sure the disk icon is highlighted.
- Select "Burn Hard Disk Image".
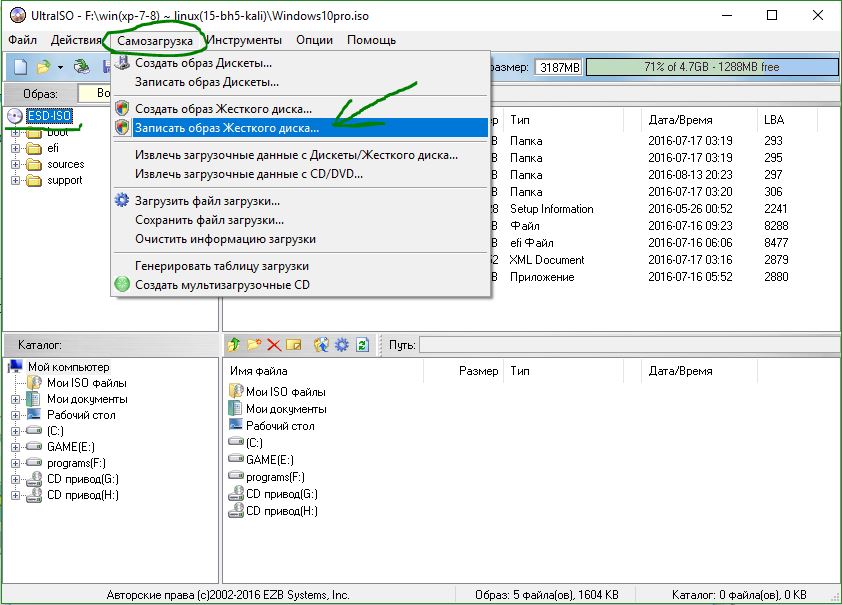
- We look carefully to see that he is standing USB drive so as not to format your hard drive.
- Select the recording method "USB-HDD+". (When booting the computer, select USB-HDD+ in BootMenu).
- Click "record".

Bootable USB flash drive for Windows 7, 10, XP using Rufus
If your old bios is not uefi, then Rufus is created for this. Suitable for all versions of Windows. Select in the "Partition scheme and type" column system interface": For old BIOS, select MBR. For modern UEFI. Download and install the rufus program.
Bootable Windows 7 USB flash drive using USB/DVD Download Tool
A utility from Microsoft created in ancient times is very relevant to this day to create Windows 7 installation media with using Windows USB/DVD Download Tool. Download and install on your computer.
- Select USB drive.

- Click "Erase".

- We press “Yes”, it formats the drive, writes it, and everything is ready.

Rufus works without installation; you can carry it with you on a flash drive. The program language will match the language of your OS. Let's launch the program. In the main program window, in the very first column Device, select the letter of our flash drive.
If you are going to create a bootable Windows 7 USB flash drive and install operating system on a computer or laptop with a regular BIOS, then select the first MBR item for computers with BIOS or UEFI (in most cases).
If you want to install Windows 7 on a computer with a UEFI BIOS and you want to convert your hard drive to the GPT partition table format standard, then check the second item MBR for computers with a UEFI interface or the third item GPT for computers with a UEFI interface.
I think that after creating a bootable USB flash drive, you will need to configure the UEFI BIOS itself accordingly.
I recommend choosing file system NTFS, but this is if you are creating a simple bootable USB flash drive, I don’t mean UEFI. For UEFI, you must select the FAT32 file system. Leave the cluster size as default.
Now all that remains is to select the ISO image of Windows 7. Click on the DVD icon.

and indicate the ISO image of Windows 7 in the explorer window that opens. Open.

We press start.

About 5 minutes and the bootable flash drive is ready!

Next, all we have to do is boot your computer or laptop from the Windows 7 bootable USB flash drive we created. To do this, you need to go into the BIOS (key F2 or Del sometimes F12) depending on the model of your laptop and in Boot Option select first boot USB device HDD.
Save the BIOS settings. And we restart the machine, wait for Setup to launch from the flash drive.
How to make a bootable UEFI USB flash drive in Rufus?
To install you will need:
Rufus program, preferably the latest version.
USB (2.0 or 3.0) flash drive with a capacity of at least 4 GB.
64-bit Windows 7 distribution (32-bit versions of Microsoft OS will not boot on a UEFI system) in the form ISO file image. You can download it from the same rutracker.org.
As mentioned above, the program does not require installation: it will launch with an interface in the operating system language and its main window looks like the picture below.

All fields to fill out do not require any special explanation; you must indicate:
The device is a future bootable flash drive.
Partition scheme and system interface type - in our case GPT with UEFI
File system (FAT32 by default) and other formatting options
In the “Create” field boot disk» Click on the disk icon and specify the path to the ISO image. The “Create extended device label and icon” checkbox adds the device icon and other information to the autorun.inf file on the flash drive.

After all the parameters are specified, click the “Start” button and wait until the program prepares the file system and copies the files to a flash drive with a GPT partition scheme for UEFI. I can say that this actually happens quite quickly compared to what I observed when using other programs: it feels like the speed is approximately equal to the speed of transferring files via USB.
So that the UEFI system can boot from USB flash drives, it is necessary that the latter be formatted in the FAT32 file system. The official Microsoft utility for creating bootable flash drives, Windows 7 USB/DVD download tool, formats the drive as a file NTFS system, accordingly, a system with UEFI in native mode will not boot from such media.
Unlike systems with BIOS, which allow you to boot from boot partitions with FAT, FAT32, exFAT or NTFS, UEFI only allows you to boot from the boot loader located on the boot disk formatted in the FAT32 file system.
Big number modern models laptops are produced without an optical drive. In such conditions, a bootable Windows 7 flash drive becomes the main method and most used tool for installing the operating system.
To create a bootable Windows USB flash drive, you must have:
- ISO image of the operating system;
- Removable media with a capacity of 4 GB;
- A motherboard that supports booting from a flash drive.
Important Note: The drive should be connected via USB interface 2.0. Windows 7 does not support USB 3.0 (it is usually colored blue inside) during installation, and therefore, when trying to boot through this interface, the user will see an error message.
Programs for preparing a bootable Windows 7 flash drive can be distributed either free of charge or for a significant amount. Using free software in in this case absolutely justified - the utility will cope with its functions perfectly, and you will solve all your problems without spending anything but time.
Let's take a closer look at how to make a bootable Windows 7 flash drive using utilities specially designed for this.
Important Note: Some programs require the user to have administrator rights to perform tasks. To get them, just right-click on the utility shortcut and select “Run as administrator”
UltraISO program
The program has a Russian interface, which is very important - you will not just press buttons sequentially, relying on your knowledge of English, but you can thoroughly understand which process is launched after the next action with the utility.
Any user can create a bootable Windows 7 USB flash drive using the ultraiso program. You just need to follow the simple step-by-step instructions:
Run the program as administrator. Load the operating system image into the window that appears. It can be recorded in ISO, MDF or NRG format. Using the Open button or a similar item in the File menu, add it to work area applications.
The next step in creating a bootable Windows 7 flash drive is writing the image to disk. This is done by clicking on the corresponding item in the “Boot” menu.
The recording window will appear. Check that the Disk Drive line contains the name of your flash drive and its letter. The recording method should look like USB-HDD+. If all parameters are specified correctly, click the “Record” button.
A warning will appear on the screen stating that all data on the removable media will be destroyed. Continue the process of writing a bootable Windows 7 USB flash drive by confirming your intention by clicking Yes.
UNetBootin program
The main window of the program looks quite ascetic. Here you need to select Disk Image, the letter that is assigned to the removable media. The ISO image address is specified manually. After adding the image, files are extracted and copied to the flash drive.
Other programs for preparing a bootable Windows 7 flash drive work similarly, such as USB/DVD Download Tool, Rufus, the operation of which will be described below, etc.
Creating a bootable USB flash drive for Windows 7 is not enough - the image recorded on it still needs to be opened somehow. If the system continues to work, then this should not cause any problems. However, if nothing else starts, you will have to go into the BIOS settings.
Important note: Depending on the year of manufacture, BIOS versions vary. They also differ in appearance, but the names of the menu items remain virtually unchanged.
Having opened the BIOS by pressing the Del, F2 or other key specified in the start boot window, you need to go to the Advanced BIOS Features tab. Here the devices are placed in the order they were launched. Simply put, first the system, for example, loads a CDROM, then HDD, then USB-HDD.
Since we made a bootable Windows 7 flash drive, and now we want to launch it, we should put booting the USB-HDD first. To do this, press the Enter key on the first line to open a menu in which all connected devices are presented. Then select USB-HDD from the list provided. In second place, put the download from hard drive(HDD), let CDROM remain in third position.
Possible problems with loading media through BIOS:
- The motherboard simply doesn't support booting from external storage(if it was developed before 2003, this is a very real reason);
- Incorrect bootable windows 7 usb flash drive. Perhaps mistakes were made during its creation. To rule out this option, test the media on another computer where motherboard accurately supports reading removable disks;
- The USB controller is disabled in the BIOS.
If you are installing the system on a computer, it is recommended to immediately connect the drive through the port located directly on the motherboard, bypassing the connectors located on the front panel of the system unit.
If the UEFI interface is installed
UEFI is replacing the traditional BIOS - new interface, which copes better with modern hardware. Essentially, UEFI performs the same functions as BIOS, providing a pre-boot environment for the OS.
However, creating a bootable Windows 7 uefi USB flash drive is somewhat different from the usual procedure for preparing installation removable media.
There are two ways:
- Usage software;
- Manual drive setup.
Let's consider each option in detail.
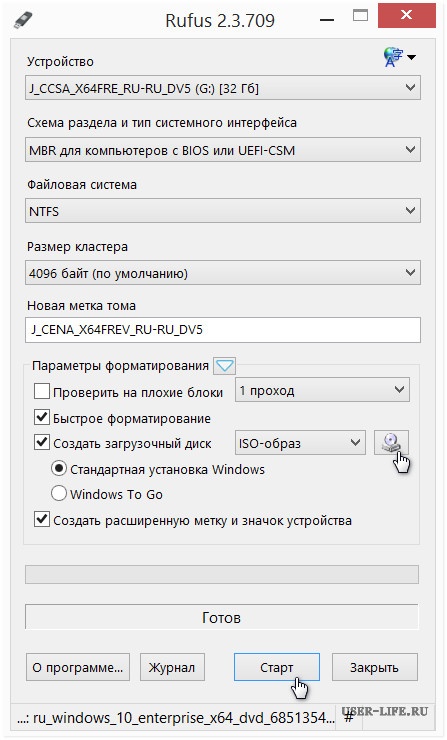
Rufus program
Why this particular utility? It has several advantages, including being free, portable, high speed, user-friendly interface and Russian language support.
Note: the algorithm described above is also suitable for creating installation media with Windows 8.
The main program window looks like this:
As you can see, there is nothing complicated here. All fields are very clear and are usually filled in automatically. But so that the question of how to make a bootable Windows 7 flash drive using this program is studied thoroughly, let’s briefly go through the points presented in the main window:
- The device is your flash drive on which you plan to write the operating system image;
- Partition scheme - leave GPT with UEFI by default;
- The file system and cluster size are also set automatically. They should not be changed;
- The Create bootable disk field allows you to select the path to the ISO image.
After specifying and checking all the parameters, all that remains is to click Start, starting the process of copying files. The recording speed is approximately comparable to the speed of conventional copying of information to removable media.
Considering that the program creates a bootable USB flash drive, a higher figure is simply impossible.
Manual setting
If you don’t want to download Rufus or for some reason creating a bootable Windows 7 flash drive does not happen or ends with an error, internal Windows tools will come to the rescue.
Important note: the steps described are for 64-bit Windows versions 7, 8 and 8.1. Users with 32-bit version are recommended to use software method entries listed above.
Run Command Prompt as Administrator. You can do this using context menu called by right-clicking on a shortcut command line V standard programs Windows.
Enter the following lines in the window that appears:
- diskpart;
- list disk.
A list of connected drives will appear. Find your flash drive (you can do this by its size). Look at what number it was identified under - you will need it for further work with the media. For example, let's take number 6 (it may be different for you).
So, the order is as follows:
- Select disk 6 – select a specific disk with which all further manipulations will be performed;
- Clean – the media is cleared of data written to it;
- Create partition primary – a partition is created;
- Format fs=fat32 quick – the created partition is formatted into the FAT32 file system;
- Active – the section is marked as active;
- Assign – assigns a name or connection point;
- List volume – check the correctness of your actions. Pay attention to the letter that is assigned to your carrier. Remember it;
- Exit – exit from Diskpart.
For clarity, look at the picture - there is nothing complicated here.
After preliminary preparation All that remains is to copy the contents of the image to the media.
Since we are making a bootable USB flash drive for Windows 7, we will have to use additional software to open the image (in the eighth version of Windows, you can mount the image directly in the system). It's good if Daemon Tools is installed on your computer. With its help, you can mount the image into a virtual drive, go into it and copy all the contents to a flash drive.
If you don't have Daemon Tools, you can use functionality WinRAR or 7Zip archivers. To do this, you need to open the ISO image through these programs, and then unpack it directly to removable drive.
Conclusion
The process of burning an operating system image to a removable disk is not as complicated as it sometimes seems to novice users. The simplest option is to use Russified software, which automatically performs all preparatory activities. As a result, the ISO image of the bootable Windows 7 flash drive can only be written directly to an external drive.
Most users have problems already at the installation stage, when they have to configure the BIOS or solve some other issues with launching the installation removable media. However, if all of the above steps are performed consistently and correctly, then installing Windows 7 from a flash drive should be successful.
Today, more and more laptop and PC manufacturers refuse to integrate optical drive. This can be explained by the fact that CD and DVD media have lost their relevance. They have been replaced by smaller media such as memory cards and USB flash drives. In addition, it is simply impossible to integrate a drive into a thin ultrabook case. This trend has led to some inconveniences, for example, when installing an operating system. Creating a bootable Windows 7 USB flash drive becomes simply necessary.
How to create a bootable USB flash drive
What is necessary:
- Flash drive
- UltraISO program
- DVD image with Operating System
The storage capacity must be at least 4 gigabytes. This is how much a standard one weighs copy of Windows 7. Larger storage capacity can be used.
If you have everything you need, we proceed to the actual creation.
First, insert the flash drive into any free USB port. Make sure there is nothing on it that you need, as all information will be erased from it.
If you are recording an image from a laptop, check the battery charge and, if necessary, connect to a charger.
If the computer turns off during recording, there is a high probability that the flash drive will turn into a useless piece of plastic.
Step-by-step instruction:
1. Launch the UltraISO program. This must be done as a computer administrator, otherwise the program will not be able to start the recording process. Click the right button. mouse on the program shortcut and select “run as administrator”.
2. After the program starts, open your ISO image file in it. In the left top corner program, click on the file->open button or press the CTRL+O button combination.

3. Select the file with Windows image 7 and click "open".

4. The selected disk image will open in the program and you will be able to see all the files that it consists of.

5. Then, go to top menu programs to the “Boot” item. In the drop-down list of actions, click “Burn Hard Disk Image”.

6. Another window will pop up where you will need to select recording options. First you need to specify which device the image will be written to. Opposite the “Disc Drive” option in the drop-down menu, select the flash drive that you prepared.

7. Opposite the “Recording method” parameter, select the “USB-HDD+” mode. Next to “Hide boot partition” put “no”. After this, you can safely press the “Record” button. The remaining parameters do not need to be touched.

8. After this, the process of writing the selected image to removable media will begin. This usually takes 10 to 15 minutes.
You can check the status of the process by looking at the event log at the top of the window and at the progress bar. Above it will be indicated the percentage of the recording completed, as well as how much time has passed and remains.
Do not close the program or turn off the computer during this time. If this happens, you risk ruining the flash drive.

9. Once the recording is complete, you will see a message in the event log stating that everything is ready and the recording was successful.

From a USB drive, installing Windows 7 is faster than from a regular disk. This is because USB 2.0 speeds are much faster than an optical drive.
10. The creation of a bootable USB flash drive has come to an end. All that remains is to check its functionality.
To do this, insert it into the USB port of the computer or laptop on which the installation will take place. Turn it on and go to BIOS. To do this, hold down the DEL or F2 key. After the transition, check your download priorities. Your flash drive should be in boot priority (First Boot Device). Save the settings by pressing the F10 key and restart the computer. If the installation process starts, it means you did everything correctly.
When purchasing licensed software, the buyer receives it on a DVD. Therefore, to install it on a PC that does not have an optical drive, you need to create a bootable flash drive. Our step-by-step instruction will help you with this.
A bootable Windows USB flash drive is very easy to make. This article will describe three simple, quick ways to create a bootable USB flash drive from a ready-made ISO image. All methods are free and popular, although among them there are simpler and more complex options, using different software. Also, all utilities work fully in Windows XP.
If you have a new laptop or computer with BIOS UEFI, and whose hard drive is used GPT style placement of tables, then on such a computer you can also install Windows 7 using a different algorithm. Also, if the device, computer, laptop, netbook, etc. has a USB 2.0 port and USB 3, and you decide to install from a bootable USB flash drive to such Windows device 7, then undoubtedly you should connect the flash drive to USB 2.0 port because Windows 7 itself does not support the USB 3 port type, which are usually marked in blue.

If the bootable USB flash drive is connected via USB port 3, then try Windows installations 7 will end with the following error:
"Not detected required driver floppy drive optical disks. If you have a flash drive, floppy disk, DVD or CD with such a driver, please insert this media."
Creating a bootable USB flash drive
Now the first thing you definitely need is an ISO image of the operating system. Secondly, this is the need to take care of the flash drive itself. Since this media will be formatted, the data from the flash drive must be moved to a safe, secure place. It is also important to note that the size of the flash drive must be strictly at least 4 gigabytes.It is imperative to check and make sure that the specific motherboard definitely supports loading such a plan (from a flash device).
- Creating a bootable USB flash drive using means (recommended last, since it is not a very effective method);
- Created by ;
- Utility;
Creating a bootable USB flash drive using UNetBootin
You need to download the program and run it (the program is portable and works without installation).
You need to check the box called ISO image, and then select the letter of the USB drive.

The location of a specific image must be specified manually.

Next, click open.

Now just click OK.

There is a short process of copying system files to the flash drive.

After a short extraction of the necessary files, our bootable USB flash drive is completely ready.

Creating a bootable USB flash drive using UltraISO
A slightly complicated solution, unlike the one described above, is to use the program Ultra ISO. However, you can quickly understand the program by following the instructions. The functionality of the program is written in understandable Russian, and the trial period under the license is completely functional and suitable for our purposes.
Next, you need to select the Russian language and download the program, which is very simple. Run as administrator, then select a trial period of use.

In front of us is a regular program window.

The next step is to find our ISO image on your hard drive, which contains the operating system. It is worth recalling that such an image can be created by any other program, and then specified here. In the main UltraISO window, you need to right-click on the file, and in the menu that opens, select the open option.

Next, we indicate our image with the system, in our case it is a Windows 8.1 image, which is located in the installation folder. Find the image in your place and click open.

You can also now place a flash drive in the slot of a netbook or laptop. You need to select the Bootstrap menu in the main window of our program and click on record hard disk image. The inserted flash drive should be present in this window.

Next, click record.

A prompt will appear indicating that your flash drive will be erased, we agree.

Next, we wait for the recording process to finish.

Now you can carry our operating system in your pocket.