Disk Mirroring in Windows 8 and Windows 7
Hard drives are the main storage devices for information on a computer. But, unfortunately, they do not last forever. And it’s very annoying one day to realize that “what you’ve accumulated through back-breaking labor” suddenly disappears due to disk failure. In some cases, data can be recovered. But usually only partially. And that's not always the case.
How to protect yourself from data loss on hard drives X? There are several options to solve this problem.
The simplest one is to periodically dump important data onto external media: DVD/Blu-ray discs, flash drives, external hard disks. The option is generally quite reliable, but not entirely convenient: you need to remember and find time for Reserve copy data, in addition, the data from the last copy to the disk failure will still be lost.
In order not to bother with external media, you can install another HDD in your computer and periodically copy data to it. It would be even better if this was done automatically.
This kind of automation has been in use for a long time and is expressed in so-called RAID arrays. These are arrays hard drives, united in a special way. There are several types of RAIDs, the most popular of which are “RAID-0” - 2 disks are connected in series for faster reading and writing of data, and “RAID-1” - 2 disks are connected in parallel for simultaneous writing of data to both HDDs at once. If one of the disks fails, there is another disk with a mirror copy of the data, and the likelihood of two disks failing at the same time is very small. RAID-1 is usually called a “mirror”, and the parallel connection of several disks is called “mirroring”.
To implement a disk array, a RAID controller must be installed in the computer. It can be built into the motherboard or installed separately.
My personal experience working with RAID controllers built into the motherboard is quite deplorable. As a rule, manufacturers, in order to reduce the price of the product, use inexpensive controllers, the reliability of which leaves much to be desired. Individual controllers good quality cost at least a hundred dollars.
In this regard, recently the so-called " software RAIDs", i.e. parallel recording of data on 2 disks is performed not at the hardware level, but at the software level. Special program monitors all data writes to a specific disk and writes the same data to another disk.
In operating rooms Windows systems 7 and Windows 8, the developers built software RAID into the OS itself, i.e. You can implement data mirroring using Windows.
I would like to make a reservation right away that this functionality is not suitable for those who like to install several operating systems on one computer. In the end, only the OS that was used for mirroring will remain working. And if you perform the steps incorrectly, then there will not be a single working OS left. Later in the article I will pay attention to these points and tell you how to avoid such mistakes.
If your computer only has one operating system, you can safely use everything described below; your Windows is in no danger.
So, in order to see all the pitfalls of data mirroring using OS tools, I use a computer with 2 operating systems installed - Windows 7 and Windows 8. Windows 7 was installed first, and then on the other logical drive, Windows 8. We will perform the mirroring itself in Windows 8.
What is needed for this? The computer must have 2 physical hard drives. It cannot be otherwise - copying disk data onto the disk itself makes no sense, since when the disk is erased, we will lose both the data and their copy at the same time. The advantage of software RAID is that, unlike hardware RAID, it can be configured for individual logical drives, and not just for the entire physical drive as a whole.
To create a mirror, you must enter Disk Management. To do this, go to the Control Panel and select “Administration”.

Administration section in Control Panel
In Administration we find “Computer Management”.

Administration Tools
In the Computer Management window on the left, select "Disk Management".

Disk management
From the figure you can see that the computer has 2 physical disks - “Disk 0” and “Disk 1”. We will create a mirror for logical drive F (New Volume), located on Disk 0. The volume of this partition is 10GB. We have second HDD(Disk 1), 12GB, which we use as a mirror. The second disk must have unallocated free place, the volume of which is not less than the volume of the mirrored disk. We have 12GB of unallocated space on Disk 1, i.e. there are no logical drives in this space.
Click right click mouse on the desired section and in context menu select "Add mirror".

Adding a mirror
The system will prompt you to select a disk that will be used as a mirror.

Selecting a disk to create a mirror
Choose required disk from the list and click "Add mirrored volume". Here's an interesting warning:

OS warning about the impossibility of running other versions of Windows
We are warned that the disks will be converted to dynamic ones and if several operating systems are installed on the computer, then after performing this operation only the currently running OS will remain working. Let's check this later. Click "Yes".
The process of creating a mirror will begin - if there is any data on the F drive, it will be copied to the mirror disk.

Synchronizing disks when creating a mirror
After completing all the processes, we get this picture.

Result of creating a disk mirror
As you can see, the system took space from the second disk, the volume of which is equal to the volume of the mirrored disk. The rest of the space on the second disk remains unallocated and can be used at your discretion, for example, to create another logical disk there.
Let's check if we can now boot the second OS installed on the computer. Let me remind you that in my case, Windows 7 and Windows 8 are installed, we performed all the steps under Windows 8. Let's try to load Windows 7.
We reboot the computer and get a list of OS selections.

Selecting the boot OS
We select Windows 7, the boot process begins and... we get this.

Windows 7 boot error
Now about the pitfalls that I mentioned at the beginning of the article. It’s not for nothing that I said there that Windows 8 was installed after Windows 7. What does this affect? The fact is that a computer can only have one OS boot loader. And the bootloader is always the bootloader of the last installed operating system - it overwrites the previous bootloader found on the disk. But at the same time, during the installation process, Windows, having found previously installed operating systems on the computer, configures its boot loader in such a way that it provides the user with a list of installed operating systems at startup. From this list we select which OS we want to run now. In my case it starts Windows boot loader 8, which was installed last, and offers a list of operating systems found. Now let's imagine that I would set up mirroring not in Windows 8, but in Windows 7. In this Windows case 8 would become inoperable. And along with it, its bootloader would cease to function and I would lose the opportunity to launch any OS on my computer at all - this has been verified by experience. The only solution to this problem is to reinstall Windows.
Thus, if your computer has several operating systems installed, you can configure mirroring only in the last installed OS, while all other operating systems will automatically become inoperable and it will be impossible to bring them back to life- we'll see this later .
I repeat once again, if you only have one operating system, everything we are talking about will not cause the slightest harm to it or the computer as a whole.
So, the mirror is configured, now all data written to the disk will be automatically written to another disk. How to check that it works?
Let's open a list of computer disks through Explorer.

Computer disks after setting up a mirror
In Explorer we see the “New Volume F” disk; its mirror is not here and should not be, since everything happens at a level invisible to the user. Let's try to write some data on disk F. I'll just create a folder and a text file in it.

Folder and file on disk
If everything works correctly, the same folder and file should have been created on another disk - a mirror. To clarify this, let’s “disassemble” the mirror.
Again, go to disk management, right-click on any of the 2 mirror disks and select “Split mirrored volume.”

Splitting a mirrored volume
Windows will warn us that after this action, data storage reliability will no longer be at this level. high level. We agree.

Windows warning when splitting a mirrored volume
As a result, we will get two separate logical drives. The system immediately assigned the letter G to the new disk (former mirror).

Mirror split result
Now in Explorer, in addition to the F drive, we will also see the created G drive.

Computer disks after splitting the mirror
And on both previously mirrored disks we will see the folder we created, and inside it a file.

Result of data mirroring
We made sure that the mirror works and, if necessary, we can “disassemble” it without any data loss.
Will we be able to boot a second OS after splitting the mirror? We try and as a result we get this again.

Error loading second computer OS
Thus, by setting up mirroring, you will forever lose the ability to run other installed Windows operating systems on your computer.
The downside of disk mirroring is the loss of space - we use two disks as one. But information costs more than disks. If you still need additional storage spaces, the mirror can be divided, as shown above - in this case we will get 2 disks with the same data, or simply remove one of the disks from the mirror - then we will get one disk with data and a second disk with unallocated area.
To remove a disk from a mirror, just right-click on one of the mirrored disks in the disk management window and select "Remove mirror".

Removing a disk from a mirror

Selecting a disk to remove from the mirror
Click “Delete mirror” and we get this picture.

Disks after removing the mirror
The disk from which the mirror was removed returned to the initial state- it is no longer dynamic, but again basic, but Disk 0 remains dynamic, which means we still won’t launch the second OS from it.
And one more subtlety is that if we remove the mirror from Disk 0, it will not become basic, but will remain dynamic.

The system disk remains dynamic after removing the mirror
Thus, by creating a mirror, we deprive ourselves of any chance of using a second OS on the computer.
But it’s not so often that at home you have to install several operating systems on one computer, but almost everyone needs data backup. Therefore, this opportunity is very useful and I advise you to use it. All that is needed for this is installed on Windows computer 7 or Windows 8, as well as availability extra hard disk of the required size.
Hello. Today I got my hands on two brand new hard drives, and I thought for a long time what I could do with them to help my readers. After thinking about it, I finally decided that it was better than a story about RAID 1, created by myself operating system, I can hardly write anything. So what is RAID 1?
RAID 1 is an array of two disk media, the information on which is duplicated on both disks. That is, you have two disks that are complete copies of each other. Why is this being done? First of all, to improve the reliability of information storage. Since the probability of failure of both disks at the same time is small, if one disk fails, you will always have a copy of all the information on the second. On a RAID 1 array you can store any information just like on a regular hard drive, which allows you not to worry about an important project that you have been working on for a very long time.
Today we will look at how to create RAID array using Windows itself when using two empty disks (I confidently declare that this instruction works on Windows 7, 8 and 8.1). If you are interested in creating a RAID array using an already full disk, then you need to read about this topic.
And, in fact, instructions for your reference:
1) First, install the hard drives in system unit and start your computer.
2) Open “Control Panel → System and Security → Administrative Tools → Computer Management → Storage Devices → Disk Management.” When you turn it on for the first time, the utility will inform you about the installation of new disk devices and prompt you to select a partition for them. If you have a disk of 2.2 TB or more, choose GPT, if less, then MBR.
3) At the bottom of the window, find one of our new hard drives and right-click on it. Select “Create mirror volume”:
4) The image creation wizard will open. Click next. 
5) On this page you need to add a disk that will duplicate the previously selected disk. Therefore, select the disk on the left side and click the “Add” button: 

Click next.
6) Select the letter with which the new volume will be designated. I chose M (for Mirror). Click next. 
7) Set file system, cluster size and volume name. I also recommend checking the box next to “Quick formatting”, let it do everything at once. And again further. 
8) Check what we got, if everything is correct, click “Done”. 
Setting up a software RAID array in Windows environment a much simpler task than Linux systems, however, it also has its own characteristics. Often, incomplete and fragmentary knowledge in this area leads to difficulties, and among administrators there are myths and legends about the “capriciousness” and “bugs” of this mechanism in Windows. In this article we will try to fill this gap.
Before continuing, let us again recall the basic principle of constructing hardware arrays: one array element - one physical disk. The basis of software arrays is a logical disk. Understanding this difference is the key to success; what is applicable to a hardware array can be catastrophic for a software array, especially if we are talking about the failure of one of the array elements.
To create software RAID in a Windows environment, we will need to become familiar with the concept of dynamic disk, since software arrays can only be created on them. Dynamic disks have a mixed reputation; many administrators shy away from them like hell. But in vain, having remembered a few simple rules Working with dynamic disks becomes as simple as working with regular ones.
The main rule: installation or Windows boot from a dynamic volume is only possible if this disk was converted from a system or boot volume. Those. if you have several instances of the OS, then after converting the disk to dynamic, you will be able to boot only the instance that is on the boot partition.
Based on this rule, it becomes obvious that for the boot and system volumes it is possible to create only a mirrored array (RAID1); creating other types of array is impossible, since they imply installing the system on a previously created partition.
Is the game worth the candle? Despite all the restrictions, it's worth it. The main disadvantage of hardware arrays is their binding to specific model controller. If your motherboard or controller is fried, you will need exactly the same one (or a motherboard with a similar controller), otherwise you can say goodbye to your data. In the case of software RAID, a machine with installed Windows Server.
In practice, work with software arrays and dynamic disks is done through the snap-in Storage - Disk Management V Server Manager. To convert disks to dynamic, just right-click on one of them and select Convert to dynamic disk, in the window that opens, you can select several disks to convert at once.
It is worth remembering that this operation is irreversible and special attention should be paid to the system partition; you will no longer be able to repartition the boot disk (more precisely, it will no longer be bootable after that), the only thing you can do is expand the volume using unallocated space.
The next step is to create an array, right-click on the desired volume and select the desired option, in the case of system and boot volumes there will be only one option - a mirror, then you will be asked to select a disk to host the mirror volume. Upon completion of the array creation, its resynchronization will immediately begin.
By connecting additional disks, we will get much wider possibilities; you can either combine several disks into a separate volume or create RAID 0, 1 or 5.
In general, nothing complicated, but many restrictions can scare away anyone. But don’t rush to make hasty conclusions; based on common sense, there are no serious obstacles, since it is usually customary to distribute the system and data across different disks, given the cheap cost modern drives, this does not entail significant costs. For example, for our test server created a mirror for system disk and RAID5 for data.
Moreover, all this pleasure can be realized on the most ordinary budget motherboard, considering that the performance of the software array is no different from cheap hardware ones, this technology looks very attractive. We will talk about methods for ensuring fault tolerance and actions in case of disk failure in our next article.
How to create a software RAID 1 array (mirror) using Windows 10, 8.1, 8, 7, Vista.
What is RAID 1?
RAID 1 is an array of two disk media, the information on which is duplicated on both disks. That is, you have two disks that are complete copies of each other. Why is this being done? First of all, to improve the reliability of information storage. Since the probability of failure of both disks at the same time is small, if one disk fails, you will always have a copy of all the information on the second.
On a RAID 1 array you can store any information just like on a regular hard drive, which allows you not to worry about an important project that you have been working on for a very long time.
Today we will look at how to create a RAID array using Windows itself using two empty disks (I confidently declare that this instruction works on Windows 7, 8 and 8.1).
Instructions:
1) First, install the hard drives in the system unit and start the computer.
2) Open “Control Panel → System and Security → Administrative Tools → Computer Management → Storage Devices → Disk Management.” When you turn it on for the first time, the utility will inform you about the installation of new disk devices and prompt you to select a partition for them. If you have a disk of 2.2 TB or more, choose GPT, if less, then MBR.
3) At the bottom of the window, find one of our new hard drives and right-click on it. Select “Create mirror volume”:
4) The image creation wizard will open. Click next.

5) On this page you need to add a disk that will duplicate the previously selected disk. Therefore, select the disk on the left side and click the “Add” button: Click next.

6) Select the letter with which the new volume will be designated. I chose M (for Mirror). Click next.

7) Set the file system, cluster size and volume name. I also recommend checking the box next to “Quick formatting”, let it do everything at once. And again further.

8) Check what we got, if everything is correct, click “Done”.

9) The system will warn that it will convert the disks to dynamic ones, and we will not be able to create a boot volume on them. There is nowhere to retreat, click “Yes”. :)
I have 2 disks of the same size, one has a win7 system, now it’s done as in the screenshot, but what confuses me is the fact that the 100MB area is not mirrored.
How to mirror system partition so that if you physically remove 1 disk (when it fails) win7 can boot just as easily?
Something terrible happened, after I completed the work normally (but apparently the disks did not finish resynchronizing), the computer did not want to boot and hangs on “Verifying DMI pool data”.
I tried to disconnect 1 disk alternately, in one case it also writes.
I tried explicitly selecting the boot disk through F12.
I tried to restore Windows from a flash drive (I installed win7). 

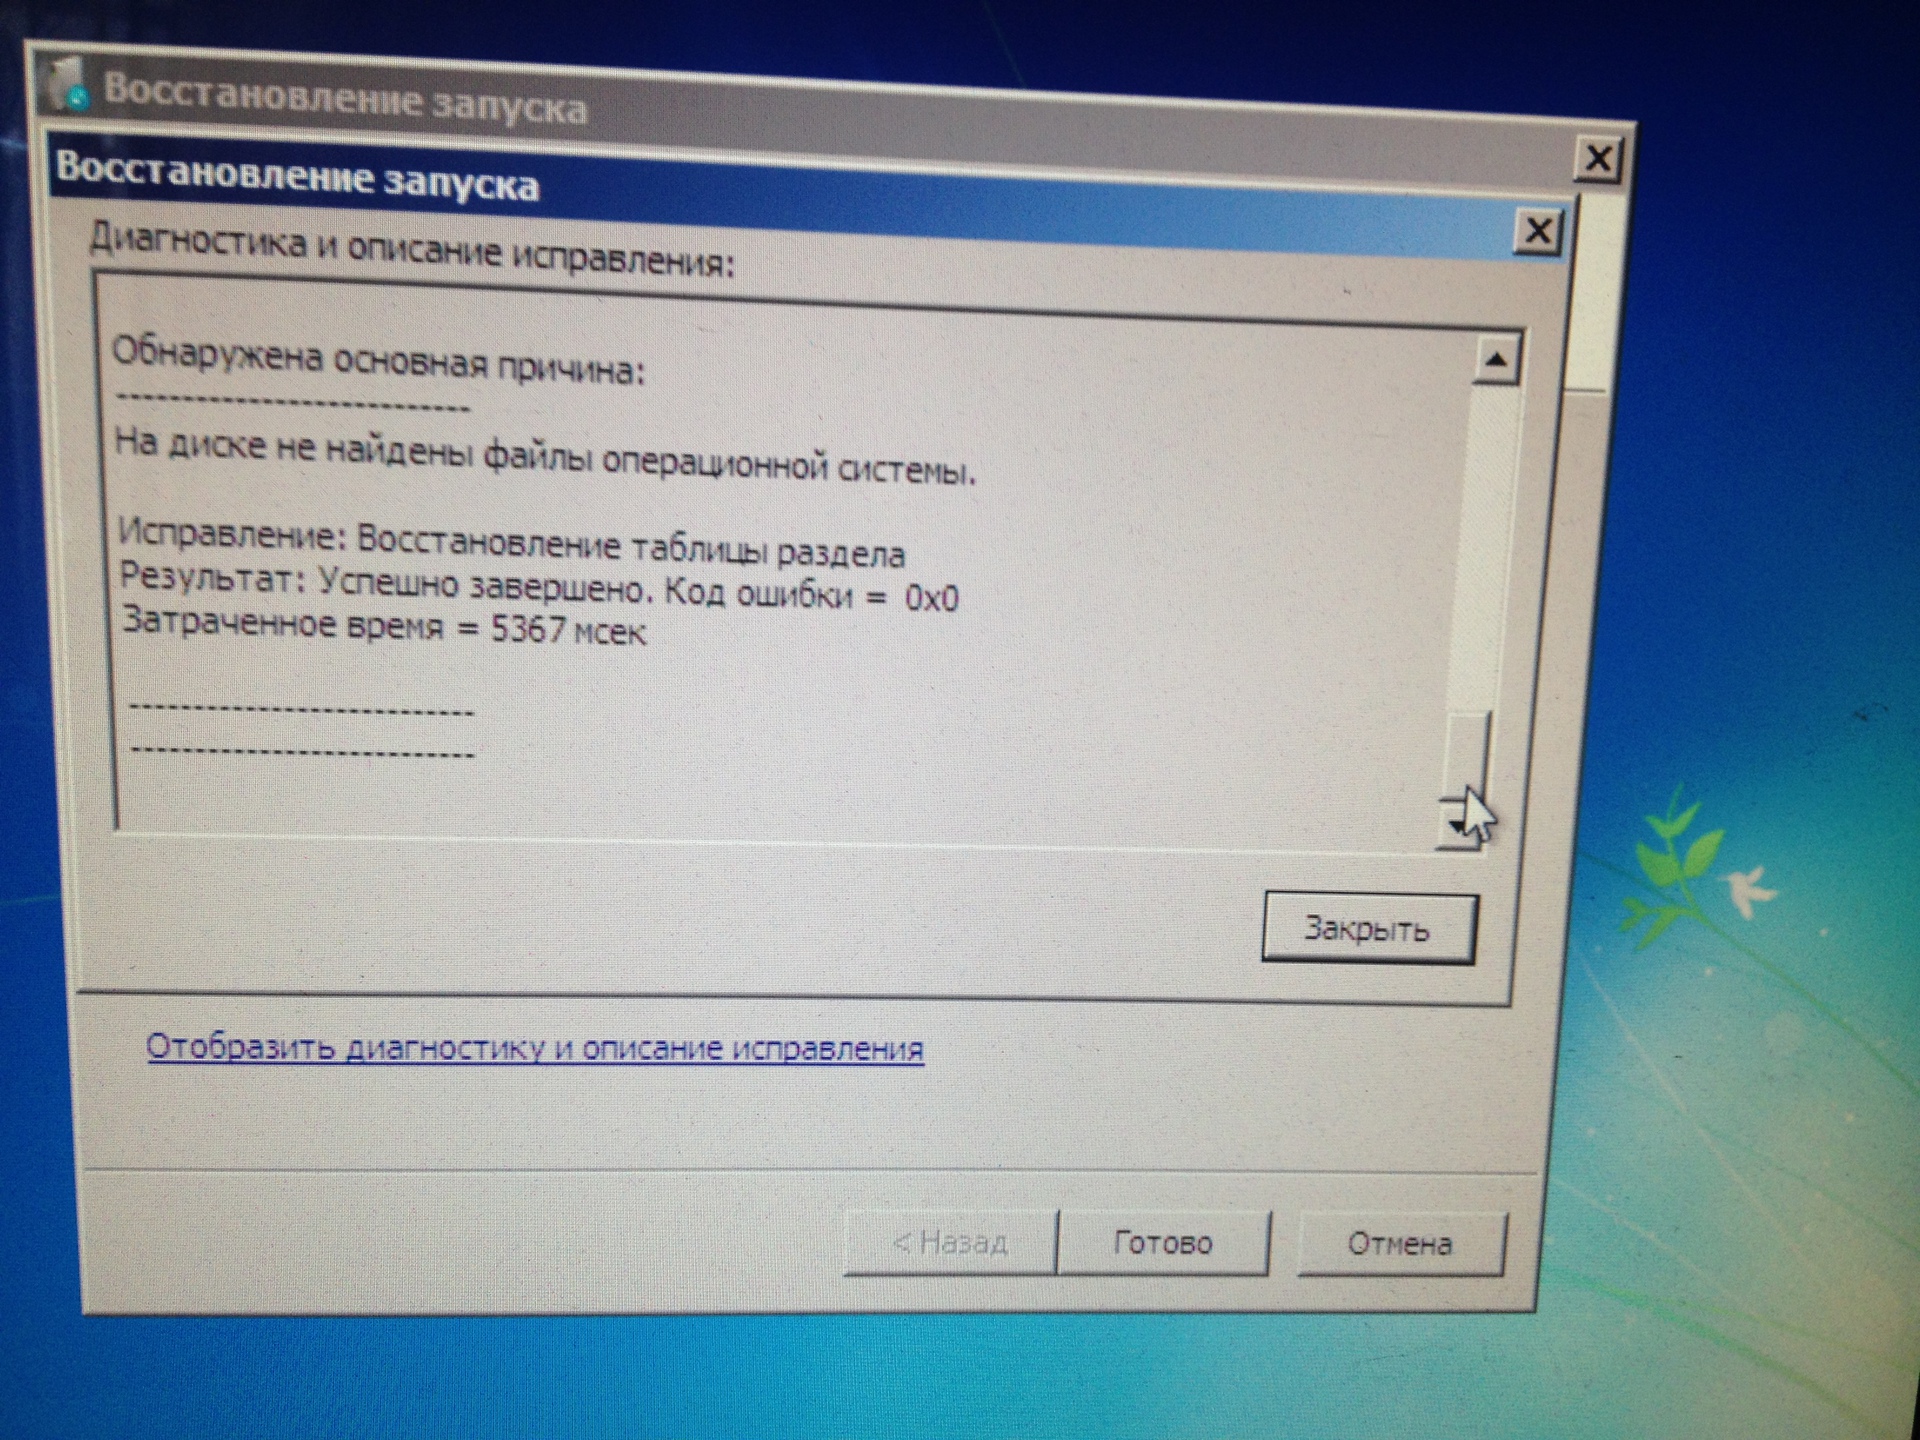
And nothing helped, despite the fact that it was written that the partition table had been restored.
This is what it shows with boot disk if you look through command line using diskpart 
Moreover, ubuntu and win7 load normally from other separate physical test disks.