This article will not contain long discussions on the topic of where and why to store passwords, which password manager to choose, etc. and so on. If you came to my site from a search engine (and according to statistics, this is my main audience), then you already understand the importance, as well as the convenience, of storing passwords in specialized programs. And your choice, just like mine, is the KeePass program. Now you are faced with the task of figuring out how to use KeePass, how to set it up and how to work with it effectively.
Well, you've come to the right place! KeePass is truly one of the best, reliable and also free password managers. And the video tutorial below tells you almost everything about this program. You could even say that it is step-by-step video instructions via KeePass.
In his video tutorial, the author tried to reveal all the subtleties that both beginners and advanced users need to know in order to effectively use this password manager. The entire work process is described - from downloading and installing the program to autodialing and connecting plugins. I have never seen such a detailed video tutorial on the KeePass program on the Internet.
See the contents of the lesson for yourself:
(if you can't wait, go straight to the video)
- Where to download and how to Russify KeePass
- How to create and configure a new password database
- How to create a key for additional database protection
- Overview of the program interface and menu sections
- Learn more about the capabilities of the password generator
- Overview of the KeePass section - “Settings”
- How to create and edit groups (categories)
- How to add records to a database
- How AutoDial Works
- Installing a plugin for automatic Reserve copy password databases.
Hello, dear readers of the blog site. Not long ago I wrote about my problem with , which got there by stealing passwords from my favorite FTP manager, Filezilla.
The program itself is not bad at all, but the entered authorization data is stored in it in clear text - I don’t want to take it. And in browsers, not everything is so rosy with the storage of data entered into them. In this regard, I became concerned about finding a way to solve the problem secure password storage.
Probably many of you already use some kind of password manager. But I just now got around to looking for such software and my choice fell on KeepPass. This program has a built-in generator of complex combinations, stores them in an encrypted database, and also quite conveniently allows them to be inserted into browsers, FTP managers and other software.
In addition, Kipas is free and open source, which allows you to believe in the reliability of storing your confidential data in this particular program (any person knowledgeable in programming could have brought it to light since 2003, however, since this did not happen, then you can trust this software 100%).
Installing and configuring the KeePass password manager
In the field of data encryption, open source code is more of a plus than a minus (TrueCrypt, which I wrote about in an article about, is proof of this). Of course, this program has a lot of paid and free analogues, which some of you probably use in your daily practice, but based on a combination of factors, I prefer this moment I really liked KeePass.
Besides everything else for him third party developers Plugins are being released that, for example, can integrate this manager with popular browsers to improve reliability and convenience of storing passwords in them. Although, in Kipas, by default there is such a tool as AutoSelection (AutoType).
Those. you simply place the cursor in the first line of the authorization form on a website or any program, and then press the key combination Ctrl+Alt+A, and if for this page or software you bothered to create a profile in KeePass, then the form will be safely filled in with a login and password, and the entered data will not remain in any other places accessible to malware.
Of course, no one guarantees absolute reliability, but by setting up this password manager you can reduce the risk of interception and theft of important data to a minimum. For example, the copied data lives on the clipboard for the number of seconds you specify; the program can close access to its database (enable blocking) after a certain time and after certain actions.
In general, let's talk about the advantages and disadvantages of this generator and storage of important data as we go. Download KeePass can be completely free on this page, but you will immediately have to choose between the simplified version 1..., which does not require Microsoft.NET (or Mono in free software) to work, and version 2..., which requires this framework, but its functionality is much wider, and it can work not only under Windows, but also under Linux, Mac OS X, BSD and other Linux-like systems. See more details.

By the way, the full name of this password keeper sounds like KeePass Password Safe and in addition to the division into versions described just above, there is also a division according to the type of installation of the program: regular and portable ( Portable Kipas).
The second option, in my opinion, is preferable, because it has no disadvantages over full version, does not leave any traces of itself in the operating system and can easily live on a flash drive (it would be advisable to duplicate it periodically to avoid losing everything at once).
Actually, I use the portable version. For Russification or Ukrainization of the interface for this password generator, it will be enough to download the translation file for the version you are using from this page and copy it to the folder with the program (in case Portable versions). Then go into it and go from top menu along the path: “View” - “Change Language”. In the window that opens, select your language, Kipas will reboot and the desired language will be applied to the interface.
Where to start? WITH creating a new base. They can be created in an unlimited number, for example, when several people work on the computer and each will have their own individual set of complex passwords generated in KeePass, to which no other user will have access. In most cases, you can get by with just one database, since remembering several master keys from them will be difficult.
To do this, click on the empty piece of paper on the toolbar of this manager (or select from the “File” - “New” menu):

If you have a portable version, then it makes sense to save the database in the folder with the program (on a flash drive). If the version of the manager is complete or you copied Portable to drive C, then under no circumstances throw the file with the database there, because if it malfunctions or is restored from the image, it may end up in storage along with all the invaluable passwords.
It can be placed, for example, in so that you always have the opportunity to pull a copy from the internet. There is no need to worry about its safety, because the data in it is encrypted in a very reliable way.
In the next step, you will be asked how secure access to stored passwords should be. This will be expressed in how many authorization steps you select in the composite key window to access the database:

Access to the encrypted database in Kipas You can close it with as many as three barriers:
- Master key to enter the manager (you will have to remember or write it down, because without it...)
- Key file - choose, for example, on your computer, or better yet a flash drive, some inconspicuous file (preferably among a bunch of similar ones) and say that it will now be the key file. It can also be created specially. But be sure to copy it to a few more places (another flash drive, HDD(but not in C) or in cloud storage on something like Yandex Disk or Dropbox, because in case of its loss...)
You can even link this program for storing passwords to your Windows account, although if you use the portable version of KeePass on a flash drive, this will be superfluous, because you will not open this password manager on another computer (you will not get access to the encrypted database). If you plan to work from only one computer, then linking to an account will further increase the security of your databases.
But remember that adding any new device will change this same account and problems will arise. At least that's what happened to me after the replacement. motherboard. Therefore, be careful with this option.
Next you will be asked to change some settings of the created database. You can, for example, increase the strength of the encryption method used by increasing the number of cycles (passes), but this will slightly (not significantly) slow down its opening and saving data into it:

It will be possible to enable or disable databases to reduce the size they occupy, and also decide whether or not to use the “Trash” built into this manager, where deleted profiles will fall.
On the “Advanced” tab, you can ask the program to remind you about the need to change the master key after a certain number of days (if paranoia has set in and you have started setting up a password manager, then periodically changing the key will not seem superfluous).
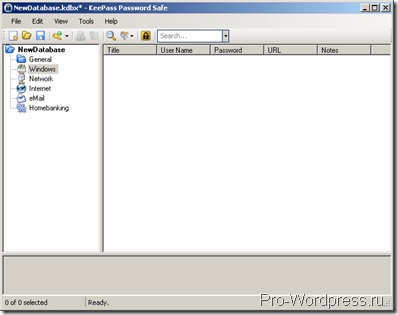
At the end of this process, you will be taken to a tab with your newly created database for passwords and logins (they are located on the horizontal strip of tabs), where you will find folders and example profiles carefully created for you by the KeePass keeper:

You are free to remove all this demo wealth so that clean slate build your well-designed hierarchical tree in this generator and saver. Well, I’ve told you the most difficult part, and then you’re on your own... Of course, I’m joking, because there’s still a lot of text left at the bottom. I’ll try to tell you in detail about what I managed to figure out.
Password generator and keeper with easy insertion
My main task was to customize the most safe work with FTP manager FileZilla, as well as convenient and safe storage passwords for money programs (for example) and money sites (or no less popular or). Well, there are also a lot of sites whose passwords should not be known to attackers.
There is also the problem of hacking mail, where letters with passwords and logins for all this wealth are often stored, but, firstly, I focus everything more or less important on my , because it is linked to my computer and using SMS sent to my cell phone . Secondly, I periodically delete all mail from there to avoid...
Let me make a reservation right away - why start this whole circus with the creation complex passwords and storing them in encrypted form. After all, there are password managers in the same FTP clients, and browsers are not offended by such tools. Waste of time? Not at all. Do you have Filezilla on your computer? Now follow this path:
C:\Users\[account name]\AppData\Roaming\FileZilla\sitemanager.xml
Or this in the case of old XP:
C:\Documents and Settings\[account name]\Application Data\FileZilla\sitemanager.xml
This file can be opened, for example, in my favorite . So what do we have? And we have a full set of passwords saved in this program, which Absolutely no protection from theft, because the file is not encrypted, and its location is the same for 99.99% of computers.
And a little earlier I scolded my beloved for this. Take it - I don’t want it.
Do you think things are better with browsers? Well, maybe a little, but if you type in the search queries “how to find out the password in Opera”, then you will probably receive an answer that they are stored in the file wand.dat, which is not difficult to find in the directory c:\Users\account name\AppData\Roaming\Opera\ .
Well, the freely distributed Unwand program will help you open its contents. As a result, you will receive a list that you can copy into NotePad++, and use the built-in search to find all the passwords you are interested in.
I myself have used this opportunity more than once to search for a password and login that was not written down anywhere, but remembered. I can’t speak for other browsers (it’s possible that passwords are encrypted somewhere and this is done securely), but most likely the situation is not very optimistic. Therefore, I decided to remove all important profiles from the managers built into browsers, first transferring them to KeePass.
In general, something similar to convenient and secure storage and generation of passwords I managed to organize it. I couldn’t figure out some things, but here I am hoping for you - maybe someone knows English well and understands the essence that I didn’t understand.
So, first you need to think about the structure of the hierarchical tree in Kipas. New subfolders are created using the context menu of the parent folder:

Although, you can then use the mouse to drag folders inside other directories as you please. After creating the structure, you can start creating profiles in this manager. There is a special shortcut for this on the KeePass toolbar.
Go to the desired folder in the left panel, and then click on this shortcut with the key, or in the right panel from the context menu, select “Add entry”:

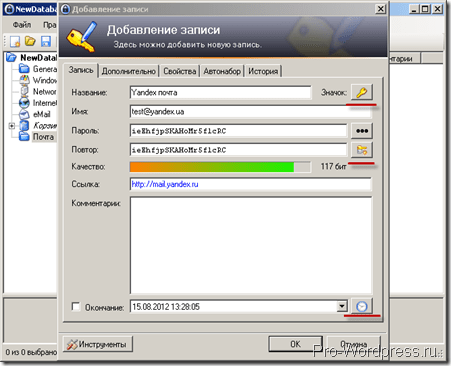
A window will open with a number of bookmarks. The main fields to fill out are on the first tab:

In most cases, the “Name” field needs to be filled in with the exact name of this password profile, but sometimes not (more on that later). In the “Name” field, enter your login, and in the next two fields, enter your password. If you are filling out a profile in Kipas for an existing account, then password generator you won’t need it, but if you simultaneously register on any site or program, then you will simply have to create a complex and hack-resistant code.
For this purpose, Kipas uses a tool for auto-generating passwords for a new account (its complexity can be assessed in the “Quality” line), which can be configured using a button with a key and a gear called “Password Generation,” which you will find at the end of the “Repeat” line.
Same tool to create passwords of any complexity will also be available to you from the top menu of the manager: “Service” - “Generator”:

As you can see from the screenshot taken, you are free to set the length of the generated password in characters, as well as very finely tune which of the possible characters will participate in the generation. You can see approximate versions of the created codes on the “View” tab.
The tool is quite powerful and Passwords can be created extremely complex, but you still won’t need to remember them, and you won’t even have to type them on the keyboard - the smart KeePass manager will do everything for you, and thank you.
To ensure that all the settings you make here are always applied to the automatically generated passwords of the new profile, just click on the blue floppy disk at the end of the “Profile” line and select the option to save “Automatically generated passwords for new entries”.
Close the generator settings window and fill in the remaining fields "Link" and "Comments". For sites, filling them out will be prosaic, but for programs, for convenience, you will need to insert the path to executable file this software (for example, cmd://"C:\Program Files\FileZilla FTP Client\filezilla.exe"), and in the comments there is information about it (see the example with Filezilla just below the text). All? Ah, no.
The most interesting thing about the Kipas manager is that passwords entered into it can be automatically inserted using the hotkeys Ctrl+Alt+A already mentioned just above (well, or what is more difficult - Ctrl+U and Ctrl+V). However, for all this splendor to work, you will now need to spend a little time setting up, so immediately in the new task window go to the tab "Auto dial":

What kind of animal? This thing allows you to explain to the program exactly where to insert the login and password on the required website page or program window. Imagine you place your mouse cursor in the initial field of the authorization form, which in most cases will consist of two fields for entering a login and a password, respectively. Then press Ctrl+Alt+A and these fields will be automatically filled in by KeePass. But in fact it obeys the rule:
(USERNAME)(TAB)(PASSWORD)(ENTER)
This means the following. The contents of the “Name” line are entered into the first field, then pressing the “Tab” key on the keyboard is simulated, which provokes a transition to the next field of the authorization form, where the password is inserted, and then pressing Enter on the keyboard is simulated. As a result, you safely enter the site or program. Shaitanama.
This is a standard combination that will work on most sites, but not all. I once wrote where I mentioned the popular Direct/Advert service. The teaser is wonderful, but now we’re not talking about that, but about some non-standard form of entry to this site:

How is she unusual? This is shown with an arrow in the screenshot. When using a standard combination, only the login will be entered, because the second field is a link to a request for a new password. Login to the site will not take place, but your Mailbox You will receive an email asking you to change your password. What to do?
Create your own profile in Kipas for this site by checking the box in the previous screenshot in the “Use the following sequence” field and change it a little:
(USERNAME)(TAB)(TAB)(PASSWORD)(ENTER)
After pressing the AutoDial keys (Ctrl+Alt+A) nothing may happen, because KeePass manager will not find a match between the page opened in your browser and the profile that was created for it. What to do? Teach him, of course.
To do this, we look again at the previous screenshot and see a button there "Add" in the middle of the autodial settings window. You will click on it a little later, but first open in your browser the page where the login form is located or open the application (for example, filezilla) that will be the receiver of the auto-dial fields. Have you opened it?
Well, now go to Kipas and click on “Add”:

From the “Target window” drop-down list, select the application you need (for example, the Opera browser with the authorization page on the Direct/Adverta website open in it), and then click on OK.
By the way, in the same window you can use a more expanded set of operants for more fine tuning behavior of the KeePass autodialer bot in the specified program, but this is for inquisitive minds (there is a link to help on Auto-Type, but it is in English).
Now, on the autodialer settings tab in the password manager, a corresponding line will appear that will rigidly link the site page with the authorization form (or application) to the password profile you created in Kipas:

All. Click OK. Go to the website page with the authorization form, place the cursor in the first field and use the treasured three-finger combination(Ctrl+Alt+A). Happened? So that's great. I'm very happy for you.
How to Use KeePass with Filezilla
Great, but now let's get back to where I started all this - possibility of safe and comfortable work with sites via FTP through . As we saw just above, the password manager built into it is no good in terms of security.
Therefore, we open the Kipas program, create an FTP folder in its left column and create the first profile for logging into one of our sites using the FTP protocol.

There are several nuances in filling it out. In the first field we enter the address of the FTP server of your hoster, then enter the login and password given to you to access the site using the file protocol, but in the “Link” field we insert the command to open Filezilla, which is quite convenient.
For regular Windows it will be:
Cmd://"C:\Program Files\FileZilla FTP Client\filezilla.exe"
And for 64-bit:
Cmd://"C:\Program Files (x86)\FileZilla FTP Client\filezilla.exe"
It would be best to write the name of this connection in the comments field, because The FTP server address may not be very informative. Next, open the file and, without entering any passwords into it, go to the “Auto-dialer” tab of the KeePass program to link this profile to our FTP manager:

As was shown just above in the text, click the “Add” button, select FileZilla’s “Target window” from the drop-down list (it should be open at this moment and there should be nothing in the authorization fields), and then click OK.
The checkbox in the screenshot is in the “Inherit autodial from group” field, because I registered the necessary operants for the entire group (FTP folders) by selecting the “Change group” item from its context menu and going to the “Auto dial” tab:

You are free to change the checkbox in the “Use the following sequence” field and for each FTP connection enter a set of operants in the field located just below:
(TITLE)(TAB)(USERNAME)(TAB)(PASSWORD)(ENTER)
This doesn't change the essence. Now, to check, open FileZilla, place the cursor in the first line of the authorization field and press the three magic keys (Ctrl+Alt+A):
If you use the algorithm described just above to create several password profiles for different FTP connections, then when you press the magic keys you will be asked where you still want to log in (the same will be true for sites where you have several accounts):

Can use a different login algorithm. Open your program for storing passwords (kipas), go to the FTP folder, click once on the line with the desired FTP account and click Ctrl+U on keyboard.
The focus is transferred to the Filezilla program that opens (that’s why the link cmd://"C:\Program Files\FileZilla FTP Client\filezilla.exe" was added), but without going anywhere else you return to KeePass and press the key combination Ctrl+V. As a result, the authorization fields in FileZilla will be filled in automatically and you will have access to your site. What way automatic input It’s more convenient for you to choose a password.
And finally, you can simply copy your login and password to the clipboard, double-clicking on them in turn in the Kipas window (name and password in the columns). Double-clicking on the title of an entry will open a window for editing it, and double-clicking in the “Link” column will activate the transition to it.
Password retention period on the clipboard is set in the settings (Tools - Settings - Security - Automatic buffer clearing) and by default is 12 seconds.
So, and a couple more steps that will allow remove all traces of passwords entered into FileZilla from KeePass. The fact is that this FTP manager stores the history of entered passwords for some time and a certain number. To eliminate this incident, you will have to do a number of simple manipulations.
First, delete the sitemanager.xml already mentioned above (see its storage folder above). Secondly, you will need to slightly change the program settings.
To do this, find the file fzdefaults.xml.example in the c:\Program Files (x86)\FileZilla FTP Client\docs\ directory and rename it, removing the ending in fzdefaults.xml . Transfer this file to the folder with FileZilla (c:\Program Files (x86)\FileZilla FTP Client) and, opening it for editing in Notepad++, delete all its contents, replacing it with this:
Save the changes, then go to the folder C:\Users\[account name]\AppData\Roaming\FileZilla\ and delete the recentservers.xml and filezilla.xml files there. That’s it, your FileZilla will now not tell anyone what passwords were entered into it automatically from the KeePass manager. This is what needed to be implemented.
More about KeePass
During its long existence this program has acquired a wealth of functionality that you could write a small book about. There are many possibilities, but not all of them are obvious. In addition to the built-in functionality, there is expandable by installing plugins, which can be downloaded from the official page.
Plugins are installed by simply copying them to the program directory and then restarting it. The mentioned Favicon Downloader adds to context menu the “Download Favicon” item, clicking on which will download favicons from the Internet for those sites whose passwords you store in this program. As a result, the visibility of working with it greatly increases.
There is also a whole galaxy of plugins that work in tandem with the corresponding extensions in the browser, allowing, as I understand it, to raise the level of interaction between these programs to a qualitatively higher level. high level. However, in practice I still don’t understand why this is all needed. If anyone is in the know, please describe the advantages and principles of using these extensions in browsers. Thank you.
Yes, there are still plenty programs for mobile phones and tablets, who can use the KeePass password database, which you shared via DropBox or Google Drive. For my beloved iPad, this program is called KyPass.
In Kipas settings you can activate it to launch along with the start of Windows. To do this, from the top menu you need to select “Service” - “Settings” and go to the “Integration” tab:

There you can also change the keyboard shortcuts for autodialing and calling the manager window. On the tab "Additionally" you can make dozens more settings, including checking the “Run in minimized and locked state” box, which can be useful:

In addition, KeePass has the ability to create your own filters for events and assign actions to them. This is done in the menu “Tools” - “Triggers” (?). If you've ever set up filters in an email program, you can easily figure out what's what. However, I will give an example. Let's say that we want to automatically save newly entered or changed passwords into the database.
To do this, select “Tools” - “Triggers” from the top menu of the program, and in the window that opens, click on the “Add” button:

Now you will need to give the rule a name and then go through the Events, Conditions and Actions tabs one by one. On each of these tabs, click on the “Add” button and select the following options from the drop-down list (then click on OK), if you want, so that the database is saved automatically.
For Events, the user interface state has been updated, for Conditions, the Current database contains unsaved changes, and for Actions, Save the current password database. Now save all this by clicking on the “Done” button and enjoy the result. For this, allow me to take my leave.
Good luck to you! See you soon on the pages of the blog site
You might be interested
 FileZilla - where to download for free and how to learn to use the popular FTP client Filezilla
  Windows clipboard and saving its history in Clipdiary
  Total Commander is the best file manager for Windows, its capabilities, installation and configuration of plugins
  Extensions and themes for Google Chrome
 Opera - how to customize the browser for yourself, as well as Opera Link, config, express panel and mail client
 Mozilla Firefox- download, install and configure the most extensible of browsers called Mazila Firefox How to search the contents of files in Total Commander
 TrueCrypt - how to put a password on a folder or computer, as well as password and encrypt a flash drive
Hello everyone! Today I will talk about a program that I have been using for a long time and am very pleased with. This is a program for saving passwords on your computer. KeePass Password Safe is the best free password manager that allows you to quickly and securely manage your passwords.
Each of us constantly registers on different sites and services. And for complete security, the passwords on these resources must be different and complex. Of course, remembering so many combinations of numbers and letters is simply unrealistic. This program exists for these purposes. Let's move on to its detailed consideration.
The best password storage program
What are the advantages of a manager? KeePass passwords Password Safe? In this program to save passwords on your computer, you can
- create groups, sections
- generate passwords
- export passwords to different formats (.txt .html and others)
- use the Russian version of the program
This program works using Advanced Encryption Standard secure password encryption algorithms. Banks use such algorithms, so storing passwords in the program has high degree security. And the reviews about KeePass on the Internet are very good!
This is what the program interface looks like:

KeePass instructions in Russian: download and install
First, you need to download KeePass from the official website keepass.info. And also download the localization file, if you want the program to be in Russian, from here keepass.info/translations.html. I'll tell you what to do with it next.
After installing the program, launch the computer password manager KeePass. To save your passwords, you need to create a database for them. To do this, in the top panel of the program, select “ File ->New" A window will open where you need to select the folder on your computer in which your password database will be stored.
I do not recommend saving the password database on the drive where it is installed. Windows system(drive C), because after reinstalling it, your passwords will be deleted.
Now you need to come up with a password, entering which you will enter the program. Click “Ok”, after which another window with settings will appear.

Password manager KeePass: Russification
Once you've installed the best password manager, all that's left to do is set it up and enter your passwords there. This is not difficult to do.
First, let's translate the KeePass password storage program into Russian to make it easier to work with.
- Copy the localizer file that you downloaded from the link above.
- Open the folder where you installed KeePass.
- Paste the copied localizer file there.

Return to the program and go to the “ View ->ChangeLanguage" Select the Russian language, after which the program will ask you to restart it. Done, our password manager is Russified.

KeePass: how to use a password manager for your computer
To avoid getting confused by the huge number of your passwords, I advise you to divide them into groups. To create a group, click: " Edit-->Create Group", call it, say, “Mail” and enter passwords for all mailboxes there.

To add new entry to the group, click on the icon with the image of the key (or the “Edit” menu):
When you need a login and password for a site, go to the created entry and click the buttons:

I told you the most important thing. Now you know how to use the best program for saving passwords on your computer, KeePass, leave your feedback. If you have any problems, please contact us.
I’ll suggest another useful tool for bloggers - a program for writing articles, I advise you to try it.
Not yet subscribed to RSS subscription? Subscribe immediately using the form below! See you in the next lessons.
Keepass is a free password manager. It will be useful primarily for those users who are forced to create separate passwords for each service. At the same time, it is worth understanding that storing passwords and logins in the browser’s memory or somewhere on a sheet is unreliable, since they can be accidentally lost and/or stolen by attackers.
Using Keepass to Store Passwords
The program interface is in English by default, but it can be translated into Russian by downloading and installing the Russian language. The program also has several convenient tools for working with passwords. Let's look at the process of interacting with it in more detail.
Download and installation
It is recommended to download the program from the official website of the developer, since the manager is open source, therefore, a version with built-in spy code may be distributed on resources with a bad reputation.
On the website you can find three versions of the program:
- Classic Edition is a standard version of the program that has reduced requirements for hardware and software components of the computer. For example, for it to work it is not necessary to have installed package Microsoft.NET;
- Professional Edition - it weighs more compared to previous version, and also requires the installed Microsoft.NET package for its operation. At the same time, the user has access to some improved tools and capabilities;
- Portable – portable version, downloadable in a ZIP archive. It can even be launched from a flash drive. The main advantage is that it does not leave any records of its work on the computer, so you don’t have to worry about the safety of your personal information.

The installation process for the first two versions is almost the same. You check or uncheck certain items, accept the license agreement, wait for the installation to complete and use it.
In the case of the portable version, instead of installing, you only need to unpack the ZIP archive wherever it is convenient for you. You can install this version of the program on a USB flash drive or even virtual disk and store your passwords there. Also the portable version works fine on others operating systems eg Android, Linux Ubuntu etc.
In terms of working with programs, there are practically no differences.
Translation of the interface into Russian
If you are not satisfied with the English-language interface of the program, then you can change it by adding a special file to the main directory of the program and selecting Russian in the settings. The Russifier file has the following name - "Russian.Ingx". On the official website, it is advisable to select a file that is compatible with your current version.
To download and install the Russian language for your version of Keepass, do the following:

Creating a Password Database
In Keepass, you can create several files that will serve as password databases. This is convenient in cases where several people use the computer and everyone needs their passwords to be saved, but not in one shared file, which all users will have access to. The created file can be protected from unauthorized access and saved on any medium. However, in the case of the Classic Edition and Professional Edition there may be some restrictions.
The process of creating a password database file might look like this:

Working with the database
Once the creation of the database file is complete, it will be opened in the main program window. By default, it will already contain some information for informational purposes. You can change or delete them.
To create your own posts, use these instructions:

Login to your account
After creating a record with a password and login in the database, try logging into your account on a particular site. To do this, open the login form, place the cursor in one of the fields and press the key combination Ctrl+Alt+A. If everything is configured correctly, you should be able to log into your account. It is worth understanding that depending on the settings set above, the login process may take some time.
Keepass is great program to save passwords and logins, but at the same time, those who are not well versed in computers may have a question about how to use this program. An example of using the program, as well as its main functionality, was reviewed.
- After installation, launch Keepass2Android. You can now open your existing password database. The program supports database files created using the Windows version of KeePass 2. If you don't already have a database, click Create New Database.
- First, specify the location of the password file. You can customize the path suggested by the application through "Change Location". In addition to local memory, for example, on the SD card of a smartphone, the application offers various cloud services to choose from. if you have Account Dropbox or OneDrive, you can also put the file there. You will need to enter your credentials. Locally or in the cloud - either way, you still have to select the target directory and assign a file name.
- Now comes a very important step: you save your password file using your master password. This combination should be quite long and complex and kept secret by you. If you know the master password, you have access to all KeePass2Android passwords. Therefore, use at least eight characters and a combination of uppercase and lowercase letters, numbers and special characters. Once you have entered the Master Password twice, click “Create Database.”
Password management and use

Once you've created or opened a database, you can enter new passwords and easily transfer them into login fields on websites or other applications.
- For better structuring, all access data is organized into groups. To create a new new password entry, first switch to one of the predefined groups. Or create new group. Click the plus sign in the lower right corner and then click on the folder. Enter a name and confirm with “Ok”.
- Switch to the appropriate group by clicking the group name. Then select the plus sign and key in sequence to enter a new password. Depending on the input type, different templates are available. For example, there are custom forms for addresses Email, credit cards or Wi-Fi networks. For a regular username and password entry, use the "default entry".
- Enter at least a username and password. For websites, it is also recommended to include a URL. Save the recording by clicking on the floppy disk icon at the top of the window.
- If you now want to use the saved password, then the username and password must be pasted one after the other via the clipboard into the corresponding login form. Open the required entry in Keepass2Android. Then tap the three dots after the username and select Copy to Clipboard. Go to the application where you need to enter the details and paste the username from the clipboard into the correct field. Then go back to password management and repeat the procedure for the password.
- Important. The clipboard is cleared at regular intervals by Keepass2Android for security reasons. This prevents other processes from using the cached data. Additionally, the application is blocked if it has not been used for a certain period of time. You can adjust the time periods yourself. To do this, go to the “Keepass2Android” settings menu and go to the “Security” section. Here you can set values for clipboard lock and app shutdown time.
 In order to manage your passwords on your PC, you will need a version