There are several ways to copy a table in an MS SQL Server database. I offer several options for creating a copy of the tables. Which one to choose depends on the structure of the table, the presence of indexes, triggers, etc. in it, as well as the desire to do something with your hands.
1. Manual method of copying the table structure
In Microsoft SQL Management Studio, select a database, select a table, click right click mouse and select "Script Table as" -> "CREATE TO" -> "New Query Editor Window". The query window will open the code to create the table. In it, you need to specify the name of the database in which you want to make a copy of the table, and a new name if the database does not change. How to create code to create the structure of an existing table is shown in the figure below.

This method will create table indexes but not copy triggers. They need to be copied in the same way.
To copy data to an already created table, you need to use the following SQL query:
INSERT into ..tmp_tbl_Deps SELECT * FROM ..tbl_Deps
2. Copying a SQL table with a query in one line
Make a copy of the table structure and data inside the same database:
SELECT * into tmp_tbl_Dep FROM tbl_Deps
Copy the table structure and its data from one database to another:
SELECT * into ..tmp_tbl_Deps FROM ..tbl_Deps
The downside of this solution is that indexes are not copied.
This article will show you how to manually take a full database backup using Microsoft SQL Server Management Studio.
1. Create a backup
In fact, everything is quite simple. Launching the tool " » (« Start» — « All programs» — « SQL Server 2008 R2» — « Microsoft SQL Server Management Studio”) and enter the data for authorization.

Then, in the Object Browser, open the " Database” and right-click on the database you want to back up. In the appeared context menu choose " Tasks» ( Tasks) — « Create a backup» ( Back up…) .

The window " Database backup» ( Back Up Data Base) . Make sure it's worth Complete» ( Full), if necessary, set a name and description, as well as indicate the purpose backup. By default, the path on the computer's hard drive to the Backup folder of the main location of the SQL server databases is selected. To change the location of the copy, first click " Delete» ( Remove) to remove the existing assignment, followed by " Add» ( Add...) to add a new one.

Here we set the location and name of the backup file and click " OK» . You can specify several such destinations. In this case, the backup will be split into equal parts, each part in the specified file.


When all settings are set, click " OK” and wait for the task to complete. If everything is done correctly, in the specified directory we will find the SQL database backup file.

2. Restoring a database from a backup
Recovery occurs in a similar way. IN " Microsoft SQL Server Management Studio» select base from which the backup was made, right-click on it, select " Tasks» ( Tasks) — « Reestablish» ( restore) — « Database…» ( Database...).

The window " Database recovery» ( Restore Database). Here, as a source, we indicate " From device» ( From device) and select the backup file (created in step 1).

Set the flag " Reestablish» ( restore) next to the selected backup. If necessary, on the tab " Parameters» ( Options), you can specify Extra options recovery, the meaning of which can be read.

After all the settings are done, click " OK” and wait for a message about the successful restoration of the database.
3. Restoring a backup to another database (copying data)
If you need to load data into the database, different from the one from which the backup was made, then when loading, in addition to the actions described in paragraph 2, it is necessary on the tab " Parameters» (Options) set the names of the files of this database and set the flag « Overwrite existing database» (WITH REPLACE).

Did this article help you?
This article is devoted to solutions for MS SQL recovery. We will try to consider the main points and important details that you need to consider when planning and choosing a solution for recovering an MS SQL database.
Within MS SQL disaster recovery planning, two parameters are of particular interest: the recovery time objective (RTO) and the recovery point objective (RPO).
RPO, in other words, is the period of time since the last Reserve copy until the moment of the incident, for which a non-critical amount of data (information) will be lost. RTO is the allowable time for which it is necessary to restore the service / system to working capacity from the moment of the incident. Both options have variable value and depend on the requirements for a particular system. Therefore, in order to fulfill the established RPO and RTO, it is necessary to have an appropriate backup plan. Using an example, let's analyze possible emergency incidents and try to highlight the points of failure of our SQL server and how to solve them:
- hardware failure, physical failure of the server: disks, CPU, motherboard, power supply, etc.
- software failure: operating system, database
For each designated incident, there is a whole range of measures to avoid the consequences of the incident.
HIGH AVAILABILITY MS SQL
With high requirements for RPO and RTO (seconds / minutes), the only solution to ensure MS SQL fault tolerance is the organization of High Availability server technology:
- Built-in MS SQL and OS Windows Server we can achieve high availability (High Availability) by implementing a failover cluster Windows Server Failover Cluster (WSFC), including using AlwaysOn technology. A failover cluster consists of at least two nodes/servers. When the active server fails, it fails over to another available server and becomes active. In this case, all services that were hosted on the server are automatically or manually transferred to another available node.
- In cases with an MS SQL virtual machine, high availability can be provided with the help of VMware HA-cluster or Hyper-V High Availability virtualization tools. In this case, when the physical server fails, it allows you to automatically start virtual machine on another cluster server.
Both methods can be implemented either separately or together, if necessary. Clustering is more designed to quickly fix a hardware failure.
Benefits of High Availability MS SQL:
- instant switching from node to node, no downtime
- without dependence on physical servers
- allows you to maintain servers without interrupting the work with the database
Disadvantages of High Availability MS SQL:
- implementation requires additional infrastructure and resources
- high cost of the solution for licenses and equipment
- more complex and highly qualified service
BACKUP MS SQL
In cases where the requirements for RTO and RPO are not high and there is no need for High Availability (clustering), to ensure the fault tolerance of MS SQL databases on a physical or virtual server a necessary condition is the presence of a backup copy. To do this, you can use the built-in SQL functions Server or use separate specialized systems that support various MS SQL backup methods, for example:
These systems will help to avoid both hardware and software failures in the operation of the database server.
After calculating the RTO and RPO values, you can proceed to planning the SQL server configuration. To achieve these values, we can use both the high availability technologies listed above and database backups.
backup MS SQL policy
- Backups must be on different physical media from the original database files
- Use a test server (sandbox) to test the procedure for restoring backups
- Do your daily
- Do it as often as possible. They take up much less storage space and further reduce the risk of data loss
- Back up transaction logs as often as possible. Transaction logs contain all the latest activities that have taken place in the database. Logs can be used to restore a database to a point in time, and this is the biggest benefit. Transaction log backups can be performed while the system is running. If the frequency of new data being created in your database is very high, then you can backup the transaction log every 10 minutes, while for other databases that are less active, such backups can be performed every 30 or 60 minutes
- Back up MS SQL system databases: server, master , model and msdb . These databases are absolutely essential as they contain the system configuration as well as SQL Server job information that will need to be restored in the event of a full system restore.
SETTING UP MS SQL BACKUP USING BACKUP EXEC
Backup Exec offers three MS SQL backup methods: Full, Differential, and Full Copy-only. The Full method performs a full backup of the entire database, while Differential only backs up the changed blocks in the database since the last full backup. The Full Copy-only method is identical to a full backup, except that it does not affect subsequent differential backup jobs.
Let's consider each case in more detail. To do this, we will create a new task in the system to back up the main and system databases.
Then, in the parameter settings (options), select the type of task (first set Full then Differential backup).

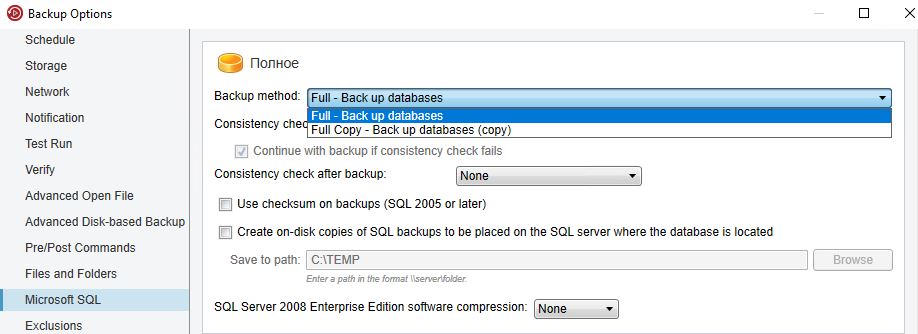
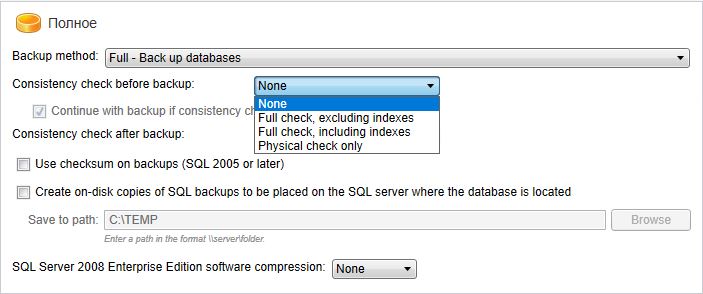
Backup Exec has a very important and useful feature"Checking the integrity of the database before and after the backup" (Consistency check before / after backup), there are four options to choose from:
- do not check
- full check, excluding indexes
- full check based on indexes
- only physical check
To configure differential backup, you must (similarly to job full backup) first add a new Job Differential job, and then select one of the backup methods on the Microsoft SQL tab.

IN this list primarily interested "Differential - Backup up database changes since the last full"(creating a differential backup based on a full backup). It is also possible to create a differential backup (at the block level) with subsequent conversion to a virtual machine "Differential (block-level) - Backup up database changes since the last full - use with convert to virtual machine job".
Another important parameter is "Log - Back up and truncate transaction log" for MS SQL transaction log backup.
We have covered the main points of MS SQL backup. Please note that backup is part of the overall Disaster Recovery Plan (DRP), therefore, before planning a backup, it is necessary to conduct a complete analysis of systems and infrastructure to ensure RPO and RTO. And if it is possible to perform DRP planning during system development, this will help eliminate many problems and, possibly, reduce the cost of operating the system.
The information used in the article is taken from official sources.
"He who owns the information owns the world" - Mayer Amschel Rothschild
The most valuable entity in any business is information. The loss of information can lead to unpredictable consequences, mostly financial. Therefore, one of main task IT professionals is backing up the entire IT infrastructure. This also applies to MS SQL Server databases.
In order to ensure the safety of information in the databases used, as well as to reduce the time for recovery, it is necessary to perform periodic backup SQL copy-servers.
Let's take a look at the simplest example: you need to set up a database backup on a separate disk.
Solution:
- We open Microsoft SQL Server Management Studio. In the navigation menu on the right, open the tab "Control". There we see a tab "Service Plans". Right click -> "Create Maintenance Plan" and give a name to our plan (Fig.1):
Fig.1 Creating a new maintenance plan.
2. On the elements panel, add a task "Database backup"(Fig.2):

Fig.2 Adding the "Database backup" task.
3. On the created task, right-click -> "Change"(Fig.3):

4. In the task properties window, select the type of backup (in my case, full), select the desired database (I have ka_cons), the directory for backups, the ability to check backups for integrity and options for compressing them (Fig. 4-6):

Fig.4 Backup type - full.

Fig.5 Selecting a database for backup.

Fig.6 Determination of the directory for backups, checking the integrity and degree of compression.
5. On the maintenance plan settings panel on the right. press the button "Schedule"(Fig.7):

6. Set up the schedule we need and click "OK"(Fig.8):

Fig.8 Setting the backup schedule.
7. Save our maintenance plan (Fig. 9):

Fig.9 Saving the maintenance plan.
Scheduled full database backup is configured.
Restore the database " Test _Recovery "to the state" t4».
Let's proceed with restoring the database from a full backup "Full2_Test_Recovery.bak" using "SQL Server Management Studio" ". Right click on the database Test_Recovery ”, in the menu that appears, select “ Tasks”, then “Restore”, then “Database”.
In the appeared window " Restore Database" in the " Source" section, select " Device ". Next « Add ”, write the path “\\ vniz - tst - bkp 01. test . local \ Backup _ SQL \ Full 2_ Test _ Recovery . bak", click " Ok". In the "Destination" section, select Database "Test Recovery"
Click "Ok"

The database will be restored successfully.
Consider restoring a database using Transact-SQL.
We right-click on the “Test_Recovery” database, select “New Query” in the menu that appears:

In the window that appears, enter:
USE master
RESTORE DATABASE Test_Recovery
FROM DISK= "\\vniz-tst-bkp01.test.local\Backup_SQL\Full2_Test_Recovery.bak"
WITH REPLACE

The database will be restored successfully.
In this example, we used the "REPLACE" parameter:
Recovery usually prevents a database from being accidentally overwritten by another database. If the database specified in the RESTORE statement already exists on the current server, and the family GUID for the specified database differs from the family GUID for the database recorded in the backup set, then the database will not be restored.
The REPLACE option overrides several important checks that are normally performed by the restore operation. The following checks are cancelled.
- Checking for a restore over an existing backup database created for another database.When you use the REPLACE option when restoring, you can write data over an existing database regardless of which databases are contained in the backup set, even if the specified data name is different from what is written in the backup set. This can lead to accidental overwriting of another database over the database.
- Checking for recovery of a database that uses a full recovery model or a bulk-logged recovery model that has not been backed up at the tail end of the log and has not had the STOPAT option applied.When you use the REPLACE option, you may lose committed data because the last logged data has not yet been backed up.
- Overwriting existing files.