Password storage on portable devices is often different from desktop systems. Sometimes you come across laptops on which the boot password or BIOS password is disabled simple reset BIOS, but it should be noted that there are only a few such laptops. The situation with premium and business class laptops is much more interesting. In these devices, the password is stored separately from the BIOS in non-volatile memory. Naturally, this was done solely for the purpose of protecting user data, and it is not logical to blame the manufacturer in this case.
There are a lot of methods for getting rid of a password, and each of them is usually applicable to a particular brand of laptop. Old Toshiba models, for example, lost passwords using a simple plug on the lpt port. With the progress of progress, the situation has changed a little: Today, the password is removed using a service password that depends on the model and serial number.
Sometimes there are laptops (usually from local assemblers) in which it is possible to “overwrite” set password using the service master code, they depend on the BIOS version. Such cases are rare. Most often, the password is stored in epprom produced by atmel 24Cxx series (where xx are digits); 24RF08 and C46C1 are less commonly used.
In laptop repair service centers, they usually unsolder this epprom, put it on the programmer, flash the firmware from the same laptop model, but without a password, and solder it back. The downside is that the epprom stores not only the password, but also the laptop serial number, partnumber and some service information. Naturally, with this method, at least the serial number will change. This is not always convenient and may void the warranty. Serial number You can change it, but for this you need a program from the manufacturer, which is not freely available.
The second option is to look at the firmware in more detail and find and change the password there, but not everything is smooth here, you will still need a programmer and a soldering iron, and, in addition, the password is stored in encrypted form, and in a one-way way, that is, even knowing the algorithm, you can return it cannot be deciphered. But in principle, knowing where exactly it is located, it can be erased without disturbing all the other information.
And finally, one more method, it does not work on all laptops, but, for example, HP and Dell managed to do this operation on two-thirds of machines of different classes, but the method does not require a programmer.
So, first you need to disassemble the laptop; sometimes you don’t need to completely remove the motherboard, just remove it top part housings. It will not be possible to unambiguously determine where exactly the required epprom is located; in 90% of cases it is not far from the BIOS or the control room, but where exactly on which side, etc. it depends on the laptop model. This does not exclude that the element you are looking for will not be on the reverse side motherboard or even in another part, for example, even behind the south bridge from the duty room, you just need to look first of all near the BIOS and the duty room. The duty board has already been mentioned twice, or the more complete name is the duty power chip, this is a large four-way controller combined with a keyboard controller, most often it is a 160 or 176 pin chip manufactured by National Semiconductor, usually labeled PCXXXXX (where X are numbers), for example PC87570. Finding it on the board is not difficult; it is close in size to the south and north bridges.
So, we find the required epprom, it has a reference mark for the legs: either a notch on one of the sides, or a dot. The notch version is shown in the following figure:
We find the power leg, in the pictures it is designated Vcc, unsolder it and lift it. Roughly speaking, we de-energize this microcircuit. After which we need to start the laptop and go into the BIOS. Usually, when the laptop starts, it takes a very long time to sort through the memory, but in the end it is possible to enter the BIOS. It no longer asks for a password; while in the BIOS, you need to press the soldered leg back to the contact pad, or use a thin screwdriver to restore the contact (I usually do this with a dental hook), or solder it straight away. Soldering is bad - a breakdown may occur and repairing the laptop will be more difficult, especially if you use a 220-volt soldering iron. The laptop must work and be loaded into BIOS! With your power foot pressed, you go to the security menu and go through all the items where the password was (User or Supervisor) and confirm that there is no password or write a new one. Then save the changes and restart the laptop. All that remains is to turn off everything, solder the leg and assemble the laptop.
Let me remind you that on some models this method does not work, when the epprom is de-energized, the laptop does not initialize at all, that is, it does not even get to the invitation to the BIOS. And just recently I came across a laptop that started without this epprom, but booted only from the network, not wanting to go into the BIOS.
Based on materials from www.azbooki.ru
Let's look at how you can enter the BIOS Lenovo laptop S510, as well as how to set and change the password to enter the BIOS.
We turn on the laptop. While turning on the laptop, hold down the “Fn” button and simultaneously press the “F2” button.
We get into the BIOS.
To set a password, you need to go to the “Security” tab in the main BIOS menu.
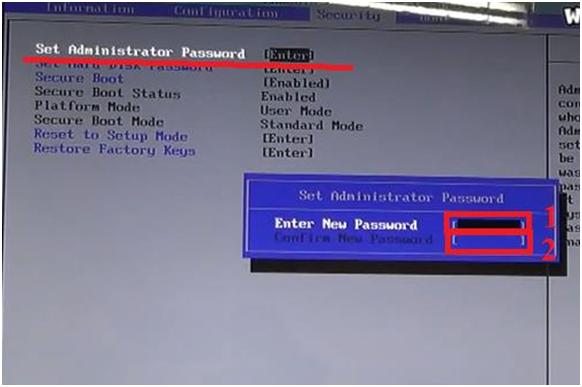
In the upper free field (marked with the number 1) enter New Password. In the lower free field (under the number 2) we confirm it. Press the “Enter” button.
If we want to change the set password, then again select the “Set Administrator Password” item and press the “Enter” button.
A window will now appear with three free fields. See the image below.
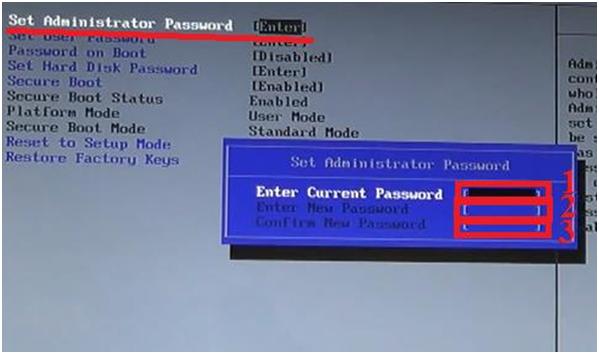
Here, in the upper free field (marked with the number 1 in the image), enter the old password. In the second field (under number 2) enter a new password. In the third field (under number 3) we confirm the new password.
The password is removed in the same way, only after entering the old password in the second and third fields, you just need to press the “Enter” button.
Press the “Enter” button again.
We set the administrator password.
In the same way, you can set a password for the user, a password for downloading and a password for hard drive. See the image below.

Here the arrow under the number 1 points to the field for setting a password for the user. The arrow with the number 2 indicates the boot password setting field operating system. The arrow with the number 3 indicates the field for setting a password for the hard drive.
It is advisable to remember or write down passwords, because if you lose or forget them, it is very difficult to recover them. Sometimes it's even impossible.
After setting a password, changing it, or removing the password, you must go to the main BIOS menu. To do this, press the “Escape” button.

Press the “Enter” button. Another window will appear. Here we make sure that the “Yes” on-screen button is active. Press the “Enter” button again. So we save changes made in BIOS settings.
The computer will restart and the changes will take effect.