How nice it is when a kitchen pleases you not only with a beautiful and functional design, but also with original decor. Unconventional ideas for the kitchen with your own hands will help you transform your kitchen, make it special and unique, give it a bright personality, fill it with warmth and comfort - useful and funny handmade little things with wordless messages: “made with soul”, “made with love”, “hands” got itchy”, “it was evening, there was nothing to do”, “creativity popped”, “it dawned on me”, “look, how cleverly I came up with this”, “you have to think of such a thing!”, “what a craftswoman!”, “ It’s good that I didn’t throw it away”... Money can’t buy this, just like you can’t buy joy, a sincere smile, laughter from the heart, happiness and love. But all these cute kitchen accessories can be made with your own hands and given as a gift... from the heart and with love.
DIY kitchen accessories will become unique and unusual decoration
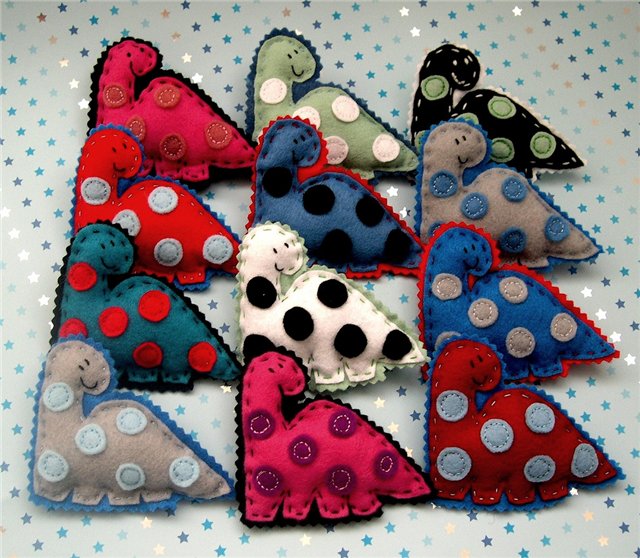
Idea #1: Handmade felt potholders
Fill your kitchen with the charm of fall leaves with these wonderful leaf potholders. To make them, you just need to cut out a few leaves from the fabric and add a couple of decorative seams. Just imagine how wonderful these colorful leaves will look hanging on the wall or even carelessly thrown on the table! What a mess is there?! I'm just having leaf fall! Leaf fall, leaf fall, yellow leaves are flying...
To sew potholders we will need:
- 3 pieces of wool felt of different colors - 50 cm each (synthetic felt is not suitable - it can simply melt if it is hot)
- leaflet template (if you are not confident in your artistic abilities)
- paper
- pencil
- scissors
- contrasting threads
- sewing machine
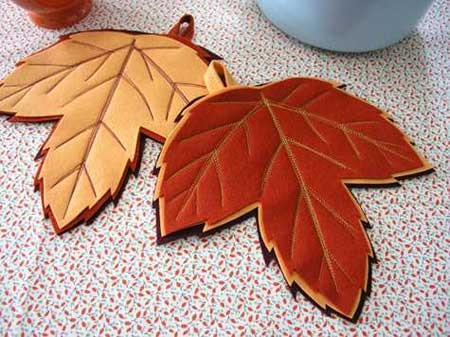
Handmade felt potholders are practical and beautiful
Operating procedure
- Step 1: Create a Leaf Shape
We arm ourselves with a pencil and draw on paper a piece of paper of the required size and shape. You can use real leaves as a sample, find a suitable image on the Internet, or borrow one from this article. Cut out a drawn or printed piece of paper along the contour. Voila...the template for the oven mitts is ready!

Step 1: Create a Leaf Shape
- Step 2: Cut out three layers of felt
Place the template on the fabric, trace it with a pencil and cut it out. In the same way, we cut out a second sheet of felt of a different color, only it should be slightly larger in size than the first. We perform similar actions with the third piece of felt. As a result, we should have three leaves of different colors, each slightly larger than the previous one.

Step 2: Cut out three layers of felt to create a layered effect
- Step 3: Making loops
Cut a strip of felt 10 cm long and 2.5 cm wide. Fold it in half in width and sew a zigzag stitch in the center. We bend the stitched strip in half and pin it to the bottom edge of the largest layer of the sheet. Sew the strip with a straight stitch, starting the seam approximately a centimeter from the raw edge of the sheet.

Step 3: We make loops on which we will then hang the potholder
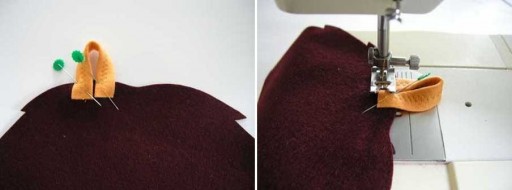
Step 4: Attach the loops to the base of the potholder
- Step 4: Create veins on the leaf
Place all three layers together so that the smallest is at the top and the largest is at the bottom. We hide the raw edges of the loop between the layers. We chop off the layers of the leaf with pins. Having set long stitches on the sewing machine, we sew the sheet in the center from bottom to top. Having reached the top, we raise the presser foot, turn in the other direction and make a seam in the opposite direction - from the top to the base. We repeat the “maneuver” several more times to get a wide “juicy” central vein. Similarly, we create the remaining veins and streaks on the surface of the leaf.

Step 5: Create veins on the leaf using a sewing machine

Step 5: We try to give the veins as natural a look as possible
Felt potholders a la autumn leaf fall are ready! Admire the result! Isn't it beautiful?!

Ready-made felt potholders look neat, cute and unusual
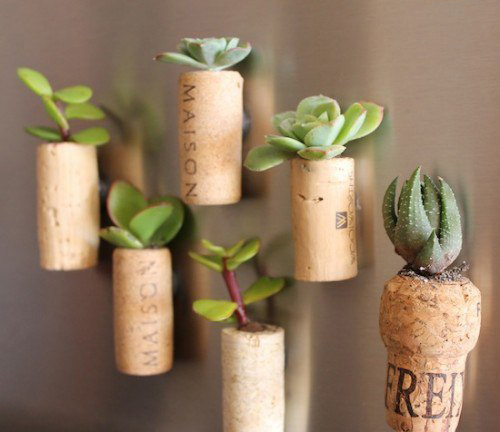
Idea #2: Cork coaster
Do you like to indulge in wine? Where do you put the traffic jams? Are you throwing it away? In vain! After all, the most ordinary wine corks can be found in a very beautiful and non-standard use - to make a stand for hot food in eco-style.
We will need:
- 30-40 round wine stoppers
- long flange belt with clasp
- silicone for gluing
- wooden cutting board
- sharp knife
- ruler
- pencil
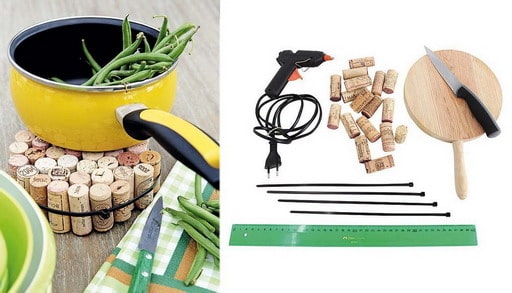
Cork hot tray - not something you see in every kitchen
Operating procedure
We select the shortest cork, cut off the uneven part and measure the resulting length. Using the same measurement, we cut the remaining plugs so that all the blanks are the same height. Starting from the middle, we glue the corks together with silicone so that we get a circle. When the stand is ready, wrap it with a flange belt, fix the edges and cut off the excess part of the belt. Ready! Now your kitchen will have an original eco-style cork stand.

We take the shortest cork as a basis and align the rest with it
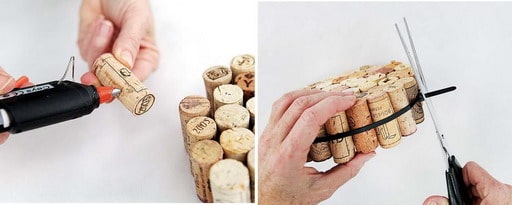
We form a circle from corks fastened with silicone, which we secure with a flange belt
Idea No. 3: Wall collage for the kitchen using cutlery
Sets of expensive cutlery are usually sold in beautiful boxes with a velvet backing. We will go the other way and place the silverware on the most ordinary burlap. In addition to this and silver cutlery (all the “salt” is in the contrast of textures, so ordinary stainless steel will not give the desired effect), to create a collage we will need:
- Ribba volumetric frame from Ikea, size 23x23 cm
- silicone and regular glue for gluing parts
- ruler
- scissors
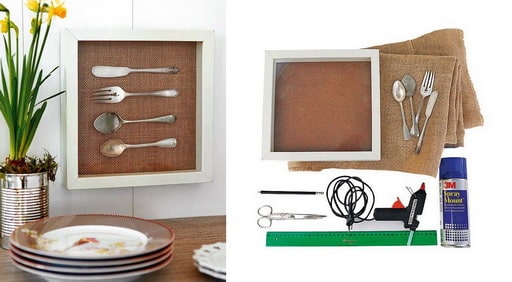
Kitchen wall collage made from cutlery
Operating procedure
Let's take the frame apart. We cut out the burlap according to the size of the back of the frame (the base is made of thick cardboard). Glue with regular glue. We apply a little silicone to the back of the cutlery, press it to the place marked on the burlap and heat it with a hairdryer for quick adhesion. We attach the front part of the frame with glass and send the finished collage to a shelf or hang it on the wall.

Step 1: Glue the burlap onto the cardboard base using regular glue.
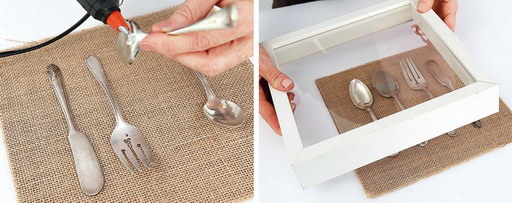
Step 2: We attach cutlery to the burlap with silicone, and cover it with a frame with glass on top
Idea No. 4: Kitchen lampshade made from disposable forks
Don't rush to throw your used plastic cutlery into the trash. This junk can be recycled very creatively, turning it into a real treasure, at least for the interior of your kitchen. A stylish lampshade made from disposable cutlery impresses not only with its non-standard design, but also with the intricate patterns that the plastic parts form on the ceiling when the light bulb is turned on.

Kitchen lampshade made from disposable forks - a bold and extraordinary design solution
Once you have collected 100 forks, 100 spoons and 100 plastic knives (the easiest way to get hold of such wealth is at your next corporate event), connect them using glue in a chaotic manner. To prevent your plastic lampshade from melting from the heat of the light bulb, use low-heat energy-saving lamps.

It turns out that disposable forks can be given a second life
Idea No. 5: Original pendant lamps for the dining table
Decorating the kitchen dining area with original pendant lamps that no one you know will have is as easy as shelling pears.
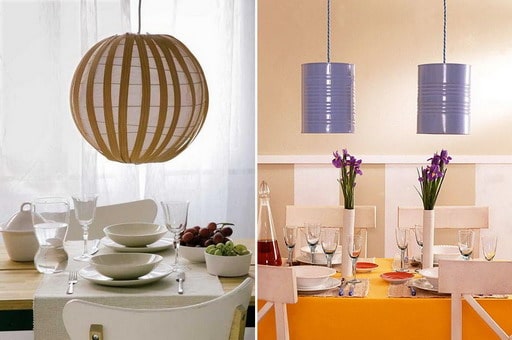
These creative dining table pendant lights are made from items you just happened to have on hand.
To make a round oriental-style lamp, we will need a Japanese lantern from Ikea (for example, the Regolit model or any other Japanese-style lampshade made from rice paper), a hole punch, strong threads and edge tape for finishing furniture. The whole process is shown in detail in the pictures. We are patient and create our own version of a stylish oriental ball lamp.

Oriental style ball lamp made from these simple materials, will become a real decoration of the kitchen
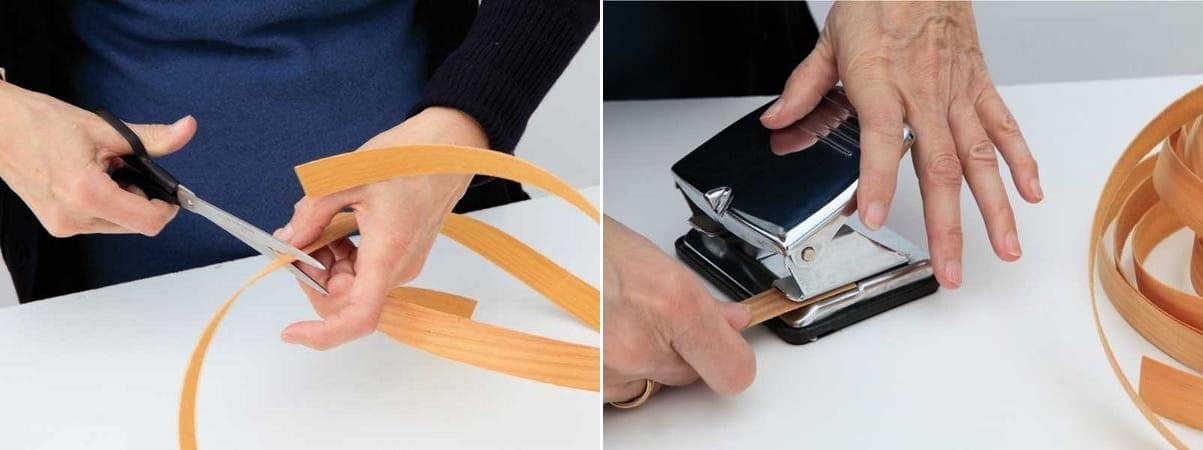
Ordinary furniture tape is used to decorate an oriental-style lamp

All the steps are so simple that even a teenager can handle them.
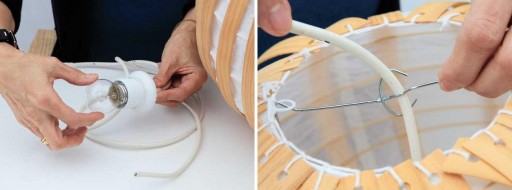
As a result of simple and short manipulations we get a ball lamp in an oriental style
Large tin cans of canned fruits and vegetables, such as pineapples or olives, can also serve as a creative lampshade. We drill a hole in the bottom of the can for the wire, thread it through, and attach a base with a light bulb socket on the inside. As a final touch, we cover the jars with a layer of spectacular bright paint that matches the color of the kitchen interior. Similar lamps can be created from tea cups.
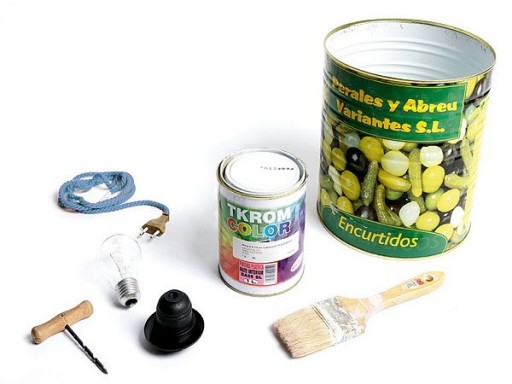
Don’t rush to throw away cans of canned food, they may still come in handy

The most difficult action can rightfully be called fixing the lampshade

You can paint the tin in the chosen color before or after installing the lampshade
When preparing this article, materials from the following sites were used:
The editorial team of the online magazine “Handmade and Creative” pays great attention to interior products and useful little things, so the kitchen was no exception and we have prepared a large variety of DIY crafts for the kitchen. These can be a wide variety of things: potholders, vases, cutlery, menus, magnets and much more.
Man is constantly evolving, trying to develop and thereby causing everything around him to move. The kitchen is a place that should express a person no less qualitatively than any other. If you are truly cheerful, resourceful and somehow different from the rest, then why not fill your kitchen with useful handmade crafts. Not only will this be useful for your home and guests, it is also very beautiful and will always pleasantly surprise the first time guest entering your home.
We invite you to spend a little time creating kitchen crafts that keep up with the times. You can use the most interesting materials that will reflect the present time or the topic that you like. These will be unique products created with your own hands, by your own hands, for your kitchen, which will become a real highlight of your home.
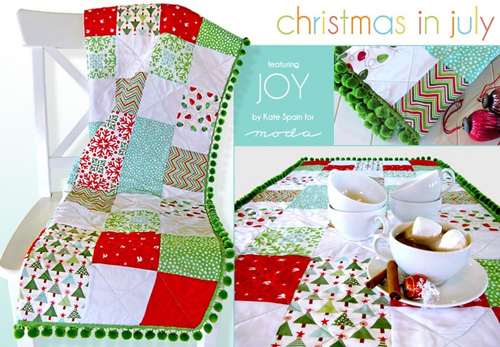
If you are planning a holiday feast soon, you can make your own fabric napkins. By decorating your holiday dinner with them, you will pleasantly surprise your guests. To create such napkins, you will need leftover fabrics from past projects, your imagination and good mood. Make as many napkins as possible, because already at the beginning of the evening they can get dirty or ruined.
Dear readers of our magazine! We bring to your attention an interesting idea for creating an original tablecloth for a festive dinner, which will make the New Year's Eve elegant, magical and a little fabulous. If, at first glance, it seems to you that such a New Year’s tablecloth is difficult to make, then we responsibly tell you that you will master this technique in a few minutes if you carefully study the master class.
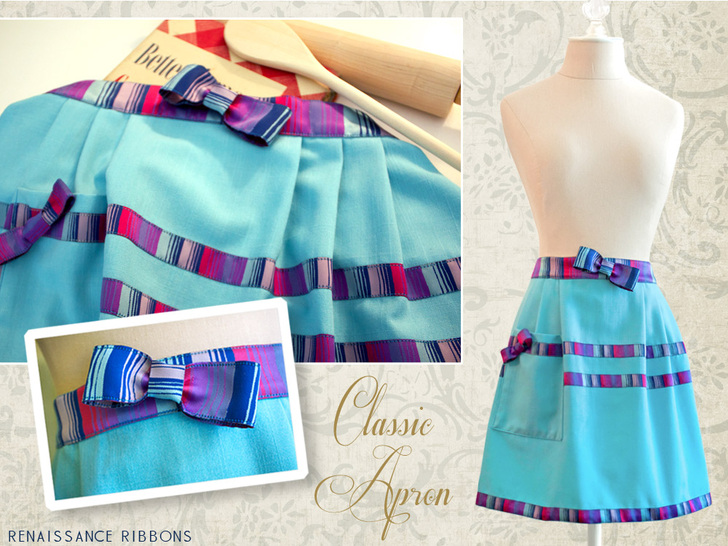
Every woman wants to look neat and stylish when doing housework. An original apron will help us with this. It is not at all necessary to purchase new fabric. You can sew an apron from an old dress or skirt. For decoration you can use braid, frills, lace and bright contrasting ribbons. For a holiday when we want to look beautiful and elegant, we will sew an apron with our own hands and decorate it with a bow.
An oven mitt is one of the most important elements in the kitchen. Potholders come in a wide variety of shapes. The most comfortable and convenient are in the shape of a mitten, but they are also found in rectangular and oval shapes. Typically, a potholder mitten is made of three layers (resistant to temperature and dirt, pleasant to the touch). Of course, you can grab the hot lid with a towel or any other oven mitt. However, when you need to remove a hot baking sheet from a hot oven, you cannot do without such a mitten. Thick oven mitts will protect your hands and wrists from burns. In this master class we will tell you how to sew a mitten-potholder and acquire such an indispensable assistant.
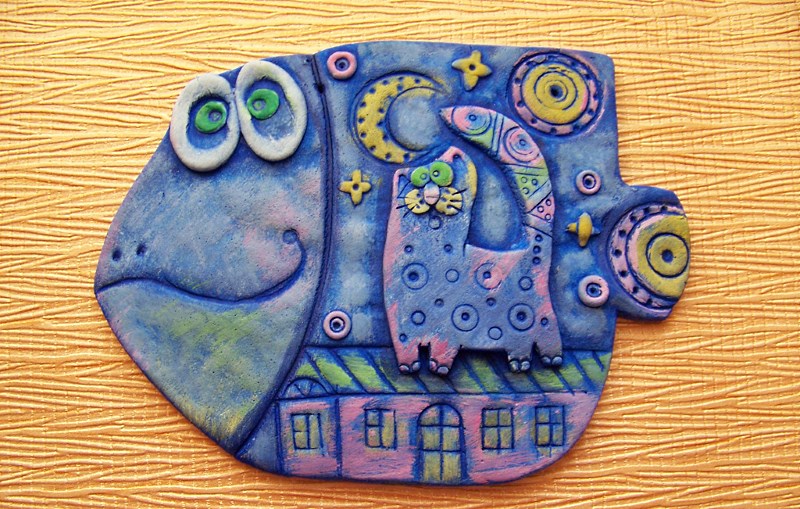
Do you want to decorate your kitchen wall with an unusual and very necessary item? You don’t need to buy it, just buy any wooden shelf for spices, printouts depicting the corresponding plot and put in very little effort. In just a few hours you will create an interesting decorative item. By using the decoupage technique, you can create original crafts for the kitchen with your own hands. The decor ideas in this master class will help you realize your ideas. Go?
I would like to thank the fairy Gulnaz for participating in the creative meeting and for giving me the opportunity to capture the history of the creation of her product.
Materials and tools
Decoration materials.
- wooden blank,
- stencil,
- transparent modeling gel paste (Tair),
- printout or napkin for decoupage,
- stained glass (lead) tape,
- acrylic paints,
- acrylic lacquer,
- decoupage glue,
- white ground,
- synthetic brushes,
- palette knife,
- rags, sponges, roller.
Stenciling
If we, as a rule, started decorating by priming the surface, here we will begin work by applying patterns using a stencil.
Which stencil to choose for decoration? Anyone, but it’s better to opt for stencils with an adhesive base. It will prevent the modeling paste from leaking out, thereby helping to obtain clear, neat three-dimensional patterns.

We fix the stencil on the workpiece. Using a palette knife or plastic card, apply a thin layer of paste. Let our beauty dry up. It will take approximately 15 minutes for the paste to dry completely. The duration depends on the thickness of the applied paste. When it becomes completely transparent on the surface, it means the texture has dried. I think we did it.
Cover decor
Let's put the blank with the patterns aside and start decorating the retractable lid of the napkin holder. We mix paints (brown, black, white) and get this gray-brown color. Add a little water to the palette to get a liquid consistency. Paint the lid evenly. On a wooden surface (in in this case plywood) when painted with liquid paint, the pile will rise greatly, so after drying, carefully sand the entire surface with sandpaper No. 300-600.

Shall we draw polka dots? If you don't have such a stencil, you can try applying them in another way, for example using an eraser on the end of a pencil.
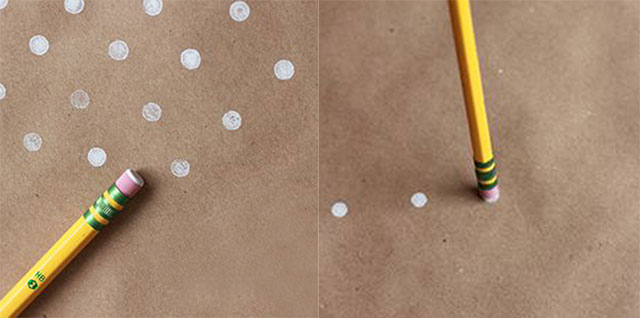
Let's prepare the colors on the palette that we will work with - in this case it is black and white.

We pick up a little paint with a sponge, beat it on the palette so that it does not drip from the sponge, and apply the polka dots with stamping movements.
Decoupage
But for decoupage we need to cover the base with white primer. Apply a thin layer of primer, then after drying, carefully sand the surface.
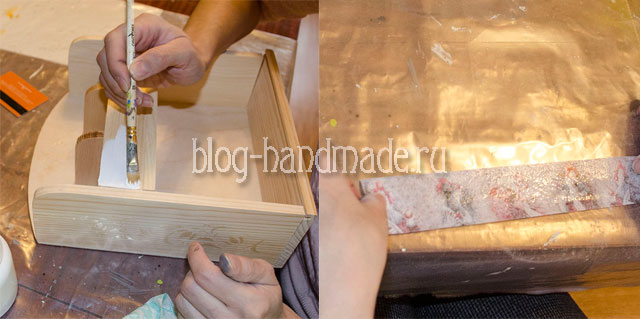
If you are working with a printout, then first thin it out, cut it to the required size, and place it in a container of water for 1-5 minutes, depending on the thickness of the paper. It is better to moisten larger pictures with a sponge. The more the paper gets wet, the better it will stick. Glue is applied to the base and back of the pictures, this will make it easier to adjust their position when gluing.
It is convenient to paste the printout onto the base using the file method. Let's do so. Let's go over the file with a roller or plastic card, thus expelling all air bubbles and excess glue. Carefully remove the file. We blot the water and glue that has leaked out from under the paper with a cloth.
Let's move on to the next stage.
Coloring
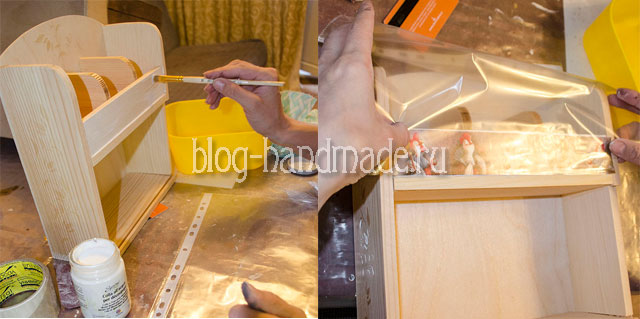
Mix paints to obtain the desired color. Dilute with water to a liquid consistency (like stain) and evenly paint the wooden piece.
Keep in mind that the color on a wooden base may not appear as rich or deep. Therefore, when adding water, test the resulting shade on a draft or the back of the workpiece. The wood pattern and our pattern from the modeling paste should be visible on the painted surface.
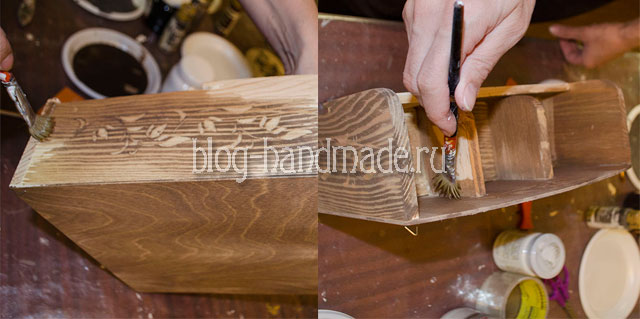
After the workpiece is completely dry, sand its surface with fine-grained sandpaper. When painting, we slightly tinted the patterns that were applied using a stencil. Therefore, to make them brighter, let’s “clean them” with a damp cloth, as shown in the photo.

The finishing touch
Voila! All that remains is to decorate the shelf with stained glass tape and secure the decor with 2-3 layers of acrylic varnish.

![]()
If you don’t have stained glass tapes, you can get by with patinaing the edges with bitumen varnish or acrylic paints. Place a little bitumen varnish on a sponge, then use a tamponing motion to darken the edges of the shelf.
All is ready! Let's decorate the interior of our kitchen with it and let this work become your another little pride. After all, you made it with soul and, most importantly, with your own hands!

Inspiration to you, dear readers, I love you all, see you again!
The kitchen, like any other room in the house, needs decoration. Of course, you can go to a hardware store and buy a charming pepper shaker with a salt shaker or cute oven mitts, an apron, cutting boards, the front side of which is decorated with patterns and other decor. But isn't it better to make crafts for the kitchen with your own hands?
Crafts yourself? It is not difficult! By showing your imagination and using the master classes presented below, you can create things that will suit the style of your kitchen and at the same time bring coziness to such a warm room.
What will go into kitchen crafts?
DIY kitchen crafts can be made from various materials. We often have them at hand.
- Fabric: various potholders, napkins, teapot cloths.
- Glass bottles and jars. Let's fill them with colorful contents.
- Regular cutting boards.
- Cardboard.
- Plastic bottles.
- Multi-colored paper or colorful magazine covers.
- Pasta, cereals, etc.

Look around the kitchen - what would you like to put in it? Now let's get to work.
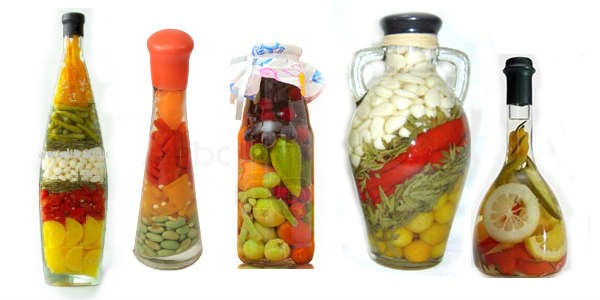
Bottle with colorful contents
Bottles that attract attention with their colorful contents look beautiful in a kitchen designed in any style. Let's make them.
We will need:
- bottles made of transparent (colorless) glass;
- multi-colored vegetables, cut into cubes, cubes, slices or circles;
- cork;
- leg-split;
- vinegar;
- wax.
Remove labels from the bottle and rinse thoroughly inside and out.
Tip: to prevent the contents from becoming moldy in the future, boil the bottle.
Arrange vegetables the way you like. If the bottle is pot-bellied (like a cognac bottle), you can place lemon slices along the edges of the walls (remove the seeds). Pour vegetables up to the very beginning of the neck. A wooden skewer or a regular knitting needle will help to distribute the vegetables in places.
Pour vinegar into the bottle to the very top. We seal it with a cork or lid and fill it with wax so that the acid does not evaporate, spoiling the air in the kitchen. The wax should be soft, so heat it in a water bath. We wrap the top with twine - this will make the bottle look more beautiful.

You can decorate the outside of the bottle if you wish or leave it as is - it’s already good.
Instead of fruits and vegetables, you can take cereals or legumes: there are white, black, red beans, green beans, peas, white and red lentils. Or combine them with colored vegetables.
Bottle of salt
If there is a problem with vegetables, then salt in the required quantity is available in every home and nearby store.
But first you need to paint it in different colors. We use gouache paints or food coloring as a dye.
Let's prepare:
- interestingly shaped bottle;
- extra salt – it is the finest;
- paints or food colorings;
- stopper or cap;
- twine or ribbons;
- spatula or brush.
We wash the bottle, boil it and dry it well. Otherwise, in the future, the salt may swell from moisture and form a lump. You can dry and sterilize the bottle in the oven.
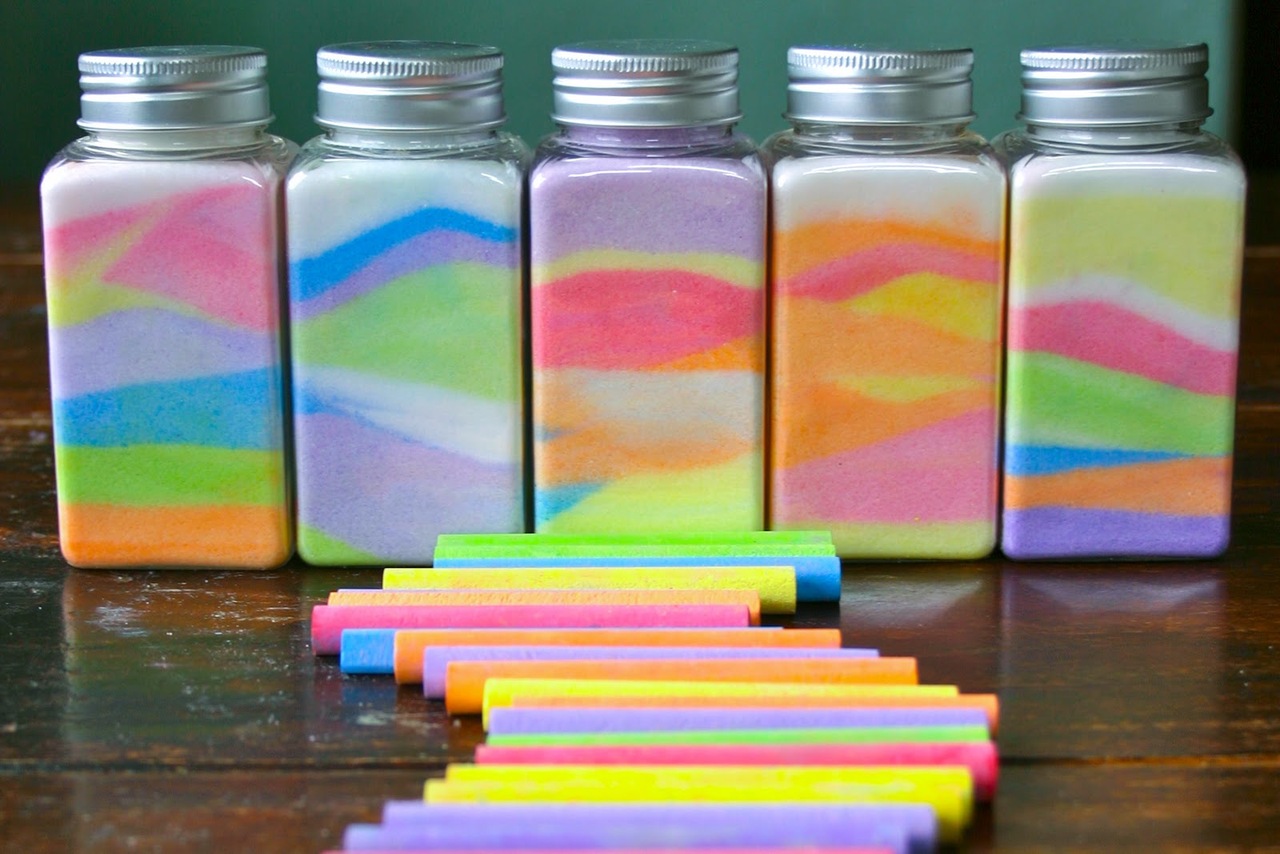
Salt, bottle and crayons...
Plastic containers, yoghurt or cheese boxes are needed for coloring salt - there is a separate container for each color. During coloring, the salt will collect in lumps, so it will need to be mixed and kneaded. The salt should dry out within a day. You can dry the salt in an hour in the oven, spreading it on a baking sheet.
Using a funnel, pour the colored and dried salt into the bottle in the order you came up with. To prevent colors from mixing, use a brush, carefully straightening each floor. Pour slowly - haste will lead to the fact that the border between colors will be blurred and it will be impossible to correct this - even Cinderella could not cope with dividing the mix of salt colors into separate ones.
Tip: tilt the bottle so that the top layer of each paint is not straight, but at an angle. Some craftsmen manage to make entire paintings in sand bottles. Salt is no worse.
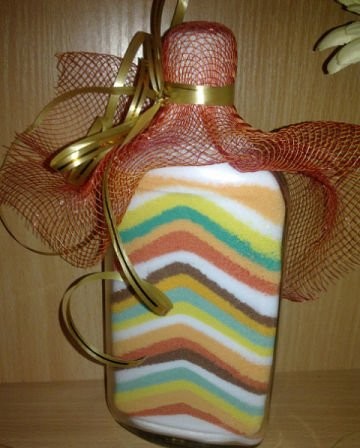
We close the finished crafts for the kitchen with our own hands with a cork, a lid, and wrap the top with twine or ribbons.
Fridge magnets
To attach small notes or a shopping list to the refrigerator, you may need refrigerator magnets, but instead of buying them, we will make them ourselves.
We will need:
- thick cardboard (can be cut from a box);
- paint: gouache, acrylic or watercolor;
- scissors, a flat brush, PVA glue and a clean sponge;
- napkins with a pattern;
- a block of notes for notes, glued on one side;
- short pencil;
- template of a figurine that will hang on the refrigerator;
- ribbon to match the napkins;
- colored paper.
Draw it yourself or print and cut out a template from which you will cut out the base for the magnet. It can be a hedgehog, a heart, a sun, a butterfly, a pear, an apple, a teapot and other figures. Use an awl or hole punch to make a hole at the top.
- The workpiece must be painted (primed) white, otherwise a brown background will show through the napkin.
- Glue a magnet to the back of the workpiece (you can use double-sided tape).
- Divide the napkin into three parts. From the top layer (it is colored), we cut out or tear off the design with our hands and paste over the dried blank, covering it with glue and on top of the napkin. There is no need to decorate the middle of the workpiece - there we will have leaves for writing. Let the workpiece dry.
- We decorate the edge of the workpiece by passing over it with a sponge dipped in paint.
Advice. To make the magnet moisture-resistant, varnish it with varnish or the same PVA glue.
- We wrap the pencil in a strip of colored paper, grease the ends with glue, and glue them to each other and to the workpiece on top. The pencil should be removed from the loop - you will use it to take notes.
- Glue a recording block to the center of the workpiece, hiding the ends of the paper tape.
- We pass a ribbon through the hole and tie it in a knot.
You can make several magnets: for recipes, for the daily menu, and for notes.
Organizer for storing packages
Fabric crafts for the kitchen also have a place. For example, a package organizer. So that they do not spoil the look of the kitchen, they need to be hidden. But in such a way that, if necessary, it is easy to get these bags.
You will need a piece of fabric measuring 40 cm by 50 or 60 cm. The length of the bag depends on how many bags you have. So the cut can be 40 by 50, or 40 by 40, or 40 by 30. Matching threads and cord. Instead of a finished cut, you can take scraps left over from sewing products and sew them into ribbons of the required width (40 cm). We also grind the ribbons together until you get the length you need.
- We connect the long sides together. We tuck the short sides and stitch them, leaving a part for threading the cord. This will be the top and bottom of the bag bag.
- We pull the lace through the drawstring and tie it into a knot.

You can compact the packages into a bag. We hang the bag on a hook or nail, and take out the bags from above or below by pulling the protruding edge.
Bag decor ideas. Get creative and make a doll or animal. To do this, sew a face or muzzle. Glue or draw eyes, mouth, nose, hair on them. For volume, fill with padding polyester or holofiber. To prevent the bag from hanging like a pot-bellied sausage, make a skirt for a doll or animal. It can start right from the neck - you don’t have to achieve a perfect resemblance to the characters.
The craft is ready to take its place on the kitchen wall or on the balcony.
Cup coasters
Favorite cups do not always have saucers - this is the prerogative of tea sets. But a hot cup can ruin the polish or scratch the glass countertop. In bars, such things for beer glasses are called coasters. We will make it ourselves and supply both a glass and a cup.

- You need damaged (non-recordable) CDs, padding polyester, fabric, thread, scissors and needles.
- We trace a disc on the fabric and, stepping back half or a whole centimeter from the edge, cut out two circles from the fabric and two more from padding polyester without allowance.
- The hole in the disk can be sealed with tape on both sides, filling the hole with a piece of padding polyester, or left as is.
- Place two circles of fabric together and sew only half of the circle. Otherwise, the disc simply won’t fit into our pocket.
- We attach the padding polyester to both sides of the disk with double-sided tape and insert our structure into a fabric pocket.
- Now, having threaded the needle, sew the two circles together using a blind stitch.
The stand is ready. You cannot iron it; the disc will melt. Hand wash only, in washing machine the disk may break.
Tea house

If you drink tea in bags, then it would be nice to build a tea house for them. All business! And you only need cardboard, a ruler, napkins with drawings, glue, a pencil and scissors.
So, we cut out the parts from cardboard.
- Four sidewalls with sides of 9 and 20 cm.
- 4 squares with a side of 10 cm for the bottom and roof.
- Roof lintel with sides 6 and 10 cm.
- Two triangles with a bottom side of 9.3 cm and a height of 6.5 cm.
The remainder of the cardboard will be used to fasten the parts.
Let's start connecting.
- In one of the sidewalls (in the lower part) we will make an arched opening - a window through which we will pull out the bags.
- We fasten the sides of the houses together using thick paper or thin cardboard. We got walls 20 cm high.
- The bottom was glued to the walls using the same fasteners. It extends 0.5 cm beyond the walls - this is how it should be for greater stability.
- We roll up a triangular pipe from a piece of excess cardboard and glue the two remaining squares to it - this is the roof slope.
- To prevent the roof from bending, we attach a lintel to it, bending the edges (we coat them with glue).
- We glue triangles to the sides of the roof.
- We wait for everything to dry and glue the napkin using the decoupage technique. Instead of a napkin, you can use a thin cloth or paper for wrapping gifts.

We coat our house with varnish to protect our house from moisture. Dry and use.
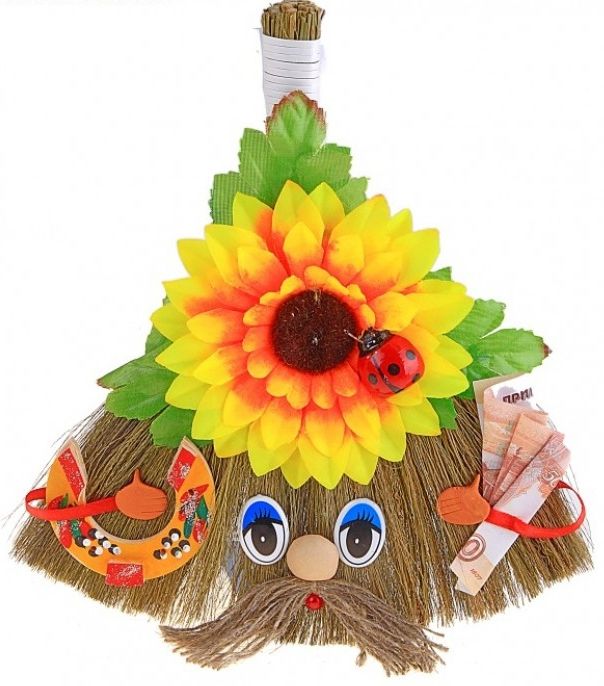
Broom-amulet
DIY kitchen crafts can be made from an ordinary paint brush - the one that is used to moisten the wall. It should be fluffy, made from natural materials. You will also need dried flowers: flowers, blades of grass; spices, dried fruits or dried vegetables, cereals and other decorative elements.
We divide the brush into two halves, so we can make two amulets.
The upper part (cutting) must be tied with wire so that the panicle does not fall apart. Spread the bottom one like a fan, generously coat it with PVA glue and put it under a press overnight.
According to folk traditions, there should be 12 elements on the panicle. And the panicle itself signifies abundance.
- Coins are for money.
- Cereals mean prosperity.
- Chili pepper - to male endurance and strength.
- Poppy seeds - for the fulfillment of desires.
- Rosehip - for facial beauty.
- Seeds - to the health and obedience of children.
- The image of a house is a sign of a family idyll.
- Bagels and pretzels - to satisfied guests.
- Corn is for the kids.
- Bast shoes - for comfort.
- Vegetables, dried fruits - for a rich harvest.
- Sunflower flower - to peace in the family.
- Lavrushechka - to fame and recognition.
- Walnuts - to youth and health.
- Garlic – against the evil eye and evil spirits.
- Jug - to health.
- Chicken egg - for children.
- Cones - to great achievements.
- Pumpkins - for a good harvest.
In the morning we take out the broom and attach the selected elements with wire, glue, and thread. All details must be bright so that the panicle is pleasing to the eye. Spray the finished composition with aerosol varnish and hang it in the kitchen.

How to hang a broom? It can be placed with the handle down or up. In the first case, the broom will lure wealth into the house, and in the second, sweep away evil from it. Which is better?
Remember, you have one more broom left? Make another broom and hang it in the hallway for other purposes.
These are just some of the kitchen crafts. You can also sew it.
The personification of comfort can be a variety of kitchen accessories that match the style. Most items can be bought in stores, but to get a truly original and exclusive interior, it is better to make it yourself. This approach will allow you to show your creativity and decorate the surrounding space in an interesting way. In addition, making accessories yourself will save a significant amount of money on decoration.
Currently, such a direction in design as handmade is gaining popularity. This allows you not only to beautifully decorate the interior, but also to introduce a little originality into the surrounding space, add zest and originality. Kitchen crafts can be not only a decorative item, but also a functional one. Various potholders, tablecloths, chair covers, hot pads, shelves, clocks, boxes and caskets, storage containers and much more are very popular.
The choice of material, style and decor directly depends on the interior of the kitchen. Therefore, before you start making this or that item, you should thoroughly prepare and think through all the details of future accessories down to the smallest detail.
Wall decor
You can start decorating your interior by decorating the walls. If the kitchen is wallpapered plain wallpaper or painted, then you can focus on one of the walls using a variety of decorating techniques:
- stencils,
- self-adhesive film,
- paintings,
- ceiling sockets.
Stencils with any suitable motif will help you create an original design or ornament. First of all, you need to prepare the image by printing it in the desired size and cutting out the pattern along the contour. Then you should carefully secure the sheet to the wall with tape and paint the cut out pattern with paint of a suitable shade.
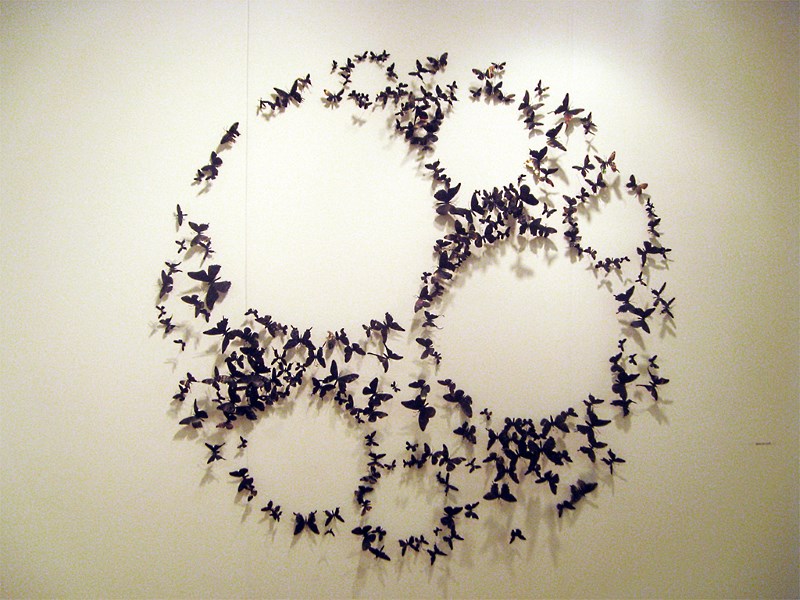
There are also ready-made patterns made on self-adhesive film. They are distinguished by a wide variety of choices; you can purchase both a simple pattern and a rather complex, sophisticated and unusual one. Among vinyl stickers, images of flowers, butterflies, various silhouettes, inscriptions, etc. are especially popular. A big plus is the ability to easily change a boring image to another.
Creative people and those who prefer exclusive interior solutions can decorate their kitchen with wall paintings. This is not only unusual and original solution, but also sophisticated and luxurious. The size of the painting and the motive of the image depend only on personal wishes and capabilities. Naturally, the drawing should look organically in the interior. You can do the painting yourself if you have skills in this matter, or order it from an artist.
Ceiling rosettes made of polyurethane or plaster can be an interesting interior solution. They can be painted in any color and fixed to the wall with glue, creating the desired composition.
To decorate one wall or part of it, you can use ceramic tiles with a beautiful pattern or mosaic. Patterned wallpaper or photo wallpaper are also suitable.
Advice! It should be remembered that a bright, variegated or multi-figured ornament can be used only in separate fragments of walls or on one of them as an accent, so that the interior does not turn into an uncomfortable and irritating to the eye room.

Window decoration
In addition to decorating the walls, it is important to pay attention to such details as the window. For the kitchen it plays no less important role than for the living room or bedroom. To make the room always cozy and elegant, you should choose the right curtains. Textiles must meet all the requirements of the interior style of the kitchen, and externally overlap with other items: tablecloths, furniture covers, etc.
In a small room, light curtains made of transparent or translucent fabric are suitable. More spacious classic kitchens can be decorated with curtains consisting of tulle and drapes. Simple roller blinds or blinds will fit perfectly into minimalist style interiors.
If you wish, you can sew the curtains yourself by choosing the appropriate fabric and decor. The following details can be selected as decoration for curtains:
- do-it-yourself grabs;
- embroidery, decorations made of beads, lace, sequins;
- fringe, lambrequins, etc.

Interior items
The character of the room is determined by the accessories. You can buy various products in the store, but it will be much more interesting and unusual to make them yourself. In addition, most items are not particularly difficult to manufacture.
Among the products that you can make yourself without spending a lot of time and effort, the following stand out:
- potholders, tablecloths, napkins, aprons, chair covers, curtains;
- paintings, panels, posters, embroidery;
- shelves and stands for cutlery and dishes;
- hot coasters;
- cutting boards;
- flower pots, boxes, clocks, etc.
Products for decorating the kitchen can be created with your own hands using various techniques: decoupage, burning, patchwork, embroidery, sewing, sawing, painting, knitting, etc. You can also use a variety of available materials such as matches or toothpicks, bottle caps, coffee beans, cardboard, paper, plaster, buttons, beads, etc.
Chair covers
If the kitchen interior is made in Provence or country style, then elegant and beautiful covers for chairs and stools will come in handy.
To work you may need:
- scissors,
- chalk or soap,
- fabric (cotton or chintz, as well as any other suitable for the style and interior)
- lace,
- sewing and safety pins,
- rubber.
The first step is to measure the stool seat and make a pattern. From a suitable fabric, cut out a piece of the required size with a seam allowance of ten centimeters on each side. Next, you need to sheathe the square around the perimeter, leaving space for the elastic.
Then you need to stretch the elastic band and tighten the fabric on the seat of the stool to form beautiful folds. For greater elegance, you can decorate the cape with lace or stitching, sewing around the perimeter. The cover for the back of the chair is made according to the same principle, starting with taking the dimensions. Safety pins come in handy to secure the ribbon or bow to the corner of the chair. So, the cover will look even more delicate and flirty.
![]()
Mug stand
Not all mugs and cups in the house have saucers. Most often, a cup with a bright design or inscription, given for some holiday, is the most beloved. Tea, coffee and other drinks are drunk from it every day. But a hot surface can easily ruin the table covering, leaving scratches and unattractive marks. To prevent such situations, you should get a special stand for hot mugs and plates.
First of all, you need to prepare the following materials:
- a CD that is no longer in use,
- padding polyester,
- fabric matching the color and decor,
- scissors, thread, needles.
The first step is to trace a disc on the fabric and cut out the resulting part, leaving seam allowances of a centimeter or one and a half. You need two such elements and two more from padding polyester, but without allowances. Next, fold the two circles of fabric together and sew through half, leaving room for the disc.
It is necessary to attach the padding polyester to the disk on both sides using tape and insert it into the prepared fabric part. Use a blind stitch to sew up the hole in the stand. The edge can be decorated as desired by sewing on braid, lace or ribbon. Do not iron the stand to prevent the disc inside from melting. It is recommended to wash by hand only.
DIY kitchen crafts open up space for imagination and allow you to show all your creative abilities. For some, this process can turn into a real hobby. Decorating the kitchen will allow you to get not only beautiful and unusual accessories, but also, in most cases, very functional items that allow you to store cereals, spices or kitchen utensils, protect the surface of furniture from scratches and other marks, cut food, etc.