What to do if suddenly stopped charging your laptop? If you have a problem charging your MacBook, we advise you to go to service center, where real professionals will offer you their help. First of all, it will be necessary to determine the exact cause of the breakdown. There are 2 options to consider here:
This cable will allow you to charge your computer on almost any device
Until recently, this possibility was only available theoretically. Moreover, these cables are not very expensive because they cost $10. For art. However, the fact that such an opportunity exists does not mean that it pays off. It's very, but it's a very slow download. When this was turned off, it only managed to increase the battery's charge by 5 percent.
This solution has its drawbacks, but it's still worth your attention.
After half an hour. Simple math shows that it takes up to 10 hours to fully charge the battery. This will allow you to charge your equipment in unusual conditions, such as on an airplane. The truth is that carrying a battery is not convenient. If I need to carry two devices, is there a better option for a faster, longer on a single charge, and cheaper computer? In this situation, they only offer a slightly longer charging time, and once charged, the rechargeable battery can charge mobile device many times.
- Problem with the hardware (difficulties in the power circuit or connector).
- There is a problem with the battery or charging.
Let's take a closer look at the first problem (A). If your MacBook laptop does not charge, the following problems may occur:

Problem (B) is with the battery.
In the case of computers it is completely different. In turn, the loading time is long enough that the entire project will only be useful in crisis situations and will not replace a wall socket installed in the coming years. Only laminate defects such as delamination, dendrites, spines or tin pits can be prevented.
- There is no image on the matrix characteristic.
- The flashing sound output to the matrix lights up, but there is no image on it.
- The laptop does not charge the battery.
- The image on the laptop screen lights up for a second and then goes out.
If suddenly it doesn't charge accumulator battery MacBook Air, Pro, as a rule, this means that the battery has lost capacity or has become unusable. IN in this case you need to try to restore it (restore capacity) or simply replace it.
If, when you move the cursor to the panel where the battery status is displayed, it cannot be detected, the MacBook problem is as follows:
The laptop does not turn on when the battery is not charging - Possible reasons: damage to the power supply, motherboard refusal. The laptop does not turn on and the battery is charging - Possible reasons: damage to the motherboard. Incorrect image display on the matrix - Possible reasons: damage to the image sensor, damage to the tape signal matrix.
Battery not charging - Possible causes: Battery malfunction. Depending on the malfunction, there may be a defective battery element or electronics located in the integrated battery case, a damaged power supply, a defective motherboard.
- Most likely the battery has become unusable. This means that it will have to be replaced.
- If laptop can't see the battery, perhaps the reason is in the power circuit. In this case, you will need to do diagnostics immediately before we carry out high-quality Apple Mac repairs.
If MacBook laptop sees the battery that is in it, but when you pull out the charging cable, the laptop turns off, the problems may be the following:
The touch panel does not work or the button panel does not work - Possible reasons: damage touchpad, touchpad buttons damaged, touchpad ribbons damaged, motherboard damaged. You can try to clean the laser lenses yourself; in some cases, such an operation will solve our problem. To clean the lens, get a swab on a stick and perfume or perfume with high alcohol content, then proceed as follows.
Cleaning a lens with a laser on a movable carriage should be done very carefully so as not to break the lens from its socket. The laptop was flooded, laptop flood - This is one of the worst laptop failures. Please note that as soon as possible after flooding, disconnect the adapter alternating current and remove the battery. Then, notify the service to clean the landing laptop as soon as possible. The more liquid in the laptop, the more corrosion progresses. The laptop will be taken down, cleaned in an ultrasonic bath, and then repaired if necessary.

- Most likely, the battery is simply not fully latched, which means there is no contact. To correct the situation is quite simple - try to pull it out, and then reinsert it. This should help.
- If the laptop does not turn on from the battery, the contacts may be missing, oxidized or damaged. It will be necessary to do cleaning.
- The battery on the MacBook has become unusable. It doesn't take much time to replace it.
- If the motherboard or power circuit is damaged, then it is not surprising why the device does not work as it should. We will conduct a deep diagnosis, get ahead of the real cause of the malfunction, and then repair the laptop.
If your laptop battery drains quickly.
How quickly the equipment is in service, including the greater the likelihood of successful repairs. For getting additional information You can find more information on this topic in the repair of flooded laptops section. Take advantage of our offer, which will allow you, without leaving your home or business, to return equipment for repair with a door-to-door courier, so that in a few days you can again enjoy its proper operation.
X-ray inspection will not show us the situation associated with improper wetting of the alloy, and it will not be possible to fix the connection in the event of an improperly evaporated flow. Most services on the Polish market are limited to the statement: “faulty motherboard, faulty motherboard, faulty power supply, etc. must be replaced."
- The battery does not hold a charge - this means that it has simply lost its capacity and needs to either simply be replaced, or taken to a TV workshop, where the capacity can be restored.
- If it does not charge the battery, there may be excess consumption, and the battery is not designed for this, as a result of which it runs out very quickly. Excess consumption occurs as a result of moisture getting inside, through failure of the microcircuit itself. It is necessary to diagnose before repairing MacBook Air, Pro. Entrust this difficult work to our professionals, as unqualified intervention can lead to very serious consequences.
| Seize the moment: 2 weeks left until the end of the promotion! Seasonal discount 40-70% |
||
| Matrices (model, matrix size in inches") | Cost in rub. | Installation cost No glass/there is glass |
| Macbook 11.6"-17" | 4800 3800 | 900/1900 |
| Macbook Pro 13,3"-15,4" | 4800 3800 | 900/1900 |
| Macbook Pro 17" | 6800 5800 | 900/1900 |
| Macbook Air | 6800 5800 | 900/1900 |
| Macbook Air (screen with case) | 13600 12600 | 900/1900 |
| Protective glass | 3900 2900 | 900/1900 |
| Accessories | ||
| Name of spare parts | Cost in rub. | Installation cost (repair) in rub. |
| CD and DVD drive | 2900 1900 | 900 |
| Winchester ( hard disks) | From 3000 From 2000 | 900 |
| Keyboards | 5900 4900 | 900 |
| System power connector | 2400 1400 | 900 |
| USB connector | 2600 1600 | 900 |
| RAM ( RAM) | From 2000 From 1000 | 900 |
| Processor (CPU) | From 1900 From 900 | 900 |
| North Bridge (video chip) | 3800 2800 | 1900 |
| South Bridge | 3800 2800 | 1900 |
| Video card | 3800 2800 | 1900 |
| Inverter | 1900 900 | 900 |
| Backlights | 1900 900 | 900 |
| Plume | 2600 1600 | 880 |
| Cooler | 2800 1800 | 880 |
| Motherboard repair | from 900 | |
| Troubleshooting OS errors | from 900 | |
| Case parts | from 900 | 900 |
| Complete laptop cleaning | Cleaning the cooling system, cooler, replacing thermal paste, cleaning the entire laptop with compressed air. | 1500 |
If you find that your Macbook Pro's battery can no longer be charged from the original adapter, do not rush to poke it with a soldering iron. As stupid as it may sound, the first thing to do is:
- If you can't restore.
- Cleaning the keyboard with ultrasonic cleaners.
- Repair or replacement of any type of tapes and signal cables.
- Inverter repair.
1. make sure the contact in the socket is reliable (do not use a broken one);
2. make sure that there is power in the outlet (plug another, known working device into it);
3. check that the laptop’s power socket is not filled with foreign objects (usually food crumbs, compressed dust balls and other insects get there);
We invite you to check our authority on the tab on home page. All indications are that after a software update, quite a few commercially available replacement cables with the new 8-pin connector refuse to comply. By the way, unfortunately, users are confused.
The option does not include cable replacement, so some users may still experience problems. Which should be expected this spring. According to the connector's patent specification, the plug will not be connected to the computer as it has been until now, but will stick to it thanks to magnets.
4. Carefully inspect the yellow contacts of the connector. They should not be burnt, blackened, or oxidized. When you try to push them in, the pins should come back without jamming. It is advisable not to scratch the gold-plated coating again;
5. make sure that the cord from the adapter to the connector has no mechanical damage, no kinks, no bare wires sticking out from under the insulation, no office chair running over it, etc. You can easily replace a damaged wire with your own hands with any other appropriate cross-section. In MacBooks, there are only two wires from the power supply to the Magsafe 2 connector:
I was particularly interested in the description of the power supply with its various connectors. As the patent shows, the power supply also has the ability to connect devices to it as well, so it essentially acts as a specific hub. Of course, in this situation too we encounter many voices of criticism and ridicule. If your laptop battery is not charged or not fully loaded, follow the tips below to find out the exact reason. Are you having problems charging your battery? This is not only disappointing, but it is probably a sign that something is wrong.
If you are a very lucky person, simply unplugging the adapter for a few minutes can save you. It happens that, due to a power surge in the network, the charger goes into protection and needs time to think about the blocking being reset.
Sometimes, when connecting the adapter to a Macbook, the charging indicator does not light up, but in fact charging in progress. The fact is that the required indicator (orange or green) is lit upon command from the SMC system management controller located in the MacBook. Sometimes, due to accumulated errors, the SMC begins to fail and then resetting the controller helps.
If the battery is more than 3 years old, then there is every chance that the battery is faulty. Average time battery life laptop is 400 cycles, if you use it once every two days it will fail in about two years and you will probably need new battery.
If the battery is between one and two years old, there is a 50% chance of damage. If the battery is new, you have a very low chance that the battery is faulty. How many times have you bought the remote control battery remote control and were damaged?
Who has two batteries in the house? This is by far the most common case. Chargers lose power over time and although seemingly working, it may not have enough power to charge the battery. Also, if you recently bought a new battery and find that it won't boot, the prime suspect is the old one. Charger.
To do this, you need to connect the adapter to a completely switched off (not sleeping, namely switched off) MacBook, press the key combination Shift+Control+Option and, without releasing them, press Power. Then, simultaneously releasing all the buttons, turn on the laptop with the controller reset.
With an old battery! -Yes, but the new battery consumes more because it is actually loaded, unlike the old one. The laptop is coming to the charger, it just won't load, so the charger is good! -No, the charger provides power. The power decreases over time and if it drops below the limit, it cannot charge the battery and support the laptop.
Perhaps, but from our experience the charger is also responsible for messages such as: "Insert, not charge" "Battery not detected" "Insufficient time remaining." If you don't have another charger available, turn off your laptop and leave it with the battery in it for a few hours. If the laptop is turned off and the battery is charging, the charger is faulty and you need to replace it.
If all else fails, you will have to make a friend with exactly the same MacBook and quietly swap chargers with him and try to connect to his charger. It is not necessary that your friend has exactly the same adapter - a more powerful one will also work. The main thing here is that the connectors match.
KO says that if your charger does not work (the battery in the MacBook does not charge), and when you connect someone else’s charger everything works like a charm, then your charger is broken. The bravest ones can tell their wife that the purchase of a mink coat is canceled again, since a MacBook is more important to you than some kind of fur coat. In the meantime, we will try to fix the adapter ourselves.
Another case: a faulty laptop connector. Check the plug on your laptop, it may be faulty. If that doesn't work you need to open your laptop and check for continuity, you most likely need an electronics repair. The motherboard may be the problem if it won't charge either old battery, nor any new battery. And if the battery is loaded into another laptop, you probably have a problem with the motherboard.
This is the most expensive problem, the motherboard is difficult to repair, very expensive to buy and worth the replacement itself. Test: only an electronics engineer can tell if a laptop is good. You need to attend the service. Software problems for those who don't know what they are software, are problems that are not related to the physical side of the laptop. There are programs that regulate charging and can, especially with modern batteries, cause problems. They are divided into two categories.
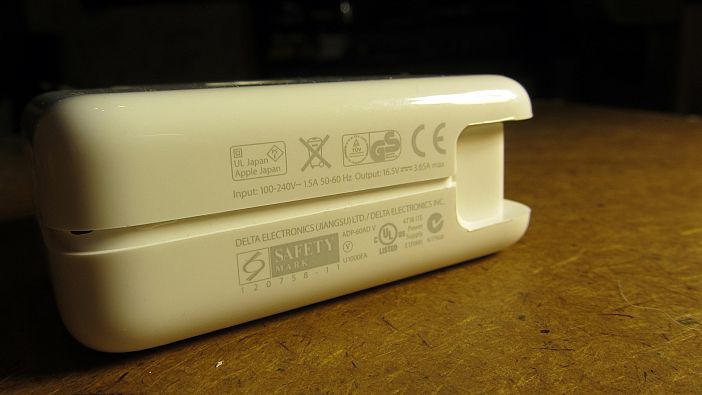
I happened to have a faulty power supply with a MagSafe 2 connector and a power of 60 W, so the following will mostly be true for this adapter. This charger was included with 13-inch MacBook Pro models with Retina display:
- MD212, MD213 (late 2012)
- MD212, ME662 (early 2013)
- ME864, ME865, ME866 (late 2013)
- MGX72, MGX82, MGX92 (mid 2014)
- MF839, MF840, MF841, MF843 (early 2015);
Macbook Pro charging repair
Before you dig into the internals, it's useful to know how the charging process is initiated. You might be surprised, but Apple engineers managed to integrate microprocessor control even into such a simple device as a charger. Here are the key points:
- operating voltage is 16.5 Volts. However, as long as the adapter is not connected to a load, its output has an open circuit voltage (about 3V) with a current limit of ~0.1 mA;
- After connecting the connector to the MacBook, the adapter output is loaded with a calibrated resistive load, due to which the open circuit voltage drops to a level of ~1.7V. The 16-bit microcontroller in the charger detects this fact and after 1 second commands the output switches to output full voltage. Such difficulties allow you to avoid sparking and burning of the connector contacts when connecting the charger to the laptop;
- when connecting too large a load, or when there is short circuit, the open circuit voltage will drop significantly below 1.7V and no command to turn on will follow;
- The Macbook Pro power connector contains a DS2413 microchip, which immediately after connecting to the MacBook begins exchanging information with the SMC controller via the 1-Wire protocol. The exchange takes place over a single-wire bus (middle contact of the connector). The charger tells the laptop information about itself, including its power and serial number. The laptop, if everything suits it, connects its internal circuits to the adapter and tells it current mode operation, based on which one of the two LEDs in the connector lights up. The entire exchange of pleasantries takes less than 100 milliseconds;
Considering the above, it is unlikely that you will be able to charge your MacBook without its original charger. It's also not possible to check the power supply without a MacBook. 
Theoretically, for testing, you can connect a 39.41 kOhm resistor to the two extreme contacts of the Magsafe connector (which is not so easy to do, given the design of the connector). After a second, a voltage of 16.5 Volts should appear on the resistor. In this case, the indicator on the connector will not light up.
For those who don't know, the block connector Apple power supply Magsafe 2 has the following pinout: 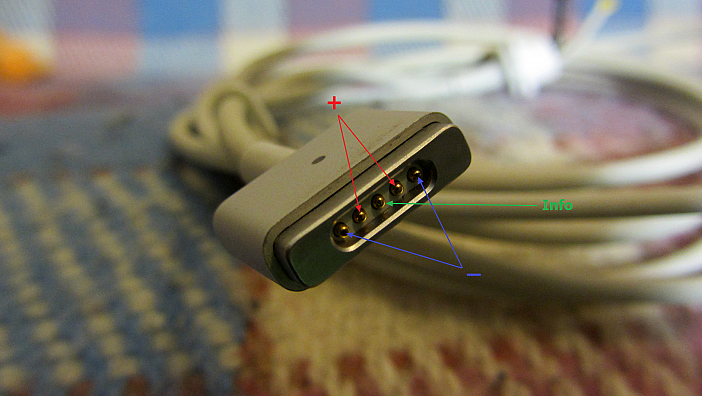
This clever design of the charging socket allows you to connect your Macbook without worrying about polarity.
Despite the fact that the original adapter has all kinds of foolproof protection built in, you should not treat it with disdain. The power of this power supply is enough to burn you with flames at the first opportunity, splash you with molten metal and scare the crap out of you... hiccups.
How to painlessly disassemble the adapter
To disassemble the Macbook charger you will have to use brute force, since the halves of the case are glued to each other. The most painless option is to use pliers as shown in this video:
I was able to disassemble the power supply from my Macbook Pro in 2-3 minutes (most of the time was spent finding a convenient stop for the pliers). After this, light traces of an autopsy still remain: 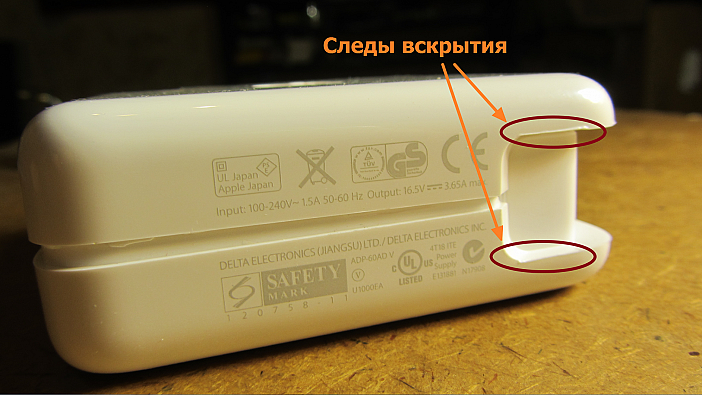
After the case is opened, you need to carefully inspect the printed circuit board to identify burnt tracks, charred resistors, swollen or leaking electrolytes and other anomalies.
The board will most likely be filled with some kind of compound; it needs to be carefully removed. And it would be nice not to tear off anything unnecessary. 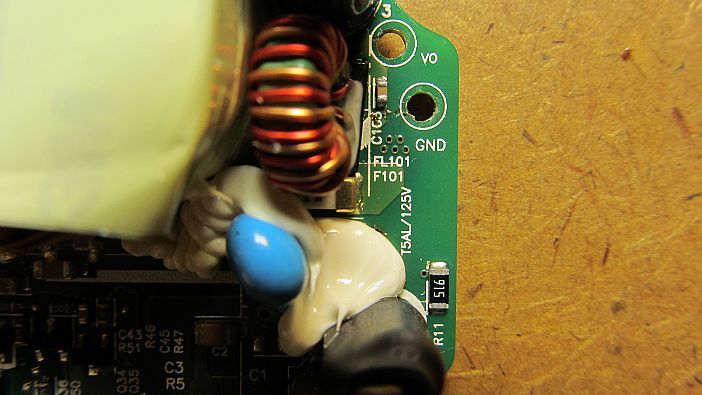
It wouldn't hurt to immediately ring the 3.15A fuse. Here it is, in a brown case: ![]()
If the fuse is faulty, this usually indicates a breakdown or diode bridge, or a power MOSFET, or both. These elements burn most often, since they bear the main load. They are very easy to find - they are located on a common radiator. 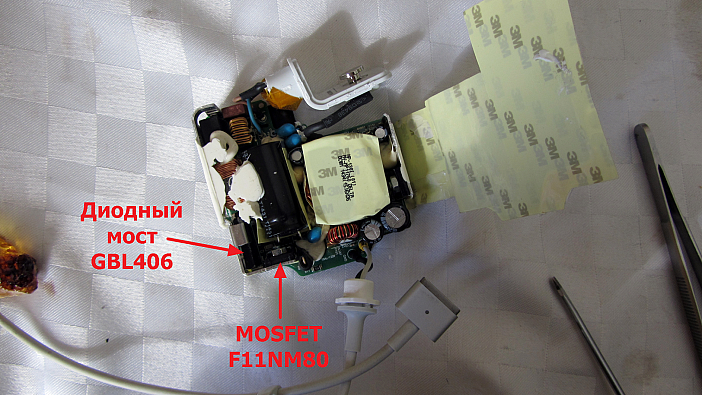
If knocked out field-effect transistor, it makes sense to check the low-resistance resistor in the source circuit and the entire snubber circuit (R5, R6, C3, C4, D2, two chokes FB1, FB2 and capacitor C7): 
When repairing a Macbook power supply, it is strongly recommended to connect it to a 220V network through a 60-watt light bulb. This will prevent devastating consequences in the event of a short circuit in the circuit. 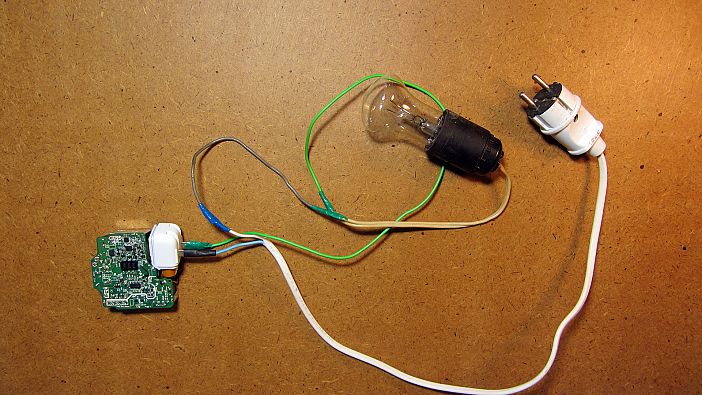
Be extremely careful! A high-voltage capacitor can maintain life-threatening voltage for a long time. I got caught once and it was extremely unpleasant.
If, after replacing faulty elements, the power supply does not start, then, alas, I have to admit that further repair of the charger Apple devices Magsafe 2 is not possible without an electrical circuit diagram.
By the way, the most reliable way to find out whether the circuit is working or not is to measure the voltage at the output electrolytes. On the working adapter there should be 16.5V: 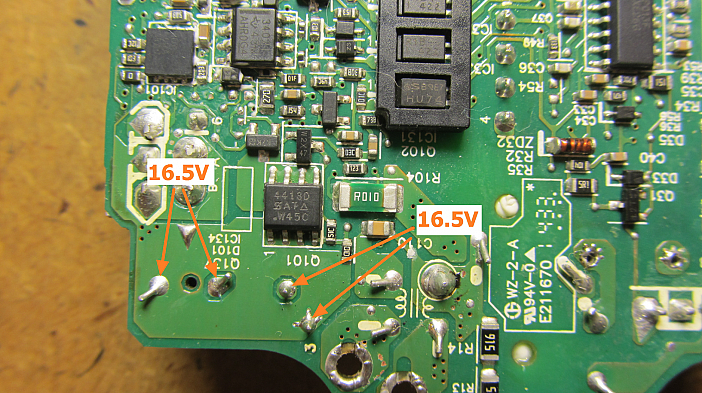
Magsafe 2 adapter circuit (60 Watt)
Find schematic diagram Macbook power supply failed, so there was nothing left to do but copy it from printed circuit board. Here is the most interesting fragment: 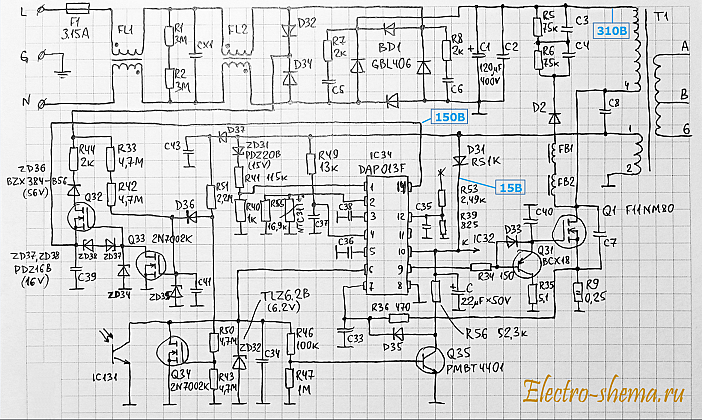
As can be seen from the diagram, the charger is assembled according to the classic single-cycle circuit pulse block nutrition. The heart of the converter is the DAP013F chip - a modern quasi-resonant controller that allows you to achieve high efficiency, low noise levels, and also implement protection against overload, overvoltage and overheating. 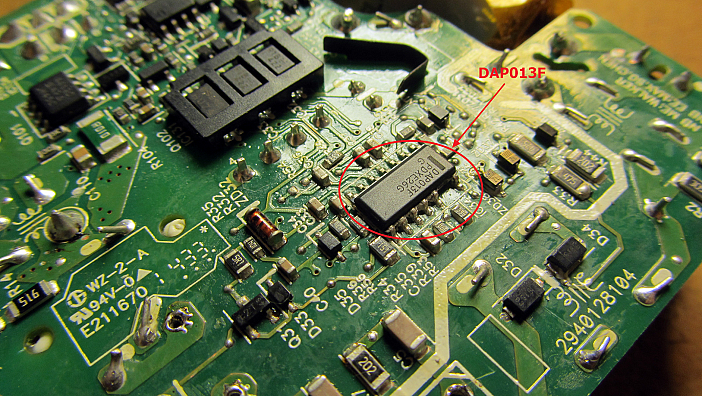
At the initial moment of time, after connecting the adapter to the socket, there is no voltage on winding turns 1-2; accordingly, the voltage at the gate of transistor Q33 is zero, and it is closed. At its drain, the voltage is equal to the operating voltage of the zener diode ZD34, which is supplied there from a full-wave rectifier formed by diodes D32, D34 and part of the power diode bridge BD1, through a chain of resistors R33, R42.
Transistor Q32 is open and capacitor C39 begins to charge from the same diode rectifier (via the circuit: R44 - ZD36 - Q32). The voltage from this capacitor is supplied to the 14th leg of the IC34 microcircuit, which, through its internal switch, is connected to pin 10 and, accordingly, to a 22 µF electrolytic capacitor C (we could not find its designation on the board). The initial charging current of this capacitor is limited to 300 μA, then, when the voltage across it reaches 0.7 V, the current increases to 3-6 mA.
When capacitor C reaches the startup voltage of the microcircuit (about 9V), the internal oscillator starts, pulses from the 9th pin of the microcircuit are sent to gate Q1, and the entire circuit comes to life.
From this moment on, the voltage of the IC34 microcircuit is supplied from capacitor C, the voltage on which is generated from winding 1-2 of the transformer through the rectifier diode D31. In this case, the internal switch of the microcircuit breaks the connection between the 14th and 10th pins.
Protection against excessive increase in output power is implemented using elements ZD31 - R41 - R55. When the voltage at the output of winding 1-2 increases above the breakdown voltage of the zener diode, a negative potential appears at the 1st pin of the microcircuit, which leads to a proportional decrease in the amplitude of the pulses at the 9th pin.
Overheating protection is implemented using an NTC31 thermistor connected to the 2nd pin of the microcircuit.
The 4th pin of the microcircuit is used to determine the moment of switching of the output switch at the points of minimum current.
The 6th pin of the microcircuit is designed to stabilize the output voltage of the adapter. In the chain feedback includes an optocoupler IC131, which provides galvanic isolation of the high-voltage and low-voltage parts of the adapter. If the voltage on the 6th leg drops below 0.8V, the converter switches to reduced power mode (25% of the rated power). For correct operation in this mode, a capacitor C36 is required. To return to normal operation, the voltage on the 6th leg must rise above 1.4V.
The 7th leg of the microcircuit is connected to the current sensor R9 and if a certain threshold is exceeded, the operation of the converter is blocked. Capacitor C34 sets the time interval for the auto-recovery system after an overcurrent.
Pin 12 of the microcircuit is designed to protect the circuit from overvoltage. As soon as the voltage on this leg exceeds 3V, the microcircuit goes into blocking and will remain in this state until the voltage on capacitor C drops below the controller reset level (5V). To do this, you need to unplug the adapter from the network and wait a while.
It seems that this adapter does not use the overvoltage protection functionality built into the chip (in any case, I was not able to trace where resistor R53 is connected to). Apparently this role is assigned to transistor Q34, connected to the feedback circuit in parallel with optocoupler IC131. The transistor is controlled by voltage from winding 1-2 through a resistive divider R51-R50-R43 and in the event of, for example, an optocoupler malfunction, it will not allow the microcircuit to increase the converter voltage uncontrollably.
Thus, this 60-watt power adapter implements three-fold protection against exceeding the output voltage of permissible limits: an optocoupler in the feedback circuit, a Q34 transistor in the same circuit, and a ZD31 zener diode connected to the 1st leg of the microcircuit. Add here also protection against overheating and overcurrent (short circuit). It turns out to be a very reliable and safe charger for a MacBook.
In Chinese chargers, most of the protection systems are thrown away, and, in the interests of economy, there are no circuits for filtering RF interference and eliminating static electricity. And although these crafts are quite functional, you have to pay for their cheapness with a higher level of interference and an increased risk of failure of the laptop power board.
Now, having the diagram in front of your eyes and imagining how it should work, it will not be difficult to find and fix any malfunction.
In my case, the malfunction of the adapter was caused by an internal break in resistor R33, which is why transistor Q32 was always locked, the voltage did not flow to the 14th leg of the controller, and accordingly, the voltage on the capacitor WITH could not reach the chip's turn-on level. 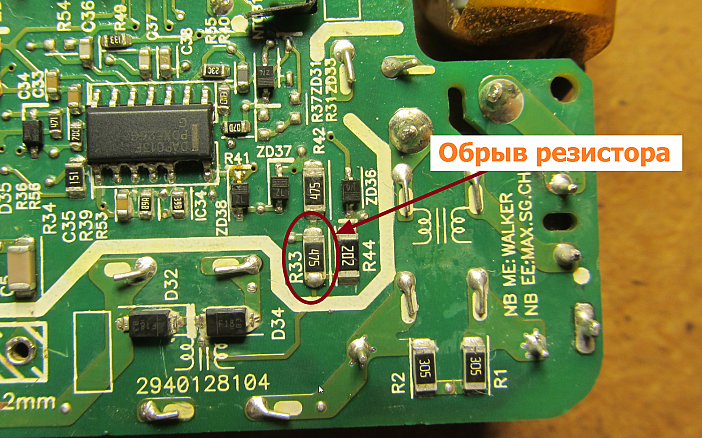
After soldering resistor R33, the microcircuit trigger circuit was restored and the circuit started working. I hope this article will help you fix the charger on your MacBook Pro.
To help you identify completely burnt-out elements, I am attaching an archive with photographs of the board in high resolution(37 photos, 80 MB).
And people dissected exactly the same charger, only with a power of 85 W. Interesting too.