Sometimes it happens that when you try to install the seventh version operating system Windows (and only this version) at a certain stage, instead of starting the installation, the system displays a message that it cannot find a driver for the optical drive. Windows 7 is a rather capricious OS in this regard. But the saddest thing is that installation can be done from a regular flash drive, and there is no optical drive at all! Where is the logic? This issue requires a deeper and more careful study, so let’s consider what can be done if required driver for the optical drive was not found (we take Win 7 as a basis).
Previously, everyone complained about Vista: it looked absolutely crude and unfinished, but then, as it turned out, it was the turn of Vista, which was also not immune to various kinds of shortcomings, which appeared, to the chagrin of many users, even at the installation stage. There are not many solutions to this problem, but some of them can improve the situation. First, let’s figure out why this error appears, and only then will we make a decision on how to deal with it.
The essence of the error “The required driver for the optical drive was not found” (Win 7)
Actually, it's not even a matter of installation distribution, although he sometimes plays an important role. The so-called pre-installation system is to blame for everything here. Windows environment PE (Pre-installation Environment), which is responsible for starting the installation and is built into the core of the system.
And the appearance of a notification that the required driver for the disk drive was not found indicates that there are problems with it. As a rule, it simply cannot recognize the USB drive, considering it an optical disk (even though there is no drive). But sometimes this can actually apply specifically to optical drives (it will become clear why later). And this situation may not always apply specifically to PE, since you can find quite a lot of completely different cases, when this environment, by and large, has nothing to do with this problem.
Possible causes of the problem
As for the reasons why a notification is issued that the driver for a laptop drive (of any type, because USB port- this is also a disk drive) or there is no desktop PC, there can be quite a lot, but among the most common the following are usually distinguished:
- Not correct connection drive;
- using USB 3.0 without support from a flash drive;
- sudden removal of a disk or flash drive (or loss of contact in the port) during the installation process;
- installing the system from a disk with custom firmware;
- incorrectly recorded ISO image;
- corrupted ISO image;
- damaged or low-quality media (disks with the noname attribute);
- drive clogged with dust;
- drive or port failure.
Based on the above reasons, we will look for a solution to fix the problem. All of them are quite simple and do not require any special knowledge.
Checking the drive connection
First, let's look at how to connect a disk drive, if we are talking about optical drive. The fact that it needs to be inserted into a special compartment on a stationary terminal, laptop, or used external connection, everyone knows. But installing the drive is not the most important thing. The main thing is to correctly connect the cables to it.

Please note that cables for hard drive and the drives are the same, but it's all about the Master/Slave jumper. Remember: the hard drive is always connected only through the Master (naturally, if there is only one HDD), and the drive is exclusively via Slave. Along the way, pay attention to the interface used (IDE, SATA, etc.) and the position of the jumper.
It’s clear how to connect the drive. But why then does nothing happen when you insert a disk into it? In theory, when the reading process begins, the drive should flash led indicator, but the drive shows no signs of life.
Activating the device in BIOS
The problem here may be that this device is simply not activated in the primary system, so it is not available to the primary system (an error related to the fact that the driver for the DVD drive is missing may also be issued in this case).

To check when restarting a computer or laptop, you should enter BIOS settings, then check in the equipment section whether the drive is visible. If yes, you may need to enable it (select Enabled in the device line). After this, you can reboot and look at the result.
Problems reading optical discs
But it often happens that the drive is recognized and active, but the disk is not readable. The system again displays a notification that the driver for the CD drive is missing.
IN in this case The problem may be that the drive itself has dust on the optical lens or it has simply failed. But most often the problem is caused by low-quality media. In such a situation, you can simply try to burn the image to another disk and try to install from it.
On the other hand (and this is confirmed sufficiently big amount users and specialists), most often a message stating that the required driver for the drive was not found is received by all those who recorded the image in the UltraISO program. Moreover, this applies equally to optical discs and USB drives. Why this happens is not known for certain, but the fact remains.
Another type of problem, when the system reports that the necessary driver for the disk drive was not found, is a damaged installer image. In this case we are talking about a situation where it was downloaded from the Internet. Perhaps you should find another resource and download the image from there, and then burn it to the desired media.
The same, by the way, applies to unofficial custom repacks. In theory, during the installation process the system installs the necessary drivers from its own database automatically, but in such firmware the necessary driver may not be present as such. The solution is to download the official distribution (if activation is required, you can always use the tiny KMSAuto Net utility, although this is illegal).
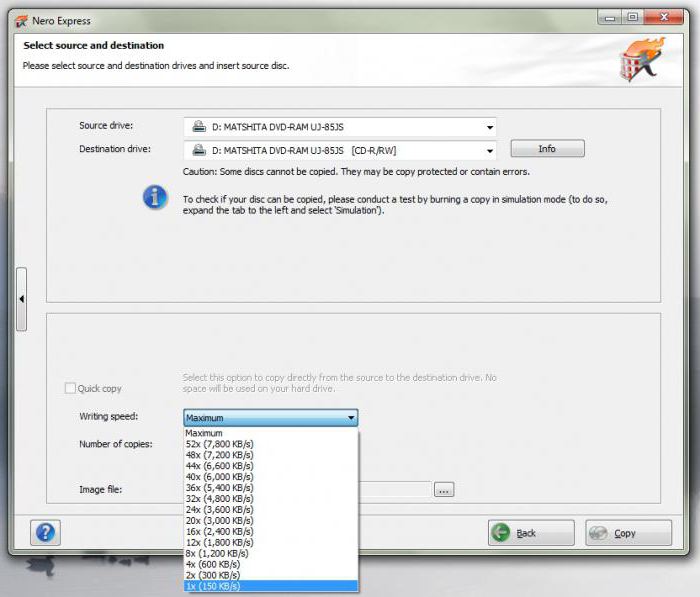
Finally, the reason for the message that the required driver for the drive was not found may be a completely trivial situation when the disk was burned on maximum speed. It is believed that the best option for recording is the minimum speed supported by both the drive and the optical media itself (it is best to use 2x, if possible, 1x or at least 4x, but not higher).
Checking functionality in Device Manager
But perhaps the drive itself does not work for some reason. In such a situation, you can simply connect it to another computer with already installed system and check its performance there. If the OS does not install the appropriate software, in the Device Manager (devmgmt.msc in the Run menu), the drive will be marked in yellow or labeled as unknown device. In this case, there is nothing else left to do except download the required driver.
Where can I find the driver for the floppy drive?
This is where problems begin for many people. If the disk drive is detected in the system, but the driver is missing, you need to not only find it on the Internet, but contact the manufacturer’s official resource. It’s not worth downloading it from anywhere, since you can easily catch a virus.
But there are so many drivers on the manufacturer’s website that even for one device or similar devices there can be dozens of them. To select exactly what you need, in the “Device Manager” you should use the properties section, called up via RMB on the drive line, and go to the details tab, select the equipment ID in the drop-down menu at the top and use the most accurate search long string, containing the identifiers DEV and VEN. In principle, you can also go to special sites that are created to find drivers using this data. After downloading, the driver along with the image will only need to be written to a USB drive and installed from it, and if an error occurs, indicate the path to the driver on the removable device.
from USB stick
But even here the user faces troubles. A driver missing message may appear even in this case.
First of all, try simply removing the flash drive from the port and inserting it back (you never know, maybe the contact is lost). If this doesn't help, use a different port. Finally, look at which port the drive is inserted into (Windows 7 USB interface 3.0 does not support). The inside of the port itself is usually painted blue.
BIOS settings and options
If this option does not work, you must use the BIOS again. Here we are interested in several important settings.

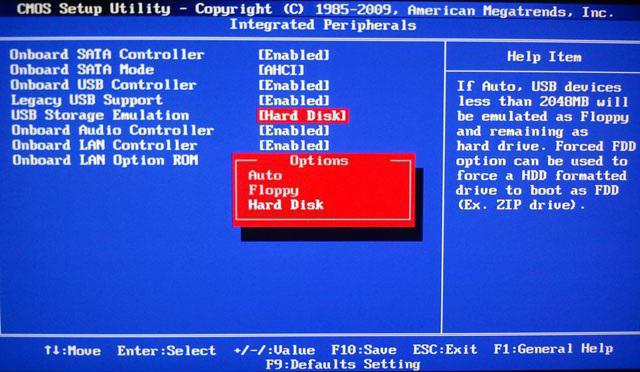
First of all, the HDD operating mode must be switched to AHCI (without this, installing any system is simply impossible).
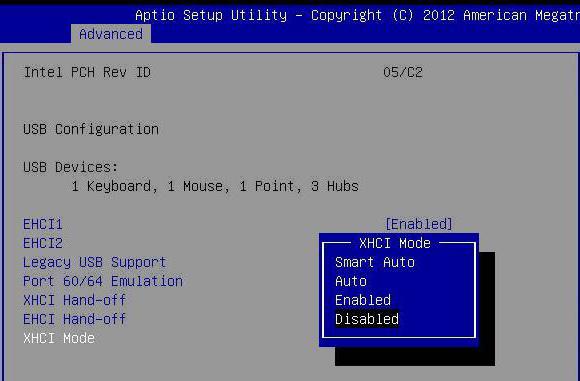
If your computer actually has a USB 3.0 port, you need to temporarily disable it in the settings. In addition, for USB, you need to deactivate the XHCI mode, and set the USB emulation parameters to Auto.
After completing all the steps, of course, you need to save the changes made (usually F10 + Y or the “OK” button is used), then boot from the removable media and install again, not forgetting to set the flash drive first to boot.
This technique, judging by the same reviews on a variety of forums, works flawlessly. In the end, you can simply completely format the media and change the program for recording the installation image. You never know...

Sometimes it is completely impractical to perform the above settings. You just need to reset all parameters to the factory state and try the installation again. Who knows, maybe this option will give the desired result. In any version or modification of the BIOS, you can find a line like Load Setup Defaults or something similar, use it and agree to change the parameters.
As a last resort, if BIOS settings nothing works at all, and the message about the missing driver appears again and again, you can try the latest solution, which is to download and install newer firmware for the primary I/O system. True, if in some systems the update item is already built into the shell itself, there will be no problems. But for all other modifications, you will have to download and install the firmware yourself, but you should be extremely careful, since if the firmware is inappropriate or even if there are power outages during its update, the consequences can be catastrophic.
Problems with the disk drive in the installed system?
But let’s assume that the system was installed from a USB device. It happens that users complain that the disk drive is not visible in Explorer, and they immediately begin to panic. It's not worth it because this is a normal situation. The fact is that some models of optical drives have accompanying software that hides the drive in file managers until a disc is inserted into it.
If the drive is not visible even with a disk inserted, you should check its definition in Device Manager. If it is not there either, you need to expand the list using the display of hidden devices. Perhaps the driver itself was installed incorrectly. To correct the situation, you will have to either update the driver (in the RMB menu or on the corresponding tab by clicking the button of the same name), or remove the driver or device completely, and after Windows reports that new hardware has been found, but an error occurred during the driver installation process (such also happens), install the corresponding software yourself, indicating as the source the same flash drive on which the driver was recorded in the previous stages. In the end, you can simply copy it to your hard drive and select the location there.
However, these are all standard situations that can be corrected quite simply. But it may also be that the drive in the system is working properly, but for some reason the drive does not read discs. What to do in this situation? There may be several options: a damaged disk, a dusty or broken drive (although visible in the system). In the first case, just insert normal media and look at the result. In the second, you can blow out the drive a little, so to speak, or remove dust and dirt from the main exit pocket. If none of this has any effect, the drive will have to be repaired or even replaced altogether. At the same time, you should not buy any specific models for which drivers may not be in the system database, but give preference to common brands. The system will install, as it seems to it, the most suitable driver, but in fact the drive will not be able to operate under its control.
Brief conclusions
So, these are all the situations that may be associated with errors indicating the absence of the necessary drivers for the drives. As you may have already noticed, this problem does not apply only to DVD drives, since even if they are absent, it can appear when trying to install Windows 7 from USB drives or even external HDDs, which are also classified by the system as disk drives.
It is believed that if there is no optical drive, the most effective solution is to set the above parameters in the BIOS, plus use only the 2.0 interface for USB, since the third modification is not supported in the “seven”.
If we are talking exclusively about optical drives, the most likely reasons could be incorrect connections and problems with installation images or unofficial distributions, not to mention, of course, purely technical failures.
Accordingly, when such problems are identified, one or more of the above solutions must be applied. At least one proposed technique will help.
You have downloaded the driver.
You have a driver disk, but you don't know what to do next.
In this article I will try to make it somewhat easier for you to install drivers yourself.
There are several ways to install drivers. Let's call them figuratively:
1. Installation using installation disk
2. Installation using setup file
3. Installation using Device Manager
a) automatically
b) from the specified place
- installation without searching, specifying the driver file (forced installation)
Let's look at each of them using the example of driver installation sound card motherboard Foxconn.
Installation using the installation disc
You bought the equipment - motherboard, printer, laptop, video card, etc..
As a rule, the kit includes a special disk (or several disks) with drivers and various programs, utilities.
Some equipment requires you to first install the driver, and then only connect the device itself. Usually, this is specifically indicated either in the manual or on the packaging.
To install the driver, the installation disk must be placed in a CD/DVD drive. If disk autorun is not enabled, you must manually click on the CD/DVD reader in “My Computer.”
After this, the navigation menu of the installation disk starts (Fig. 1).
Picture 1
In the menu, select the required driver (in our case, the Audio Drivers sound card driver) and click the install button. The button can have a different appearance - as a full-fledged button with an inscription, for example Install, or graphic image(as in our case)
Figure 2
After pressing the button and checking the system, the driver installation program starts.
Figure 3
When various menus appear asking you to accept license agreements or something similar, you should boldly accept everything and completely agree. Operating systems often appear much earlier than hardware. And therefore, during installation, some drivers require you to confirm a digital signature (Fig. 4) or your consent to install an incompatible driver.
Figure 4
This is a very common and common occurrence. Here you can safely continue the installation. As a rule, if the driver is taken from a trusted source, from the manufacturer’s website, and even more so from the original installation disk, this warning serves solely as an annoying factor for the user.
After the driver installation is completed, a prompt to reboot the system usually appears (Fig. 5). For a more correct installation, it is better, of course, to agree, wait for the reboot and then proceed to install the next drivers.
Figure 5
This is the simplest and most understandable way to install the driver even for an inexperienced user. Today, almost all manufacturers provide installation disks with a Russian-language menu - this makes installing drivers on a computer even easier. There are also fully automated installations of the entire set of drivers (mother Asus boards, GigaByte, laptops). There the user is required to press only one button.
Installation using a setup file
This method is practically no different from the first method. Its only difference is that the user does not have an installation disk from the equipment manufacturer, and the driver (archive with the driver) was downloaded from the Internet or taken from another source.
If the available driver is one single file with the extension .exe (or .msi), then simply run this file and then follow the installation instructions - they are not much different from those described above.
If the driver is an archive, it must be unpacked into a folder. In the unpacked folder, find the startup file setup.exe (or install.exe).
Figure 7
Namely, when various menus appear asking you to accept license agreements or something similar, you should boldly accept everything and completely agree (Fig. 4). After the driver installation is completed, you should reboot (Fig. 5).
As you can see, this method is as simple as if you had a driver disk. The only difficulty is finding a driver for your equipment.
Installation using Device Manager
This method requires a little experience working with computer settings.
When the first two methods do not help, but you know for sure that the downloaded driver is specifically for your operating system and hardware, then installation using Device Manager should help you.
Unpack the archive with drivers into a folder.
Launch Device Manager. To launch it, click on the "My Computer" icon right click mouse and then select "Control" (Fig. 8)
Figure 8
In the “Computer Management” window that appears, select “Device Manager” from the list on the left (Fig. 9)
Figure 9
That's actually the device manager. All connected devices that require driver installation are marked with a question mark. If the device type is determined by the operating system, then you see the type name in the list.
In our case, we have a motherboard sound card driver. In the list, the device is named as “Multimedia Audio Controller” (Fig. 9).
To install the driver, right-click on the required device and select “Update driver” (Fig. 10).
Figure 10
Since the installation will not take place from the Internet, but from the folder with drivers, in the next window you should stop searching for drivers on the Internet. Click "Next" to continue.
Figure 11
The next window requires you to select the installation type.
You can install:
a) automatically
b) from the specified place
Automatic installation
Almost nothing is required from you. This method is the simplest, but time-consuming, since the Installation Manager will search for drivers in all folders of the Computer, and not just in one folder with drivers.
Select "Automatic installation" and click the "Next" button.
Figure 12
The Installation Manager will begin searching for drivers on your Computer.
Figure 13
If the found driver asks for consent to install, you should allow the installation (if you are sure that the found driver fully matches the hardware and operating system).
Figure 14
After installation is complete, you should reboot.
Figure 15
IN automatic mode During installation, the device manager often does not find the necessary drivers (Fig. 16). Or the search for a driver on the Computer takes too long (due to the huge number of files and folders on the Computer).
Figure 16
In this case, you should select "Install the driver from a specified location."
Installation from a specified location
Installing from a specified location installs drivers faster and more reliably, unlike Automatic installation. The search occurs from the specific folder where the drivers are located. Therefore, there is no search throughout the entire Computer.
To begin Installation from a specified location, you must select “Install from a specified location” in the installation method selection window (Fig. 17) and click “Next”
Figure 17
The next window (FIG. 18) offers two types of installation from the specified location:
Installation with driver search in the specified location
- installation without searching, specifying the driver file
Installation with driver search in the specified location
If you do not know a specific driver file, then choose this installation method.
Check the box "Search for the most suitable driver in the specified locations."
If your driver is located anywhere on external media(floppy disks, CD/DVD disks, etc.), check the box "Search on removable media" and click the "Next" button
Figure 18
if you know the location of your specific driver folder, select "Include the following search location" and click the "Browse" button to select the folder
Figure 19
In the Explorer window, point to the folder with the driver for your operating system. If the selected folder contains a suitable driver, the "OK" button becomes active when this folder is selected. Click the "OK" button
Figure 20
After selecting the driver search locations, click "Next"
Figure 21
The search for the driver begins in the specified locations
Figure 22
If the found driver asks for consent to install, you should allow the installation (Fig. 14.). After installation is complete (Fig. 15), restart the Computer.
In any case, if the driver is successfully installed after a reboot (or immediately) in Device Manager, you should see completely installed device(Fig. 23).
In our case, this is a Realtek AC "97 Audio audio device. When correct installation There should be no questions or marks with errors. And you can start installing the next device.
Figure 23
Installation without searching and specifying the driver file
This method is often called " Manual installation" or "Forced". This method is used, as a rule, by experienced users and in especially difficult installation cases. When all the methods described above did not help, but you know for sure that you have the correct driver in the folder, then this method should definitely help.
In the installation method selection window, check the box "Do not search. I will choose required driver" and click the "Next" button
Figure 24
In the next window, click the "Have from disk" button. If you are quite experienced in installing drivers, then you can uncheck the “Only compatible devices” checkbox.
Figure 25
To locate the driver, click Browse
Figure 26
In the drivers folder, find the appropriate driver (usually a file with the .inf extension) and click the "Open" button
Figure 27
and then the "OK" button
Figure 28
In the list of devices that appears, select the required one (preferably with digital signature) and click on the "Next" button
Figure 29
driver installation will begin
Figure 30
After installation is complete, you should reboot
Figure 31
And be sure to check that the driver is installed correctly after rebooting.
Figure 32
That's all. Of course, this is not a solution to all problems - very often installing drivers involves downloading several versions of drivers and selecting each one manually. It is especially difficult to install sound drivers for laptops. Before installing the driver here, you should install a special patch on the audio device bus.
If you need help installing drivers and searching, you can always contact the Site Administration in the Contacts section
Some HP computers, such as HP Mini laptops, do not have CD/DVD drives. If you want to install software from a disc onto a computer without a CD/DVD drive, use one of the methods described in this document.
Installing software using an external CD/DVD drive via USB.
An external CD/DVD drive can be connected via any USB port on the laptop. For use external USB CD/DVD drive to install the software on your laptop, follow the instructions below.
Connect USB cable to the USB port on the laptop.
To get information about connecting and turning on external drive, refer to the documentation included with your USB CD/DVD drive.
After installing the drive, insert the software disc into the drive and begin installation.
Installing software using a USB drive
Use another computer that has a CD/DVD drive to copy the files from the disc to a USB flash drive, and then transfer them to a computer without a CD/DVD drive. To use a USB drive to install software on your laptop, follow the instructions below.
-
And then select OK.
Create new folder on the USB drive by right-clicking on an empty space in the window and selecting New and then Folder. Name the folder the software name.
Double-click the new folder to open it. Right-click the folder name and select Paste.
Once the files are copied, close the window and remove the USB drive from the computer.
Insert the USB drive into a USB port on a computer without a CD/DVD drive.
When the AutoPlay window appears, click Open folder to view files, and then select OK.
If the AutoPlay window does not appear, simply open the USB drive by clicking Start, Computer, or My Computer and selecting the appropriate drive.
Right-click on the software folder and select Copy.
Right click in any free space desktop and select Paste.
If the installer does not launch automatically, double-click the software folder on your desktop to open it.
Look for a file called Setup.exe, Start.exe, Install.exe, or similar.
To begin installation, double-click the file and follow the on-screen instructions.
Insert a CD with software into the CD/DVD drive.
IN Windows Vista Click Start , Computer and double-click the CD/DVD drive icon.
In Windows XP, click Start, My Computer, and double-click the CD/DVD drive icon.
Select all files and folders, right-click and select Copy.
Note.
If a message box appears Available hidden files or folders. Include them in the selection?, click OK.
Sharing another computer's CD/DVD drive over a wireless network
Settings wireless network allows you to open general access to a CD/DVD drive on another computer on the network, and then use the shared drive to install the software. If you are running Windows Vista, you will also need to grant permissions to share the drive.
Following these instructions will allow computers on your network to share your CD/DVD drive, configure access permissions, and install software.
Step 1: CD/DVD Drive Access Settings
To share a CD/DVD drive between two computers, follow these instructions according to your OS type. Follow these steps on a computer equipped with a CD/DVD drive.
On Windows Vista:
Click Start, Computer, right-click the CD/DVD drive, then select Properties from the drop-down menu.
The Properties window will open.
On the Access tab, click Advanced setup, and then select the checkbox. In field Name shared resource:
Click Permissions to open the permissions window. In the permissions window, check Full Control.
Click Apply then OK to close the permissions window.
Click Apply and then OK to close the advanced settings window.
On Windows XP:
Click Start, My Computer, right-click your CD/DVD drive, then select Access and security in the drop down menu...
The Properties window will open.
Click the item If, despite this, you still want to share the root folder of the drive, click here., check the box Share this folder. In field Share name: Enter the drive name for easy identification from another computer.
Select item Allow modification of files over the network and click the Apply button.
Click Close to close the properties window.
The CD/DVD drive can now be accessed from other computers on the network.
Step 2: Configure Access Permissions in Windows Vista
The instructions in this section apply only to Windows Vista. If you are using Windows XP, you can skip this section.
To access files in a CD/DVD drive shared between two computers on the network, enable file sharing and sharing to files in shared folders.
To enable file sharing and shared folders, follow these steps.
Click the Start button, type sharing in the search bar, and then select an item from the list Network and Sharing Center.
Some HP computers, such as HP Mini laptops, do not have CD/DVD drives. If you want to install software from a disc onto a computer without a CD/DVD drive, use one of the methods described in this document.
Installing software using an external CD/DVD drive via USB.
An external CD/DVD drive can be connected via any USB port on the laptop. To use an external USB CD/DVD drive to install software on a laptop, follow the instructions below.
Connect the USB cable to the USB port on your laptop.
For information about connecting and turning on the external drive, see the documentation that came with your USB CD/DVD drive.
After installing the drive, insert the software disc into the drive and begin installation.
Installing software using a USB drive
Use another computer that has a CD/DVD drive to copy the files from the disc to a USB flash drive, and then transfer them to a computer without a CD/DVD drive. To use a USB drive to install software on your laptop, follow the instructions below.
-
And then select OK.
Create a new folder on your USB drive by right-clicking on an empty space in the window and selecting New and then Folder. Name the folder the software name.
Double-click the new folder to open it. Right-click the folder name and select Paste.
Once the files are copied, close the window and remove the USB drive from the computer.
Insert the USB drive into a USB port on a computer without a CD/DVD drive.
When the AutoPlay window appears, click Open folder to view files, and then select OK.
If the AutoPlay window does not appear, simply open the USB drive by clicking Start, Computer, or My Computer and selecting the appropriate drive.
Right-click on the software folder and select Copy.
Right-click anywhere on your desktop and select Paste.
If the installer does not launch automatically, double-click the software folder on your desktop to open it.
Look for a file called Setup.exe, Start.exe, Install.exe, or similar.
To begin installation, double-click the file and follow the on-screen instructions.
Insert the software CD into your CD/DVD drive.
In Windows Vista, click Start, Computer, and double-click the CD/DVD drive icon.
In Windows XP, click Start, My Computer, and double-click the CD/DVD drive icon.
Select all files and folders, right-click and select Copy.
Note.
If a message box appears There are hidden files or folders. Include them in the selection?, click OK.
Sharing another computer's CD/DVD drive over a wireless network
Setting up a wireless network allows you to share a CD/DVD drive on another computer on the network, and then use the shared drive to install software. If you are running Windows Vista, you will also need to grant permissions to share the drive.
Following these instructions will allow computers on your network to share your CD/DVD drive, configure access permissions, and install software.
Step 1: CD/DVD Drive Access Settings
To share a CD/DVD drive between two computers, follow these instructions according to your OS type. Follow these steps on a computer equipped with a CD/DVD drive.
On Windows Vista:
Click Start, Computer, right-click the CD/DVD drive, then select Properties from the drop-down menu.
The Properties window will open.
On the Access tab, click Advanced setup, and then select the checkbox. In field Share name:
Click Permissions to open the permissions window. In the permissions window, check Full Control.
Click Apply then OK to close the permissions window.
Click Apply and then OK to close the advanced settings window.
On Windows XP:
Click Start, My Computer, right-click your CD/DVD drive, then select Access and security in the drop down menu...
The Properties window will open.
Click the item If, despite this, you still want to share the root folder of the drive, click here., check the box Share this folder. In field Share name: Enter the drive name for easy identification from another computer.
Select item Allow modification of files over the network and click the Apply button.
Click Close to close the properties window.
The CD/DVD drive can now be accessed from other computers on the network.
Step 2: Configure Access Permissions in Windows Vista
The instructions in this section apply only to Windows Vista. If you are using Windows XP, you can skip this section.
To access files in a CD/DVD drive shared between two computers on the network, enable file sharing and file sharing in shared folders.
To enable file and shared folder sharing, follow these steps:
Click the Start button, type sharing in the search bar, and then select an item from the list Network and Sharing Center.