Windows itself selects the optimal screen resolution based on: monitor (display) size, video adapter, installed drivers. The article will tell you how to change the screen resolution in Windows 10, 7, 8 if you notice any deviation in the display (blurriness, mismatch in size, the appearance of black bars on the sides).
Screen resolution is measured in horizontal and vertical pixels. With low resolutions of LCD monitors (displays), for example, 800 by 600, fewer objects will fit on the screen and they will appear larger. At higher resolutions, such as 1920 by 1080, objects will appear smaller, thereby allowing you to see more elements displayed. Modern monitors(displays) allow you to set the resolution lower than the native one without loss in quality. To set up the most acceptable picture, follow the recommendations below.
Manually changing screen resolution
To change the screen resolution on Windows 7, 8, right-click on free space desktop. In the menu that pops up, select “screen resolution” to open display settings (they helped in the previous article).
There is another way to get to the resolution change settings. . In the “view” area, set small or large icons. From the list of options, find “screen”, click it.
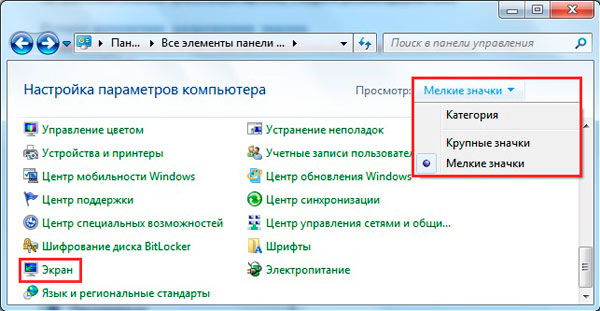
Note: if all screens are not displayed, click “find”, if you are not sure which display needs to change the resolution, click “determine”. This will briefly show a large screen sequence number to uniquely identify it.
In the screen settings you click on which a vertical slider will become available. To decrease or increase screen resolution in Windows, drag the slider. The native resolution is marked as “recommended” and is the highest, which is optimal.

Click OK, then you will see a preview of the selected resolution and a message if you are sure click “save change”.
You can change the screen resolution in Windows 7, 8 from the list of ready-made options. In screen settings, click " Extra options" Next, on the “adapter” tab, click “list of all modes”. Modes consist of 3 elements: resolution, color depth, refresh rate (in Hz). Select a mode, press OK, OK, confirm changes.

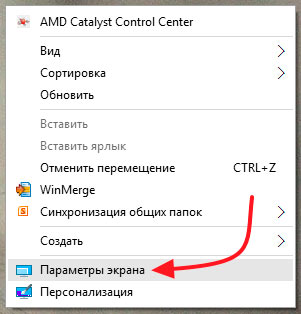
In Windows 10, screen resolution changes slightly differently. When calling the menu, by clicking right click(on an empty space on the desktop), you need to select “screen settings”.
Click on the current resolution, then set yours. Don’t forget, the optimal one is the one next to which there is a “recommended” mark. Click "Apply" and then "Save Changes". This way, you can change the screen resolution in Windows 10. If you encounter problems, read on.

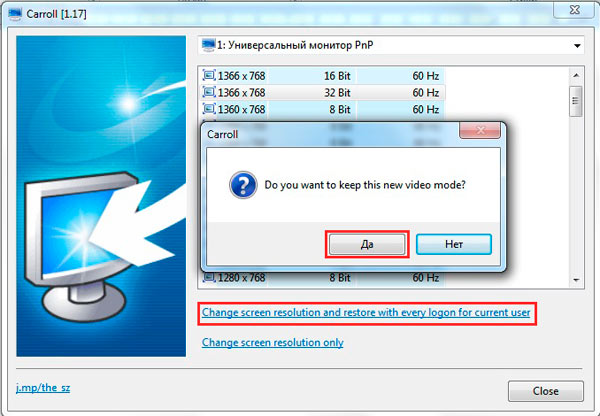
I present a program for changing screen resolution - Carroll. It also allows you to set each account your permission. Download the zip archive and unzip it. Install Carroll on your computer.
After launching the program, many resolution options (other parameters) will be available in its interface; select the optimal one. To change the screen resolution on Windows and save it every time you start your PC, click on the first link and “yes” in the message.
Enabling Screen Settings
Sometimes when you try to adjust the screen resolution on Windows 10, 7, 8, the options become pale and cannot be changed. There are 2 ways to enable these settings.
1. Download the archive with the reg file and unpack it. Run vkl-razresh.reg, when the User Account Control prompt appears, click “yes”, then “yes”, OK. Restart your computer to apply the changes.
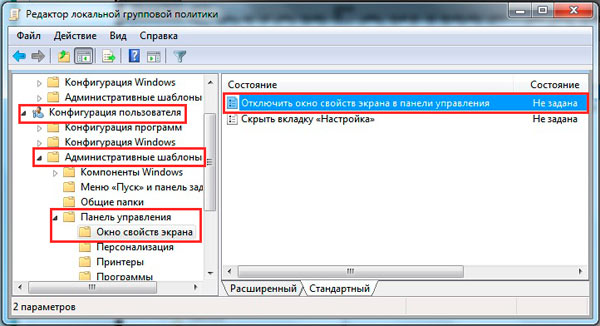
2. Open the editor group policy. To call it, enter gpedit.msc, click OK. In the editor, go to the “screen properties window” section (see screenshot). IN right side, double-click the screen settings option. In the next window that opens, mark one of the two states: “not set”, “disabled”. Next, click OK and close the windows. At the same time, you can change the screen resolution without restarting the computer.
Troubleshooting problems when changing resolution
Users are faced with the problem that the screen resolution in Windows does not change or changes, but before the first reboot or exit. It is recommended to restart the system first; if the problem persists, try these tips:
- Recently installed programs may well have a negative impact on the resolution settings in Windows. You will need .
- Make sure there are no problems with your graphics drivers. Check whether the drivers are installed at all, and also make sure that they are installed latest versions.
- , see if it helps or not.
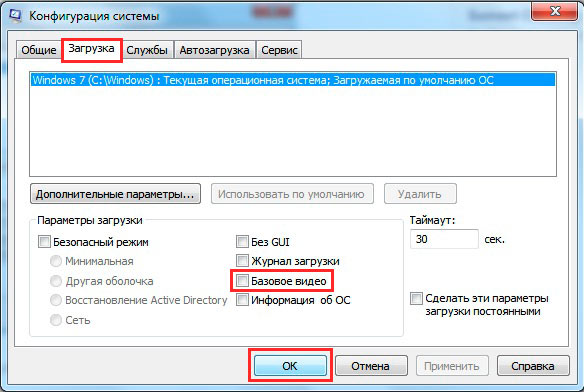
- Press Win + R, type msconfig, press enter. In System Configuration Options, go to the "Boot" tab. Make sure the "base video" option is unchecked. If you unchecked the box, click OK and restart your PC.
As you can see, changing the screen resolution in Windows 10, 7, 8 is quite simple, especially in most situations it’s not worth it, because by default the OS itself chooses optimal settings. By following the recommendations, you can easily identify and eliminate any problems with the display of the monitor (display).
Let's talk about changing the screen resolution. Select the command Screen => Adjust screen resolution. In the change resolution window, you can select the screen resolution.
Click the More Options button. On the Monitor tab, you can select the screen refresh rate.

To prevent eye pain, you need to choose a frequency of at least 85 Hz. If your adapter or monitor does not support 85 Hz, you need to select a lower resolution that can set the frequency to 85 Hz. In extreme cases, a refresh rate of 75 Hz will do, but not 60 Hz.
Let's return to the Personalization window. In the center of the window there is an area for selecting desktop themes. Themes come in two types: Aero Themes and Basic Themes. If your system meets the Aero interface requirements, one of the Aero themes will be selected. But if you see that the system is slowing down, you can choose one of the basic themes. Yes, the desktop design will not be as impressive, but the system will work faster.
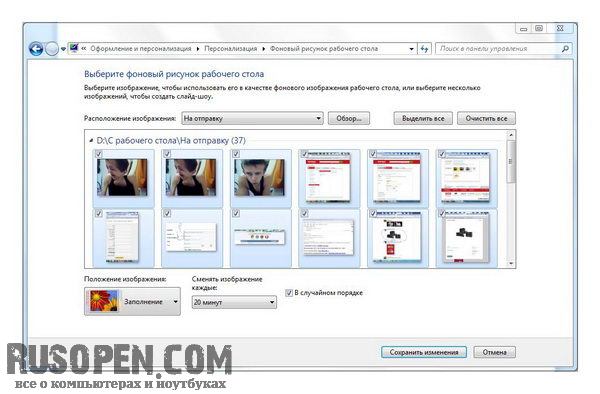
Let's try to change the desktop background. Finally, Windows has the ability to organize slide shows on the desktop. Previously, you could only set one wallpaper. Now you can select a directory with wallpapers, and Windows will periodically change the desktop background.
Click the Desktop Background button. After that, you can select the background images that are available in the selected theme. Mark the pictures that you would like to see on your desktop. The Image Position list allows you to select how the image will be displayed (Fill, Fit, Stretch, Tile, Center), and the Change image every list allows you to select when the background image will change. If you want the images to appear in random order, enable the Random checkbox.

Want to set your own pictures? Then click on the Browse button and select the directory where the desktop images are located.

You can then browse through the images from the selected directory and choose which ones to use as your wallpaper.
Note. Want to just set the background color without a background image? Select the Solid Colors option from the Image Arrangement list and you will then be able to select a background color.

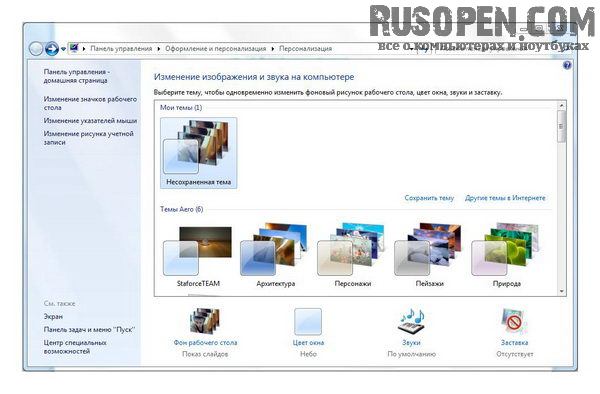
The More Online Themes button allows you to download more themes.
At the bottom of the Personalization window, in addition to the Desktop Background button, there are also buttons Window Color (changes the color of windows), Sounds (allows you to set a sound theme) and Screensaver. You can select the sound theme and window color without my comments, but changing the Screensaver, i.e. screen saver, we will consider separately.
The figure shows the Screen Saver Settings window.
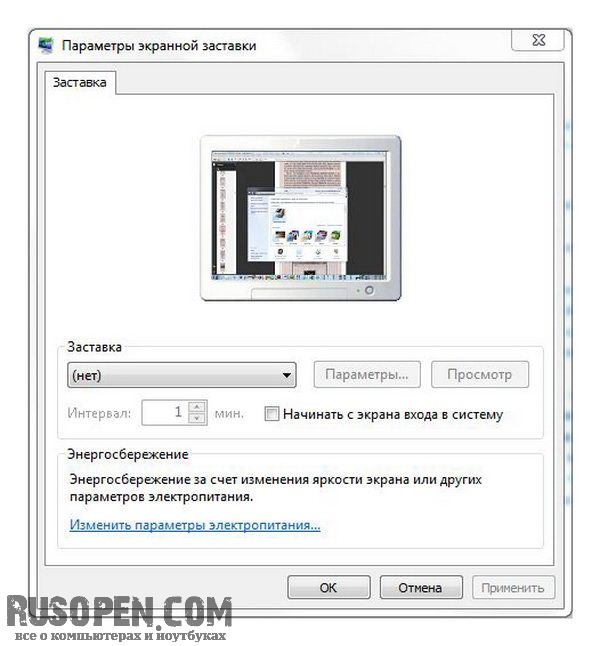
Even a schoolchild can handle choosing a screen saver: you just need to select the screen saver you like from the Screensaver list, set the interval (the idle time after which the screen saver will be launched) and click the Apply button. The Options button is used to set screensaver options, if any, and the View button allows you to preview the screensaver.
We are more interested in energy saving parameters - this is very important for users. Click the Change power settings link.
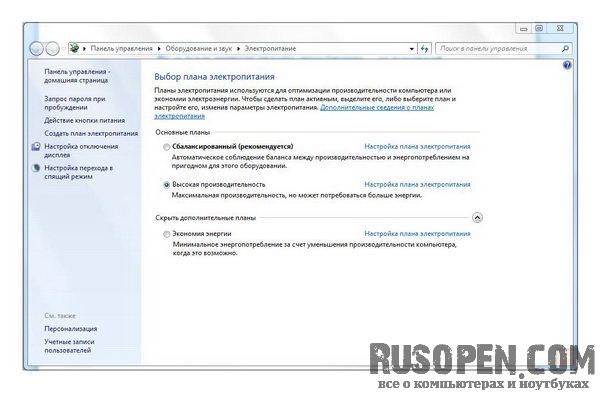
- If you want to go the route of minimal resistance, simply choose the following power plan:
- Energy saving - if you are running on battery power;
- High performance - if you work from the mains power supply;
- Balanced (used by default) - if you are too lazy to change the power plan when switching the laptop to battery power and back.
- Request password on wake-up - For security reasons, it is recommended to request a password when waking up the laptop from sleep mode. You can leave the laptop on your desk and walk away for a while, the laptop will go into sleep mode. To prevent anyone else from using your laptop, you need to ask for a password when you wake up. This command allows you to determine whether you need to request a password or not.
- Power button action - allows you to set the action when you press the power button on the laptop body (and not in the Start menu). The default action is shutdown. In principle, you don’t need to change it, but you can change the default action for the power button in the Start menu - Hibernation if you use this mode.
- Create power plan - allows you to create your own power plan. The Create a New Power Plan Wizard will launch. You'll first be asked to select one of the basic power plans, and then edit its settings.
- Display turn off setting - determines after how many minutes the laptop display should be turned off.
- Setting the transition to sleep mode - after how many minutes you need to put the laptop to sleep. For maximum flexibility in setting up a power plan, click on the Set up power plan button located opposite the plan you are interested in, and in the window that appears, click on the Change advanced power settings button. In the Power Options window, you can change all the settings that interest you. All these parameters will be discussed in detail in the article.
On Windows XP
Click the Start button, select Control Panel, and search for Display if you have the classic panel view. Or “Designs and Themes” - “Screen”, if you have a category view configured. In the “Options” tab, find the “Screen resolution” slider and select the view that suits you. Click the "Apply" button to apply the changes. A countdown timer window will flash on the screen. If you don't like what you see, click "no" and look for a new option. If you are satisfied with everything, click “yes”.
Change screen resolution in Windows Vista
Start again from the Start button and Control Panel, click the Appearance and Personalization button, click the Personalization button, and then click Display Settings. Move the slider until you are happy with the result.
Click the Apply button at the bottom of the menu for the changes to take effect. The timer will flash again on the screen. If you are happy with what you see, click OK.
Changing screen size on CRT monitors
Due to system failures, it may happen that you see the screen surrounded by black bars on the right and left. If you have a CRT monitor, you can easily fix this using the buttons on its panel. Just press the “Menu” key, enter the parameters and use the buttons on the monitor panel to select the option you need.
To play video on most mobile devices, you need to reduce size images so that a weaker phone or player processor can correctly process and run the file. To resize videos there are special programs-video editors.
Instructions
One of the most common utilities for editing video files is VirtualDub, due to its small size and wide functionality. Download the VirtualDub archive from the program's official website and unpack it using an archiver program (WinRAR or WinZIP).
Go to the extracted folder and run virtualdub.exe. In the window that opens, select the File – Open video menu. Specify the path to the video file you want to shrink. Wait until it opens and displays in the player window.
Go to the Video – Filters tab in the top panel of the window. In the menu that appears, click the Add button. From the list of available filters, click resize and then Ok.
In the Filter resize menu, specify new parameters for the width (width) and height (height) of the video image. If you want to play the file on your device, please adjust these settings according to your display resolution. For example, if the screen has a resolution of 176x220, then the width is set to 176, and the height is 220. You can find out the width and height of the display in the specification for your device, in the instructions for use, and on the Internet by entering the model name in the search.
After making all the settings, click Ok. Go to the File – Save tab to save the applied settings. The image has been resized.
There are many other converters that allow you to downsize videos. For example, the Format Factory application. The program has many presets for various screens, has the ability to save modified video in various formats, including mp4 and 3gp, which are most common in mobile devices. Changing the file format allows you to reduce its size, which is important for phones and players with small amounts of memory.
Don't know how to change screen resolution? There’s already a dazzle in your eyes, but there’s no one to expect help from? Our article will help you change the screen resolution depending on the operating system installed on your computer.
How to change monitor screen resolution if Windows XP is installed
- Click the "Start" button and select "Control Panel" from the menu that opens. Double click mouse click on the "Screen" icon. This window can also be opened by right-clicking anywhere on the screen and selecting “Properties” from the menu that appears.
- In the "Display" window that opens, go to the "Options" tab. Select the desired screen resolution, but remember that large quantity dots will give a clearer image. A screen resolution of 1280 by 1024 will be most optimal for standard office monitors.
- If the set parameters suit you, click on the "OK" button. The desktop configuration will be changed, you will only need to confirm these changes in the window that appears by clicking on the "Yes" button. If you do not confirm your changes within 15 seconds, the system will return the old screen resolution.
Now you have a new monitor resolution!
How to change monitor screen resolution if Windows Vista and Windows 7 are installed
Windows 7 automatically selects the best monitor screen settings, including screen resolution, picture refresh rate, and color depth. But let's say you don't like it. How then can you change the monitor screen resolution manually?
- Click on the "Start" button again and select the "Control Panel" menu. In the window that opens, find the “Screen” item, and from there go to “Screen resolution”. You can also get to this window by right-clicking anywhere on the screen and selecting “Screen Resolution” from the menu that appears.
- In the window that opens, in the “Resolution” submenu, select exactly the parameters that suit you.
- Click the "Apply" button and if you like the changes, close the window by clicking the "OK" button. If you do not confirm your changes within 15 seconds, the system will return the old screen resolution.
Your monitor screen now looks completely different!
There are cases when it is not possible to change the settings, for example, the desired resolution is not in the list. In this case, there are several ways to change the resolution of your screen:
- go to the websites of your video card developers (for example, GeForce, ATI) and download drivers. In each of them, during installation, there will definitely be an item for changing the screen resolution, where you can change the settings.
- use programs to overclock video cards. As a rule, they necessarily have the ability to change the monitor screen resolution (for example, the PowerStrip program).
- use special programs to change the monitor screen resolution (for example, Screen Resolution Manager).
At any computer system The screen (monitor) plays an important role in terms of visualization of information and user interaction with the system. And its resolution is one of the most basic characteristics. Next, we will show how you can change the screen resolution on Windows 7 to make working more convenient and comfortable. There are several simple methods you can use to do this.
What role does screen resolution play in the system?
Before we begin to consider how to change the screen resolution in Windows 7, let's look at some basic parameters that can be used during the setup process.
The role of setting the optimal resolution allows you to improve the quality of the image displayed on the screen and even make it more detailed. In addition, when this parameter is increased in some programs, the visible work area may also increase, due to which elements that are inaccessible at lower values appear. Finally, when combined with screen refresh rate settings, optimal resolution results in a more comfortable experience and less strain on your eyes. But many probably know that when sitting in front of a monitor for a long time, the eyes get tired very quickly.
Setting screen resolution in Windows 7: instructions for beginners
So, in order to set the necessary parameters in the simplest and most accessible method, using the built-in tools of the system, you do not need to have special knowledge and skills.
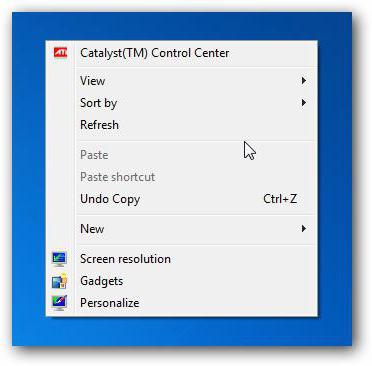
How to change screen resolution on Windows 7? As easy as pie. First you need to right-click on any free area of the “Desktop” space and call context menu, in which at the very bottom there is a line for calling the corresponding parameters.

In the settings window, you should select the required one from the drop-down list of supported resolution monitors, and then save the changes made by clicking the “Apply” button. It is not necessary to use standard values. You can also change such settings by moving the fader (slider).
It is worth paying attention to the fact that when saving changes in the settings, the screen may go dark for one or two seconds. This is fine.
The question of how to change the screen resolution on Windows 7 is clear. But this is not all that is required to ensure the convenience of viewing the contents of the monitor. One of the main characteristics is the refresh rate, expressed in Hertz. By default, the system is set to the optimal mode supported by the monitor, but quite often you can observe the image “blinking” in the form of vertically alternating horizontal stripes (this is especially noticeable if you move a few meters away from the computer screen). This effect has an extremely negative effect on the eyes, although at a distance of 30-50 cm it is not particularly visible.
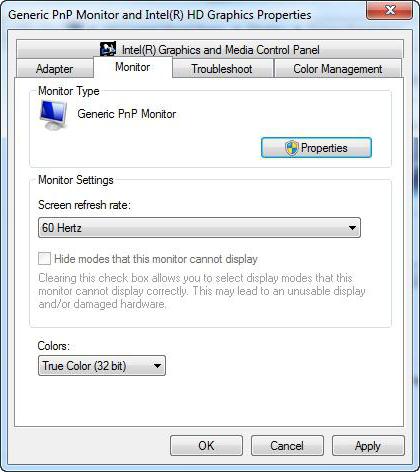
To set this parameter, click the button additional settings and on the monitor tab look at the refresh rate. For example, for laptop screens, in most cases the value of 60 Hz is used, which is considered optimal. On stationary monitors, you can use frequencies higher (for example, 100 Hz) or advanced settings, using a line to display values that are supposedly not supported from a system point of view. But here you need to be extremely careful, since the installation is too high level can only lead to the monitor failing. Therefore, it is advisable to study in advance technical documentation and look at the supported modes.
How to change screen resolution on Windows 7 using graphics adapter control programs
For those who have Radeon or NVIDIA graphics chipsets installed in their computer, there is no point in making such settings. Special control programs (Catalyst, PhysX, etc.) are supplied pre-installed with the cards. Their capabilities are much wider than those of Windows systems. And configure all required parameters it can be much thinner.

In addition, when installing applications for testing cards and monitors in modern computer games, after a series of tests with peak loads, applications can establish an optimal mode both in terms of resolution and in terms of the refresh rate used. Thus, the game will not slow down due to the fact that inflated parameters are used.
Monitor diagnostics using DirectX
Finally, before trying to deal with the problem of how to change the screen resolution on Windows 7, you can independently diagnose the monitor using the universal DirectX bridge (preferably the latest version).
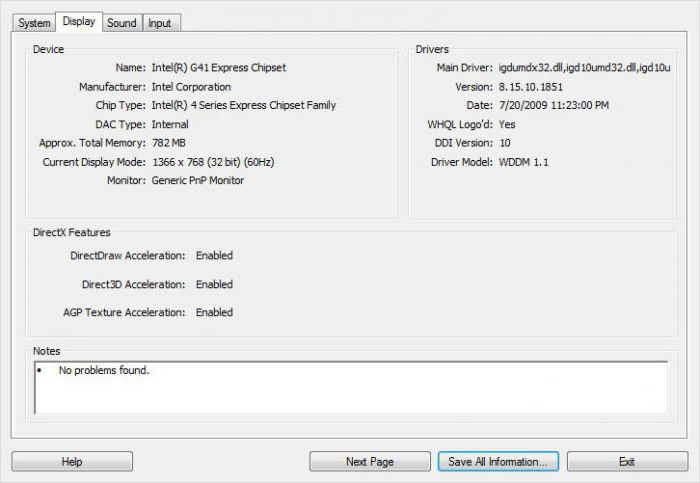
The dialog box is called by the dxdiag command, which is written in the corresponding “Run” line of the console. On the monitor tab you can get comprehensive information not only about the screen parameters or video card, but also perform full diagnostics using DirectDraw, ffdshow, Direct3D modes and AGP texture acceleration. Based on the results, it will be possible to judge the capabilities of the monitor.
Instead of an afterword
It remains to be said that setting up the basic screen parameters and some related elements is not as complicated as it might seem at first glance. What to use? For integrated Intel video cards, both system tools and additional developer utilities are suitable, although they are usually from Windows tools are not particularly different. But for owners of discrete graphics accelerators, without any doubt, it is better to configure it using the included control programs, since the possibilities for fine tuning they have much more. It would be possible to set the resolution via system registry, but for many such a procedure would be too complicated, so it was not considered.