It's probably great when the opportunity to organize one's work on a personal laptop becomes available to any user of such a laptop, without third-party interference from "all sorts of programmers and system specialists." And even in the saddest case - it is possible to press a couple of keys and make your computer Factory Reset - returning to the original Windows state thereby solving their pressing problems.
However, in those cases when you yourself work on such a laptop, and even worse - prepare such a laptop to give it to your colleagues for use - then the "baggage of programs" that come with the preinstalled system are so terrible and useless that they immediately take away about 30% of the resources of your brand new laptop. What to do? Remove such programs in stages, manually. Or.... ?
There are several situations where you need to think about this:
- you really these programs interfere, take "ALL THE POWER" of your laptop
- you do not know what programs to remove
- you have already deleted such programs somehow, but you did a Windows restore and now, they are all in front of you again
- you want to get rid of the Recovery partition, which eats up about 15-25Gb of your hard drive
- and finally, you changed your HDD to a new one and you simply have nowhere to restore Windows
And even with such a disk, there is no guarantee to restore the system. After all, each such set of disks is focused on specific model. Let's say the recovery discs for the T430 model are no longer suitable for the T430U model and vice versa.
Again, having restored the system from such a disk, we will again get a bunch of extra software that is an eyesore to our eyes and our hard drive.
Therefore, the main task is to install a clean Windows without losing the license.
The main "headache" for Windows that comes with a laptop is that the version of Windows is the OEM version. And if in a nutshell - a copy tied to a specific laptop. Those. logically, reactivation of such a product is impossible. Except for the indulgence of Microsoft and by calling tech support - you are very likely to activate your copy over the phone.
However, it is not possible to obtain the OEM distribution itself. At the time of this writing, it was no longer possible to officially download the Windows 7 distribution from the Microsoft website. This fact was confirmed to me when I called Microsoft technical support. But for Windows 8.1 there is a wonderful utility.
So, to avoid even more "unnecessary" controversy, I'll just write a solution for these systems.
 If on your Windows laptop 7:
- look for the serial number sticker on your laptop. Perhaps it is hiding under the installed battery.
- find a clean Windows image 7. Not activated, not customized, namely a clean image that matches your edition. In my case, it was a Windows 7 Pro x64 distribution. And I downloaded it on the VLSC website https://www.microsoft.com/licensing/servicecenter/ If you download from third-party resources and doubt the authenticity of distributions or suffer from paranoia, I recommend looking for hash sums for the distribution you are interested in and comparing with downloaded images.
- Install the system using your serial number(which you found on your laptop)
- Activate the system by automatic activation over the Internet. As it turns out, it's completely painless.
- Install only required drivers, without unnecessary software, downloading them from the manufacturer's website.
- Everything. Your legal copy of Windows 7 is ready to use!

If your laptop is Windows 8:
- Go to: http://go.microsoft.com/fwlink/p/?LinkId=510815 to download a utility that will help you create a bootable distribution image to install Windows 8.1
- After launching the utility, choose the most convenient option for yourself: a) create a bootable USB flash drive (at least 4Gb) or b) create iso image which can later be burned to DVD.
- Install the created image using special test keys (provided by Microsoft itself):
- Pro version: 27NXJ-JH9WY-KYF3K-J8DPP-9P9HP
- Single language version: PRN2R-9J3M9-VHVKK-YVTJ7-PWD3X
- According to the employee technical support Microsoft: "After installing 8.1 with test keys, the system will pick up activation using your SLIC table.
- In my case, I got legal a copy of Windows 8.1 without the extra junk from Lenovo.
Summary.
I didn't go into details" why\how\why\maybe and only used similar solutions. Because I know for sure: if I have a laptop with a pre-installed, legal copy, then I have the right to use it and reinstall it as much as I want :) Well, if this is not the case, write, maybe someone will be interested in your justification :)The development of technology, the emergence of new generations of components that work much faster and more economical, allows you to extend the life of computers, delay the need to purchase a new, more productive model. One of the options for such an upgrade would be to replace a traditional hard drive with its solid-state counterpart.
Given the excellent speed characteristics of such drives, using them as system drives is the best solution. ABOUT possible problems, which may arise when transferring a system partition from a classic hard drive to an SSD, we will tell. We will talk about the Windows 8 system installed on a Lenovo laptop, and similar issues of modernization, repair, computer settings Apple we'll leave it for another time.
Linking a wim image
Windows 8 has a factory reset mode for crashes that cannot be fixed by any other means. This will entail the loss of all installed programs, settings, personal data, etc., but all the shortcomings in the work will disappear, and the system will return to its original form.
When replacing a disk and after the accompanying procedure of transferring the system from the old disk to the new one, it happens that the binding to the system environment is broken Windows Recovery 8 wim-image OS with factory settings. It is contained in the hidden Recovery section. The result of violation of such a binding is the impossibility of rolling back the system to the factory settings.
Next, we describe the process of how to restore the binding of a wim image. For example, a Lenovo laptop with a UEFI BIOS is used. The algorithm of action will be similar for devices from other manufacturers. The difference may lie in the names of menu items and some other little things.

If there is no self-confidence, the description below looks too complicated, then it would be best to go to the launch.rf workshop for computer repair in Otradnoe and find out when they can help you with this problem.
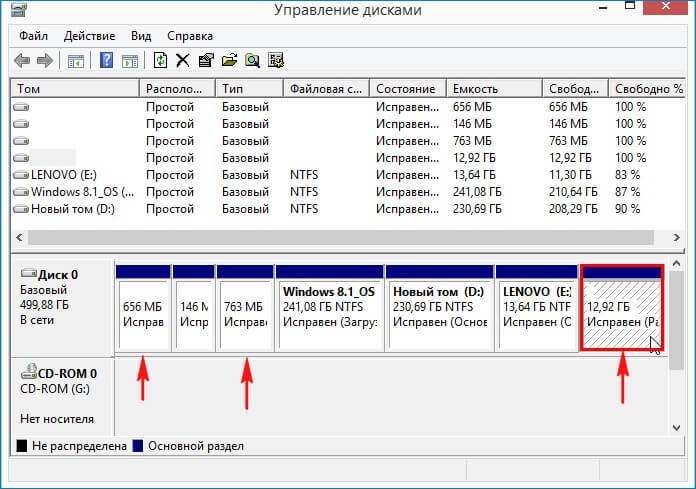
You need to go to the Disk Management utility. There we will see that all sections, including the hidden Recovery, are on system drive intact.
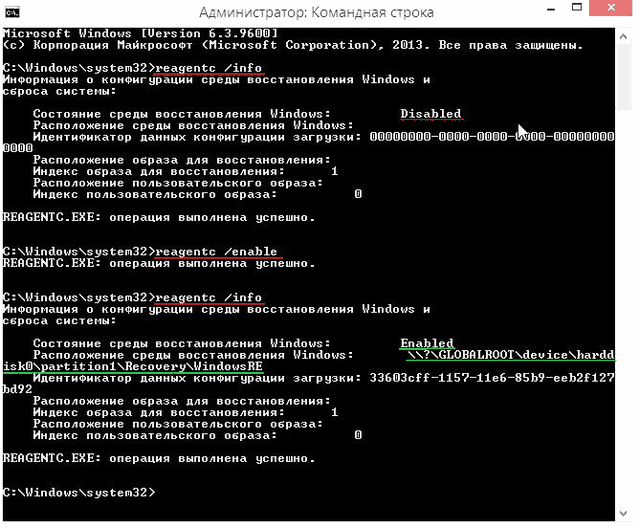
First of all, we make sure that the recovery environment is enabled, for which you need to command line type "reagentc /info".
In response, we will receive a message that the recovery environment is disabled. This happened after moving the system from the old drive to the SSD. It needs to be enabled. The "reagentc / Enable" command is intended for this.
The REAgentC program will report that the recovery environment (Winre.wim file) is enabled, and its default location is in the hidden first disk partition - \\?\GLOBALROOT\device\harddisk0\partition1\Recovery\WindowsRE. The problem is that the location of the recovery image is unknown. This means that if you use the one-button recovery mode (Push-Button Reset Overview), then the image will be used installation DVD Windows.
Earlier, we established that we have all the necessary partitions, including the hidden Recovery with a wim image, and the problem is the missing connection between this image and system environment recovery. Let's reconnect. You will need a command line, where you need to enter several commands in sequence:
- Diskpart.
- "lis vol" - displays a list of all disk partitions.
- "sel vol 4" - select the partition containing the desired recovery image.
- "assign letter M" - assign the letter "M" to section 4.
- "exit" - exits the Diskpart utility.

Now you should open "Explorer", in which the "M" disk will appear. For control, you can check that the "install.wim" file containing the factory image of the system is located on this disk.

Let's return to the command line and continue our work. "M:" - with this command we go to the "M" drive.
The next directive is "attrib /s /d". With its help, the full paths of files located in the directory and subdirectories on the screen are displayed. this disk and their attributes. We see that the “Factory” subdirectory of interest to us has the attributes S “system”, H “hidden”, R “read only”, which we do not need, and they need to be cleared.

To do this, enter the commands:
- "cd OKRBackup\Factory" - change the current directory to L:\OKRBackup\Factory.
- "attrib -s -h -r /s" - remove the listed attributes from all files in this directory.
- "attrib /s /d" - control that attributes are removed.

"C:" - go to the system drive.
Now we bind the wim image with the command "reagentc /setosimage /path M:\OKRBackup\Factory /index 1". If everything went well, now when you roll back to the original settings, information from the desired disk partition (from the wim image) will be used. To verify this, you can run the "reagentc / INFO" command.

Push-Button Reset Overview (one-button system reset)
Just in case, we will briefly describe the procedure for returning to factory settings. You need to go to "Settings".


Click the "Start" button in the item "Delete all data and transfer Windows installation».

A window will appear with a warning about what action will be taken. You must click the "Next" button.

The procedure for resetting the system to factory settings will start.
If the OS does not start
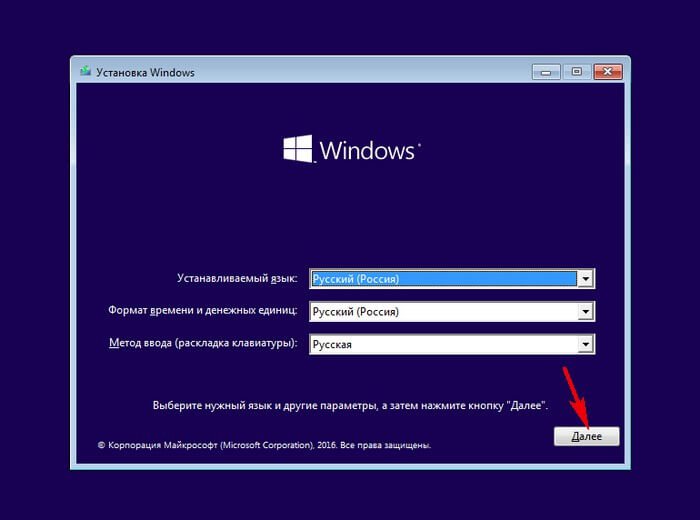
You need to boot from the Windows 8 installation media, click Next.
Click "System Restore".

In the "Select action" window that opens, click "Diagnostics".

Select the "Reset the computer to its original state" mode.


Then select "Windows 8.1".

The last window will open, in which click the "Revert to original state" button.

The process of restoring the system to factory settings will start.

On the Lenovo laptops there is a great button. Thanks to this button, you can restore the system to its original state. All this is provided by the Lenovo OneKey Rescue program, which is built into the system, and in the event of a crash, Windows starts up and you get a laptop with a clean system, like from the factory. But what if this system is broken, but you really want to restore it? For example, when replacing hard drive this disaster recovery system flies, how to restore everything back to its place?
Let's deal with the concepts: OneKey Rescue is a disaster recovery system after a complete crash, installing Windows from scratch. And the OneKeyRecovery system will allow you to return to a previously created system image (possibly already with installed programs, documents).
We will restore both of these systems.
1. Download the program OneyKey Rescue. Note, this program belong to the category of engineering. Be attentive and careful. Burn the program to disk. Since not all devices are equipped with drives, we need the UltraISO Premium Edition program to write the image to a USB flash drive.
How to use it:
1) Run the program
2) On the File tab, select Open
3) Open file OKR7.iso
4) Next, in the Boot tab, select the item: Burn a hard disk image
5) Make sure that the Disk Drive entry contains the letter of your flash drive.
6) Format in FAT format
We write down. Accordingly, in BIOS settings choose to boot from a USB flash drive or disk.
2. Clean install. All partitions will be deleted and formatted. The first section is intended directly for the operating system, the second section is for your personal files, documents, music, etc. And the third section is systemic, hidden. It is just necessary for the program to work.
After launching the engineering disk, the system will ask you to select an installation option. Choose the 1st one (Clean install, recommended). But you can also try other options. Next, mark up the C drive, select the language (18.RU-RU)
Further installation will take place without our participation. Just wait for the installation to complete. And now we put any system on drive C. If you wish - an original disk from lenovo with automatic Windows activation through the BIOS.
Optionally, we install essential programs and drivers (all this will be included in the emergency image).
The last step is to set up a clean system image. We turn off the laptop and start it with the NOVO button (if it doesn’t work, we load the OS and press the NOVO button, however, in this case, the correct creation of the system image is not guaranteed).
In the window that appears, click OneKey Recovery.
Press the keys Ctrl + Left Shift + O, a command prompt window will open. Now we need to find out under which letter the OKR is located. By default, the letter OKR should be G or F.
But it's better to check. We check this: in the open command line, type DIR G: - a list of folders should appear, it should contain the ONEKEY folder. If it doesn't work, try another letter, and so on until the result is achieved. Once done, on the command line we type:
G: DIR - press enter
CD ONEKEY\OSIMAGE-enter
OSIMAGE.EXE /FB - enter
We wait 10-15 minutes and you're done. Now you can restore the system from scratch. The advantages of this method are obvious. After all, reinstalling the system will take only 15-20 minutes! Do you have any questions? Write in the comments.
Many Windows users 7, as well as 8 and 8.1, are often unaware of the existence hidden section on your computer. From the eyes of the average consumer, Microsoft engineers hid (this is where the “popular” name came from - hidden section ), a given area on the disk. However, you can still see it in a special applet in the control panel called " Disk Management". How to get there? Very simple! Open the control panel (in Windows 7 you can use the "Start" button, in Windows 8 through the search by typing "Control Panel" in the search bar):
And we hit the applet " Disk Management».

That's hidden section- a shaded rectangle with a size of 300 MB in Windows 8, and if you have a "seven", then it will be about 30 MB in size. Notice how he "filled up" ten times! :)
This area does not have a familiar drive letter like C:\ , for example. What is its purpose?
Hidden section (aka chapter system reserved from English. " System Reserved") in Windows 7 and later Windows versions 8 and 8.1 is intended to protect system boot files OS (operating system).
A little technical information about what is there:
- BCD- upload storage configuration files
- bootmgr- Windows system bootloader
In the environment ordinary users There is an opinion that using this section you can restore the system in case of any software failure. It is also often called recovery partition. This is a little not true specifically for Windows 7, because the size of this area ( System Reserved) barely exceeds 30 MB in the "seven". All recovery files are located in the hidden Recovery folder. Earlier, I described how easy and painless it is to produce .
In Windows 8, these files were transferred to the System Reserved partition, which is why it became almost 3 times thicker - 300 MB in the G8.
Indeed, the entry into the recovery environment occurs precisely from the hidden partition, however, then the recovery image is loaded from hidden folder Recovery, which is physically located at the root of the C:\ drive in Windows 7.

At the same time, it must be understood that hidden section it's not the same as system recovery partition. The first, as I said, is reserved by the system for download files. The second is created by manufacturers mobile computers(laptops, for example), to restore the PC to its original, or factory, state.
However, Windows 8 has its own recovery partition, separate from the laptop manufacturer's.
There may or may not be a hidden section
Yes, it may well be that your particular hidden partition may not be in the system. Why is this happening? In order for it to be created when the system is installed on a computer, several conditions are necessary:
- First, the installation must be done from any external device such as a DVD or USB stick. In this case, there will be no possibility to perform operations with partitions on a stationary disk.
- There should be no more than three primary, that is, primary (primary) partitions of the disk before installing the system. If you already have four of them at the time of installation, then a hidden partition (100 MB) will not be created. The download files will simply be copied to the active partition. By the way, it is not a fact that they will be located on the partition with system files. Like this!
- The section in which Windows is installed must be the first in the truest sense of the word, that is, the topmost in the installation window.
- The OS installation area must be unmarked. If there is no such area, you will have to delete one of the primary partitions first and then re-create it. Of course, if there is no need for a reserved area (System Reserved), then simply do not delete the previously created partition.

Here it is necessary to make a reservation that it is necessary to install on the active partition, since otherwise the one that was active before installation may disappear (become invisible). The fact is that Windows simply removes its letter during its installation. However, the problem is solved in the Disk Management applet by setting the letter to the active partition.
Advantages of a hidden partition
The most important advantage of the hidden section - download file protection from accidental alteration or damage. This section is not negatively affected by compression. disk space. It is quite safe to restore the boot in case of failure, without reinstalling Windows.
Of course, the hidden partition is a significant help when it is necessary to restore the system due to operations performed by an inexperienced user.
Disadvantages of a hidden partition
These are not even shortcomings, but rather inconveniences. As I wrote above, they are related to the fact that when sharing on the same computer, say Windows XP and Windows 7 and 8, it becomes necessary to assign a letter to a hidden disk partition, and then delete it in order to copy Windows XP boot files there.
So, the system-reserved hidden partition in latest versions Windows is great way protect important boot files system from rash user actions.
On Lenovo laptops, as well as on laptops from other manufacturers, there are a lot of pre-installed junk programs (blotware). But among all the rubbish there is quite useful program One Key Recovery from CyberLink. If you do not know how to use other system recovery tools, then you can use this program. She can only restore Windows system, but it may still come in handy for someone ... In this article we will figure out how to restore the performance of this program.
This program has two components. The first is a regular windows program that can create backup everything that is on your C drive. The second is an EFI application (sort of a mini operating system), which is responsible for restoring from a backup.
It is assumed that the user can get into the recovery utility in the following ways: 1) From a running Windows: run the OneKey Recovery program, select System Recovery and the computer should reboot into the recovery utility; 2) From the off state: press the Novo button with a paperclip, select the System Recovery item and the recovery utility should load.
You wonder why does Windows 10 boot up again instead of the recovery utility? And I'm gone. I know how to fix this because I did the research. And do not believe Lenovo officials who rub that "Recovery tools are built into the OS" win8, so win10 will not support OneKey Recovery. They also say that when you roll back to win8, you will earn OKR. This is not true. Let's take a look at everything.
Generally speaking, there is a way to download the one key recovery utility without improvised means. But for this, the Windows must still be in working order. Hold down the Shift key and select reboot. You will see a menu where you need to follow the following items: diagnostics, Extra options, download other devices, show more devices and select the Lenovo Recovery System item that appears (if you have a menu in English, then either guess or change the bcd locale from under windows).
If Windows has already been demolished, then you can use either the already installed Linux, or bootable flash drive with Linux. A flash drive with ArchLinux is suitable, since it does not contain anything superfluous, takes up little space and ultimately saves us time. Boot up, run the efibootmgr -v command. This is how we find out the Lenovo Recovery System boot variable number. We need four digits for the BootXXXX variable. Next, you need to set the efi variable BootNext, for this we execute efibootmgr --bootnext with the entry number. We reboot and rejoice - the recovery utility is loaded.
But such a procedure will have to be done anew each time, since the BootNext variable is applied once and is overwritten. What if you want everything to work as it should?
Before installing Linux, I looked at how the markup scheme from the manufacturer (OEM builder) is arranged:
List of sections with explanations
- Sda1 ntfs 1000 MiB WINRE_DRV is the boot partition windows recovery. Used when you boot into the WinRE environment.
- Sda2 fat32 260 MiB SYSTEM_DRV is the EFI System Partition (esp, that is, the main boot partition for UEFI). It all starts with him. It stores efi applications (windows loader, Linux loader and other applications).
- Sda3 fat32 1000 MiB LRS_ESP is the original equipment manufacturer (oem) partition, namely Lenovo Recovery System. This partition imitates a real esp (only one real esp can be created on a hard drive). It just stores the efi one key recovery application.
- Sda4 without FS 128 MiB Microsoft Reserved Partition is a partition that microsoft reserves for gpt disks. Used by Windows when you move or change partitions using the disk manager.
- Sda5 ntfs 892.15 GiB Windows8_OS is the main Windows partition (drive C). There is the OS itself, the swap file and all your files.
- Sda6 ntfs 25.00 GiB LENOVO - this is the partition on which lenovo put drivers for your computer and installers of some spam software, it is displayed as disk D. It was assumed that you could backup to this partition. But look at its size and everything will become clear.
- Sda7 ntfs 12.03 GiB PBR_DRV is the partition that contains the very best initial recovery image you can select from OneKey Recovery.
When installing Linux, if for some reason you need a pre-installed Windows, I advise you to just compress system partition to the necessary, and on the freed space create an LVM partition and smear all the insides of Linux in it (forget about the problems of moving and resizing partitions). I checked that the OKR system will not destroy this partition when restoring from an image.
If your Lenovo computer was preinstalled with windows 8 and you decide to upgrade to windows 10, then you have the functionality of the One Key Recovery program will be lost. You can run OKR in windows and create a backup, but you won't be able to run the recovery utility either when choosing Reboot recovery in the program or from Novo Button Menu - System Recovery. It will just start windows. How to boot into the recovery utility, and why did this problem arise?
The thing is that when windows is installed, it replaces the file in the standard path $esp/EFI/Boot/bootx64.efi with its own, and in windows 8 it was simply replaced manually by oem's.
Where do we even need to go? We need to load the efi application from the LRS_ESP section. There we have the following efi files, which I checked and found out what we need:
LRS_ESP: / EFI / Boot / bootx64.efi - loads what we need, the OKR utility
LRS_ESP:/EFI/Microsoft/Boot/bootmgr.efi - Does not support booting
LRS_ESP:/EFI/Microsoft/Boot/LrsBootmgr.efi - loads what we need, the OKR utility
LRS_ESP:/EFI/Microsoft/Boot/memtest.efi - Does not support booting
LRS_ESP:/bootmgr.efi - does not support booting
My laptop has UEFI firmware from Phoenix. It is made in such a way that when System Recovery is selected in the Novo button menu, the following boot order occurs: 1) If there is a $esp:/EFI/Boot/bootx64.efi file, then it is loaded; 2) If there is a file $esp:/EFI/Microsoft/Boot/bootmgrfw.efi, then it is loaded, that is, the usual windows loading; 3) If there are no files from points 1 and 2, then LRS_ESP: / EFI / Boot / bootx64.efi is loaded (exactly so, and not the lrs boot record) 4) If it is not there, then (regardless of the existence of other boot records) c lenovo entry added to bootorder recovery system and a normal startup occurs, which will lead to our OKR utility, because the Lenovo Recovery System entry contains the required path LRS_ESP:/EFI/Microsoft/Boot/lrsBootmgr.efi.
When you press the power button, the firmware download sequence is as follows: 1) if the esc, f2, f12 key is pressed, then load desired application from ROM; 2) if the bootnext variable is set, then load the boot record with the number from this variable; 3) normal boot using the boot order (bootorder).
And when you press the Novo button, a new menu is loaded. And generally speaking, you can safely do without the novo button, since all the items that are in its menu can be called separately, and last paragraph is nothing more than loading a record from a hard disk. This entry is displayed when holding f12 and for me it starts with WD. Please note that WD is not a Lenovo Recovery System boot record, but a hard disk record that behaves according to the boot sequence described above, that is, in step 3 it will load LRS_ESP:/EFI/Boot/bootx64.efi, and not a Lenovo boot record recovery system. OKR is also loaded along this path, but I specifically pay attention to this subtle point. Because of this boot sequence, by the way, we did not get into the recovery utility, despite the working entry of Lenovo Recovery System.
That is, the firmware itself was made quite cleverly, deleted the system boot variable - it was restored with the cleanup of all other variables, if there is absolutely nothing to load with normal sturtup - it will add the number of the lrs entry to the boot order, which in turn will be recreated automatically; in a sad situation, the firmware tries to do everything possible from it. BUT the culprit of all dances with a tambourine is Micosoft, which obligingly does nasty things to you, for example, overwrites non-own loaders when it is not asked about it. On the standard path, you can put, for example, a fallback kernel for linux and boot into it, if necessary, with the novo button or make a boot selection menu.
As you can see, when windows is running, even deleting the $esp:/EFI/Boot/bootx64.efi file will not help us, which, when windows update was overwritten by Microsoft, which loads Windows, although there should be a file that contains instructions to either load the application from the LRS_ESP partition, or set bootnext to the lenovo recovery system entry and reboot. Now it’s clear why you had a normal windows boot with the novo button?
I could write these instructions myself, but I haven't done EFI application programming yet. So for now, as an option, either pull out a similar file from a lenovo computer that has not yet been updated to windows 10, or you can install rEFInd there, which already has built-in functionality for downloading OKR from Lenovo laptops. If it doesn't show up, just press ESC. An orange life jacket with a Windows icon will appear in the menu.