Default majority hard drives are accompanied by two volumes: C and D. These are the main partitions on the hard drive (volumes or root directories), which are strictly separated from each other. First of all, they are made so that the system does not have to wander in the wilds of heavy films and games on the way to vital files. For ordinary users, the ideal placement of programs, games and files is: everything light and frequently launched is on the system drive (C by default), everything heavy and unimportant is on the second disk, an alternative OS is on the third. And in order to most efficiently distribute space between volumes or change their number, you should be able to manage disk space.
How to open hard drive management
Like most windows Windows settings, disk management has many doors and you can get to it different ways. The simplest: press right click on the start menu and find the required item there (not available on all versions) or type in “Creating and formatting partitions” in the search.
In Windows 10, “Hard Disk Management” is called “Creating and Format Partitions” hard drive", but in the window signature the name remains the same, and "Disk Space Management" is a completely different window with limited functionality.
If for some reason this method does not suit you, here is the path to disk management, which has not changed since XP:
- Right-click on Start and open Control Panel. If it is not there, you can find it through the search.
- Open the "System and Security" category when categorized.
- Scroll down and click “Create and format hard disk partitions”, under the “Administration” group.
You cannot access control via the command line. There is only a separate set of disk management commands as a fallback, but this is quite complex and pointless.
If it doesn't open
If the system does not allow you to manage disks, the issue is a limitation of user rights, since for this you need to have administrator rights. Most likely, the root cause of the problem is a virus on your computer and after following the instructions, be sure to scan everything and everyone with an antivirus.
Before proceeding with the method described below, try disabling your antivirus and try again.
- Search the Start menu and find and open “regedit”.
- On the left side of the window, go to the path “HKEY_LOCAL_MACHINE/SYSTEM/CurrentControlSet/Control” and click once on the “Windows” folder contained there.
- On the right side of the window, open the “CSDVersion” option.
- Set the parameter to zero and confirm the changes.
Disk space management
So-called disks are correctly called partitions or volumes (you only have 1 disk, most likely), but given that even Windows calls them disks, this is not important.
To make one volume larger, you must first make another volume smaller. You can't just grab a spot out of nowhere and you have to find a donor first. It is worth saying that in Windows 10 there is no function for merging volumes. If you want to merge, you will have to use the standard methods described below and copying information from disk to disk.
There is one very important non-obvious rule that imposes a strong limitation on disk management, and before you start wasting space, you need to consider the most popular mistake.
Why is "Extend Volume" inactive?
Pay special attention to the order of the volumes in the lower half of the window.
In our case, the order is: C, J, D. After we pinch off a piece of space from one of the disks, it will appear behind the donor volume. For example, if we take a piece from drive J, the order will be: C, J, Free space, D. Free space can only be filled into adjacent partitions. That is: return to the donor volume (J) or expand the next disk (D). We cannot expand drive C, since there is an obstacle in the way in the form of drive J.
To expand the C drive, you need to completely remove J and make it a remote space. But if this doesn’t seem enough and you want to expand to include drive D, you’ll have to delete it too.
Expansion of the first volume is possible only with the help of an individual multi-pass or specialized programs.
For example, in this case, to expand drive C at the expense of D, you can do the following multi-step:
- Creating a new volume using drive D.
- Moves all files from drives J and D to a new volume.
- Removing the J drive and expanding the C drive using the freed up space.
- Removing drive D and expanding drive C using the freed up space.
- We call the new volume disk D.
- We move from C to D as much space as needed.
- We create drive J at the expense of C and move old files from drive D to it.
It all depends on the order of the disks, their size and availability free space, so the multi-pass is individual.
If the disk with the system is not the first, then expanding the ones in front of it is impossible, since the disk with the system cannot be removed.
Compression
- Right-click on the partition you are interested in and select “Shrink Volume...”.
- Set the donor space size and click Shrink.
- Free space will appear behind the donor volume.
If you cannot compress the volume, you must either moderate your appetite or delete part of the contents of the volume.
Removal
- Right-click on the volume and select "Delete Volume...".
- All its contents will then be deleted.
- The freed space will appear in the place of the deleted volume.
Extension
System disk is expanding just like everyone else. But due to the error described above about the impossibility of expanding the volume, this is not easy to do. Before expanding your disk, be sure to read the first part of this chapter, which covers the most common disk management error.

Creation
Windows 10 does not recognize the difference between a local disk and a simple volume. In principle, there is no difference between them. The difference between volumes and local disks used on older operating systems and was purely a conditional limitation. By creating a simple volume, you create a full-fledged local disk.
- Right-click on the unallocated space and select Create Simple Volume.
- Select the size of the allocated space. Use non-neighboring free space you won't succeed.
- Select a letter for the new volume.
- It is better to leave all settings as default.
- A new volume will appear in place of the used space.
Video: Disk Management in Windows 10
Defragmentation
The entire contents of the hard drive are divided into many small fragments and when writing new information, these fragments are arranged taking into account their best position for sequential reading, one might say side by side. However, when they change, new information is recorded and existing information is moved, a well-ordered structure gradually tends to become more chaotic. Moreover, there appear bad sectors, where the reading process is greatly hindered. The process of optimizing this entire structure is called defragmentation and is recommended for periodic execution at least once every six months.
Checking the disk for errors is also included in the optimization process.
Defragmentation is intended exclusively for HDDs. For SSDs, it is not only dangerous, but also harmful. If you don't know what you have:
- HDD - The computer turns on for 10 seconds or longer, and the hard drive looks like a box with a round part.
- SSD - Windows starts in less than 7 seconds, and the drive looks like an electrical contraption, just like the other components.

Cleaning drive C
In addition to banal cleaning of the desktop and deleting unused programs, it’s worth getting rid of files that are really called junk. Windows 10 has a very specific place for collecting junk and junk files- this is the Temp folder. Everything in it can be deleted without any regrets and the slightest risk of harming the system.
Cleaning the C drive through its properties in Explorer is less complete and does not affect some temporary files.
- Go to settings.
- Open the "Privacy" section.
- In the General tab, disable Ad ID and Start Tracking.
- Go to the “Speech” tab handwriting and text input" and turn off speech services if they are active.
- In the “Feedback and Diagnostics” tab, select the main method of data collection, disable the only switch and disable the generation of reviews.
- In the " Background applications» turn off the main switch.
Programs
As mentioned above, standard Windows tools for managing hard drive space are very limited in capabilities. If you are faced with an insurmountable problem or are simply too lazy to bother with moving space multiple times, you can always use the help of a special program that will do all the dirty and mental work for you in just a couple of buttons.

Proper distribution of disk space is a simple and very far-sighted action, and timely defragmentation is the key to order on your computer. You should only change the size of volumes or their number after carefully considering your future plans for using the computer and distributing priorities between heavy games and programs. The main thing is to always leave at least 10 GB of free space on each volume, especially on the system one, and do not forget about defragmentation.
As in previous versions system, you can change the size of logical drives in Windows 10 using the standard tool - the Disk Management snap-in. The utility is extremely easy to use, but in practice, novice users often encounter problems when performing certain actions. In particular, when you try to increase the size of the partition, you find that the “Extend volume” option is inactive.

This is not a bug, it’s just that in order to expand volumes using the system’s built-in tools, certain conditions must be met. First, the volume being expanded must be formatted in file format. NTFS system, if you want to expand or, on the contrary, shrink a volume with FAT32 or another file system, you will need third party programs, For example, . You can also temporarily move the files to another partition, format the FAT volume to NTFS, expand it, reformat it again, and then move the files to it again.
The second prerequisite is that there is free space on the disk. That is, to expand one partition, you first need to shrink another, freeing up the required amount of disk space. It is also very important that the area with unallocated space in the Disk Management snap-in is located directly with right side from the partition being expanded. The attached screenshot shows that the area with unallocated space is located immediately behind the system partition. This means that you can extend partition C, but you cannot extend partition D or the reserved area.

The free space must also be on the same base disk as the volume being expanded. And although in the screenshot the unallocated space is located after partition D, you will not be able to expand it, since at the same time it is located on another base volume. These are the limitations of the standard Disk Management utility in all Windows versions.
Have a great day!
Disk management in Windows is one of the most important functions; from the very beginning of a computer's life, you need to split the disk into two or even three partitions to store the necessary information. And if you did something wrong at the beginning, then in the future you may need to expand some partition, you will want to change the letter of the partition or create another one. Yes, the easiest way is to create partitions on a new computer during Windows installations, but not always everything can be calculated. There are a lot of programs to work with hard drive, but you need to install them, find a free one and understand the functionality, or you can try the standard disk management feature, it has very good functionality:
This functionality may be reduced in home versions of Windows.
Now let's look at each point in more detail, starting from the first point"How to open Disk Management":
1) The easiest way is to press the keys Win+R

in the window that appears, enter diskmgmt.msc, after pressing OK Disk Management will open

2) Go to start => execute (line found in Windows 7 and higher) => register diskmgmt.msc => press Enter

3) Click on My computer(Windows 7 and above just Computer) right mouse button => in the menu that opens, select Control

let's go to Disk management

There is a fourth way - through the control panel, and in Windows 8.1 you can simply click on start with the right mouse button and select Disk management
Now let's consider second item Shrink disk:
Click Win+R enter dfrgui.exe(if you have Windows XP then dfrg.msc) => we defragment the required volume (this may take a long time)

After defragmentation, we begin compressing the disk:
1.Go to Disk management(start => diskmgmt.msc);
2. On the disk that you want to compress - right-click => Shrink volume (in my example it will be compressing drive C)

3. First you will need to wait a little until it passes Request space for compression(I have this action took two minutes)

4. In the window that appears you will see:
Overall size before compression- the full capacity of your disk;
Space available for compression- free space that can be compressed;
Size of compressible space- here we specify how much space we want to compress, I specified 10000MB;
Overall size after compression- how much space will remain on the disk you are compressing after compression.
write down how much you need to compress and press Compress

No more than a minute will pass and the disk you were squeezing will become smaller and appear not distributed space

We've sorted out the compression, let's continue :)
Let's take advantage of the fact that unmarked space has appeared and move on to point Create a section:
1. Let's go to Disk management(start => diskmgmt.msc);
2. In disk management you see unallocated space, so we will use it to create a new volume. Click on not distributed right mouse button, select Create a simple volume

How to create a section
A small digression, for those who wondered “Why create a simple volume” and what other types of volumes mean:
- Simple Volume may consist of free space on one disk;
- Split Volume created from the free space of several (up to 32) disks. Data is first saved to one disk, and when it is full, it is transferred to another. This volume can be expanded with additional disks, but cannot be mirrored;
-Striped Volume is created from the free space of several disks, but the data is not written sequentially, but is evenly distributed across all disks to ensure maximum speed access to data;
-Mirror Volume The same data is written to two disks at once, they duplicate each other. Thanks to this function, if one disk fails, the system continues to see the data as it remained intact on the other disk. The system sees it as one disk, and the writing speed to it is slightly lower, since recording goes to two disks at once.
-Raid 5 duplicates data onto several disks at once; creating this volume is possible on server versions of Windows.
Not all operating systems support the creation of these volumes, and to create them, the disks must be dynamic, plus there must be at least two of them. If you immediately wondered what is dynamic disks, I won’t go into too much detail about the answer:
There are two types of disks - primary and dynamic; primary (also called basic) is used to work with operating systems. Dynamic ones have a number of advantages over the basic ones: it is possible to create fault-tolerant volumes (as mentioned above), the ability to make changes without rebooting the computer. And other little things that you can read about on the Microsoft website.
3 . Let's continue creating a simple volume: after the second point, appear simple volume master, nothing important is written here, so just click Further

4. Now you need to decide on the volume size, in the field maximum size- you see how much is available for the new volume in the field minimum size section - the minimum you can afford to create a partition. Simple volume size - By default, all unallocated space is registered, which we can use to create a partition; we write down the volume you need or leave it by default. Click Further

5. Select a drive letter from the list and click Further.(we'll look at changing the drive letter later)

6. We decide on the parameters and click Further
- file system: NTFS by default is the most popular file system nowadays, allowing the creation of partitions up to 16TB. FAT32 - a file system of the 90s, was popular for a long time, had many limitations, one of them is that this file system cannot manage files larger than 4GB, another drawback is that creating partitions in FAT32 is possible no more than 32GB. Plus FAT32 does not support long file names, a maximum of 256 characters. NTFS is a more stable file system that supports encryption.
- Cluster size: The write speed depends on the size of the cluster; if you are going to store only movies on it, then it is better to choose 32kb or more. If different data will be stored on this partition, it is better to leave it as default. If you choose a cluster size of 4096, and while working with a partition you copy data to it 1 byte at a time, then each such file on the partition will occupy 4096 bytes.
- Volume Label: the usual name of the section, the name that will be displayed in Explorer
I leave everything as default, change only the volume label and click Further. If you uncheck Quick formatting then the formatting will be complete, more thorough. It is recommended to choose full formatting when you want to erase data irrevocably, but it takes much longer.

7. In the last window there is a list of everything we have chosen, if you agree with everything, click Ready, no - click Back and change to the desired one

After clicking Ready Another volume has appeared in Disk Management, which we created in this paragraph

Let's move on to the fourth point Changing the drive letter:
1. Go to Disk Management (start = > diskmgmt.msc);
2. On the section in which you want to change the letter, right-click and select

3. In the window that appears, click Change

4. Select the letter you need from the list and press OK

5. A warning window will appear that some programs using this drive letter may stop working. Let me explain: if you installed some programs or games on a partition, then after changing the partition letter they may stop working, because when installing the program, data is written to the folder, registry and other system folders. Some programs are installed only in a folder, and they are not afraid of even reinstalling Windows, they will work no matter what disk (they are called portable), while others may have to be reinstalled after changing the letter.

After confirmation in Disk Management, the partition letter will change.

Let's move on to the fifth point Formatting:
Formatting is the creation of data access structures, for example: file system structures. During formatting, all partition data is lost! If the formatting was quick, then they can still be restored different programs, if it has been fully formatted, this will be very difficult to do.
1 way. In the same disk management, right-click on the partition => format

in the window that appears, name the partition (volume label), select the file system, cluster size and formatting method, click OK.

We confirm that you do not mind that all data from the selected volume will be lost - click OK

We wait a couple of minutes, after formatting it will be written on our disk Corrected
Method 2. Go to My Computer (in Windows 7 and higher in Computer) => click on the disk that you want to format with the right mouse button => format => select the one you need (described in the previous method) => click OK

Let's move on to the sixth point Remove disk:
Just don't delete the volume Reserved by the system - are stored on it required files to load the operating room Windows systems, and after removing it you will have to reinstall Windows :) or play with the Live CD...
1. Go to Disk Management (start => diskmgmt.msc );
2. Right-click on the partition you want to delete => delete volume

you will be warned that all data from the volume will be destroyed, if you agree - click Yes

in disk management, we now have unallocated space the same size as the volume.
Let's move on to the seventh point Expand disk:
To expand a volume using standard Disk Management, you need to have unallocated space immediately after the disk being expanded! If you want to expand a volume, but after it there is a partition, and then only an unmarked place - the “expand volume” itself in the menu will not be active! Therefore, you will have to either delete the volume following the one being expanded (losing all data) or .
We will expand drive C, we have unallocated space after it.
1. Go to Disk Management (start => diskmgmt.msc);
2. Click on the disk with the right mouse button => Expand volume

3. The volume expansion wizard will appear, nothing interesting is written here, just click Further. We need to decide how much of the unallocated area you want to leave, and how much to add to drive C.
Total volume size - how much space is there on drive C?
Maximum available space - how much disk space can be taken for expansion;
Select the size of the allocated space - Enter how much you want to expand drive C.


In a split second, drive C will be expanded. Nothing complicated :)
Let's move on to point eight
For reference- MBR The disk is visible to any computer, it just has minor limitations:
- you can only create four main partitions;
- The maximum volume size is 2.2 terabytes.
Agree, only 2 terabytes, how can it be so “small”? 🙂 And there are only four sections, it’s just terrible... Some new laptops use the structure GPT on which you can create 128 partitions, and the size of each can be up to a billion terabytes (in theory, up to 9.4 ZB). Just a billion terabytes, pump up a few movies for relaxation :).
This conversion is only possible on additional disk By choosing this action, you will basically lose all information! Therefore, convert the disk from MBR to GPT I will be on a virtual disk, right-click on the disk and select Convert to GPT disk

wait a couple of minutes (depending on the size of the disk you are converting) and look at the result. To perform this action with the main disk, you need special programs, loading from a Live CD and complete indifference to the fact that all data from the disk will be lost...
Let's move on to point nine Creation virtual hard disk:
Use virtual HDD you can do it in different ways, it can be easily created and just as easily dismantled (disconnected), you can install a second operating system on it and carry out the necessary testing, and when you get tired of it, turn it off and transfer it to another computer.
1. To create a virtual hard disk, go to disk management ( Win+R in the window that appears, enter diskmgmt.msc)
2. Choose Action =>

Please note that the menu has Attach a virtual hard disk, as you already understand, you can mount a virtual hard disk that was used previously, or on another computer.
3. Here you need to specify the size of the virtual disk to be created, and decide whether it will be dynamic or fixed
Dynamic- as the disk fills up, it can expand at the expense of the real disk on which it is located, but if you delete the data, it will not shrink back.
Fixed- you initially set a disk size that does not increase, you know that you have a certain amount of space and if it runs out, you need to delete the excess.

Choose Review and come up with a location for him, give him a name.

Enter Virtual hard disk size and press OK. You already understood that the created virtual disk will be located on the disk where you choose, from my example it will be on the D:\ drive, if I select a fixed size, then I will know that it takes up no more than the space specified for it, and if dynamic, then you will need to look so that it does not eat up all the free space on the D:\ drive.

After the virtual disk has been created (Disk 1 in our example), you need to Initialize it (click on the disk that appears with the right mouse button => select Initialize disk)

You will be prompted to decide whether to choose an MBR or GPT table (if you have a disk smaller than 2TB, it is better to choose MBR), click OK

Now the virtual disk will become like a regular disk, you can create volumes on it and perform the same actions as on a regular disk.
As I said at the beginning of the article, there are many utilities for working with a hard drive, but the standard Disk management allows you to carry out many actions. I could have written a bunch more theory, but I judge by myself, I’m not a fan of reading encyclopedias, everything should be brief, but I’ve already dragged it out... If you have questions, write comments! Good luck to you :)
Question: Error when creating a new volume (there is not enough free space to complete the operation)
Help me please. I wanted to expand the girl’s C drive and it was a big mess, now I don’t know what to do.
She had two combined volumes D and E. I deleted D and wanted to add it to E. But it didn’t turn out what I wanted. When creating a simple volume it gives an error.
I'm in a panic, I don't know what to do. Guys, don’t leave yours, don’t let your face fall in the dirt in front of a girl
Answer: No, all the information remains on it
Question: Error on device \Device\CdRom1 during paging operation
Events appear in the log:
"An error was detected on device \Device\CdRom1 during a paging operation."
In this case, I burn discs with Nero Burning ROM with verification.
Post-registration checks go through without any problems.
Plus, I then use the disc and watch movies from it without any problems.
Everything can be copied back to the hard drive.
What could be the problem? I would be glad to try other discs, but we don’t have any other BD-Rs except Mirex 4x. They sell them everywhere.
Drive iHBS 312. Firmware is the latest available.
Could this be somehow related to error correction and therefore, if it fails to write/read something the first time, Windows writes to the log (and at the same time the disk is checked and read)?
P.s.
calculated MD5 for each of the 29 files that were recorded from the hard drive to BD-R.
All amounts calculated for files on the hard drive completely coincide with those calculated when reading from the drive.
When reading from BD-R, no errors were added to the log, which means it doesn’t like something while writing, as I understand it...
Answer: garniv, It's clear. Score, so score
Question: [solved] Install Windows on HDD2 if there is no free space on HDD1
The computer has two physical hard drives HDD1 and HDD2. I want to install Windows 8.1 on HDD2, but the installer does not allow me to do this, saying that there is no free space on HDD1 and it cannot install the bootloader there. I actually need the bootloader to be installed on HDD2, and in the BIOS I selected HDD2 first, but it still doesn’t allow it. What to do?
Answer: Vadikan, I seem to have provided information, I wrote that there is no free space on HDD1. This is not enough?
HDD1 has three partitions that are used by the operating system Linux system, which uses the Grub boot loader, in the menu of which I can add an option to boot Windows 8.1 from HDD2 after it is installed. Everything on HDD2 disk space free.
The Windows 8.1 installer does not allow you to continue the installation, complaining about the lack of free space on HDD1 where it will install the bootloader. Specify that the bootloader should be installed in Disk MBR I can’t do HDD2 because there is no such setting in the installer. In previous versions of Windows, in particular in XP, this was not the case; Windows was installed only on the partition that the user specified; the MBR was not affected at all.
Question: Expanding and creating a new volume
I can’t create a new volume or expand others, although I still have 127GB free, please advise what to do
Answer: alex8800, there are several options:
1. Optimal - merge important information from D, delete everything after C through disk management and create a new one D.
2.RMB 126 GB - Create volume.
Who created it and what is on the 4 GB partition?
Question: [Solved] Cobian Backup 11: error creating shadow copy
Hi all! This is the problem: there is a server on Windows Server 2008 R2 Enterprise, it runs Hyper-V with virtual machines, it also has Cobian Backup 11 which backs up a folder with files from shared access, which has nothing to do with virtual machines. However, when backing up, Cobian Backup displays the error: “Error creating a shadow copy: The creation of a shadow copy is already in progress.” Backup completes, but with errors, not all files are copied. Can Hyper-V interfere with Cobian Backup by somehow using shadow copies? On other servers, without Hyper-V, this problem does not exist.
Answer:
Quote santey007:
I did everything like this, but the logs show the same error: Error creating a shadow copy: The creation of a shadow copy is already in progress. Moreover, I tried to make a backup.vhd of an already working virtual machine, there was an error, but nevertheless it started copying. Any other ideas on how to get rid of this error?
Question: Without any apparent reason The amount of free space on your hard drive decreases
Server on Win 2008r2. 2 disks - 1 working, 2 mirror. System disk 250+GB. Spinning mysql database(500 MB) and timex (10 GB), the day before yesterday the mysql database stopped connecting. We climbed in and found that the space was 0kb. Cleaned it up, removed paging on the 2nd logical drive and freed up 6-7GB. Everything worked. A few hours later mysql stopped responding again. Locations 0. The database was moved to another logical drive and removed from the old location. We started watching, and for no apparent reason the free space was decreasing by 1 MB per minute. At 2m logical drive this is not the case. Update is disabled, the server only works in local network and there is no Internet, but in Kaspersky, the database is updated in the locale. avz and dr cureit did not give the slightest hint of doubt. The server worked flawlessly for 4 months. Does anyone have any guesses - where to dig?
Answer: Too much for an ordinary muscle base, Timex has a log of 10GB, but not 200, that’s a fact. We have 3 dozen such “servers” (scattered around the city) - all are made approximately the same, the differences are only in hardware, and even then insignificant. In total, all files and folders are system, invisible, etc., etc. a little more than 30 GB.
Added after 2 hours 27 minutes
magirus, you were right. These are logs, but of Timex errors. 200GB of logs are long and beautiful logs. You can close it.
Question: Restoring a profile without creating a new one
There was such a problem, the start button does not work, 2 icons are not displayed on the taskbar: store and edge, I had windows 10 pro on this moment I downloaded the corporate version from above, but the problem still remained. A black screen will appear for another 5 minutes before loading the desktop. I installed the corporate one from the original image without any bells and whistles, build 10586) I read somewhere online that changing the user will help solve the problem. And yes, everything works fine under a different user. And now the essence of this topic:
- How can I restore my profile with settings? (I copied folders from one user to another, as a result, the same problems on the new account)
- Is it possible to restore the current profile to a working state without creating a new user?
I created a topic here, but then, due to the startup problem and some of my actions, the system hung. I sorted out the freezes, then I couldn’t get to the computer for 2 weeks, and now I decided to take it anyway. Deleting it clean and reinstalling it is an extreme option that I wouldn’t really like to do. I hope the community can help me with my question)
Answer: I solved the problem with the startup and taskbar. Who is interested in this solution)
Check if there is a list of all programs in the new account. If yes, then try returning the "Start" in your regular account to its original state. To do this, follow these steps:
1.Enable the Administrator account, to do this, open “Command Prompt (Administrator)” and enter the command net user administrator / active: yes if you have a Russian version of Windows.
2.Create a temporary new user account.
3.Log out of your regular account and log in to the temporary new user account, this is necessary for the TileDataLayer folder to be created.
4.Log out of the temporary account and log into the created Administrator account, making sure that you are logged out of your regular account and the temporary account.
5.In the Administrator account, open Explorer, turn on show hidden items and navigate to the folder C:\Users\%USERPROFILE%\AppData\Local\TileDataLayer, i.e. the folder regular user, who had problems with Start.
6.In this folder, rename the TileDataLayer folder or delete it after making it backup copy, this is necessary in order to copy a folder with the same name from a temporary account here.
7.Now open the temporary user's C:\Users\%USERPROFILE%\AppData\Local folder and copy the TileDataLayer folder from here to the regular user's C:\Users\%USERPROFILE%\AppData\Local folder.
8.Log out of the Administrator account and log in to your regular account.
9.Delete the temporary account.
Editing partitions and volumes helps out in case of thoughtless disk partitioning at the beginning of Windows installation. Any shortcomings made during installation can be easily corrected.
Why do you need to change hard drive partitions?
Because of large quantity programs and games occupying almost all the free space, Windows begins to slow down, and defragmentation of partition C is carried out with errors.
The main reason for changing hard disk partitions is the lack of space on the system partition C.
At this time, up to several hundred gigabytes are empty on partition D, but moving some files to partition D forces you to reconfigure many third-party applications. In this case, it is easier to expand drive C at the expense of D.
How to expand C drive
Expansion of drive C is possible using: Windows tools, and using third-party programs.
Extending the C drive directly in Windows 7
If you want to expand the disk using standard means Windows, then do the following:
- By pressing the Win + R buttons, bring up the “Run” window. Enter the command "diskmgmt.msc" and click "OK". The command “diskmgmt.msc” will open the Disk Management utility
- Select partition D and in the volume context menu click on “Delete volume”. Don't rush to edit hidden drives without a volume name, since deleting a partition will destroy all valuable files stored on it. The necessary information should be copied to another disk in advance or removable media.You cannot remove drive C, on which the system itself is installed. After disk D is destroyed, there will be unallocated space in its place.
 Select the volume and delete it
 - Select drive C and in the context menu give the command “Extend volume”.
- Set the number of megabytes that will be added to drive C. Exceed maximum value will not succeed, since the physical medium itself is limited. Click Next.
 The size of the previously unmarked area will decrease by this amount.
 - Drive C will be enlarged. The size of drive D will be reduced by the megabytes given to drive C. Click on a free area of the drive and give the command “Create a simple volume”. When recreating volume D, this partition will be automatically formatted (quick format using Windows tools).
 Click on the remaining unallocated area and click on “Create Simple Volume” in the context menu
Now there is enough space in C for normal Windows operation and your programs.
If desired, you can use third party applications, for example Acronis Disk Director or Partition Manager. But it should be remembered that in the hands of inexperienced users alternative programs often become not a “lifesaver”, but a means of destroying user files, and only in a computer service center will you be able to recover lost data.
Video: Extending a volume using Windows 7 tools
Expanding the C drive when reinstalling Windows 7
When installing Windows, you will not skip the stage of changing disk partitions. During the reinstallation process, the program will ask which partition to install the system in and will suggest redistributing the hard drive space.
There are two types of Windows installations: upgrade and full installation. The update is carried out on top of the existing system, saves everything installed programs, but resets system parameters. Full installation - installation with formatting system partition, or installation on another hard drive partition. If you want to change hard disk partitions, then you need to choose the second installation type.
If you really need a “clean” installation of Windows, do the following:
- Paste installation DVD or flash drive and restart the PC.
- To open the BIOS window, press the Del, F2, or Esc key during system startup (the choice of key depends on the computer manufacturer). In the window that opens, use the arrows to select “Boot”.
 In the window that opens, use the arrows to select “Boot”
 - Next, use the arrows to open the “Boot Device Priority” tab and in the list, select the boot device from which you need to boot the system. Close the BIOS and save the changes.
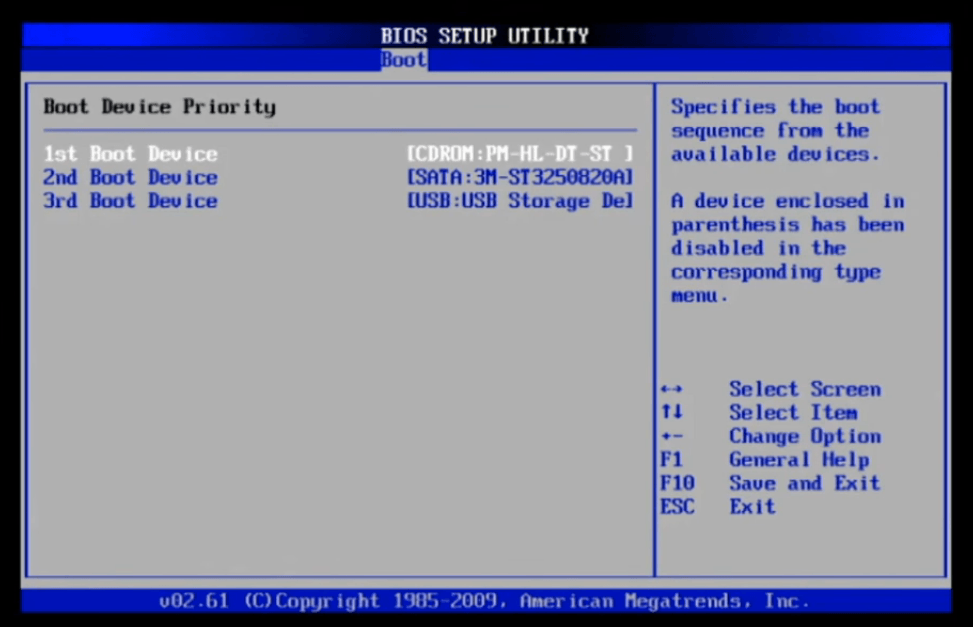 In the list, select the boot device from which you need to boot the system
 - Wait while the installer downloads to RAM PC.
- Select type Windows reinstallation.
 Select full installation Windows 7
 - For example, one disk and one partition are taken. Select the drive and click Disk Setup. All your files should be copied to other drives in advance.
 Select the drive and click "Disk Setup"
 - Additional links will appear - click the “Delete” link. A warning about data transfer will appear, click “OK” and delete the partition. Do the same with adjacent sections (D, E, etc.), if there are any.
 Click "OK" if your personal files have been copied to other media
 - After removing existing partitions, you will have an unallocated (unformatted) disk area, which is the full size of the hard drive. To create new sections, click the “Create” link.
 Windows 7 Setup will help you create new logical drives
 - Specify the size of partition C, and create partition D in the same way. Go to partition C and format it. A quick format will be applied (clearing the disk table of contents).
 The installer requires you to format partition C
After formatting, Windows will continue to be reinstalled. Section C has been successfully modified.
Video: resizing partitions during reinstallation of Windows 7
Why can't I expand a volume in Windows 7?
A situation where the “Extend volume” option is inactive is possible. For example, we take the extension of the same C drive.
 A situation where the “Extend volume” option is inactive is possible
 - a spanned volume was created as D, which includes, for example, disks D and E. Transfer files from these partitions to other media. Remove this spanned volume;
- you forgot to delete all subsequent volumes, including drive D. Expanding the previous volume only works when deleting the next one.
How to delete a volume
You can only add an unallocated partition to a disk, which appears after deleting a volume.
Deleting a volume in Windows 7
To delete a volume:

You will be left with free space the size of this volume, which can now be attached to another partition.
Why can't I delete a partition or volume?
In some cases, removal may be difficult.
The reasons are as follows:

How to remove the swap file
To make volume deletion available, do the following to eliminate the Windows page file:
- From the Start menu, go to Control Panel.
 From the Start menu, go to Control Panel
 - Go to the “System” section.
 Go to the "System" section
 - Go to " Extra options systems."
 Click on "Advanced system settings"
 - In the "System Properties" window, go to the "Advanced" tab and click on the "Options" button in the performance settings.
 Click this button
 - In the performance settings window, select the “Advanced” section and click on “Change”.
 Select the “Advanced” section and click on “Change”
 - In the virtual memory settings window, uncheck the option to automatically select the paging file size and check the box next to “Without paging file.” Click on the "Set" button.
 Uncheck the option to automatically select the paging file size and check the box next to “No paging file”
 - Click "Yes" when prompted to clear the page file.
 Answer yes to the request to clear the page file
 - Close all windows by clicking "OK" and restart your computer.
Go back to Disk Management and try to delete the volume again. Check if it is connected this volume with an adjacent volume in the same partition.
How to shrink a volume
The disk can also be expanded by compressing it. As a result of compression, free space will be obtained, which can be used to create a new partition or volume.
Features of volume compression in Windows 7 are as follows:
- compression works only for primary and secondary partitions, as well as file system NTFS. If the partition or volume is formatted in FAT32, move the data from it and reformat (or convert) it to NTFS. To do this call context menu disk and click “Format”;
- if a partition or volume has many bad sectors, it will not be possible to shrink it;
- The page file, hibernation files, and recovery point data present an additional challenge to compacting partitions and volumes. Compression will not proceed beyond the second area of free space, counting from the beginning of the volume.
Shrinking a volume using Disk Management
If you want to shrink a volume using standard Windows tools, then:

Shrinking a volume using the command line
If the option to shrink a volume in Disk Management is no longer available, use the command Windows string. It can bypass the inactivity of some actions that are hidden by the Windows graphical shell. The instructions are universal for Windows 7/8.x/10.
- Search for the Command Prompt application in Start and run it with administrator rights. For tasks beyond the use application programs, Windows often requires administrator privileges.
 Launch the Command Prompt application with administrator rights This command displays a list of disks, partitions and volumes. The command line reports the maximum available volume space for compression
 - Enter "shrink desired=(number in megabytes)" which you want to shrink. The “shrink” command is entered with parameters, and if they are missing, all available content will be compressed.
 The “desired” attribute is a variable that corresponds to a value in megabytes
When volume compression is complete, the command line will display a message indicating that the volume was successfully reduced by the specified megabytes. Using the Disk Management application, make sure that there is free space in which you can create a new volume.
Video: Shrinking a volume using the command line
Expand, compress, delete, add new partitions and volumes using standard Windows utilities- it's not difficult. The main thing is not to lose valuable data that you have been collecting and creating for many years.