The era of floppy disks is long gone, but sometimes when trying to write to a flash drive, the user may encounter a situation known since the days of using floppy disks - the removable disk is locked and cannot be used to write files.
We will look at how to solve this problem in detail in our article today.
So, you need to write some information to a flash drive, you insert it into the connector and receive a message like “The disk is write-protected, remove the protection or use another disk.”
This problem can be solved quite quickly, and we will talk about this a little later, but now we should say a few words about the purpose of installing write protection on a flash drive.
Note! As a rule, this operation is performed for only one purpose - to protect the flash drive from viruses that can spontaneously be copied to removable media without the user’s knowledge.
Methods for removing write protection from a flash drive
There are 2 key ways to remove protection from a flash drive: hardware and software.
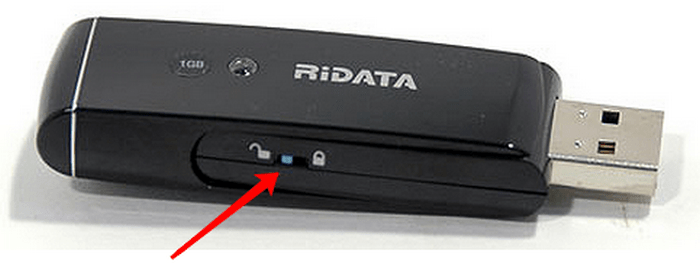
The hardware method is to install a lock switch, which is present in some models of USB flash drives, as well as SD cards. As a rule, the switch is located on the side edge of the drive.
Carefully inspect your existing drive and look for an open/closed lock icon or the word Lock on it.
Note! Removing the protection is very simple - you just need to move the locking lever in the opposite direction. Write protection has been removed. Insert the flash drive into the appropriate slot and repeat the file writing operation again.
The software method involves software interaction between the operating system and the flash drive controller, which is responsible for the ability to record information.
You can remove write protection programmatically using the command line, registry editor, or local group policy in Windows 7/8. Let's take a closer look at all of the above methods.
Removing protection using regedit
Step 1.“Start”, in the search field enter the name of the Windows registry editor - regedit. Right-click (RMB) on the program and in the context menu go to the “Run as administrator” item.

Step 2. Let's go to the StorageDevicePolicies section:
HKEY_LOCAL_MACHINE\SYSTEM\CurrentControlSet\Control\StorageDevicePolicies
Important! If there is no such section, you need to create it. To do this, right-click on the section Control - New - Section. We name the section “StorageDevicePolicies” without quotes.

Create (RMB in the right column of the registry) a DWORD value (32 bits) in the created registry branch. For convenience, let's call the created element WriteProtect.

Step 3. You need to make sure that the value of the WriteProtect parameter is 0. Right-click on WriteProtect and select “Change”. If the value is “1” you need to change it to “0” and click “Ok”.

Step 4. Close the registry editor, remove the flash drive and restart the computer. Insert the flash drive. Now the flash drive works as usual, allowing you to write files.
Removing protection using Diskpart
If the flash drive could not be unlocked using the registry, let's try to do it using the Diskpart command interpreter, which allows you to manage disks and partitions using commands that the user enters at the command line.
Step 1.“Start”, in the search field enter the name of the Windows command line - cmd. Right-click in the program and select “Run as administrator” in the context menu.

Step 2. Now you need to enter the commands: diskpart and list disk, and after entering each of them, press the Enter key.
Step 3. In the list above, you need to determine what serial number in the name the flash drive has.
This can be done based on the specified size, in our case an 8 GB flash drive, presented in the table as “Disk 1” with a capacity of 7441 MB.
Step 4. We select the disk with the “select” command, clear the attributes that allow only reading “attributes disk clear readonly”.
If the flash drive needs to be formatted, you should enter the following commands “clean”, create a partition “create partition primary”, format it to NTFS “format fs = ntfs” or FAT “format fs = fat”.

Removing protection using the Local Group Policy Editor
Step 1. Open the editor by pressing the Win + R key combination, after which you should enter the command gpedit.msc and press “OK” or Enter.

Step 2. In the editor, open the branch: Computer Configuration - Administrative Templates - System - Access to Removable Storage Devices. And look at the status of the “Removable drives: Deny reading” parameter.
If the parameter is enabled, you must disable it.

Step 3. To disable recording restrictions, double-click on the parameter and in the window that appears, select “Disable”, “OK”.

If all the methods described above did not help solve the recording problem, you can try going to the official website of the flash drive manufacturer and looking for proprietary utilities for working with the drive.
It is also possible that the flash drive has exhausted its resource (there is a limit on the number of rewrites, after which the drive is switched to read-only mode) and the only way out of the situation is to buy a new flash drive.
When trying to write data to a flash drive, users are faced with disk write protection, so they are faced with the question of how to remove write protection from a flash drive. A message appears on the computer screen: “The disc is write-protected. Remove protection or use another disk."
It is necessary to remove write protection from a USB flash drive, because it is impossible to copy or add files on the device, or, conversely, delete files from the disk in the Windows operating system. In this case, you will not be able to use a flash drive to perform your tasks.
Such an unexpected situation occurs, which, as usual, arose at the most inopportune moment. The user expects to use a USB flash drive or flash memory card of various types (SD, xD, MS, CF, etc.), but here is this error.
The reasons for the error may be different: due to a hardware malfunction, or the problem is caused by software actions. It happens that the flash memory device simply malfunctions, for example, the electronic filling burned out, so there is nothing you can do to help here.
Sometimes you cannot use a flash drive due to viruses. Checking the flash drive using an antivirus program and removing malicious software from the disk will help you get out of the situation.
The main reasons for blocking writes to flash memory devices:
- hardware failure of the drive;
- write protection using physical locking;
- virus infection;
- changing the disk attribute to read-only mode.
If the flash drive is write-protected, what should I do, how to remove the protection? In this guide, we will look at 5 methods that help remove write protection on a flash drive. In most cases, this problem is solved successfully.
How to remove write protection from a flash drive physically
SD cards and some USB flash drives have a switch that can be used to disable/enable the drive's recording mode. In this case, the flash drive or micro flash drive (memory card) is write-protected mechanically.
On the body of a flash drive or memory card there is a special switch marked with the word “Lock” with a picture of a lock. Move the switch to a different position, and then check the operation of the flash drive on your computer.
How to remove write protection from a flash drive on the command line
If the flash drive says: remove write protection, you can use the command line to remove the read-only attribute from the disk.
Follow these steps:
- Run Command Prompt as an administrator (read how to run Command Prompt in Windows 10).
- In the command line interpreter window, enter (after entering the appropriate command, press the Enter key):
- Next, enter the command to display all drives on your computer:
- The Command Prompt window will display all drives connected to the computer. We need to choose a flash drive number, which can be easily determined by the size of the disk.
On this computer, the flash drive has a size of 8 GB (7712 MB), so I should select the number “1”; on your computer, the flash drive may have a different disk serial number.

- Enter the command to select a volume (disk):
- Next, run a command that clears the attributes of the selected drive:

Close the command line interpreter. Check the operation of the flash drive on your computer.
How to disable write protection of a flash drive in Registry Editor
By changing the Windows registry, you can disable write protection for flash drives.
To do this, do the following:
- Press the “Win” + “R” keys on your keyboard at the same time, and in the “Run” window, enter the command “regedit” (without quotes).
- In the Registry Editor window, follow the path:
- In the “StorageDevicePolicies” section, right-click on the “WriteProtect” parameter, and in the context menu click “Edit...”.
- In the "Edit DWORD (32-bit) Value" window, in the "Value" field, enter the value "0" (without quotes), and then click on the "OK" button.

- Restart your computer.
If the "StorageDevicePolicies" key is not in the registry, create it. To do this, right-click on the “Control” section, select “New” => “Section”.
In the "StorageDevicePolicies" section, create a DWORD value (32 bits) called "WriteProtect", set the value to "0". Reboot your system.
How to remove the write ban on a flash drive in the Local Group Policy Editor
A write ban on a removable drive can be set in the Windows Local Group Policy Editor. In this case, you need to disable the ban in the following way:
- Press the “Win” + “R” keyboard keys, in the “Run” window that opens, enter the command “gpedit.msc”, and then click on the “OK” button.
- In the Local Group Policy Editor window, go to: “Computer Configuration” => “Administrative Templates” => “System” => “Access to Removable Storage Devices”.
- Right-click on the "Removable drives: Deny writing" policy, in the "Removable drives: Deny writing" window, set the option to "Disabled", and then click on the "OK" button.

Check for a problem with the removable drive.
Troubleshooting by formatting a flash drive
If the flash drive has the FAT32 file system (FAT16, FAT, exFAT), then you will not be able to move files larger than 4 GB to the USB drive. To support the use of large files on a flash drive, you need a drive in the NTFS file system.
In other cases, formatting to the default file system sometimes helps to restore functionality to a problematic flash drive.
Using utilities to recover flash drives
Specialized utilities from device manufacturers will help you cope with many problems that arise in the operation of USB flash drives. Well-known manufacturers: Transcend, Silicon Power, ADATA, Kingston, etc., have created software to restore the functionality of their devices.
Using the programs: JetFlash Online Recovery, USB Flash Drive Recovery, USB Flash Drive Online Recovery, Kingston Format Utility, solve problems that arise when working with flash drives.
If these utilities do not help, use more advanced programs: HP USB Disk Storage Format Tool, AlcorMP, D-Soft Flash Doctor.
Conclusions of the article
If a problem occurs with the write protection of the disk, the user cannot use the flash drive. Using various tools, you can try to solve the problem that has arisen: remove write protection from the flash drive.
Experienced PC and Internet user
The era of floppy disks is long gone, but sometimes when trying to write to a flash drive, the user may encounter a situation known since the days of using floppy media - it is blocked and cannot be used.
We will look at how to solve this problem in detail in our article today.
So, you need to write some information to a flash drive, you insert it and receive a message like “The disk is write-protected, remove the protection or use another one.”
This problem can be solved quite quickly, and we will talk about this a little later, but now we should say a few words about the purpose of installing protection from downloading on .
Note! This operation is performed for only one purpose - which can spontaneously be copied to removable media without the user’s knowledge.
Methods for removing write protection from a flash drive
There are 2 key ways to remove protection from a flash drive: hardware and software.
The hardware solution is to install a lock switch, which is present in some drive models, as well as SD cards.
Most often, the toggle switch is located on the side edge of the drive.
Carefully inspect your existing drive and look for an open/closed lock icon or the word Lock on it.
Note! Removing the lock is very simple - just move the lock lever in the opposite direction. That's all. Insert the media into the appropriate slot and repeat the file writing operation again.
The software solution involves the interaction of a flash drive controller, which is responsible for the ability to record information.
You can remove write protection using this method using the command line of the Registry Editor or Local Group Policy.
Learn more about all of the above methods.
Removing protection using regedit
1. Click “Start” and enter - in the search field. Right-click (RMB) on the program and in the context menu go to the “Run as administrator” item.

2. Go to the StorageDevicePolicies section:
HKEY_LOCAL_MACHINE\SYSTEM\CurrentControlSet\Control\StorageDevicePolicies
Important! Important! If there is no such thing, you will have to create it. To do this, click on the section Control - New - Section. We call it “StorageDevicePolicies” without quotes. If there is no such section, you need to create it.

Create (RMB in the right column of the registry) a DWORD parameter (32 bits) in the created branch. For convenience, let's call the element WriteProtect.

3. Make sure that the WriteProtect value is 0. Right-click on WriteProtect and select “Change”. If the value is “1” you need to change it to “0” and click “Ok”.

4. Close the registry editor, remove the media and restart the computer. Insert the flash drive. Now the flash drive works as usual, allowing you to write files.
Removing protection using Diskpart
If we were unable to unlock using regedit, let's try to do it using the Diskpart command interpreter, which allows you to manage the commands that the user enters into the command line when working with partitions and disks.
1. “Start”, enter the name - cmd - in the search field. Right-click in the program and select “Run as administrator” in the context menu.

2. Now you should enter the commands: diskpart and list disk, and after entering each of them, press the Enter key.
3. In the list above, determine what serial number in the name the flash drive has.
This can be done based on the specified size, in our case an 8 GB flash drive, presented in the table as “Disk 1” with a capacity of 7441 MB.
4. Select the disk with the “select” command, clear the attributes that allow only reading “attributes disk clear readonly”.
If, you should enter the following commands: “clean”, create a partition “create partition primary”, format it in NTFS “format fs = ntfs” or FAT “format fs = fat”.

Removing protection using the Local Group Policy Editor
1. Open it by pressing the Win + R key combination, after which you should enter the command gpedit.msc and press “OK” or Enter.

Read what to do if, when you try to format a flash drive, memory card or hard drive, you receive the message: “The disk is write-protected.” And also, how to properly remove protection and unlock any device if you cannot create or copy files to a flash drive or memory card because the device is write-protected.

If you see a message while copying or creating files on your device: You need permission to perform this operation.

Or when you try to format, you receive a message: You do not have sufficient permissions to perform this operation.

This means you need to remove device write protection in the Windows Local Group Policy Editor:

- Run the run command, enter gpedit.msc and press Enter.
- Go to section "Computer Configuration" - "Administrative Templates" - "System" - .
- Disable the property "Removable drives: disable writing". To do this, double click on it, set the value Disabled and press OK.
- Repeat these steps for the section "User Configuration" - "Administrative Templates" - "System" - "Accessing removable storage devices".
After completing these steps, try creating a file or folder on the flash drive. If this guide did not help you, watch our previous videos about fixing errors on a flash drive.
Are you afraid that your information may be stolen from your work computer and taken away on a flash drive? Or, on the contrary, are you afraid of losing data stored on a flash drive because it can be easily deleted? How to protect files from being copied to removable media without prohibiting its use in the system? How can I protect what I copied from being deleted?
Write protection of a flash drive can be implemented in several ways, depending on the goals being pursued. Some of them prohibit writing to a removable disk using the system itself, which makes it impossible to write files to any flash drive on your computer, while others allow you to prohibit writing to a specific medium, regardless of which computer it is connected to. Let's look at them in more detail:
Prohibiting writing to removable media by editing the registry.
Small changes made to the registry will allow you to prohibit writing to any removable drives. In order to make the necessary settings, open the “Run” window using the Win/R key combination and launch the registry editor (to do this, enter the “regedit” command in the window and press the Ok or Enter button):

In the editor we are interested in the HKEY_LOCAL_MACHINE section,

in which we will sequentially open /SYSTEM/CurrentControlSet/Control/

In the Control subsection we need to find the StorageDevicePolicies folder (and if it doesn’t exist, create a new one) and in the WriteProtect parameter replace the value zero with one:

To do this, double-click to open the parameter and edit its value:

If we created StorageDevicePolicies ourselves, we need to create the WriteProtect parameter in it, for which we need to right-click to open the context menu, select “32-bit DWORD parameter” and assign the name WriteProtect to the new parameter, then change its value to one , in the manner indicated above.
After closing Registry Editor, restart your computer to apply the changes. Writing to removable disks is no longer available, nothing can be copied to a flash drive, and existing files on it cannot be deleted or renamed:

To disable write prohibition, you must return the WriteProtect parameter to zero.
Prohibiting writing to flash media by changing group policy
Another way to achieve similar results is to make changes to Local Group Policy. Open the editor using the familiar Win/R keys and entering the gpedit.msc command in the Run window:

Let's sequentially follow the path Computer Configuration / Administrative Templates / System / Access to removable storage devices:

Here we are interested in the “Removable drives: disable writing” parameter, which must be set to enabled:

This method is good because it does not require a system reboot to apply the settings - after clicking the “Apply” button, the prohibition of writing to disks is activated immediately.

Also, recording is immediately disabled and turned off; just set the “Removable drives: write prohibit” parameter to “Not set” or “Disable”.
Both methods are good for prohibiting writing on your computer, but they are not capable of protecting important data on a flash drive when used to transfer files to another computer. This requires a completely different approach:
Write-protection of a flash drive by setting access rights
To use this method, you need to format your flash drive using standard Windows tools into the NTFS file system:

All data will be destroyed, so if you have important documents on it, first copy them to your hard drive, and after formatting, return them to the flash drive.

In “Properties” we are interested in the “Security” tab, where we can make changes to the file system access rights:

Set the “Everyone” group to write prohibited, apply the changes:

Now, regardless of the computer to which your flash drive will be connected, no user will have rights to write (and, accordingly, to delete files). Moreover, you can restore rights only on the computer where the initial changes were made by returning the checkbox for the “Record” item to the “Allow” position.
If you wish, you can experiment with different user groups, for example by only allowing a group with administrative rights to write. However, please note that these settings will only be valid for administrators on the computer where the changes are made and not on any other.
How to remove such write protection if there is no access to the original computer, or if the operating system was reinstalled on this computer? In this case, only formatting the flash drive again will help you. Don’t be alarmed if you store important documents on it - copy them to a folder on your computer’s hard drive, and then feel free to format your storage medium. After formatting, the file system will return to its original state; to be sure, you can select the FAT system as the new file system.
Write protection of removable media using a built-in switch
Don’t forget that some manufacturers provide a switch that allows you to block recording on a flash drive. This applies mainly to memory cards and adapters for them, however, USB drives can also be equipped with it:

If your media has such a switch, just switch it - and until you return it to the reverse position, it will be impossible to write anything or accidentally delete files. The main thing is that you yourself do not forget that you have enabled write locking on the flash drive, otherwise you are guaranteed unpleasant emotions when you will not be able to submit a report to your boss due to the fact that you will not be able to copy files to the flash drive, which is now protected.