The console is an advanced game configuration tool that can be used to set various parameters and properties hidden in the standard Dota 2 in-game menu.
Before turning on the console in Dota 2 and entering console commands in the game, the console must be unlocked.
As you can see, opening the console in Dota 2 is very simple!
Dota 2 config
Config - custom commands to be connected separate file when starting the game. These commands in Dota 2 Reborn are activated automatically thanks to the flexible and convenient structure of the Source 2 engine.
Go to the folder where you installed the game. If you used the standard installation path, then this is:
- For Windows x86: C:/Program Files/Steam/steamapps/common/dota 2 beta
- For Windows x64: C:/Program Files (x86)/Steam/steamapps/common/dota 2 beta
If you cannot find the folder, then do this:
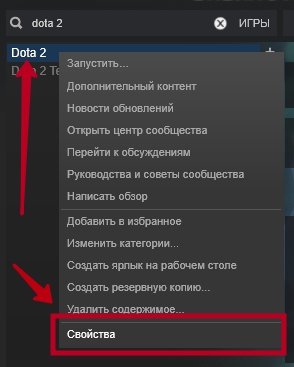
- On Steam, right-click on the game name and select “Properties”.
- In the window that appears, select the “Local files” tab and click the “View local files...” button, as in the screenshot below.

So, you got to the “dota 2 beta” folder in any of the ways. Then follow the following path: game → dota → cfg. This folder contains the Dota 2 config.
The next step is to create the Autoexec.cfg file
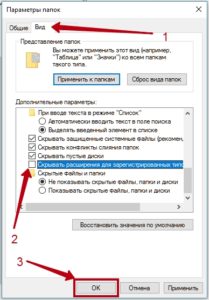
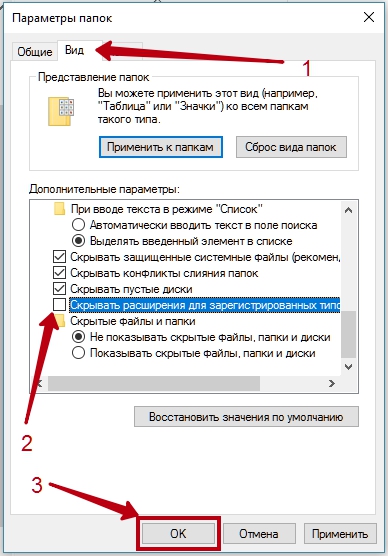
First you need to enable the display of file extensions. For WIndows 10, in Explorer, select the “View” tab, click “Options” and “Change settings for folders and search.”
Great! Create in a folder Text Document and name it without quotes “autoexec.cfg”. Make sure you remove txt extension.
When Dota 2 is launched, the contents of the autoexec.cfg file can be automatically copied to the main configuration file- config.cfg. To prevent this, right-click on config.cfg -> Properties -> Attributes -> Read Only.
And finally, we need to make sure that our config for Dota 2 starts automatically. Add the following text without quotes to the game launch parameters: “+exec autoexec.cfg”.

Please note: In the autoexec.cfg file, commands are written with quotes, but in the console - without quotes.
It is useful to put in autoexec.cfg the commands that you enter every time you start Dota. It could be like additional settings, and changing the standard ones, if it is convenient for you. For example, this is what my config file looks like:

Dota 2 Console Commands
Below I will provide a short list of useful console commands. Also, you can check out full dump of Dota console, but do it at your own risk - there are a lot of commands.
All commands are given with quotes so that they can be conveniently inserted into the autoexec.cfg configuration file.
Game performance
Adjusting network parameters
Default values
- rate "80000" - setting bandwidth Internet channel.
- cl_updaterate “30” - number of updates from the server per second.
- cl_cmdrate "30" - the number of updates that the client sends to the server per second.
- cl_interp "0.05" - this parameter is responsible for the accuracy with which the location of your hero will be transmitted to the server.
- cl_interp_ratio "2" - related to the previous command. It is the second component of interpolation.
- cl_smooth “1” - adjusting values after errors on the client side.
- cl_smoothtime "0" - number of seconds to smooth out errors.
- mat_vsync "1" - enable vertical synchronization.
- r_screenspace "1" - activate anti-aliasing.
Extra options
- con_enable "1" - activate the console.
- fps_max “120” - set the frames per second limit.
- cl_showfps "1" - enable fps counter.
- retry - reconnect to the server.
- volume “0.5” - overall game sound volume
- snd_musicvolume "0" - volume of game music.
Displaying connection information
- net_graph "1" - displays technical data in the corner of the screen, namely: fps, ping, number of packets. The commands below are for setting up this information.
- net_graphinsetleft "-50" - move the block to the left. The numbers are the number of pixels.
- net_graphinsetbottom "300" - move the block with data up.
- net_graphpos "1" - change the location of the block. 1 - on the left, 2 - in the center, 3 - on the right.
- net_graphproportionalfont "0" - change the font size for the block. From 0 to 1.
Settings for weak computers
- dota_cheap_water "1"
- cl_globalllight_shadow_mode "0"
- r_deferred_height_fog "0"
- r_deferred_simple_light "1"
- r_screenspace_aa "0"
- mat_vsync "0"
Game console commands
Hero Settings
- dota_force_right_click_attack "1" - activates finishing off creeps using RMB.
- dota_player_units_auto_attack "1" - enables or disables auto attack. .
- dota_shop_force_hotkeys “1” - activates the purchase of items in the store using hotkeys.
- dota_player_add_summoned_to_selection "1" - automatically adds summons to the control group.
- dota_apm - displays the number of actions per minute (shown only in the console).
- ping (in console) - displays ping for all players; -ping (in chat) - displays your ping and the number of dropped packets in the right top corner screen.
- dota_always_show_hero_names "1" - display player nicknames above heroes.
- dota_disable_range_finder “0” - a green line will appear, which indicates the range of skills.
- dota_camera_speed "3000" - adjust the camera scrolling speed.
- dota_camera_accelerate “50” - camera acceleration setting.
- dota_hide_cursor "1" - hides the cursor.
- r_shadows "1" - activate shadows.
- dota_topbar_buyback_time “25” - adjusts the display time of the hero’s buyback..
- hud_sticky_item_name - changes the sticky item.
- dota_screen_shake "1" - enable or disable screen shake.
- dota_player_multipler_orders "1" - includes orders for all controlled units.
- dota_unit_fly_bonus_height "150" - controls the flight height of units.
- dota_unit_use_player_color "1" - turns on the highlighting of units.
And here is a list of commands from my autoexec.cfg file that allow you to disable the health reduction animation.
- dota_health_hurt_decay_time_max "0"
- dota_health_hurt_decay_time_min "0"
- dota_health_hurt_delay "0"
- dota_pain_decay "0"
- dota_pain_factor "0"
- dota_pain_multiplier "0"
You can also configure the display of health in the bar above the hero:
- dota_health_per_vertical_marker 250 (standard value - 250) - sets the amount of hp that falls on one healthbar bar;
- dota_health_marker_major_alpha 255 (standard value - 255) - sets the location of the thick division;
- dota_health_marker_minor_alpha 128 (standard value - 128) - sets the location of the fine division;
- dota_health_per_vertical_marker 9999999 - removes marks;
Minimap settings
- dota_no_minimap "1" - the command disables the minimap.
- dota_minimap_hero_size "600" - adjusts the size of hero icons on the minimap.
- dota_minimap_hide_background "1" - disables the minimap background.
- dota_hud_flip "1" - places the minimap to the right.
- dota_hud_colorblind "1" - activates color blindness mode.
- dota_hud_healtbar_number "1" - shows the health number above the hero.
- dota_minimap_mis.click_time "0.2" - activates the delay between clicking on the minimap and moving the camera. A convenient command if you often accidentally click on the map.
Command bindings to hotkeys
Binds, or bindings, allow you to set console commands to hotkeys of your choice.
The most useful binds in the game are setting the camera to the position of the runes:
- bind “*button*” “dota_camera_setpos -2273.898682 1232.745483 982.072876” - move the camera to the top rune.
- bind “*button*” “dota_camera_setpos 3035.773438 -2972.680176 966.072937” - move the camera to the bottom rune.
Instead of *button*, of course, you need to enter the required key. By the way, the keys on the NumPad are designated with the prefix KP. For example, Num 7 is designated as KP_7.
You can bind to the desired buttons any phrases that you say into the chat as soon as you press this key:
- bind “*button*” “say_team No need to feed! Let’s retreat!”
The console is an advanced game configuration tool that can be used to set various parameters and properties hidden in the standard Dota 2 in-game menu.
Before turning on the console in Dota 2 and entering console commands in the game, the console must be unlocked.
As you can see, opening the console in Dota 2 is very simple!
Dota 2 config
Config - custom commands included as a separate file when starting the game. These commands in Dota 2 Reborn are activated automatically thanks to the flexible and convenient structure of the Source 2 engine.
Go to the folder where you installed the game. If you used the standard installation path, then this is:
- For Windows x86: C:/Program Files/Steam/steamapps/common/dota 2 beta
- For Windows x64: C:/Program Files (x86)/Steam/steamapps/common/dota 2 beta
If you cannot find the folder, then do this:
- On Steam, right-click on the game name and select “Properties”.
- In the window that appears, select the “Local files” tab and click the “View local files...” button, as in the screenshot below.
So, you got to the “dota 2 beta” folder in any of the ways. Then follow the following path: game → dota → cfg. This folder contains the Dota 2 config.
The next step is to create the Autoexec.cfg file
First you need to enable the display of file extensions. For WIndows 10, in Explorer, select the “View” tab, click “Options” and “Change settings for folders and search.”
Great! Create a text document in the folder and name it without quotes “autoexec.cfg”. Make sure you remove the txt extension.
When Dota 2 is launched, the contents of the autoexec.cfg file can be automatically copied to the main configuration file - config.cfg. To prevent this, right-click on config.cfg -> Properties -> Attributes -> Read Only.
And finally, we need to make sure that our config for Dota 2 starts automatically. Add the following text without quotes to the game launch parameters: “+exec autoexec.cfg”.
Please note: In the autoexec.cfg file, commands are written with quotes, but in the console - without quotes.
It is useful to put in autoexec.cfg the commands that you enter every time you start Dota. This can be either additional settings or changing standard ones, if it is convenient for you. For example, this is what my config file looks like:
Dota 2 Console Commands
Below I will provide a short list of useful console commands. Also, you can check it out, but do it at your own peril and risk - there are a lot of commands.
All commands are given with quotes so that they can be conveniently inserted into the autoexec.cfg configuration file.
Game performance
Adjusting network parameters
Default values
- rate “80000” — setting the Internet channel bandwidth.
- cl_updaterate “30” — number of updates from the server per second.
- cl_cmdrate "30" is the number of updates that the client sends to the server per second.
- cl_interp “0.05” - this parameter determines the accuracy with which the location of your hero will be transmitted to the server.
- cl_interp_ratio "2" - related to the previous command. It is the second component of interpolation.
- cl_smooth “1” — adjustment of values after errors on the client side.
- cl_smoothtime "0" - the number of seconds to smooth out errors.
- mat_vsync "1" - enable vertical synchronization.
- r_screenspace "1" - activate anti-aliasing.
Extra options
- con_enable "1" - activate the console.
- fps_max “120” — set the frames per second limit.
- cl_showfps "1" - enable fps counter.
- retry - reconnect to the server.
- volume “0.5” — overall game sound volume
- snd_musicvolume "0" - volume of game music.
Displaying connection information
- net_graph “1” - displays technical data in the corner of the screen, namely: fps, ping, number of packets. The commands below configure this information.
- net_graphinsetleft “-50” — move the block to the left. The numbers are the number of pixels.
- net_graphinsetbottom “300” — move the block with data up.
- net_graphpos "1" - change the location of the block. 1 - on the left, 2 - in the center, 3 - on the right.
- net_graphproportionalfont "0" - change the font size for the block. From 0 to 1.
Settings for weak computers
- dota_cheap_water "1"
- cl_globalllight_shadow_mode "0"
- r_deferred_height_fog "0"
- r_deferred_simple_light "1"
- r_screenspace_aa "0"
- mat_vsync "0"
Game console commands
Hero Settings
- dota_force_right_click_attack "1" - activates finishing off creeps using RMB.
- dota_player_units_auto_attack "1" - enables or disables auto attack. .
- dota_shop_force_hotkeys "1" - activates the purchase of items in the store using hotkeys.
- dota_player_add_summoned_to_selection "1" - automatically adds summons to the control group.
- dota_apm - displays the number of actions per minute (shown only in the console).
- ping (in console) - displays ping for all players; -ping (in chat) - displays your ping and the number of dropped packets in the upper right corner of the screen.
- dota_always_show_hero_names "1" - display player nicknames above heroes.
- dota_disable_range_finder "0" - a green line will appear, which indicates the range of skills.
- dota_camera_speed "3000" - adjust the camera scrolling speed.
- dota_camera_accelerate “50” — camera acceleration setting.
- dota_hide_cursor "1" - hides the cursor.
- r_shadows "1" - activate shadows.
- dota_topbar_buyback_time "25" - adjusts the display time of the hero's buyback..
- hud_sticky_item_name - changes the sticky item.
- dota_screen_shake "1" - enable or disable screen shake.
- dota_player_multipler_orders "1" - includes orders for all controlled units.
- dota_unit_fly_bonus_height "150" - controls the flight height of units.
- dota_unit_use_player_color "1" - turns on the highlighting of units.
And here is a list of commands from my autoexec.cfg file that allow you to disable the health reduction animation.
- dota_health_hurt_decay_time_max "0"
- dota_health_hurt_decay_time_min "0"
- dota_health_hurt_delay "0"
- dota_pain_decay "0"
- dota_pain_factor "0"
- dota_pain_multiplier "0"
You can also configure the display of health in the bar above the hero:
- dota_health_per_vertical_marker 250 (standard value - 250) - sets the amount of hp that falls on one healthbar bar;
- dota_health_marker_major_alpha 255 (standard value - 255) - sets the location of the thick division;
- dota_health_marker_minor_alpha 128 (standard value - 128) - sets the location of the fine division;
- dota_health_per_vertical_marker 9999999 - removes marks;
Minimap settings
- dota_no_minimap "1" - the command disables the minimap.
- dota_minimap_hero_size "600" - adjusts the size of hero icons on the minimap.
- dota_minimap_hide_background "1" - disables the minimap background.
- dota_hud_flip "1" - Flips the minimap to the right.
- dota_hud_colorblind "1" - activates color blindness mode.
- dota_hud_healtbar_number "1" - shows the health number above the hero.
- dota_minimap_mis.click_time "0.2" - activates the delay between clicking on the minimap and moving the camera. A convenient command if you often accidentally click on the map.
Command bindings to hotkeys
Binds, or bindings, allow you to set console commands to hotkeys of your choice.
The most useful binds in the game are setting the camera to the position of the runes:
- bind “*button*” “dota_camera_setpos -2273.898682 1232.745483 982.072876” - move the camera to the top rune.
- bind “*button*” “dota_camera_setpos 3035.773438 -2972.680176 966.072937” - move the camera to the bottom rune.
Instead of *button*, of course, you need to enter the required key. By the way, the keys on the NumPad are designated with the prefix KP. For example, Num 7 is designated as KP_7.
You can bind to the desired buttons any phrases that you say into the chat as soon as you press this key:
- bind “*button*” “say_team No need to feed! Let’s retreat!”
Dota 2 console
Not all players who have started their gaming career know how to open a console in Dota 2. It is mainly used by experienced players. Its use allows you to configure various game parameters, for example, increasing fps, disabling various effects, disabling the loading screen.
Let's figure out how to start the console in the game.
Switching procedure
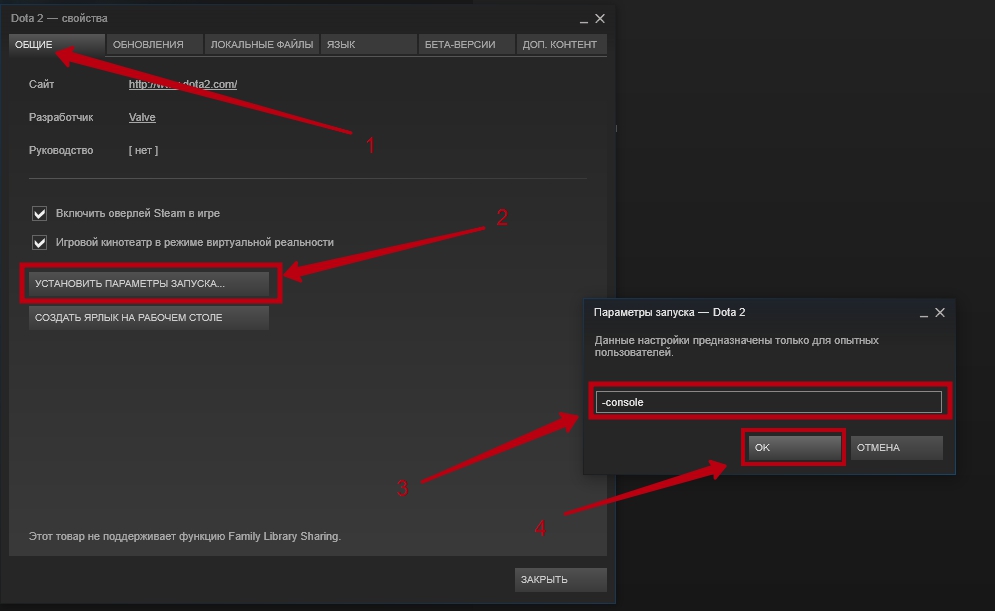
- Launch Steam and go to the “Library” tab.
- Find Dota2 and right-click on it. Find the “Properties” tab and go to it.
- In the window that opens, click on the “Set launch options” button. A window has opened in front of us into which we enter “ – console” (without quotes and with a hyphen before the word itself) and click “ok”.
- Then we launch the game and in the upper left corner click on the settings icon and go to the “Management” tab. In it we look for the “console” cell and set up a hotkey for it.
For experienced
Advanced players configure and use the “autoexec.cfg” file, or config in slang, to launch the necessary parameters.
- Go to the control panel of the Windows operating system, then to “folder options”. Go to “View”. Disable "Hide extensions for known file types".
- Next we need to create new file"autoexec.cfg". First, we perform the first two points specified in the console settings. In the “Properties” tab window that opens, find the “local files” tab. Next, click “view local files” and find yourself in the game folder.
- Go to the “dota” folder, then to “cfg”.
- In the folder that opens we create “autoexec.cfg”.
- Edit this file in text editor, for example, in Notepad.
In this file we can enter various commands that will be launched along with the game. It is important to remember that we must enter commands into the console without quotes, and vice versa into the config - with quotes.
To “customize” Dota for yourself, you can’t do without using a console, because you miss out on a whole expanse of opportunities and all sorts of goodies. In this article we will talk about how to enable the console in Dota 2 and what to do if for some reason it does not open for you.
For example, using the console and a simple command, you can install denial in Dota 2 on right button mice. But first of all, you need to configure it.

How to open Dota 2 console while playing
To call up the console in Dota during the game itself, you just need to press the assigned key for the console, which is specified in the in-game settings. The default is "\" key, but they tend to get lost, so it would be a good idea to check them.
The screenshot below shows where to look for the key to open the console:
Console won't open in Dota 2
If you have problems opening the console, first of all make sure that the required command is set "-console"(without quotes) in parameters Dota launch 2. If everything is normal, then go to the control settings and find the “Console” item (shown in the image above). If the settings indicate the wrong key or it is missing altogether, put the one that you think is convenient for you.
If you still can’t set up your console, write in the comments below and we will try to help you solve this problem.
How to close the console in Dota 2
There is nothing complicated here - just press the same button that your console is bound to and return to the game.