If your laptop freezes or slows down, the operating system is “cluttered” with unnecessary modules and applications, or is blocked, the easiest way out is to do a Hard Reset, reset to factory settings.
This article is dedicated to restoring factory settings on a laptop. We will tell you step by step how to do this, and in what situations Hard Reset is impossible.
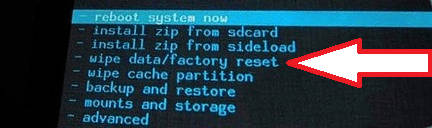
When you can't restore factory settings on your laptop
Reinstalling the operating system on a laptop is the first reason that prevents you from resetting user settings. Every second person, after purchasing a laptop, installs another software - most often Windows 7. The thing is that when you reinstall Windows 7 or 10, the partition on the hard drive is deleted, which is responsible for resetting the settings. This section is hidden and therefore the deletion occurs out of ignorance.But even if you call a professional computer technician to replace the software, 85% of the time the same situation will happen. Computer technicians and service workers delete the partition either out of ignorance or because of the belief that the pirated version of the operating system is better, and therefore there is no need to reset the settings to factory data.
If the OS was reinstalled on your laptop, you can look for a disk with an image of the partition that was deleted. Such a disc can most often be downloaded from pirated resources. There is also an official opportunity to buy a disk with reset settings; this can be done on the manufacturers’ websites. Another option is to install a clean operating system on your laptop.
If the OS was not reinstalled after purchasing the laptop, a Hard Reset is not so difficult to do, but only if you follow the instructions strictly. And you should know that the steps that will lead to a factory reset will differ for different models of portable personal computers.
You should be prepared for the following to happen after the reset procedure:
- Deleting all user information on Drive C.
- Formatting the system partition and reinstalling the operating system without entering a key.
- The first launch of the system is accompanied by the installation of all branded applications and drivers.
Factory settings of Asus laptop

Asus laptops can be restored simply using a special program. Follow these five steps to reset your settings:
Step one The Boot Booster in the BIOS is enabled by default on this brand of laptop. To disable it, you need to go into the BIOS. Immediately after turning on the laptop, press “F2”. The BIOS settings will open. Using the arrows, click “Boot Booster” in the “Boot” tab and disable it. Now you need to save this by clicking the appropriate “Save changes and exit” item on the last tab. After saving the settings, the laptop will automatically restart. After rebooting, log out.
Step two Restoring a laptop from ASUSTeK Computer Inc. is preceded by pressing the “F9” button, after which you see the laptop booting.
Step Three The utility with which you perform a hard reset will need some time to prepare the files necessary for the Hard Reset. Then a warning will appear indicating that all information has been lost.
Step Four Immediately after this, the hardware reset and software reinstallation procedure starts.
Step Five While the procedure lasts, several system reboots will occur.
HP laptop factory settings

Before resetting your Hewlett Packard laptop, you need to disconnect all external media. Then follow the step-by-step instructions:
Step one Immediately after turning on, press the “F11” button, which launches the Recovery Manager. This is the software that comes with your Hewlett Packard home laptop. If the "F11" button does not bring up the Recovery Manager, launch it yourself (it can be found in installed applications).
Step two In this program, you need to click the “Recovery OS” button.
Step three Before performing a hard reset, the program will offer to copy the necessary files and information to external media.
Step four Hard Reset will automatically start. During the procedure, your HP laptop will reboot several times.
If you complete each step, the operating system will be reinstalled, new drivers necessary for the correct operation of all components, and proprietary applications from the developer will also be loaded.
Acer laptop factory settings

Making a hard reset on Acer laptops is even easier and faster. Before restoring factory settings, turn off your laptop. After turning it on again, press “Alt and F10” until the password entry field appears. Users who are doing a Hard Reset for the first time can enter the factory password - six zeros. After entering the correct password, the data reset menu will appear. Click on Factory reset. Here's a quick way.
There is another one that the factory program offers. It has an option to restore your computer.
Samsung laptop factory settings

The Recovery Solution software utility performs data reset for a Samsung laptop. If you cannot find it on your hard drive, or the system cannot be booted, use another method. Turn off/on your Samsung computer and while it is loading, press the “F4” button. This button will launch another system program with which you can reset to factory settings. Follow the step by step instructions:
Step one Click "Restore".
Step Two Click "Full Recovery"
Step three Click "Factory data reset".
Step Four The system will warn you about rebooting. Agree, and then follow the operating system commands.
The utility will automatically install drivers, settings and those programs that come with your Samsung laptop. But for all these settings and settings to take effect, you need to reboot again.
Resetting your Toshiba laptop to factory settings

The recovery program for Toshiba laptops starts after the PC is turned off/on. For the Hard Reset procedure, do the following:
- Press zero on your keyboard several times;
- Turn on your computer;
- After a characteristic “squeak” appears, release the button.
Factory settings on a laptop may be required in a variety of cases. For example, your computer is very clogged with various programs, or errors occur frequently, the computer slows down a lot and nothing helps. Also, using a reset, you can get rid of the Windows locked problem.
All these problems can be solved by resetting the laptop to factory settings. Let's get started.
By the way, I would like to say that there are times when it is not possible to return to the factory settings. The fact is that some users who bought a laptop immediately, or after some time, reinstalled Windows, which came with the laptop. Often the hidden partition is deleted to allow recovery on the hard drive.
It also happens that after calling a computer technician, he reinstalls Windows, then, most often, the same thing happens - the recovery partition is deleted. So, it’s better to do it all yourself.
If this happens, you will most likely have to look for a data recovery disk; you can try downloading the image online. The best option, of course, would be to reinstall the system.
We will move on to those cases when it is possible to restore a laptop to factory condition.
But this will delete all data from drive C, Windows will be reinstalled and you will not need to enter the key. After reinstalling and starting the system, the installation of drivers and other components will begin.
- First you need to disable the built-in Fast Boot feature Boot Booster, which speeds up booting of the laptop. This is done in . To do this, turn on the device and press F2 Once in Bios, we find where this function is disabled. Go to the tab Boot and there we look for the point Boot Booster, press Enter on it and select Disabled. On the last tab, select Save changes and exit. The laptop will save the settings and reboot. After booting, turn off the laptop again.
- Turn on your device and then press the F9 key. The loading screen will appear.
- The factory reset program will prepare the data for recovery, and then a message will appear asking whether you really want to restore the data. Don't forget that everything from the disk will be deleted!
- Next, don’t touch anything, the recovery process is automatic. During recovery, your computer will restart several times.
So, to carry out this operation on an HP laptop, you need:

To do this on an Acer laptop, you need to do the following:
- Turn on the laptop and, while holding Alt, press F10 several times, the system should prompt for a password.
- If you have not recovered anything before, the standard password is six zeros (000000).
- In the window that appears, select Factory reset(reset to factory settings).
By the way, a return to factory settings can be done in the Windows operating system itself. To do this, you need to find the eRecovery Management utility on your computer, go to the Recovery tab and reset the settings.
In order to restore this laptop to its factory state, you need to use the Recovery Solution utility located in Windows itself. If this utility is not available, then restart the computer and press F4 to launch the recovery utility.
- Select Restore.
- Next, select Complete Restore.
- Select the Computer Initial Status recovery point.
- A message about reboot will appear, click “Yes”
- Follow the system instructions.

After completing the work, you will need to restart the laptop again to activate the recovery made by the program.
To restore a laptop, you will have to carry out the following manipulations:
- Press the 0 key on the keyboard and HOLD.
- We turn on the laptop.
- Release the 0 key when the computer starts beeping.
The second login option on this laptop, if the first one didn’t work out:
- Turn off the laptop, then press F12.
- Without releasing your finger from the F12 key, turn on the laptop.
- Wait for the corresponding window to appear.
The recovery utility will launch, just follow its instructions, it’s not that difficult.

I hope this article helped you in solving your problems; if you have any questions, ask them in the comments.
It happens that Windows 7 starts to function with errors. There are many possible reasons for this, for example, virus infection or malfunction of computer components, as well as damage to system files. In this case, the PC often reboots or, even worse, does not boot at all. In this situation, there is a significant risk of losing important data that has been saved on the computer.
Windows 7 recovery methods
Fortunately, we have the ability to roll back Windows 7 and do a factory reset. For this purpose, you can use the following methods:
- Use a boot disk;
- Use "System Restore";
- Boot with the previous working version of the system.
How to fix the OS using a boot disk?
Using the disk, we can reset the settings to factory settings or roll back Windows and restore the computer's functionality. To do this, you need to boot into safe mode and log into "Troubleshooting your computer", then install the CD into CD-rom. A menu will appear in which you need to click "OS Restore".
 Windows will then recommend the following options:
- System memory analysis;
- Windows recovery;
- System startup fix;
- Performing work on the command line;
- Restoring from a Windows image.
 We select the option shown in the screenshot above, then follow a procedure similar to that described in the section below.
How to use Windows Recovery?
Windows creates points in case corrections are required, and the user can create them independently and determine the saving time. When the user creates such a point, it is necessary to disable all applications. Next log in "Control Panel"- "System" . Then enter the window "System protection" and press "Creating a restore point"(you need to come up with and print her name). A notification will appear: “The recovery point was created successfully.”
 To fix Windows, click “Start”, enter "Control Panel" and further in "Recovery - Run System Restore". In the menu that appears, click on the point (it is recommended to select a point a few days before errors occur).
 Next there will be a reboot.
Also in this window, it is possible to reset settings and roll back the OS using a pre-created image, which is written to a disk or other external media in advance. Currently, flash drives are popular. It is recommended to use the default settings.
How to boot with a previous working version of the system?
This method is the easiest way to return to a successful configuration. Requires downloading to "Safe Mode". For this purpose, when the startup occurs, you need to press the “F8” button and press "Last Known Good Configuration". Next, you will return to the working version.
 By using a rollback to a working version, it is possible to correct errors when the software was installed incorrectly on the computer. Fix files damaged by viruses. This method is effective and convenient in case of not very serious errors, but in other cases it will not help and more effective methods must be used.
How to perform a full factory reset
If the above three methods fail, you can perform a factory reset. For this purpose, computers are equipped with a factory-installed partition with an image. This section has “system” status and is usually not visible to the user.
 There are special programs for resetting and restoring settings to factory settings. In order to use the utility, you need to press a special button provided by the PC developer. A menu will open where you need to click “Restore to condition at the time of purchase”. Then everything will happen without the user’s participation and after a reboot he will only need to create a new account.

It should be noted that the data in the computer's memory will be erased. It is recommended to first transfer the necessary information to an external hard drive.
One way or another, any user of an Android device is faced with the need to restore factory settings. Sometimes the reason for this is glitches and slow operation of the device, and sometimes restoring factory settings is simply preparing the gadget for sale. In this article we will talk about how to restore factory settings on Android.
First, a little theory. Factory settings are the state in which the smartphone was released from the factory. You need to understand that returning to factory settings will completely delete all user files, applications, photos, videos and contacts from the device memory. Only what is stored on the memory card will be saved, while the internal memory of the device will be completely cleared. Therefore, before starting this procedure, be sure to copy all the data that is important to you.
How to restore factory settings on Android through the device interface
The easiest way to reset your Android to factory settings is to use the Reset Data feature, which can be found in Settings. If you have a pure Android device (without additional launchers), then you need to open the settings and go to the “Recovery and reset” section. On devices with non-standard launchers, this settings section may have a different name. For example, if you have a Samsung smartphone, then you need to open the “Backup and reset” section, which is located on the “Accounts” tab (see screenshot).
After you have opened the “Recovery and reset” section, you need to go to the “Data reset” subsection.

After this, a screen will appear in front of you warning that data will delete all information from the device’s memory. In order to return the factory settings, here you need to click on the “Reset device” button.

After this, the device will reboot, and after the next turn on Android will return to the state it was in when it was first turned on.
It should be noted that these instructions are for modern versions of the Android operating system. If your device has an Android version lower than 2.1, then in order to return the factory settings you need to open the “Privacy” section, and then go to the “Data Reset” subsection.
How to restore factory settings on Android
In addition, you can restore factory settings on Android using recovery mode (or the so-called Recovery mode). This method of restoring factory settings will be useful if your .
Depending on the model of your Android device, recovery mode opens differently. But, on most devices, to do this you need to perform the following manipulations:
- Turn off your Android device completely;
- Press the volume up key;
- Without releasing the Volume Up key, press the Home key;
- Without releasing the Home and volume keys, press the device's power key;
- Without releasing the keys, wait until the recovery mode starts;
- Open the menu item that is responsible for restoring factory settings;
After this, you just need to wait until the device restores factory settings and reboots.
Sometimes a computer owner is faced with the need to clean the system of various bugs that interfere with normal operation. This can be done by reinstalling the operating system, or using special utilities. But there is a method that has several undeniable advantages over them.
Resetting the settings to factory defaults will help restore the device to functionality in most cases, even if you cannot start the OS. This method is especially relevant for those who do not want to waste time reinstalling the OS.
When restoring factory settings, the OS will be reinstalled automatically. You will not need to enter the OS activation code again. The version of Windows that came with the laptop when purchased will be restored.
By rolling back the BIOS, you will eliminate the problems listed above. In this article we will look at how to return a laptop to factory settings and restore its functionality. There are several methods, which we will take a closer look at.

The option to reset settings may be needed if:

What are the factory settings?
Factory settings are set by the manufacturer for a specific computer or laptop model. They store BIOS settings and computer configuration parameters. This information is located in the device's dynamic memory, which is called CMOS.
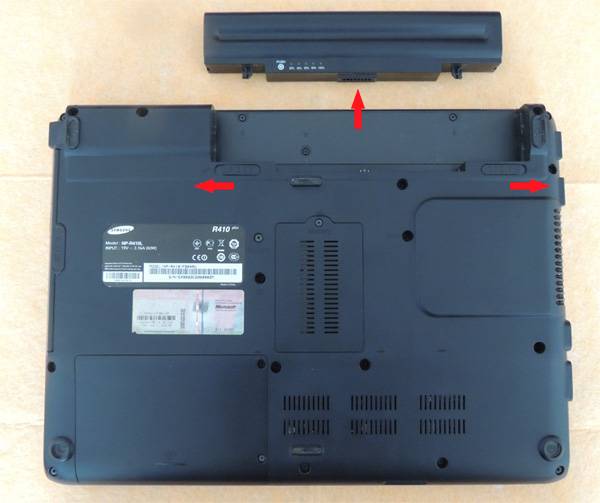
All factory settings take up very little space and are separately powered - from a small battery located on the motherboard. You can reset the laptop parameters without access to the BIOS. To do this, simply remove the battery, wait 30-40 seconds, and insert it again.
After the process of resetting the BIOS settings is completed and the OS is reinstalled, you will receive the laptop in the same condition in which you bought it in the store.
It is worth noting that to successfully return the device to factory settings, in addition to CMOS, you need a Recover partition, which stores installation files and other necessary system information.
Video: Laptop factory settings
Where is Recovery located and its activation
A hidden partition on the hard drive that stores all the files needed to restore the system is called Recovery. It is created by default on all laptops, and is deleted or damaged in most cases as a result of incorrect user actions.
You can see where the hidden section is located:

There you can see the size that Recovery occupies on the HDD. Typically this is 20-25 GB of system information and installation files.
If you have a Toshiba laptop, then you have probably already noticed that on drive D there is a system folder called HDD Recovery. It also stores the information necessary to reset the system, so it cannot be deleted.

Activating Recovery starts the process of resetting user BIOS changes, restoring factory settings, and reinstalling the OS and system programs and drivers.
To activate Recovery, press a specific hotkey combination. This will allow you to enter the system menu, where you can select several system recovery options. It should be remembered that each manufacturer has its own combination of hot keys; below we will look at the most popular ones.

Restoring settings using hotkeys
In order to return your laptop to factory settings, you should remember several hotkey combinations. When the system boots, you should press hot keys to access the BIOS Setup menu, from where you can start the process of restoring parameters.

Depending on the computer manufacturer, hot keys and their combinations differ:
- Toshiba - depending on the model F8, or 0, or Fn+0;
- Sony - F10;
- Acer – Alt and F10 at the same time;
- HP, LG and Lenovo – F11;
- Samsung – F4;
- Fujitsu - F8;
- ASUS – F9;
- Dell - both Ctrl and F11, but in some models F8;
- Packard Bell - F10. If you have Windows 8 installed, you can use the power button when you log in. You should hold down Shift and at the same time select the “Reboot” menu item;
- MSI – F3, and on some models F11.
How to reset a laptop to factory settings via BIOS
Using hot keys, you can roll back custom system changes and return the BIOS to factory settings.
On the black screen that appears, select sequentially:
- option "Running the recovery center" for Sony, or "Troubleshooting your computer" for Toshiba, or "System Recovery" for HP;
- menu item "Load Defaults BIOS".

Depending on the manufacturer, the option name may vary: "Load BIOS Setup Defaults", "Load Safe-Fail Defaults", but the words "Load" and "Default" will definitely be present.
Preparation
Prepare for a factory reset:

After you start the process of resetting the settings, the process of collecting information and preparing system files will begin. This may take some time, so don't worry.
Recovery process
Once you start the recovery process, all actions will be performed automatically, without your participation. The computer may reboot if required by the installed software. During the process of resetting the settings, device drivers will be restored and standard system programs will be installed.

It is worth mentioning that it is not always possible to successfully reset the settings on a laptop. This is possible if:

What can you do if you deleted the hidden Recovery partition from your hard drive? You will have to look for a bootable settings disk or an image of a hidden partition for your laptop. They can be found on the Internet, and sometimes manufacturers offer to buy such disks for system recovery on official websites.
If there are no ready-made images for your laptop, you can ask the owners of a similar model on computer forums to create such an image for you. And to avoid this situation, you can create a bootable USB flash drive or DVD for your laptop yourself, which you can keep on hand and use when necessary.