Login to the site as a student
Exercises on the internal programming language 1C 8.3: installing 1C
If you have not read the introduction to the exercises, please read it: .
Installation 1C
To perform the exercises we will need 1C 8.3 (not lower 8.3.13.1644 ) .
If you have 1C version 8.3 installed, use it. If not, download and install the educational version, which 1C produces specifically for educational purposes.
Exercise No. 1: download and install the educational version of 1C 8.3.
After completing Exercise No. 1, the following shortcut should appear on your desktop:
Exercise #2: write a program in 1C 8.3 language that, when launched, displays the phrase “Hello, World!” on the screen.
Instructions to follow:
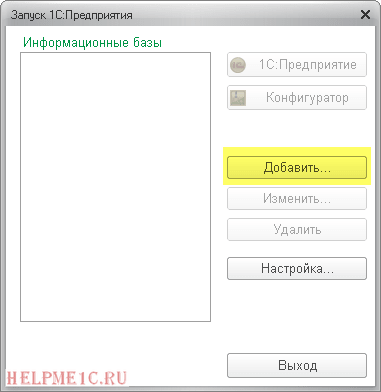
1. Start 1C.
2. A list of 1C databases has opened in front of you. As you can see, it is empty. Let's create a training base in which we will program. Click " Add".
3. Select " Creating a new information base" and click the " button Further".

4. Select " Creating an infobase without configuration..." and click the " button Further".

5. Specify " Educational" and click the " button Further".

6. Specify any empty folder as the database directory (in in this case This is the "Study" folder in my documents). Click "Next".
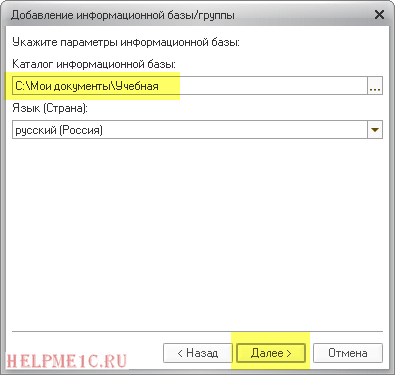
7. Specify the authentication option " Select automatically", startup mode" Fat client". Do not specify anything as the 1C:Enterprise version, click the "Finish" button.

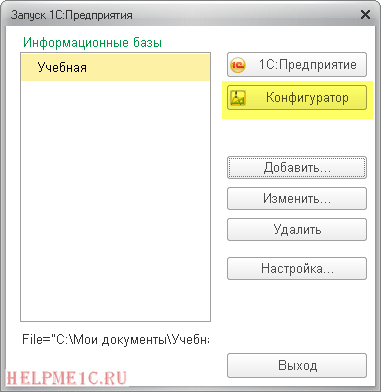
8. As you can see, the first database that we just created ourselves has finally appeared in the list. Let's start writing code. Click " Configurator".
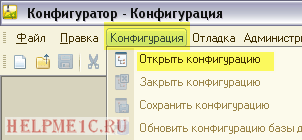
9. In the window that opens, select from the menu " Configuration"->"Open configuration".
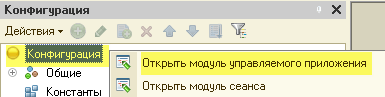
10. In the panel that opens on the left, click right click mouse on the word " Configuration" and select from the list " Open a managed application module".
11. A window with the editor has opened.

12. Write the following code:
| Report("Hello, World!"); |

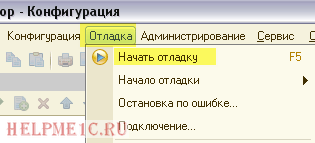
13. Great! The program code is ready. Run it. Through the menu " Debugging"->"Start debugging" (or key F5).
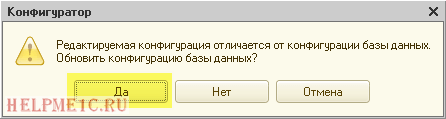
14. Answer the question in the affirmative.
15. After a second or two, 1C will start and the message “Hello, World!” will appear in the window below.

You will have to do the following exercises yourself.
For students
Second module - the most difficult At school. If you haven't programmed before, get ready for the fact that you won't be able to solve some of the problems the first time and without hints.
Therefore, stop in time and ask the teacher if something is not clear even with hints.
As a last resort, go through all the remaining modules of the school, and then return with renewed vigor to solving the problems of the second module.
Login to the site as a student
Log in as a student to access school materials
20.06.2018
How to install the basic version of the 1C:Enterprise program
You have become (or have long been) the happy owner of a basic version of one of the standard programs of the 1C:Enterprise system and now you want to install (or reinstall) the program on your computer yourself.
Important!
Please note that all of the following applies to the installation of Basic versions of standard 1C software products on the technology platform 1C: Enterprise 8.2 and 8.3: 1C: Accounting 8. Basic version, 1C: Simplified 8, 1C: Entrepreneur 8, 1C: Trade Management 8. Basic version, 1C: Retail 8. Basic version, 1C: Salaries and personnel management 8. Basic version, 1C: Managing our company 8. Basic version.
Installation of PROF versions, basic versions of industry software products and the basic version of 1C: Accounting on the 8.1 platform may differ. For more details, see the User's Guide and the package included with your software product.
You can purchase basic versions of 1C programs directly from our company:
- 1C: Accounting 8. Basic version - 3300 rub. , 1C: Simplified 8 , 1C: Entrepreneur 8 ;
- 1C: Trade Management 8. Basic version - 6700 rub. ;
- 1C: Retail 8. Basic version - 3300 rub. ;
- 1C: Salaries and personnel management 8. Basic version - 7400 rub. ;
- 1C: Managing our company 8. Basic version - 4600 rub.
The indicated price includes remote initial installation on the customer’s computer using remote administration tools (TeamViewer, Ammyy Admin, AnyDesk, etc.).
Insert the disk with the program installation distribution into the CD drive of your computer. If autorun is configured, the start window of the program installation wizard will open.
If autorun is not configured, then start installing the program “manually”, to do this go to the root directory installation disk and click "autorun.exe". If the program installation still does not start, then run it as an administrator.
In the window that opens, select " Quick installation and launch (recommended)". The program itself will install all the necessary components of the 1C:Enterprise platform and configuration, while the 1C:Enterprise 8 platform files will be installed by default in the directory C:\Program Files (x86)\1cv8\common\1cestart.exe, working information configuration files the databases will be installed in the C:\Users\[User name]\Documents\1C\DemoAccountingBase directory, and the demo database files in the C:\Users\[User name]\Documents\1C\DemoAccountingBase directory (for different versions operating systems, the default directory location may differ).

After installation, the infobase selection window will open:
- Basic enterprise accounting
- Basic enterprise accounting (demo)
If the installation was not carried out from the disk included with the program, then most likely the list of infobases will be empty and infobases will need to be added manually.

To do this, click the "Add" > "Create a new infobase" button.

In the next window, select "Create an infobase from a template". In the list of templates, select the version of the template from which you want to create an infobase and click the "Next >" button.

From a template marked (demo), a demo information base will be created with already entered approximate data of a fictitious organization; a working database is created from a template without this mark.
If the list of templates is empty or the required template is not there, this means that only the 1C:Enterprise technology platform was installed, and the installation of configuration templates was not completed. To be able to select a template, you must start installing the configuration distribution using the setup.exe file.
The configuration installation distribution is located in the directory configs83.

After this, specify the name of the infobase.

Specify the path to the directory in which you will need to create the infobase.

In the next window you can specify Extra options launch, authentication option, launch mode and bit depth of the 1C:Enterprise platform version that needs to be used for this infobase (x32 or x64).

If you do not know what parameters need to be specified, then leave all fields as default and click “Finish”.
If everything was done correctly, a new infobase will be added to the list of infobases.
Similarly, you can add a demo infobase by selecting the configuration marked (demo) from the list of templates.
Obtaining a license
Next you need to activate software license 1C protection systems.Select any of the installed databases and run the program in 1C:Enterprise mode.
When you launch the program for the first time, the message “No license to use the program was found!” should appear.

Click "Yes". You will be offered three options for obtaining a license: “Automatically”, “Manually” or “Entering previously requested license data”. Select "Automatic".

If everything was done correctly, the program will offer to activate the basic version "Enter your PIN code (16 digits) to obtain a license:"

Enter the PIN code supplied with the program. The program checks the entered PIN code at the licensing center for validity and the number of remaining activations; if the PIN code is correct and the number of activations has not been exhausted, then a license is obtained for a new computer.
The received license is written to your computer as a file with the extension lic, about which the message “The license was successfully obtained and saved on your computer” should appear.
When you are finished obtaining a license, click the "Finish" button.
Congratulations, you have installed and activated the license for the basic version of the 1C program on your computer and can start working in the program!
Special cases
This article describes the simplest and quick way installation of the program with automatic activation via the Internet.
If you plan to install the program selectively and/or manually activate the electronic license, then see more detailed instructions for installing the program "Chapter 2" in the book "User's Guide", which is included with the software product.
If, when activating the basic version of the 1C program, a window appears with the message “License not found” like in the figure below.

In this case, when you click “Get a license” in the activation field, you can enter only 15 characters (5 groups of characters of three characters in a group, as in the figure below), and the PIN code for activating Basic versions consists of 16 digits.

This means that the program cannot identify the configuration in the directory with the infobase as a basic version and in this case it requests a 15-character PIN code, as for the PRO version.
In most cases, this problem occurs if, when creating an infobase, you selected the option “Creating an infobase without configuration...” rather than “Creating an infobase from a template.” In basic versions of 1C programs, a new information base can be added ONLY FROM TEMPLATE configuration of the corresponding basic version! In in all other cases The procedure for obtaining a PROF version license will be launched with a request for a 15-character PIN code.
Also note that the PIN code must match the configuration, i.e. for example, the PIN code from the software package "1C: Accounting 8 Basic Version" is only suitable when obtaining a license for the basic version of the "Enterprise Accounting" configuration and is not suitable for the basic configurations "Salaries and HR Management" or "Trade Management".
Features of the installation "1C: Accounting 8 Basic for 1" and "1C: BusinessStart"
IN software products"1C:Accounting for 1" and "1C:BusinessStart" support accounting for only one organization - exactly the one that was specified in the application when purchasing the program. In this case, the organization’s data is not entered into the program, but is loaded from personal account portal 1C.
When you first start the program, you are asked to enter your login and password. account on the 1C portal http://portal.1c.ru and for these configurations, connection to the portal is mandatory.

If several deliveries are registered for this account, a dialog will be displayed to select one of them for activation.

If only one delivery is registered, an activation window will immediately be shown for it and the organization’s data will be loaded into the program automatically.
How to install basic 1C, Installing basic 1C, How to install 1C Accounting basic, How to install basic version 1C 8.3, Installing 1C Payroll and HR basic, Installing 1C basic version, 1C 8.3 basic license, 1C Basic license not detected, 1C accounting basic installation , installation 1c basic 8.3, 1c basic version license, 1c basic version platform get a license, installation 1c accounting basic version, 1c basic activation, 1c basic version error, installing basic version 1c 8, installing basic version 1c 8.3, installing 1c accounting 8 basic version, obtaining a 1C basic license, how to install 1C 8 basic version, How to install 1C Entrepreneur basic, How to install 1C: Simplified, reinstalling 1C basic
Tags: How to install basic 1C, Installing basic 1C, How to install 1C Accounting basic, How to install basic version 1C 8.3, Installing 1C Salary and HR basic, Installing 1C basic version, 1C 8.3 basic license, 1C Basic license
How to install 1C Enterprise 8.3? This question plagues many beginners, but in fact it is much easier than you might think! You don't have to be at all to do this. In this step by step instructions I will tell you the process of installing the 1C 8.3 program and how to install the 1C configuration using the example of “1C Enterprise Accounting 8” with operating Windows system. The procedure is absolutely similar for other applications, such as 1C Trade Management.
By the way, if you have not yet purchased 1C, you can order any 1C program and configuration services from. Delivery and installation of 1C PROF in Moscow and the regions for free!
The installation can be roughly divided into 2 small steps:
- First of all, install the 1C 8 platform itself and
- Installing the configuration: there are a lot of 1C configurations, and it is not possible to consider installing all of them. For example, I take the most popular configuration - 1C Enterprise Accounting.
Get 267 video lessons on 1C for free:
As a rule, configuration files are packaged in an archive in which setup files. It looks something like this:

In the archive you need to find and run the “setup.exe” file.
The following window will appear:

Here it is necessary for the first three points, as in the picture, to set the parameter “This component will be installed on HDD" You can also specify the one you need in the interface language menu (the default is Russian/English).
To install the 1C 8.3 or 8.2 program it is not necessary to have any special skills. Concepts such as 1C platform and configuration (for example 1C Accounting) should be distinguished. The 1C platform itself does not store data. It provides access to them and controls the operation of the configuration. The data itself is stored in the information base. There can be several of them, and the configuration of each contains the structure and rules for processing this data.
You can install 1C 8.3 without a license, even at home. That's enough for this.
The installation folder contains many files, but you only need to run “setup.exe”.
On all tabs except the Custom Installation tab, click Next. It is advisable to select the first three components and the “Interfaces in various languages” component if necessary.

At the end of the installation, the program will install the protection driver by default (this flag can be cleared). It is recommended not to remove it, then all drivers will be installed automatically.
How to install 1C configuration

To install the configuration, run the “setup.exe” file from the corresponding archive. Additional settings no need to enter. Click Next until the configuration is installed. If the template catalog does not have enough mass, choose another one.
Adding a new infobase
After you have successfully installed the 1C platform and the required configuration, you can begin adding a new information base. Launch the “1C Enterprise” shortcut on your desktop.

Your list of infobases will be displayed in the window that opens. Click on the "Add" button.

If you are adding a new infobase, as in our example, select “Create a new infobase”. In the case where the information base was previously created, select another item.
The database can be created either from a template or empty. Due to the fact that we have already installed the configuration, the database will be created from the template. Select the appropriate template and click Next.

If the information base already exists, then in the settings you will only need to indicate its name and location.

One more visual instructions watch in the video:
You have become the proud owner of one of the “yellow” boxes with a 1C program. We have already told you how to install the 1C:Enterprise platform yourself, and now we will move directly to installing the configuration with which you will work. We will illustrate the process with screenshots of the installation of the most popular solution in Russia - “1C: Accounting 8”.
Setting up the Accounting configuration is no more difficult than the 1C platform, but there is one caveat: you will need an installation distribution, but downloading it from the 1C support site, as is the case with the platform, is not always possible, because the principle by which the developer lays out installation distributions configurations, known only to him. Therefore, it is worth remembering that the support site does not have a distribution kit for every configuration. The easiest way is to take the distribution kit from the installation disk, which you will find in the box with the purchased Accounting program, or ask a representative of the service company if you have an agreement with it.
Installation "1C: Accounting"
When installing a configuration from a disk, it is best to use autorun. When installing 1C: Accounting, opening the disk by autorun will lead to the main menu::
We will need the “Custom installation” item. When you click on it, you will be taken to the next menu, in which we are interested in the “Enterprise Accounting Configuration” item.

After which the installation of the Accounting configuration template begins, from which we will create a new database.
When you launch the distribution package, obtained from a representative of the service company or downloaded from the support site (for some configurations the developer uploads installation distribution packages), you see an archive that must be unpacked to open a folder that looks like:

We are interested in the Setup. We launch it by double-clicking, which will start installing the solution conf template on your hard drive. You will see a window:

The program will ask where to install the configuration template? You can leave the standard path, or you can specify your own.

The installation process usually takes a few seconds. After which you will see a window:

The configuration template in which we will work has been created.
We see a window with a list of information bases.

If you are creating a database for the first time, the list of databases will be empty and the program itself will prompt you to create a new database. If, as in our case, the list of databases is not empty, then you can create a new database by clicking the “Add” button on the right side of the window.

We are interested in the item “Creating a new information base”. Accordingly, click “Next”.

Here you need to select “Create from template”, as well as the version of the conf that we installed earlier.
If the window with the list of configuration templates is empty, then return to the list of databases and click the “Settings” button. It is located in the same place as the “Add” button, just below.

Check that the path where you installed the configuration template is written in the directory window, as shown in the screenshot. Next we return to the previous window. Select the configuration that we want to create and click “Next”.
The program will prompt you to come up with a name for the configuration. This name will be displayed in the list of bases. Click “Next”.

We indicate the path to the folder in which our new database will be located.

A window follows for adjusting launch parameters. But we won’t do this, leaving everything as it is by default. If you already had the 1C platform installed on your computer, then in the last window, “1C Enterprise Version,” you should indicate the platform version. If you write 8.2 or 8.3 in the window, the program will run on the latest found version of the corresponding platform. You can also specify the full platform version. In this case, the configuration will run only under this version, regardless of the presence of other versions.

Click “Finish” and be patient. Creating a database takes approximately 3-7 minutes depending on your computer settings.
After creating a database, the program redirects you to the initial window with a list of databases, where you will see your new configuration.

After which all you have to do is launch the “1C:Enterprise” or “Configurator” mode and start working. Done, we have completed the installation of 1C Accounting!