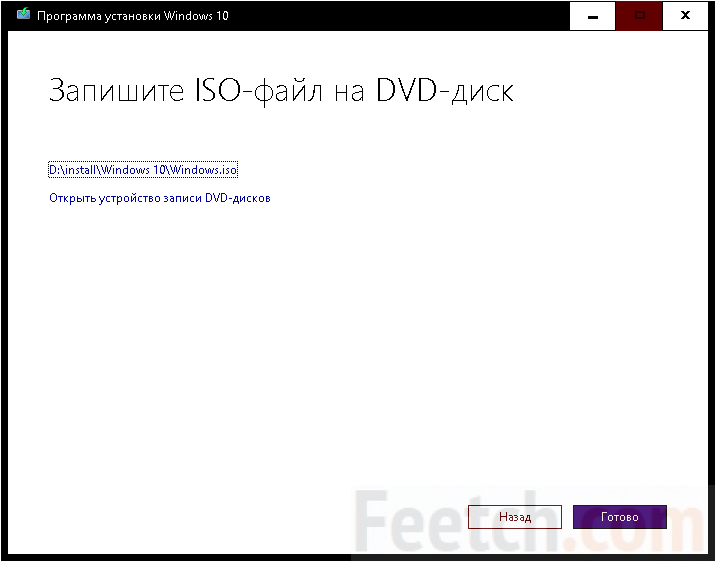
Most laptops come with a recovery sector on which the system is already hardwired. It is very rare to find models where the FreeDOS version is applied. If there is a recovery sector, then the operating system is already installed in 99% of cases. And there is no need to puzzle over how to install Windows 10 on a computer. Nevertheless, a certain percentage of people have already laid out a tidy sum for a licensed distribution and want to save a little (if at all possible after the Crimean events).
The DVD is not accepted today. Instead, the distribution kit is laid out on the store's website in the form of an image. You just need to burn the project on local computer. To be honest, it’s hard to think of a reason why you can’t do all the procedures from a USB drive, but if you really want to ...
Image
Someone will buy a ready-made image from the Microsoft store, but we decided to create it using the Media Creation Tool. A new computer is always a problem, but not a virtual one. Why burn an operating system disc when you can create an image? Now drives are unpopular because they consume a lot of energy, work slowly, take up a lot of space. Usually the installer is loaded onto a USB flash drive, but today we agreed to talk only about blanks. So let's get started!
The image is created by the utility. We just need to indicate that we want to create media and select a folder for storage. In the future, this file can be used to burn any disc. The utility will gradually pull up the distribution kit from the official site.
This process is slow. It takes from forty minutes or more, so let's see for now how to burn the project. The same application at the end of its activity will immediately offer to burn the disc.
But if this simple option does not suit you, or the image is already available (downloaded from the store), then there are other ways of developing events. The Media Creation Tool will delete unnecessary data before closing.
How to burn an installation disc
Instead of downloading Ultra ISO, we would recommend to pay attention to Windows USB/DVD Download Tool. If only because this tool is specifically designed for the purpose voiced above. After downloading the auxiliary application, you also need to install it. Ignore the inscription saying that the software is for the seventh version. Eyewitnesses say that this marvel is suitable for ten.

The process will not be long, no choice is given, and the process ends with a message that the installation of the product is complete.

In the meantime, our image with the operating system is just finishing creating, therefore, it will soon be possible to try out the mechanism in action. Appearance applications are somewhat extravagant in a contrasting theme. Apparently, the developers wanted to create something beautiful, but this is what happened.

Burning an image
We are sure that readers will easily cope with the interface of the utility. In the second step, you will be prompted to choose between a flash drive and a DVD drive so that the application can create bootable media. Therefore, you can proceed directly to the installation process.
Installation on a new computer
Do not forget that you need to break through the settings in the BIOS, set the DVD as the first boot device. Without this, the system will not start.

We see that the image is combined (multi boot disk). This is what was set in the Media Creation Tool. You need to install the version that matches system requirements. First of all, the processor:
- x86 - 32 bits.
- x64 - 64 bits.
Let's start! The traditional Windows logo will appear, followed by a language settings screen, which we, with the permission of our readers, will skip.

After a couple of screens, the meaning of which is obvious, you will be asked to enter the key. Installing Windows 10 is possible without it. Just click "I don't have a key". This will be right, because it will be possible to get to know the system a little before buying it. There is nothing worse than installing Windows 10 on a laptop and realizing that there is not enough RAM, or the hard drive is slowing down. According to our observations, this system works faster than the seven and better pulls three-dimensional games. And no configuration is required at all.

We see that in addition to bit depth, there are some other options. ordinary users should be interested in the first three. Keys for them are sold in stores, those left from the seventh versions do not fit. Therefore, the package being installed cannot be activated as if we were switching to the top ten. After July 29, 2016, this is not possible. But the installer did not accept the keys to the sevens before.
The next few screens are not of theoretical value, so we go straight to the installer. There will be two options:
- Update.
- Selective.
In our case, we need the second and only she.

Partitioning a hard drive
Windows 10 is installed on an NTFS partition with a size of 40 GB or more. Less is not worth taking, and this is not enough. Ideally, you should leave 100 GB. Gradually, the place will be eaten off for various purposes. A blank hard drive looks like this.

You just need to create a new main partition in this place. Please note that the system will take 500 MB for itself. Everything will happen completely automatically after pressing the create button. You just need to specify the size. Here's what it looks like after all the operations.

You need to install Windows in the main partition. Let's go further. Further step-by-step instruction doesn't make sense, usually the disc has a bootloader that doesn't interfere with the installation even if the media is in the drive. The next 40 minutes you can rest. Although on some machines the process takes much less time. The installed instance of the system will need to be activated via system menu, but Windows will remind you of this, so you should not worry about your own future in this regard.
Now Microsoft is actively working on its new operating system. This operating system will be called Windows 10. It is expected that the final version of Windows 10 will appear in the summer of 2015.
The most interesting thing is that Microsoft recently announced that Windows 10 will be free. Or rather, that everyone can upgrade to Windows 10. Not only users licensed Windows 7 and Windows 8, but also users pirated versions. How true this statement will become clear only after the release of Windows 10, but for now we present to your attention a guide on how to install Windows 10 using its example.
Create a boot disk to install Windows 10
If you don't have installation disk Windows 10, then you need to create it. It can be done, . As an example, we will demonstrate how this is done using free program ImgBurn.
After starting the ImgBurn program, you need to click on the "Write image file to disk" button.
After that, a window for burning disk images will open in front of you. Here you need to click on the button with the image of the folder (Browse button) and select the Windows 10 ISO file.

After the file with the ISO image is selected, you just need to click on the burn button, which is located at the bottom of the ImgBurn program window. After that, the recording of the operating room will begin. Windows systems 10 per disk.

As you can see, burning an installation disc is very simple. All you have to do is click a few buttons and select the ISO file to burn.
Setting up the BIOS to install Windows 10
Next, you need to configure the BIOS so that the computer tries to boot first of all from a DVD disk, and not from a USB flash drive or hard drive. The BIOS setup process can vary greatly depending on which BIOS version your computer is running. But, in most cases, this is done in the following way.
Clean install of Windows 10 - The best way start your computer when performance issues occur. Easy Installation will help you quickly get rid of errors in Windows 10. Eliminate problems associated with viruses and other types of malware.
This guide walks you through the steps to prepare and perform a clean install of Windows 10 from a bootable flash drive and installation disc to a PC or laptop.
There are a few things you need to do before you start following these instructions, including a full backup of your computer in case something goes wrong and you need to restore your OS.
Also, it doesn't hurt to back up your personal files, as the installation process will delete everything on your computer.
Installing Windows 10 from a DVD and a USB stick are very similar, but the only reason why USB flash drives are preferred over traditional ones DVD method- is the speed. In case you never did Windows installation 10, you can follow the instructions.
What you need to know
- If you are installing for the first time, it is highly recommended to check if your computer or laptop is compatible with the operating system. Is it optimal disk space and RAM.
- Create backup all your personal data that is stored in the C drive because during the installation, you will lose all the data lying in the C drive.
Windows 10 hardware requirements
If you are trying to upgrade to Windows 10 with more old version, such as Windows 8.1, Windows 7, Vista, or Windows XP, you must ensure that your machine meets the minimum hardware requirements.
Windows 10 has the following minimum hardware requirements:
- Processor: 1 GHz or SoC (system on a chip).
- Memory: 1 GB for 32-bit or 2 GB for 64-bit.
- Hard disk capacity: 16 GB for 32-bit or 20 GB for 64-bit.
- Graphics Card: DirectX 9 or later with WDDM 1.0 driver.
- Display: 800x600.
What is needed
- You need an ISO file. Download from Microsoft Official site.
- Bootable flash drive if you want to install Windows 10 using a USB drive (read this guide for creating a Windows 10 USB drive)
- Bootable DVD drive if you want to use DVD drive. (Follow this guide to create Windows 10 DVDs)
Installing Windows 10 from a flash drive
The process of installing Windows 10 from a flash drive requires you to start your computer using bootable media, which means that you need to access the firmware in the BIOS on your motherboard to change the boot order.
This process usually requires pressing one of the function keys(F1, F2, F3, F10 or F12), ESC or Delete keys as soon as you start your device. However, these settings vary by manufacturer and model. So be sure to check your PC manufacturer's support site for more specific instructions.
After accessing the BIOS interface, find the Boot menu and change the boot order, after which, save the settings using the F10 key.
Once you get the boot menu, select the media and hit the Enter key. After successfully booting the system from the Windows 10 installation media, you will see various options to meet your requirements. Select them and click "Next".

To continue the process. Click the "Install Now" button.

If you are installing Windows 10 for the first time or upgrading previous version, enter a genuine product key.

If there is no product key, then you can click on the Skip button and enter the product key later.
Note: If you enter the product key, you will not see an additional window where you can select the installation option on your computer.


There are two types to choose from. To do a clean installation of Windows 10, select the second option: for advanced users.

In the next window, you need to select the disk on which you plan to install a copy of Windows 10. If Windows is already installed on the disk, and you want to remove it, then you need to format the system disk with the OS. It will also free up disk space.
For formatting system disk you need to select the disk and click on the "Format" option at the bottom of the window.

Note A: After formatting the disk, all data on the disk and system settings will be lost, which include applications: games and any personal data, on the desktop, music, videos, photos and related folders.
Select the disk where you want to install and click on the "Next" button. At this stage, the installation of Windows 10 OS from a USB flash drive will begin. This will take about 20-25 minutes. In the process, your system may reboot two or three times.
Once completed, click on the "Use default settings" button if you want to choose the default settings. You can also click the Customize button if you want to customize settings.

Follow directions the following instructions as on the screen and after a few steps the home screen will appear.
I have a small article on my site about installing Windows 10 clean. However, apparently, the instructions presented in it are not enough for everyone - some clarifying questions constantly appear in the comments, and people write in a personal who “We did everything as written, but nothing works”. That is why today I decided to write the most detailed (literally microstepping) guide on how how to reinstall the "top ten"- such detailed instructions that even very inexperienced people in computers understand what is being done and how.
So, you have decided to remove all existing information from your computer along with the current operating system and install Windows 10 again. For what reasons you decided to do this is not so important. However, we will outline some situations when re-setting the "ten" is better than trying to reanimate an existing system:
- Significant slowdown of the computer compared to the original speed.
- Systematic errors in work.
- Deep infection with viruses.
- The inexplicable subjective desire to have a clean system (personally, this often occurs to me) is a fad, something like that.
Windows 10 installer
In order to reinstall the Windows 10 operating system, we need a free evening and a free flash drive with a capacity of 4 gigabytes or more. Let's start with our USB stick(aka a flash drive) and make sure that there is nothing needed on it - because then all information from there will be deleted.
Before reinstalling Windows 10, we need to use special program create the so-called installation media- write "dozens" files to the USB flash drive. To do this, you need to go to this page Microsoft and by pressing the button Download tool now"(it is the second on the page - lower), download to your computer necessary program and run its installation. The program is called MediaCreationTool. Download it right before installation. operating system. So you get a fresh "top ten" with all the latest important updates.
At one time, when starting the MediaCreationTool utility, it was observed error 80072f76 0x20017. It was associated with “jambs” exclusively on the side of Microsoft and arose everywhere around the world right from September to December 2017. On the this moment the problem is solved, but in such cases, you can use a "crutch" to download the Windows 10 image from the official site. You can download the top ten directly by replacing the user agent in the browser with Apple Safari. Everything is simple there: press F12 in the Edge browser - then go to the "Emulation" tab - change the user agent string to "Apple Safari (iPad)" - download the necessary images from Microsoft official site(described in more detail here in English). If access to Edge browser you don’t have Windows 10 anywhere because you don’t have Windows 10 and you decide to trust me (by the way, it’s completely in vain - because you can’t trust anyone on the Internet), then here I have links to ISO files in cloud storage Mega with the latest for December 2017 Windows versions 10: 32 bit and 64 bit. I will say right away that downloading from there is likely to be slow. It is faster to use the method with the official website and change the agent in the browser. After download ISO image with Windows 10 using any of the described methods, you need to create a bootable USB flash drive from this installation image. This can be done using the utility Rufus.
So, on any computer, run Media Creation Tool and to begin with, as is usually the case, we accept the terms of the agreement.

Then we wait a few seconds while the preparation is in progress. Then select the second item - "Create installation media for another computer." Attention! Even if you install Windows 10 on the same computer, it's still better to choose option 2. The update (1 point) takes much longer, it provides the ability to save personal files and settings, but a lot of garbage remains in the system.
In the next step, to write the Windows 10 setup program, you must select the architecture (you can also language) of the future system: 64-bit or 32-bit. If the reinstallation will be performed on the same computer on which the USB flash drive is being created, then it is best to leave a check mark on the item “Use the recommended settings for this computer”. If you plan to install the "top ten" on another machine, then in order to select the required bit depth, you can read the article "". Leave the Edition option unchanged: Windows 10.

In the next step, you need to select the media on which we will write the files of the Windows 10 operating system - 1 item "USB flash memory device". Then select the flash drive previously inserted into the computer.

After that, the download will begin first, and then the creation of Windows 10 media (that is, writing to a USB flash drive). This process is slow. And in many respects it depends on the speed of your Internet connection. During the download, about 3 gigabytes of data will be transferred to the computer. On my not the fastest laptop in 2010, downloading "dozens" and creating bootable flash drive took exactly an hour .

Step by step installation of Windows 10 from a flash drive
Now that we have successfully written the Windows 10 files to a USB flash drive, we can proceed directly to installing the "dozens". All required files from a computer, it is better to save it somewhere else beforehand. This will not only make the installation easier and faster, but also ensure best performance operating system in the future.
Step 1. Preparing for installation
To install Windows 10, first you need to start the computer not as usual - from a hard disk, but from a USB flash drive. This is done on various models computers and laptops in their own way. As a rule, to enter the BIOS or UEFI-BIOS, immediately after pressing the power button on the computer, you must press one of the following buttons: F2, F12, F7, F9, Del, or another. This is described in detail in the instructions for the equipment. But there is a "poke method". In my experience, the most common way to get into the BIOS was with F2 or Del.
So, the computer just started up, and we press our button with all our might to enter the BIOS or UEFI-BIOS. We enter and change the boot priority by setting our USB to the first place instead of the hard drive.
Setting up Windows 10 installation from a BIOS flash drive

For the BIOS, moving to the right with an arrow, you need to go to the Boot tab. All possible boot devices will be listed below, so that the computer boots first of all from a USB flash drive, you need to raise the item with it (in the figure it is the lowest one) to the first position. To do this, we go down to it with the usual down arrow, but we move the items in the list with the F6 (up) and F7 (down) keys. (There may be other buttons for navigating in the BIOS - they will be named on the right and at the bottom.) I got to the USB item I needed and pressed the F6 key 4 times. In general, you need to ensure that your USB device(flash drive) was in the boot list in 1st place.
Setting up Windows 10 installation from a flash drive for UEFI-BIOS
By analogy with the BIOS, everything is done in a more modern UEFI program. We also go there by pressing one of the function keys when booting the computer (it turned out to be Del). Then we go to the menu responsible for setting up the boot and select our USB flash drive as the first number. In UEFI, as a rule, you can use the mouse - so everything is easier here.

Details BIOS settings or UEFI-BIOS for booting into flash drives may differ from those described depending on your computer or laptop model. Feel free to ask questions in the comments below on this page if you don't understand something.
Step 2Install Windows 10
After we have made the necessary settings in the BIOS, we restart the computer and see that the Windows 10 installation process begins. To begin with, the “dozens” logo simply appears, then all kinds of questions. At first, we leave everything as it is.


In the next step, select the "I don't have a product key" option. If Windows 10 has already been activated on your machine, then the license is already bound to it and will be automatically validated after installation.

Now you will need to select the version of the operating system to be installed: Pro or Home. If you do not know which one to choose, then stop at Home - with a probability of 99% you had it.


At the next step, we are once again offered to save any data from the operating system existing on the hard disk, but we once again refuse (and do it right) and select the item “ Custom: Windows installation only (for advanced users)».

At the next stage, all sections of the hard disk appear in front of us. If the system is put completely clean, then personally I would prefer to remove each of these volumes in turn. There will be "Unallocated space on disk0" (as in my picture). This is where we will install Windows 10. You don't need to create anything. Partition C will appear on its own during the installation process. Just click "Next".

After a while, the computer will restart. (If after that it asks you to press any key, then you should not do this - otherwise the Windows installation will start over).
Better on reboot remove flash drive from USB port . If this is not done, then booting from the USB flash drive will remain a priority and the installation of Windows 10 will start again.

And the installation will continue.

Further installation will be carried out already on blue screen. At first, you will be prompted to "Increase the speed of work." You can use the default options, but I prefer to go into the settings and turn off all five items.

In the next step "Settings" you can also turn off the three proposed items.

In the next step, I leave active items 1 and 3: "Use SmartScreen Web Services" and "Receive updates from other PCs ..." The second is disabled.

In the next step, we have three possibilities:
- Sign in with an existing Microsoft account.
- If not, you can create an account.
- Skip the step and continue with a local account.
Personally, I appreciate the opportunity that syncing settings and files in the cloud gives. That's why I always use Microsoft account. And I advise you to get it and use it. To do this, you just need to enter the address of your Email and come up with a password (numbers and Latin letters). In the next step, for privacy reasons, it is better to uncheck both boxes.

Now, to enter the account on the computer, you will need to enter your email address and password. However, in the next step, this process can be greatly simplified by inventing a simple 4-digit authorization pin code. Attention! The PIN code is valid only on one computer.
This step, like the previous ones, can be skipped, but I personally prefer to set up a simple pin code and enter it if necessary, rather than a more complex password.

The installation is almost complete. In the remaining time, welcome inscriptions will be successively replaced on the screen: “Hello”, “We are glad that you are with us”, “Preparation is underway, do not turn off the computer” and others. After the word “Getting Started”, the long-awaited desktop finally appears.

Now it is highly desirable to get a few necessary updates as soon as possible and that's it. required drivers(in Windows 10, it is extremely rare to install drivers manually - they are installed here automatically, through the update center). To do this, go to the Start menu, select the gear icon.

The Options tool launches. In it, go to: “Update and security”, then “Check for updates”. If there is nothing, then after some time something will definitely appear.
After all updates and drivers for Windows 10 are installed, you can initial setup clean system to make it easier to use. For example, I disable the login password. I talk more about all this in the article "
The process of clean installing Windows 10 on a computer from a bootable DVD disc consists of several steps. Let's look at each of them and sequentially install Windows 10 on new computer. The process itself can be divided into two 2 stages:
- Preparing to install Windows 10;
- Direct installation of Windows from bootable media (from a DVD or USB flash drive).
Preparing to install Windows 10
Windows 10 system requirements
The first step is to check our computer for compliance with the system Windows requirements 10 as well as hardware compatibility. To do this, I recommend visiting the official website of the computer component manufacturer and checking for the availability of drivers for the Windows 10 operating system. In order not to waste time, you can also download them for later installation.
So, the minimum system requirements for Windows 10 are as follows:
- Processor: at least 1 GHz;
- RAM: 2 GB for 32-bit or 64-bit systems;
- Hard disk space: 16 GB (for 32-bit systems) or 20 GB (for 64-bit systems);
- Video adapter: DirectX versions 9 or later with WDDM 1.0 driver;
- Display: 800x600.
Windows 10 operating system image
In order to install Windows 10 on a computer, you need an operating system image (iso file, for example WINDOWS-10_RUS_64BIT.iso). Where to get Windows image ten? Of course, find it on the Internet. There are many options to choose from - you can buy and download from the official Microsoft website, you can also search for images on other sites (torrent trackers for example). We assume that we have the iso file and it is official. Next, we burn the image to an empty DVD disc.
Preparing your computer for installation
Before starting the installation, you must also prepare the computer, namely, configure Computer BIOS. This is done so that the first thing to do is to boot the PC from the DVD.
To do this, after turning on the computer, press the F2 or DEL key, open the BIOS window, in which you need to find the BOOT item, where we set the device boot priorities. In our case, in the Boot Device Priority tab, we make the first CD-DVD ROM.
Next, move to the Exit item and, when prompted on the screen, press Y (YES) to save the changes made. That's all preparatory stages Once you're done, you're ready to install Windows 10 from the bootable DVD we created! 
The process of installing Windows 10 from a bootable DVD
So let's put it in DVD drive bootable Windows disk 10;
The inscription “Press any key to boot CD or DVD” appears on the monitor, which means Press any key to boot from CD or DVD, press “Enter”; 
The Windows 10 installation process begins, a download window appears; 
- Installed language - Russian (Russia),
- Format of time and Monetary units - Russian (Russia),
- Input method (keyboard layout) - Russian. Press the "Next" button;

A window with a large "Install" button appears on the screen, click it and the installation process begins; 
In the window for entering the product key, click the "Skip" button (this process can be performed even after the installation is completed); 
Next, a window with licensing conditions opens, where you need to accept the conditions Windows licenses 10 and click the "Next" button; 
The next step in installing Windows 10 is deciding on the type of installation:
Update: install Windows while keeping files, settings, and apps;
Custom: Install Windows only (for advanced users). Since we are installing Windows 10 on a new computer (or on an empty HDD), then select the option "Custom"; 
The next question is - Where do you want to install Windows? To this question, I propose to create 100 GB for the Windows 10 system, and use the remaining space as a user partition (photo, video). Thus, by dividing the hard drive into 2 partitions, you can use the second partition of the disk to create archives and snapshots of Windows 10. And if something goes wrong during the operation of the computer, you can restore or reinstall Windows. Therefore, we create a 100 GB partition, select it and click the "Next" button; 
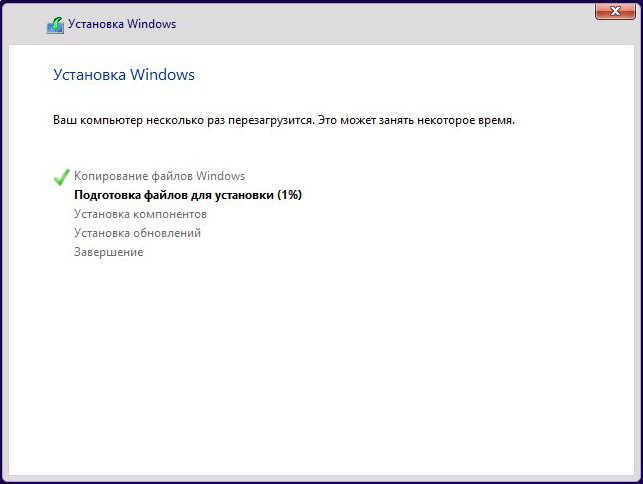
Copying starts Windows files 10 per computer - Preparing files for installation, Installing components, Installing updates, and Completing installation. I would like to note that at this time the computer may restart several times; 
Upon completion of the installation, a parameter settings window will open, where you are prompted to change the settings or agree to use the default ones. Click the "Use default settings" button; 
Next, the system analyzes the data and starts preparing the system for the first launch; 
Since the computer is not connected to the Internet, you must create an account for the computer and enter a password and password hint. Enter the data and click the "Next" button; 
When preparations for launch are completed, the Workspace will open. Windows table 10.
Congratulations, the installation of the Windows 10 operating system is complete! Also read how to run Command Prompt in Windows 10 different ways. Write comments, ask questions and do not forget to like the material if you liked it.