This article explains how to install Apache web server, PHP, MySQL DBMS and phpMyAdmin on Ubuntu Linux.
Installing Apache
Install Apache 2 from the repositories. To do this, run the command:
Sudo apt-get install apache2
After installation, the Apache server usually starts immediately (the message “Starting web server apache2” is displayed).
To manage the Apache server, we can use the apache2ctl utility. For example, you can view the current status of the Apache server by running the command:
Apache2ctl status
The commands to stop, start and restart the Apache server are as follows:
Sudo apache2ctl stop sudo apache2ctl start sudo apache2ctl restart
Checking Apache Server Health
You can check that Apache is working by typing http://localhost in your browser. If everything is in order, it will open empty page with the text: “It works!” .
Installing PHP
For PHP installations(version 5) run the command in the terminal:
Sudo apt-get install php5 libapache2-mod-php5
After this, you need to restart the Apache web server. Ubuntu did this automatically for me. If this does not happen, run the command:
Sudo apache2ctl restart
Installing MySQL
To install MySQL, run the following command:
Sudo apt-get install mysql-server libapache2-mod-auth-mysql php5-mysql
After MySQL is installed, the following window should appear in which you need to enter a password. By default, MySQL creates an administrative user named root. In this window you need to enter the password for this user and press Enter, then re-enter the password. 
Installing phpMyAdmin
phpMyAdmin is a special web application for administering MySQL. It allows you to manage MySQL databases directly from your browser, perform SQL queries, view data and much more. To install phpMyAdmin, run the command:
Sudo apt-get install phpmyadmin
The installation of phpMyAdmin will begin. At the end of the installation, a window will appear in which you need to select the apache2 server (using the Space key; an asterisk should appear opposite the line apache2) and press Enter. 
Next you will be asked to create a database for phpMyAdmin. Select Yes and press Enter. 
Then enter the password to register phpMyAdmin on the database server and confirm the password in the next window. 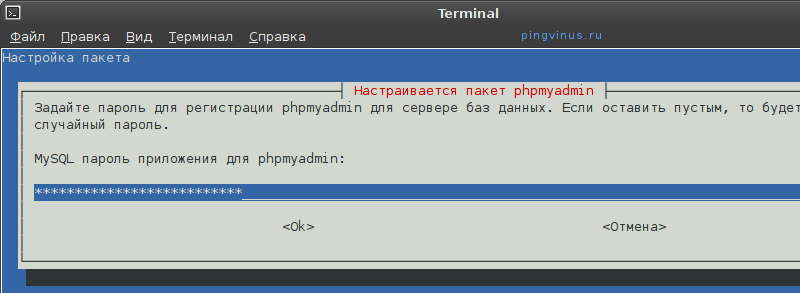
Checking the functionality of phpMyAdmin
In your browser, enter the address http://localhost/phpmyadmin. A form will open to enter your MySQL username and password to log into phpMyAdmin. For the username, enter root and the password is the one you specified for the root user when you installed MySQL.
Conclusion
We installed the Apache web server, PHP language support, MySQL DBMS and the phpMyAdmin application. The next step is to create virtual hosts (sites). Now (after installation) one virtual host has already been created, available at http://localhost. The files for the localhost virtual host are located in the /var/www directory. In one of the following posts I will tell you how to create virtual hosts Apache web server.
Website creation using CMS Joomla!
php-myadmin.ru following link. At the time of writing, release 3.4.9 was available. Stopping Apache. Create a directory C:\www\htdocs\phpmyadmin and unpack our archive into it. Please note that archive files and folders can be combined into the phpMyAdmin-3.4.9-all-languages folder. It is necessary that the contents of the phpMyAdmin-3.4.9-all-languages folder be in the directory C:\www\htdocs\phpmyadmin, and not this folder itself. Then in the directory C:\www\htdocs\phpmyadmin (this is our phpMyAdmin root directory) we create a file called config.inc.php and, depending on our preferences, fill it with the following content:
$cfg["Servers"][$i]["host"] = "localhost";
$cfg["Servers"][$i]["extension"] = "mysqli";
$cfg["Servers"][$i]["connect_type"] = "tcp";
$cfg["Servers"][$i]["compress"] = false;
$cfg["Servers"][$i]["auth_type"] = "config";
$cfg["Servers"][$i]["user"] = "root";
$cfg["Servers"][$i]["password"] = "password";
In the first case, logging into phpMyAdmin will be “automatic”, i.e. you do not need to enter your login and password. In the last line, you need to replace the word password with your password, which was specified when installing MySQL. This case has, in my opinion, a significant drawback - the root user password is stored in clear text.
In the second case, you will need to log in every time you need to use phpMyAdmin. This case is closer to me. In line $cfg["blowfish_secret"] A passphrase of up to 46 characters must be recorded. Launch Apache, in address bar browser (cookies must be enabled), type http://localhost/phpmyadmin and get to the authorization page. We go through authorization and get to the main phpMyAdmin window.
In the main window we will see a message stating that additional features are not fully configured. We will enable additional features, as they allow you to work with bookmarks, histories of entered commands, a designer of linked tables, and pdf diagrams. To do this, we will use a ready-made sql query, as a result of which the “phpmyadmin” database will be created into which the necessary tables will be imported. Click on the “Import” tab, on the page that opens, in the “Imported file” section, click the “Browse...” button, select the create_tables.sql file, which is located in the scripts folder, in the phpmyadmin directory, and click the “OK” button located in bottom of the page. If everything went well, we receive the message: “Import completed successfully, queries completed: 12. (create_tables.sql).” After this, we create a special user named pma. The username does not have to be pma - this name is used as an example. Go to the “Privileges” tab and click on the “Add new user” link. Fill out the form that appears:
Click the “Create User” button. Click on the “Show all” link, thereby updating the list of users. In the pma user line, click on the “Edit privileges” link. In the window that opens, in the “Database level privileges” section, select the “phpmyadmin” database from the drop-down list. A new page will open, and in the “Database Level Privileges” section, in the “Data” group, check the boxes next to the options: SELECT, INSERT, UPDATE, DELETE and click “OK”. We receive a message that the privileges for the user "pma"@"localhost" have been changed. Close phpMyAdmin and edit the config.inc.php file. As a result of editing we get the following:
$cfg["blowfish_secret"] = "31h15u8gr7wq99.24633480"; $i=0; $i++; $cfg["Servers"][$i]["auth_type"] = "cookie"; $cfg["Servers"][$i]["pmadb"] = "phpmyadmin"; $cfg["Servers"][$i]["relation"] = "pma_relation"; $cfg["Servers"][$i]["table_info"] = "pma_table_info"; $cfg["Servers"][$i]["table_coords"] = "pma_table_coords"; $cfg["Servers"][$i]["bookmarktable"] = "pma_bookmark"; $cfg["Servers"][$i]["pdf_pages"] = "pma_pdf_pages"; $cfg["Servers"][$i]["column_info"] = "pma_column_info"; $cfg["Servers"][$i]["history"] = "pma_history"; $cfg["Servers"][$i]["tracking"] = "pma_tracking"; $cfg["Servers"][$i]["designer_coords"] = "pma_designer_coords"; $cfg["Servers"][$i]["userconfig"] = "pma_userconfig"; ?>
Let's delete the browser cache and go to phpMyAdmin. Warning about additional features is missing - it means everything is configured correctly and is functioning fully.
This completes the phpMyAdmin setup. You can proceed to installing Joomla 2.5
More articles about Joomla 2.5
-
The installation of phpMyAdmin is written based on materials from the site php-myadmin.ru. I recommend this site to anyone who wants to understand all the intricacies of working with phpMyAdmin. Download the file archive phpMyAdmin-3.4.9-all-languages.7z from the following link. At the moment...
-
In this article we continue to talk about CMS Joomla 2.5. Namely, about creating a backup of the site. In the previous part about backup site running CMS Joomla 2.5, we considered creating a backup copy of the site manually. Now...
-
The backups have been created and now let's figure out how to get them and automate this process. The easiest way to obtain a backup copy is to download it from a link or links, if the file is divided into several archives, in...
-
Phpmyadmin is one of the most popular database management tools mysql data via the web interface. It is written in PHP and JavaScript and with it you can manage a local or remote database server.
Using PhpMyAdmin we can create, delete, rename, edit databases, tables, fields, as well as manage users, export, import records and execute any SQL commands. On this moment MariaDB, MySQL and Drizzle database servers are supported. In this article we will look at how to install PhpMyAdmin Ubuntu 16.04 on an Apache or Nginx web server.
Installing PhpMyAdmin on Ubuntu 16.04
The phpmyadmin utility is available in the official Ubuntu repositories. So you can install it from there very easily. To do this, first update the list of repositories:
Then install the program itself:
sudo apt install phpmyadmin
The official repositories contain more than old version so if you want to install phpmyadmin ubuntu yourself new version, you need to use PPA:
sudo add-apt-repository ppa:nijel/phpmyadmin
$ sudo apt-get update
$ sudo apt install phpmyadmin
During installation it will be necessary to select the web server with which we will install phpmyadmin, select Apache using spacebar and press OK:

Settings for Nginx will have to be specified manually and we will look at them a little later. Next you need to set a password for the PhpMyAdmin database, click Yes:

Then enter the required password twice. You are unlikely to need it in the future, so you can choose something complex:


You may have to enable several to make it work. php modules and apache configuration file:
sudo phpenmod mcrypt
$sudo phpenmod mbstring
Then include the Apache configuration file:
sudo a2enconf phpmyadmin
Installing phpmyadmin nginx ubuntu is done by adding the following section to the /etc/nginx/nginx.conf file, we assume that nginx is running through php-fpm:
sudo vi /etc/nginx/nginx.conf
server(
listen 80;
server_name phpmyadmin;
access_log /var/log/phpmyadmin.access_log;
error_log /var/log/phpmyadmin.error_log;
location ^~ /phpmyadmin/ (
alias /usr/share/phpMyAdmin/;
index index.php;
location ~ /phpmyadmin(/.*\.php) (
include fastcgi.conf;
fastcgi_param SERVER_NAME localhost;
fastcgi_param SCRIPT_FILENAME /usr/share/phpMyAdmin$1;
fastcgi_pass 127.0.0.1:9000;
fastcgi_index index.php;
}
}
}
Save and restart your web server:
sudo systemctl restart apache2
sudo systemctl restart nginx
Now everything should definitely work. Open your browser and type http://localhost/phpmyadmin in the address bar:

Enter your username and password and then you can do whatever you need with the databases.

PhpMyAdmin protection
Installation of phpmyadmn Ubuntu 16.04 is complete. But this program gives full control over the database, so we need to ensure its maximum security. Let's make access to Phpmyadmin using a password. For Apache settings create a file /usr/share/phpmyadmin/.htaccess with the following content:
sudo vi /usr/share/phpmyadmin/.htaccess
AuthType Basic
AuthName "Restricted Files"
AuthUserFile /etc/phpmyadmin/.htpasswd
Require valid-user

This is what these lines mean:
- AuthType Basic- this line sets the authentication type, we indicate that we will use a password;
- AuthName- set the message that will be seen;
- AuthUserFile- a file with data that will be used for authentication;
- Require- a necessary condition for authentication.
sudo htpasswd -c /etc/phpmyadmin/.htpasswd user

You can add multiple users, but do not use the -c option to do this:
sudo htpasswd /etc/phpmyadmin/.htpasswd user
Now, when you try to open the phpmyadmin address, the system will ask for a password. Only users who enter the password will be able to access the phpmyadmin login interface.
conclusions
In this article, we looked at how to install phpmyadmin Ubuntu 16.04. As you can see, everything is very simple, and it only takes a little time to figure it out. If you have any questions, ask in the comments!
Something just broke through to me today... Maybe I’ll start following the blog again?)) Well, “let’s continue to shower our Internet with all kinds of content.”
One day, while sitting at work, I needed to get into the MySQL server using one of the virtual machines. I needed to do this quickly and painlessly, because I didn’t like something there... Without hesitation, I downloaded the pma distribution there, uploaded it to the www folder, and instead of the welcome screen I received a generous offer to download index.php. A little freaked out, I realized that php was not there, and installing it there was not an option, since I did not have access to the Internet from the virtual machine. Without hesitation, I realized that I had another pma only on a different virtual machine, and I started googling for a solution... As a result, I “learned” that starting with version 1.4.2, phpMyAdmin supports the administration of several MySQL servers. In a good way, this post could be called “MULTIPMA”, but not everyone will understand, not everyone will appreciate...
An example of installing and configuring PHPMyAdmin on a Debian server will be described below.
Getting ready
If anything, we already have Apache, PHP, MySQL.
IP Server2, (here we will set PMA) let it be 10.20.20.200.
IP Server1 (where the first mysql server is) - 10.20.20.100
IP Server3 (where there is another mysql server) - 10.20.20.300
The first thing you need to do is allow the MySql server to receive requests from another IP. Silently, the my.conf configuration file contains the “skip-networking” and “bind-address” parameters. Well, there is no need to write two consecutive “bind-address” parameters with different ips there, nor do you need to enter them separated by commas. The correct thing to do would be to comment out these parameters, and to prevent MySQL from shining its bare butt on the entire Internet, block access to everyone using a firewall.
#bind-address=127.0.0.1 #bind-address=localhost
Secondly, you need to take into account that you need to configure IP access for MySQL users. By default, they only have access from localhost, which means that you will not be able to access the database from outside. For example, if we need access for the root user, the most correct thing would be to add it again, with the same password, but in the host indicate the IP from which we will break.
Mysql> CREATE USER "root"@"10.20.20.200" IDENTIFIED BY "root"; mysql> GRANT ALL PRIVILEGES ON *.* TO "10.20.20.200";
Third, in order not to include IP addresses (especially if they are external) in the server selection field, it would be correct to add the following lines to the /etc/hosts file:
127.0.0.1 localhost 127.0.1.1 server2 server1.local 10.20.20.100 server3.local 10.20.20.300
We put
Installing phpMyAdmin is not difficult, you just need to use the following command.
Apt-get install phpmyadmin
Setting it up
Let's do it just in case backup copy PMA configuration file:
Cp /etc/phpmyadmin/config.inc.php /etc/phpmyadmin/config.inc.php.bak
$cfg["Servers"][$i]["AllowNoPassword"] = TRUE;
In the same file we look for the following lines:
//$cfg["Servers"][$i]["auth_type"] = "cookie"; /* Server parameters */ //$cfg["Servers"][$i]["host"] = "localhost"; //$cfg["Servers"][$i]["connect_type"] = "tcp"; //$cfg["Servers"][$i]["compress"] = false; /* Select mysqli if your server has it */ //$cfg["Servers"][$i]["extension"] = "mysql";
And we bring them to this form:
/*server1.local*/ /* Authentication type * / $cfg["Servers"][$i]["auth_type"] = "cookie"; /* Server parameters */ $cfg["Servers"][$i]["host"] = "server1.local"; $cfg["Servers"][$i]["connect_type"] = "tcp"; $cfg["Servers"][$i]["compress"] = false; /* Select mysqli if your server has it */ $cfg["Servers"][$i]["extension"] = "mysql"; $cfg["Servers"][$i]["AllowNoPassword"] = false; /* server3.local */ $i++; /* Authentication type * / $cfg["Servers"][$i]["auth_type"] = "cookie"; /* Server parameters*/ $cfg["Servers"][$i]["host"] = "server3.local"; $cfg["Servers"][$i]["connect_type"] = "tcp"; $cfg["Servers"][$i]["compress"] = false; /* Select mysqli if your server has it */ $cfg["Servers"][$i]["extension"] = "mysql"; $cfg["Servers"][$i]["AllowNoPassword"] = false;
All. If you did everything correctly, then everything should work out.