Mandatory Availability Requirement digital signature drivers in Windows 8 (Device Driver Signing) is a system requirement Windows security, which allows the installation of only drivers that are digitally signed by the manufacturer. Microsft needs a driver certification and signing system in order to maximally protect the system from the installation of incorrect or dangerous software that can destabilize the system.
When you try to install a driver in Windows 8 that does not have a digital signature, a warning window appears:
“Windows encountered a problem installing the driver software for your device. Windows found driver software for your device but encoutered an error while attempting to install it. The hash for the file is not present in the specified catalog file. The file is likely corrupt or the victim of tampering.”
(The hash of this file is not in the given directory file. The file may be corrupted or tampered with)
In this article, we propose to get acquainted with the procedure for installing an unsigned device driver in Windows 8 by disabling the system's digital signature verification of the driver. It is important to note the fact that You install unsigned versions of drivers at your own peril and risk, and you clearly understand that by your actions you risk the stability and security of your OS.
Let us recall that the requirement for mandatory signing of drivers running in kernel mode appeared for the first time in 64-bit Windows Vista. However, if in Windows 7 (we previously described how it is possible in Windows 7) and Vista, the system still offered the ability to install an unsigned driver (which did not always work), then in Windows 8, installation of a driver without a digital signature simply ends with an appropriate warning.
Disable driver digital signature verification in Windows 8 boot options
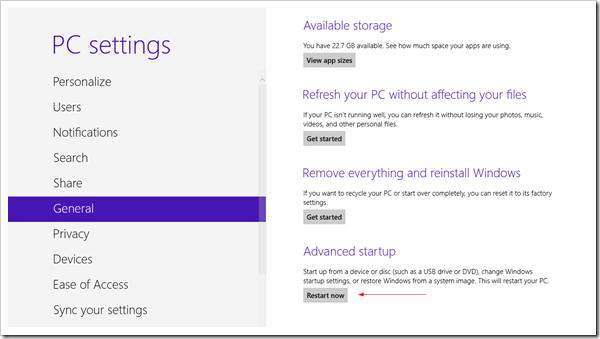
You can disable signature verification from the options menu Windows boot 8. To get into it, you need to press a key combination in the system Win+I, select item ChangePCSettings, then on the tab General select option RestartNow(will reboot now). As a result, the computer will restart and automatically enter advanced boot options mode.
The same effect (getting into the system boot settings configuration mode) can be achieved by restarting the computer from the command line ():
Shutdown.exe /r /o /f /t 00

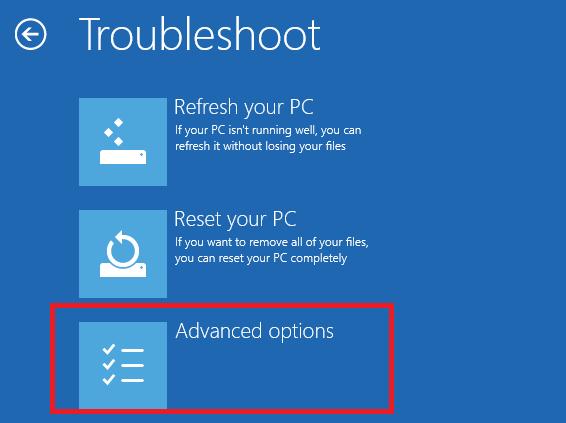
Then select the option Advanced Startup
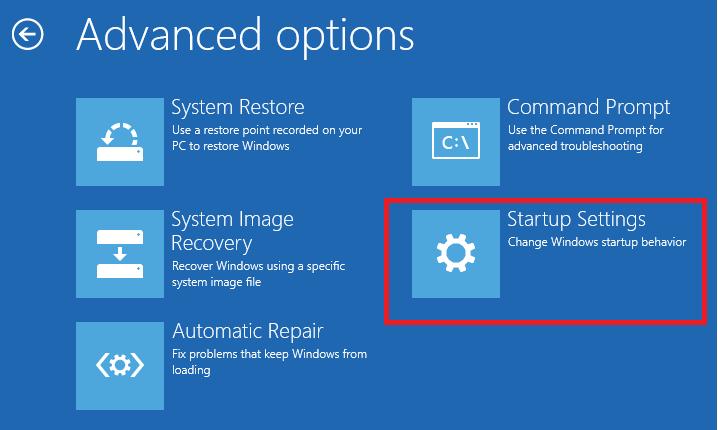
And finally click the Restart button
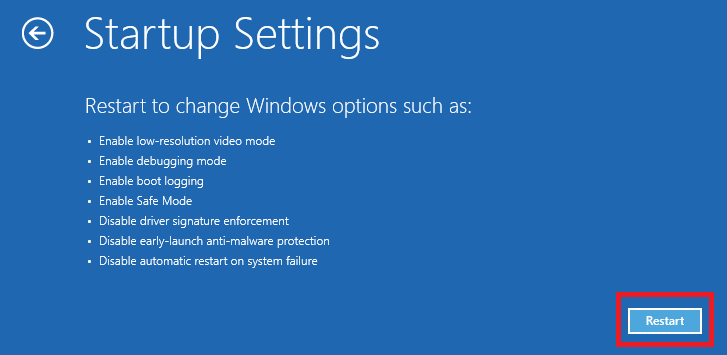
The computer will reboot again and a menu for selecting boot options will appear in front of you. We are interested in the item Disabledriversignatureenforcement(disable driver verification), select it by pressing the F7 key on the keyboard or 7
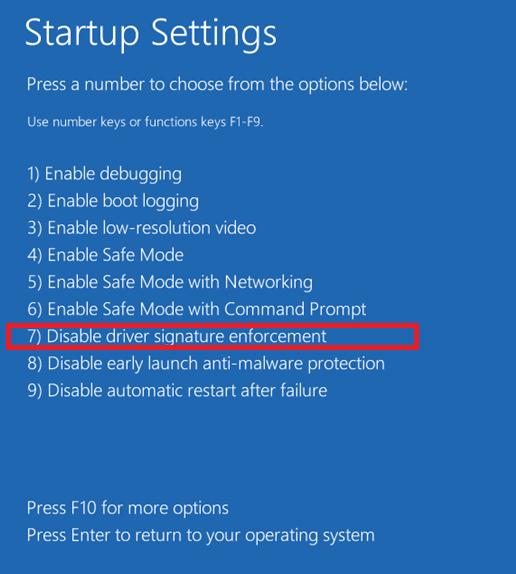
As a result, Windows 8 will boot into a mode in which signed drivers can be installed. Now, when installing such a driver (via Device Manager or using a wizard), a window with a Windows security warning will appear in Windows 8:

Select an item : Installthisdriversoftwareanyway, after which the driver should be installed. All that remains is to reboot in normal mode and check the functionality of the installed driver and device.
Installing an unsigned driver in Windows 8 Test Mode
If the above method did not work for you, there is another way to install unsigned drivers. In Windows 8 and Windows Server 2012 there is a so-called “test mode of operation” ( TestMode), in which it is possible to install any (including unsigned drivers).
What are the dangers of operating the system in “test mode”? Technically, you are working with the same full-fledged OS, but there are a few nuances. Firstly, this configuration is not formally supported by the vendor (Microsoft). Secondly, by switching the system to debug mode, you significantly reduce its security and stability of the OS, so the risk of various errors, BSODs and infection increases significantly.
So, on a 64-bit OS you need to run command line with administrator rights and sequentially execute the commands:
Bcdedit.exe /set nointegritychecks ON bcdedit.exe /set TESTSIGNING ON
The first command can be replaced with
Bcdedit.exe /set loadoptions DDISABLE_INTEGRITY_CHECKS
After each command, a message indicating its successful execution should appear.
Then reboot your system and try installing an unsigned driver.
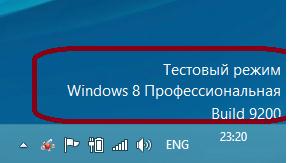
Fact Windows operation 8 in test (debug) mode is manifested by the presence in the lower right corner of the desktop: Test mode(Test Mode), OS version and Windows build number.
To disable Test Mode, you must run the following commands with administrator rights:
Bcdedit.exe /set nointegritychecks OFF bcdedit.exe /set TESTSIGNING OFF
Instead of the first command you can use:
Bcdedit /set loadoptions ENABLE_INTEGRITY_CHECKS
So, we looked at ways to disable digital signature verification in 64-bit Windows versions 8.
It is worth noting that this problem most often occurs among owners of all kinds of old devices (the drivers for which are also significantly outdated). These “lucky ones” need to be prepared for the fact that old drivers without a digital signature from the manufacturer, installed according to this article, bypassing the Windows security system, will not always work correctly. Therefore, first of all, it is recommended to check the availability of a recent signed version of the driver for Windows 8 (Windows 7) on the manufacturer’s website.
Without correct selection and correct operation of programs in any OS is not possible. Windows 8 is no exception. However, there are particular difficulties Windows users 8 should not occur.
When installed on top of an earlier version of the operating system (for example, XP, Seven), Windows 8 “picks up” installed drivers and thus provides normal work computer devices.
1. Go to device manager.
During a “clean installation”, Windows 8 selects a standard set of drivers suitable for the devices of a particular computer.
This was the case in my case: after installing the operating system, I opened Device Manager and saw that additional installation no drivers are required (there are no yellow exclamation marks or question marks next to the list of devices indicating that the device is not recognized).

Device Manager - all devices are recognized and suitable drivers installed
(Picture 1)
2. Select devices from the list With exclamation marks and questions, as well as devices for which you need to reinstall drivers.
But standard drivers cannot always provide maximum Good work devices, so you can update them directly from Device Manager.
So, select the desired device, click on it right click and select "Update drivers".
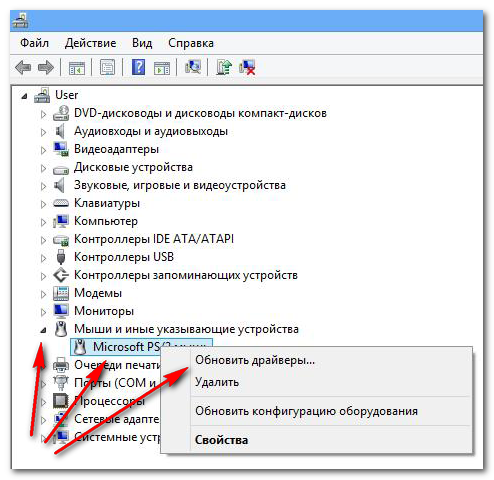
Select - update drivers. We install optimal drivers from developers.
(Figure 2)
3. Choose manual or automatic installation.
Automatic installation is intended for users who trust the program. The computer must be connected to the Internet at this time.
Manual installation is required if the system does not see necessary drivers located on disk or in an archive.
If you have a disk with drivers or an unpacked archive, then select manual installation to specify the path to the driver folder, because otherwise the system will say that best drivers already installed, but in the case of a video card it will be a lie.
Possible problems
If your driver file type is *.inf, then the above method will not work.
Also, the system will not find the driver inside the archive, the archives need to be unpacked, or you need to start the installation from the archive by double-clicking on the setup.exe file
You can also use special programs, For example DriverPack Solution. The light version of the program will scan to determine whether a driver update is needed and display a report on the monitor.
Conclusion:
1. if you know exactly which one motherboard, video card, etc. are installed on the computer, it is best to select a driver on the equipment manufacturer’s website.
In the description you need to find information about compatibility with Windows 8 and then download the driver.
2. When choosing drivers for external devices(MFPs, printers, etc.) it would be a good idea to visit the Windows 8 Compatibility Center. By selecting the desired tab, you will open a list various devices, next to the names of which it will be noted whether it is compatible or not this equipment with a new operating system.
The Compatibility Center provides easy navigation to the page with the software you need.
3. If you are unable to install the drivers, then please read the installation knowledge base http://www..html and if you have questions about installing drivers for Windows 8, ask them here.
If you ever suddenly need to connect to a computer running Windows 8.x or 10 any old device, most likely, you will not be able to find a driver officially signed by the device manufacturer. In other words, you will encounter problems when trying to install the device in latest versions operating system from Microsoft. For this reason, in this article we will show you step by step how to install unsigned drivers in Win 8.x or 10.
Before we jump into the installation process itself, let's know what a signed driver is. A signed driver is digitally signed, and this is a security measure that allows you to verify the authenticity of the driver package. It also helps ensure that no one has modified the contents of the driver other than the manufacturer. If a driver is digitally signed, it means it is trusted and you can safely install it on your system.
Instructions
In Windows 8, use the Win + i keyboard shortcut to open the Chrams panel. Next, click "Shutdown" and then, while holding down the Shift key, click "Restart." There is no Chrams panel in Windows 10, so use the Start menu to do the same.
The operating system will restart and load the menu with additional parameters. In this menu, select the “Diagnostics” section.

Now click on "Advanced Options".

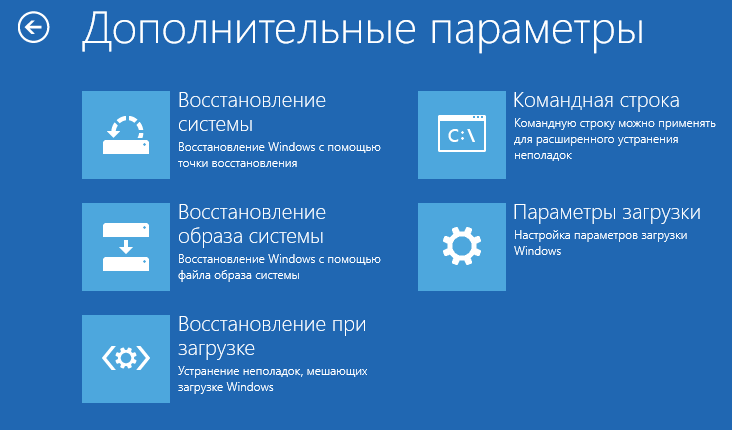
The Boot Options section allows you to change various configuration options Windows startup, but we need to reboot the system so that mandatory driver signature verification is disabled. On this screen, simply click the Reboot button.

The operating system will restart, but instead of the desktop you will be taken to the Boot Options screen. Here, press the F7 key on your keyboard. This will cause Windows 8.x to start in a mode that allows you to install unsigned device drivers.

The last thing you have to do is install the driver without a digital signature. I hope this process goes smoothly and without problems.
Have a great day!
Some printers have multiple driver options to use depending on your environment, printer connection type, and availability:
When using a PostScript-enabled printer.
When printing from Adobe or other graphics-intensive applications.
When printing documents that contain a significant number of graphics or macros.
When printing in non-uniform environments, for example when printing as in Windows applications, and Macintosh.
Software HP ePrint Provides wireless printing capabilities desktop computers and laptops for Windows control or Mac on any wireless ePrint-enabled printer connected to the HP network or cloud, from applications using the standard File > Print method. Contains driver for Windows and workflow.pdf for Mac. ePrint software is used to print documents or photos over the Internet by sending emails from anywhere from the appropriate device to the address assigned to the HP printer connected to the Internet. Use the HP ePrint App to capture, edit, and wirelessly print photos and other images from your iPad, iPhone, iPod touch, Android smartphones or other smartphones on an HP wireless printer.
Complete solution are drivers and/or software specifically created for specific products. The HP Full Feature Driver or HP Complete Driver and Software Suite provides a complete solution that includes a comprehensive set of printer software, plus most additional functions print. No other HP software is required. The complete solution is recommended for use wherever applicable and is included on the HP Windows 8/8.1 CD/DVD that came with your new printer or is available for download at www.hp.com/go/support. Installs over the network or via USB.
Basic PCL6 driver- PCL6 drivers use printer resources (internal processor and memory) to process print commands. This is a driver that is designed specifically for some printers that support PCL 6. It should not be confused with the PCL 6 UPD. This driver can only be downloaded from www.hp.com/go/support and can be used to provide basic software printing or print/ scanning. Activates more complex software functions than drivers included in the OS or Center Windows updates. Installs over the network or via USB.
Basic Host-based- Host-based drivers use the resources of the computer (host) connected to the printer via USB cable, to process print commands. This is a specially designed driver for host-enabled printers that provides basic software printing or print and scan functions. Activates more complex software functions than drivers included in the OS or Windows Update. Like the Basic PCL6 driver, this driver is only available at www.hp.com/go/support. It is also known as driver Plug and Play because it can only be installed via USB.
Driver or Plug Package and Play - Host-based driver, which can only be installed via USB. Like the Basic Host-based feature, this driver is only available at www.hp.com/go/support.
Universal Print Driver (UPD)- The downloadable HP Universal Driver is designed for customers who only require print functionality, as well as system administrators, which use this file for deployment. Includes PCL 6 and PostScript versions (UPD PCL 5 is not supported on Windows 8/8.1 when using UPD PCL 5 version 5.7 and later; PCL5 version 5.6 and earlier is NOT supported on Windows 8/8.1). Not recommended for All-in-One series printers. Often used by administrators or IT professionals in corporate environments where the process is controlled by a print server running print jobs on different models printers hosted in desktop or mobile print environments. Can be installed via USB or over a network, but is usually installed remotely over a network.
Note.
The HP PCL6 Universal Print Driver for Windows is recommended for most printing needs. It is used for general office tasks such as word processing or spreadsheets and the like.
For use universal driver To print HP PostScript for Windows, the printer must have PostScript (PS) printing capabilities. The PostScript version is used in the following cases:
Windows Update is a driver from Windows Update for Windows 8/8.1. For most printers, this driver provides print functionality only (no scanning). Some printers also support WIA. From the Devices and Printers window, run Windows Update and get the latest drivers and updates. This driver is best used when you need to provide limited number of software printing functions in the absence of other solutions.
From the OS (In-OS) - basic driver printing (without scanning), included in the operating room Windows systems 8/8.1 to provide limited printer functionality. Some advanced features may not be available. For some printer models, only this driver version is available. This driver is best used in cases where there is no Internet connection or no other solutions are available. When using All-in-One series printers, this driver is preferable to UPD.
Point and Print Driver Kit Typically used by administrators or IT professionals to enable Point and Print functionality to enable interoperability between different operating systems. Can be used to install disk public access on network server print, and then point it to the print server as shared resource directly from the network client.
Note.
This option is available for corporate clients, but is not listed in this document. For more detailed information For the Point and Print Driver Kit, go to www.hp.com/go/upd.