Oracle VirtualBox is such a practical virtualization tool that has an open source source. This is what makes creation easier. virtual installations, which imitate the computer itself. They function on your PC, but their work is the same as if they were not acting as a whole, but as individual machines.
This program has a lot of functions. It should be noted that the application supports 64 bit guest systems.
Using this VM VirtualBox program, a separate environment is created for the software that is already running. This application maintains control over all links and provides their direct support.
Password for all archives: 1progs
Video on installing the program
Although at first glance the instrument is a little complicated, when you work you already understand that you can figure everything out. If you need to download a free instrument in Russian, you can do so on this page.
Why use this program? It's actually quite simple. With its help, it becomes possible to launch the operating system, but not to actually install it. The virtual machine makes it possible to switch between different operating systems and test them in one click.

Here you will find links to VirtualBox binaries and its source code.
VirtualBox binaries
By downloading, you agree to the terms and conditions of the respective license.
If you"re looking for the latest VirtualBox 6.0 packages, see VirtualBox 6.0 builds. Please also use version 6.0 if you need to run VMs with software virtualization, as this has been discontinued in 6.1. Version 6.0 will remain supported until July 2020.
If you"re looking for the latest VirtualBox 5.2 packages, see VirtualBox 5.2 builds. Please also use version 5.2 if you still need support for 32-bit hosts, as this has been discontinued in 6.0. Version 5.2 will remain supported until July 2020.
VirtualBox 6.1.4 platform packages
The binaries are released under the terms of the GPL version 2.VirtualBox older builds
The binaries in this section for VirtualBox before version 4.0 are all released under the VirtualBox Personal Use and Evaluation License (PUEL). As of VirtualBox 4.0, the Extension Pack is released under the VirtualBox Personal Use and Evaluation License and the other packages are released under the terms of the GPL version 2. By downloading, you agree to the terms and conditions of the respective license.
VirtualBox Sources
The VirtualBox sources are available free of charge under the terms and conditions of the GNU General Public License, Version 2. By downloading from the below links, you agree to these terms and conditions.
Since we all love to experiment, tinker with system settings, and run something of our own making, we need to think about a safe place to experiment. Such a place for us will be the VirtualBox virtual machine with installed Windows 7.
When starting the VirtualBox virtual machine (hereinafter referred to as VB), the user sees a window with a completely Russian-language interface.
Let us remind you that when you install the application, the shortcut is automatically placed on the desktop. If this is your first time creating virtual machine, in this article you will find detailed instructions, which may be useful at this stage.
So, in the new window, click "Create", after which you can select the OS name and other attributes. You can choose from all available operating systems.

Proceed to the next step by clicking "Next". Now you need to specify how much RAM should be allocated for the VM. For its normal functioning, 512 MB is enough, but you can choose more.

After this we create a virtual HDD. If you have previously created disks, you can use them. However, in this article we will focus on how they are created.
Mark the item "Create new hard disk" and move on to further stages.


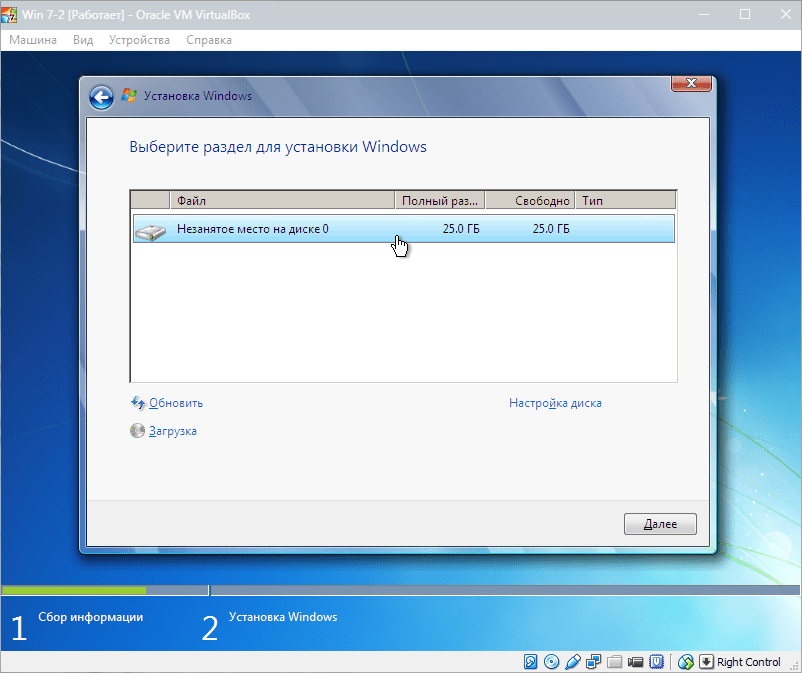
In the new window you need to indicate where the new disk image should be located and what size it should be. If you are creating a boot disk containing Windows 7, then 25 GB will be enough (this figure is set by default).

As for placement, then the best solution will place the disk outside system partition. Failure to do so may result in overload boot disk.
If everything suits you, click "Create".
When the disk is created, the parameters of the created VM will be displayed in a new window.
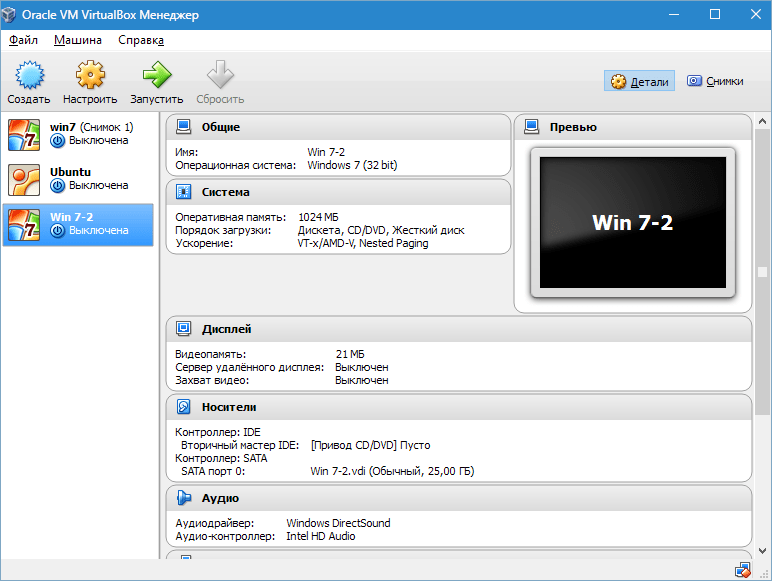
Now you need to configure the virtual machine hardware.
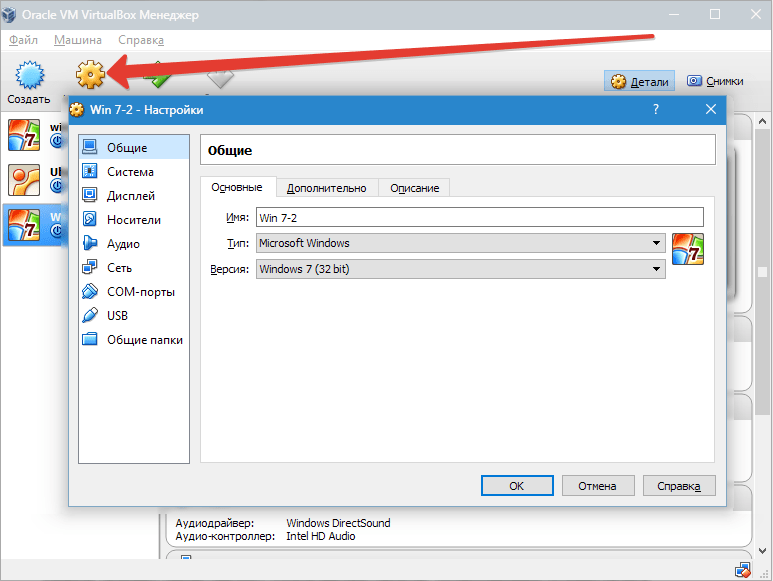
In the General section, the 1st tab displays key information about the created machine.
Let's open the tab "Additionally". Here we will see the option "Folder for pictures". It is recommended to place the specified folder outside the system partition, since the pictures are large.
"Shared clipboard" involves the operation of the clipboard when your host OS and VM interact. The buffer can operate in 4 modes. In the first mode, the exchange is carried out only from the guest operating system to the main one, in the second - in the reverse order; the third option allows both directions, and the fourth disables communication. We choose the bidirectional option as the most convenient.
"Mini toolbar" is a small panel that allows you to manage the VM. We recommend activating this console in full screen mode, since it is completely repeated by the main menu of the VM working window. The best place for her is top part window, since this way there is no risk of accidentally pressing one of its buttons.

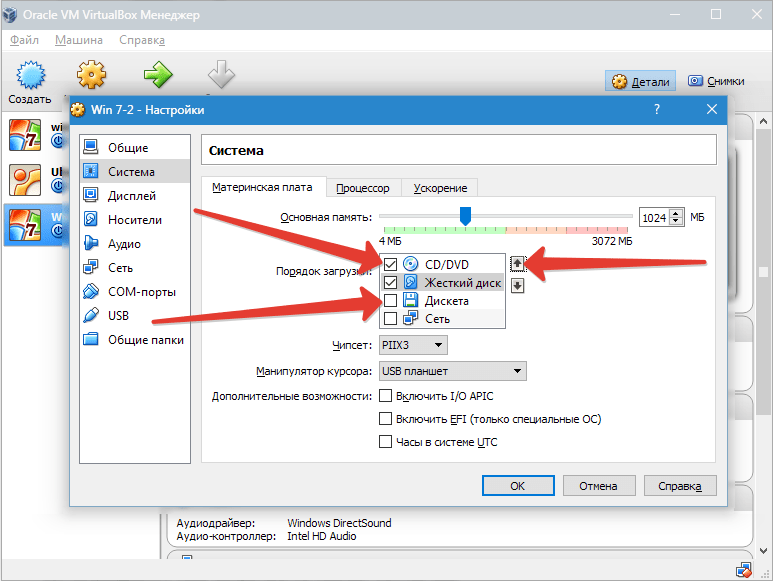
Let's move on to the section "System". The first tab offers to produce certain settings, which we will look at below.
1. If necessary, you should adjust the amount of RAM in the VM. At the same time, only after its launch will it become completely clear whether the volume has been chosen correctly.
When choosing, you should start from what size physical memory installed on the computer. If it is 4 GB, then it is recommended to allocate 1 GB for the VM - it will function without any “brakes”.
2. Let's determine the loading order. The floppy disk (floppy) player is not needed, disable it. The CD/DVD drive should be assigned first in the list in order to be able to install the OS from the disk. Note that this can be either a physical disk or a virtual image.
Other settings are given in the help section. They are closely related to the hardware configuration of your computer. If you set settings that do not comply with it, the VM will not be able to start.
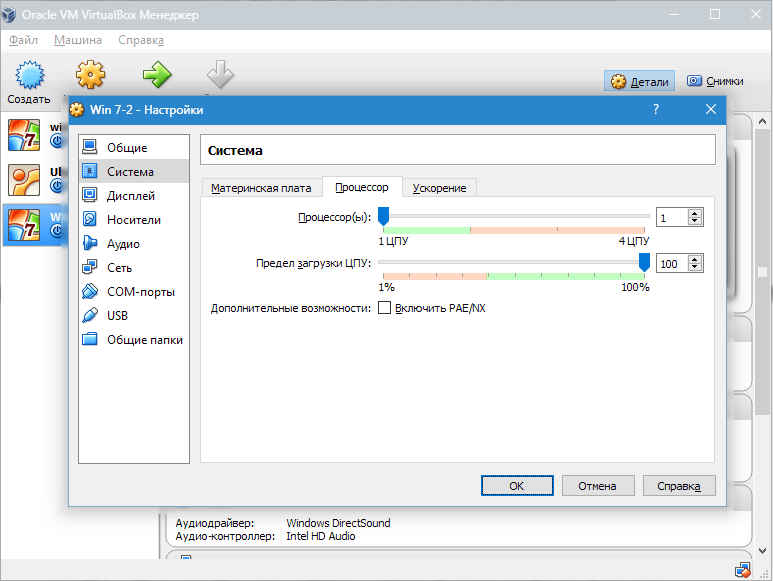
On the bookmark "CPU" the user specifies how many cores are on the virtual motherboard. This option will be available if hardware virtualization is supported AMD-V or VT-x.
Regarding hardware virtualization options AMD-V or VT-x, then before activating them you need to find out whether these functions are supported by the processor and whether they are included initially BIOS– it often happens that they are disabled.

Now let's look at the section "Display". On the bookmark "Video" The amount of memory of the virtual video card is indicated. Activation of two-dimensional and three-dimensional acceleration is also available here. It is advisable to enable the first of them, but the second parameter is optional.

In chapter "Carriers" all disks of the new virtual machine are displayed. Also here you can see a virtual drive with the inscription "Empty". We will mount the installation image into it. Windows disk 7.

The virtual drive is configured as follows: click on the icon located on the right. A menu opens in which we click "Select optical disk image". Next, you should add an image of the operating system boot disk.


We will not cover issues related to the network here. Note that network adapter initially active, which is a prerequisite for the VM to access the Internet.
On the section COM There is no point in going into detail, since nothing is connected to such ports today.
In chapter USB check both available options.
Let's go to « Shared folders» and select those directories to which the VM plans to provide access.
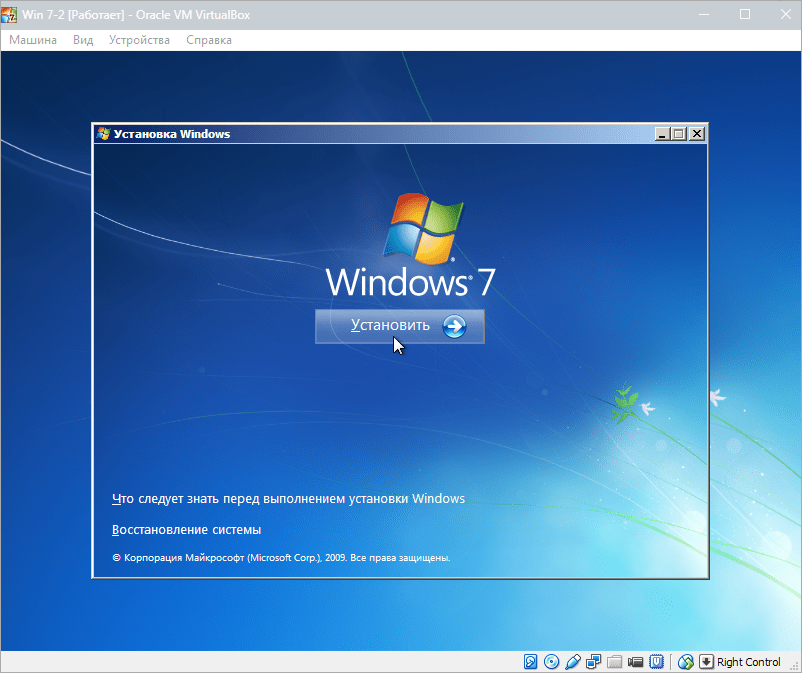
The entire setup process is now complete. Now you can start installing the OS.
Select the created machine in the list and click "Run". Herself Windows installation 7 on VirtualBox is very similar to a regular Windows installation.
After downloading installation files A window will open asking you to select a language.

We accept the license terms.

Then select "Full installation".

In the next window you need to select a disk partition to install the operating system. We have the only section, so we select it.

During installation, the machine will automatically reboot several times. After all reboots, enter the desired user and computer name.


Here we enter the product key, if available. If not, then just click "Further".


Set the time zone and date.

Then we choose which network to assign our new virtual machine to. Click "Home".

After these steps, the virtual machine will automatically reboot and we will be taken to the desktop of a freshly installed Windows 7.
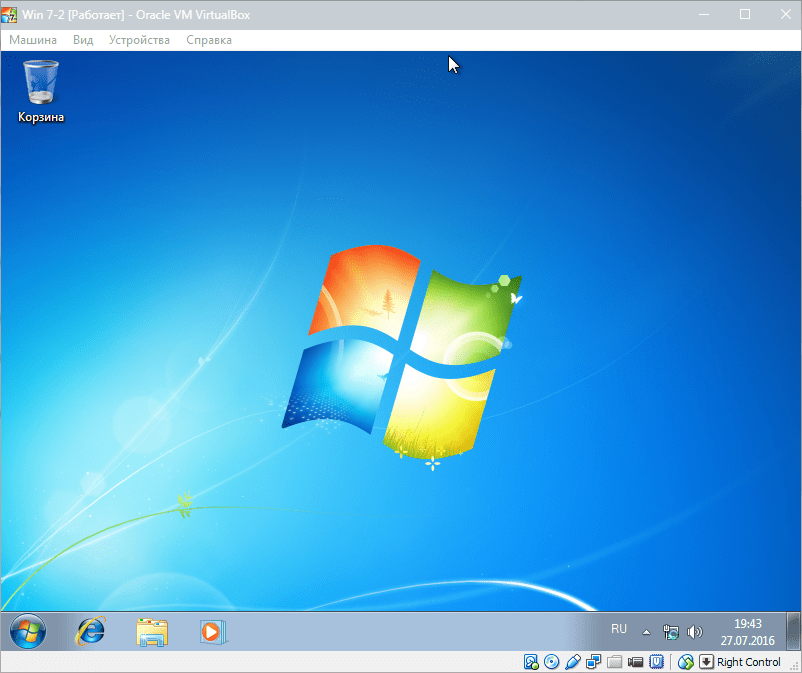
Thus, we installed Windows 7 on the VirtualBox virtual machine. Next, you will need to activate it, but this is a topic for another article...
Virtual Box is a cross-platform proprietary program that allows you to place one or more virtual machines on a computer, install operating systems, application and service software on these virtual computers. software, regardless of the underlying OS and hardware configuration of the host computer. If you need such functionality, you should download VirtualBox for free for Windows Vista, 7, 8, 8.1, 10 (32-bit and 64-bit), Server 2008, 2012 and other OS on the website https://site without registration and SMS via a direct link from the official website.
The hardware base computer is called the host, and the software base computer is called the guest machine. VirtualBox machine is logically a separate computer. The imaginary computer has its own hardware resources: motherboard, BIOS, processor, RAM, HDD, LAN card and other computer equipment.
This software allows you to create a conditional partition on the HDD and install the operating system on it, resulting in “PS in PS”. In order not to litter the main operating system on your computer with numerous installations and removal of software and toys, you need to download VirtualBox for free in Russian for a computer with OS Windows Vista, 7, 8, 8.1, 10 (32-bit and 64-bit), etc. Then, after appropriate configuration to check the correct operation, functionality or testing of the software or game, the software is installed in such a guest OS.
Virtualization of x86 and AMD64 and Intel64 architectures is supported by Oracle Corporation to use phantom machines with parameters of the real hardware configuration of the computer. Such a machine can be equipped with any popular operating system: Windows, DOS, Mac OS X, Linux (Ubuntu, Debian, Oracle Enterprise, Redhat Enterprise, Fedora Core, Gentoo, etc.), Free BSD, Solaris, ReactOS and others. Virtualization technology is used to create isolated user environments with installed certain programs, which are aimed at solving specialized problems.
VirtualBox is a powerful virtualization tool for x86-based platforms. What does this mean? If you need to run Windows on an operating system Mac system, or Solaris from Linux, you will need to download VirtualBox for Windows 7/8.
This cross-platform program will allow you to create and run a virtual machine that simultaneously uses different operating systems on one computer.
In other words, this is a system for creating a device with parameters real computer, on which it is possible to run various operating systems. It is convenient to use for testing without the need to install them directly.
Virtual Box program
Let's talk about the opportunities that the program provides:
- Cross-platform. Supports 32-bit and 64-bit operating systems.
- Transparent architecture. Modular project with separation of server and client code and internal programming interfaces.
- Guest add-on package.
- Hardware support.
- Working with OVF/OVA formats.
- Multilingual interface - also available in Russian.
- SMP on the guest side.
- Desktop of host and guest OS in integration.
- Image support hard drives VMDK and VHD, including snapshots.
- Various types of network interaction (the network can be built in three ways: NAT, Host Interface Networking, Internal Networking).
- Easily exchange files between real and guest systems.
- Virtualization of audio devices.
- Possibility of hardware 3D acceleration.
VirtualBox is convenient
The program emulates such components hardware, like a hard drive, network and video adapter, audio controller, as well as USB controllers.
The Russian version is absolutely free. You can download it from any torrent or from our Internet portal. It takes up little space and yet has high performance.
The Virtual Box program is supported by the Open Source community. The product developer is Innotek, which was subsequently absorbed by Oracle VM Corporation.
Each product update makes it even easier to use at home and adds new useful settings. We suggest you get this program right now - downloading will not take much time.