In this review, we will figure out how to perform a system restore in Windows 7 to an earlier period of time. This method will allow you to undo system changes without affecting your personal files (for example: email, documents or photos.)
Note: System Restore uses something called System Protection to regularly create and save restore points on selected hard drives on your computer.
These restore points contain information about registry settings and other information about the system that Windows 7 is running. You can also create restore points manually.
Note: Created recovery checkpoints are deleted after the system is rebooted. To prevent this from happening, you need to configure the storage of checkpoints for system recovery in Windows 7
System Restore in Windows 7 using System Protection
Note: Before you begin, disable your antivirus software when restoring your Windows 7 system to prevent it from interfering.
Let's look at what ways you can get to the Windows System Restore utility
Method 1: Open menu Start — All programs — Standard – Service and select System Restore
Method 2: Through the control panel. Open the menu Start – Control Panel:

In the upper right corner, select as shown in the figure - Small icons, in the list that opens, look for and launch Recovery:

In the window that opens, click Running System Restore:

Method 3: Through system protection. Right click on the icon My computer, and click on the button Properties:

In the next window, on the left side, click on:

In the System Properties window, click Recovery…:

We have already figured out what ways to get into Windows 7 system recovery, now let’s figure out how to do a system recovery in Windows 7.
Step 1. In the System Restore window, click Next

Step 2. In the list of system restore checkpoints, select the state to which you would like to restore the system.

You can also view older system control points by checking the box, as shown in the figure, another control point will appear:

Before performing a Windows 7 system restore, you can view the affected programs and drivers; to do this, click on the button Find affected programs

A window will open with a description of the affected programs and drivers, after you have read it, click Close

Step 3. After returning to the main System Restore window, check if your desired restore point is selected, And click Next

Step 4. In the System Restore window, you must confirm the restore point by clicking on the Finish button:

Step 5. After confirming the restore point, a launch confirmation will appear, which will be impossible to cancel if you are ready to start, click on the Yes button:

The process of restoring the Windows 7 system will begin from the specified checkpoint

After some time, the PC will be required to reboot; during the reboot, the system will be rolled back to the specified checkpoint.
After the computer restarts and successfully performs a Windows system restore, you will be presented with a report about the work done successfully:

If, after restoring the system, you are not satisfied with the desired result, and you need to rollback to an earlier date, then return to the first method in this article. After any system restore You can always cancel or will be restored to another point by selecting from the list, just select from those offered and click next.

By clicking on cancel update, the system will roll back to the previous location from which the restoration was made.
By clicking on select another recovery point, you will be offered a list from which you started the recovery (if you select this item, then proceed from step 3)
Perform a system restore in Windows 7 when the OS boots
Note: Performing a system restore in Windows 7 when booting the system to an earlier checkpoint using an installation disk or a Windows 7 system recovery disk is a very effective way if the operating system fails to boot.
Step 1. Boot from a previously prepared Windows 7 system recovery disk, select System Restore (Go back and start from step 3.)

Restoring Windows 7 is a reconstruction of the computer's system files that corresponds to a specific period in the past. This method is the best way to resolve a problem associated with incorrect installation of a program or driver, when removing the application that caused the application to slow down, freeze, or otherwise fail does not allow the OS to be returned to a working state. Sometimes restoring Windows 7 helps even in cases where the system is not able to boot at all. Another name for the Windows recovery procedure is System Restore.
There are three ways to restore Windows 7 - using the utility built into the system, using the system installation disk, or System Restore through safe mode. In this article we will look at each of them.
Restoring Windows 7 using the built-in utility in the system
Restoring Windows 7 using the system itself is only possible if the system files have not been damaged and the OS boots normally after turning on the computer. Find the My Computer icon and right-click on it and select Properties. In the window that opens, go to the System Protection tab.
You will see the System Properties window with the System Protection tab open.

Click on the Restore button. After this, the Restore System Files and Settings utility will be launched.

Click "Next. You will be taken to a window with a list of all existing restore points. To display them all, check the box next to “Show other restore points.” Select the restore point you need and click Next again.

In the next window, you will need to select the state of the system files of which disks you want to restore. Usually it is enough to restore the system drive C. After checking the necessary boxes, click Next again.

A final window will appear in front of you, summarizing all the information about the recovery point: the date it was created and a brief description of what changes to the system it was created in connection with. Here you can also create a password reset disk. A similar “floppy disk” can be created using any modern FLASH media. You may need this information if you forget your system password.

After you click the Finish button, a warning window will appear informing you that it will not be possible to abort the restore operation once you decide to start it. To continue the utility, click Yes.

After this, the system will begin returning to the selected restore point. Initially, all documents and applications will be closed, and the computer will restart. If no errors occurred during the System Restore process, you will see a window with information about the successful restoration.

System Restore via Safe Mode
If an operating system error has caused Windows to not even boot, the above method will not help you. However, you can try to restore Windows 7 using safe mode, which often boots even when the normal system boot does not work.
To enter Safe Mode, restart your computer and press the F8 button several times when it starts. A window will appear in front of you with a list of additional OS boot options.

Using the cursor keys, select any Safe Mode boot option and press the Enter key. After Windows 7 boots into safe mode, follow the same steps as in normal system mode.
Right-click on the My Computer shortcut and select Properties. Then select the Control Panel section from the list.


A window will appear in front of you where you should click on Start system recovery. You can also configure System Restore settings by clicking on the Advanced recovery methods link.

After this, the application will launch, the operation of which we discussed above.

Follow the same series of steps as described in the first system recovery method.
Recovering using a Windows 7 disc
In some cases, the operating system may refuse to boot into safe mode, then the second recovery method will also be impossible. However, if you have a Windows 7 installation disc available, you can try to fix the problem that caused the system to crash. A similar disc in the form of an ISO image file can be downloaded on the Internet, and then burned to a regular DVD.
Before you begin restoring the system, you must set boot priority from the DVD drive in the BIOS settings. After this, you should insert the Windows 7 boot disk into the drive and restart the computer. A black window will appear in front of you with the inscription Press any key to boot from CD or DVD... Press any key, after which the information will begin loading from the disk.

It will take some time before Windows downloads the necessary files.

In the window that appears, configure the language, keyboard layout and time format. After you click Next, the Windows 7 welcome window will appear. You need to click on the System Restore link. After this, the System Recovery Options window will appear in front of you.

You will see a list of Windows 7 recovery applications. First, it is recommended to run the Startup Repair utility, which will help fix problems that interfere with normal system booting.
If this does not help, go to the second point, System Restore. After this, you will see the Restore System Files and Settings utility, the features of which we discussed above. If this utility also does not help bring the system back to working condition, you can try the System Image Restore utility. However, this method can only help you if you have made an image of your system in advance.
How to create a restore point in Windows 7
In order to easily restore the system after a crash using the system utility, you should create a system restore point in advance at a time when no problems were observed in its operation. It's very easy to do. To find the utility you need, simply type “Create a restore point” into Start.

By clicking on the name of the utility, you will be taken to the System Protection window. There you need to click on the Create button.

In the small window that appears, enter the name of the point in order to distinguish it from others in the future.

The restore point has been created.
Creating a system image in Windows 7
A more reliable way to restore Windows 7 is to use a system image, which can help restore the operating system even if it does not boot. To create a disk image, enter “Backup and Restore” in the menu bar. Click on the name of the utility, a window will appear in front of you.

Click the Create a system image link on the left side of the window. The system will scan your computer for media that can save the system image and offer you a list of them to select. In total, Windows 7 has three options for saving the image: on one of the hard drives, on a DVD, or in a network location.

Select the media that is most convenient for you and click Next. If there is not enough space on the specified hard drive, the image will not be created, so do not worry that the application will fail.
If there is enough space on the hard drive, archiving will begin - a very long and resource-intensive process. Since the utility can take several hours to complete, the most convenient solution is to leave the computer overnight.
Before you figure out how to restore Windows 7 to start, you need to understand what the cause of the problem is. To do this, it will be useful to learn a little general information about how the download occurs and what stages it includes.
General information about downloading
Conventionally, the launch of Windows 7 can be divided into three stages, which, in turn, are divided into several phases.
OSLoader
This is the first stage of system startup, which starts immediately after the BIOS code is executed. First, a small group of drivers starts working, allowing you to read data from the hard drive. The Windows 7 boot loader (winload.exe) then begins initializing and loading the kernel. The registry hive “SYSTEM” and another group of drivers are loaded into RAM. The first stage lasts about 2 seconds and ends with the appearance of the operating system logo on the screen. 
MailPathBoot
The main and longest stage of system startup. Visually, it continues from the appearance of the logo until the desktop starts loading. It consists of several phases, the duration of which can vary - from a few seconds to a couple of minutes.
PreSMSS
During this phase, the Windows kernel is initialized, the plug and play device manager starts working, and the remaining drivers are launched. Errors that occur at this moment are usually associated with problems with the main components of the computer or incorrect operation of their software.
SMSSInit
The visual start of this phase is difficult to determine, but part of it is already the empty field that appears between the splash screen and the appearance of the welcome screen. The system at this moment performs the following actions:
- Initializes the registry.
- Starts the next wave of drivers that are not marked "BOOT_START".
- Starts subsystem processes.
Most often, problems during this boot phase are related to video card drivers.
WinLogonInit
WInlogon.exe is the file that launches the welcome screen, so the “WinLogonInit” phase begins at this point. During this stage, group policy scripts are executed and services are started. The duration of the phase varies greatly depending on the processor power.
Failures at this stage are often caused by incorrect operation of third-party applications, including antivirus.
ExplorerInit
Begins with the start of the shell and ends with the start of the window manager. During this phase, program icons appear on the desktop and services continue to start. These processes are accompanied by an increase in the load on the computer hardware - processor, RAM, hard drive.
Problems at this stage are usually associated with insufficient power of the equipment or its malfunction.
PastBoot
The last stage, which begins with the appearance of the desktop and ends after all startup components have loaded. At this stage, all applications that start with Windows begin to work. After the “PastBoot” stage ends, the system goes into idle mode.
Problems that arise at this stage are usually related to virus activity or incorrect operation of automatically downloaded programs.
Crashes at various stages of loading
Problems at different stages of Windows startup manifest themselves differently: some are related to hardware, others to the registry, and others to drivers or important system files. Therefore, it is so important to understand what processes occur when the system starts up so that you can quickly determine the cause of the problem.
Hardware problems
It is often difficult to determine what is not working - some specific hardware or operating system. However, based on some signs, certain assumptions can be made about which device has failed:

All the errors described are usually related to the computer hardware, however, there may be exceptions.
Boot files are damaged
The appearance of a message like “Bootmgr is missing” at an early stage of system startup indicates the absence of critical files, without which Windows cannot boot.  However, sometimes no notifications appear - the cursor just blinks on the screen, but no progress occurs.
Bootmgr is a standard Windows boot loader that is not accessible to the user, as it is stored on a separate hidden partition. You cannot accidentally delete it, but you can unknowingly format a hidden volume using external media.
When booting from external media, the hidden volume with the bootloader looks like this: 
Other files important for startup are stored on the system disk in the “Windows” directory. System registry data is also stored here.
The registry is damaged
If the registry is damaged or inaccessible, Windows may not even start loading. In this case, the system usually diagnoses the error on its own and offers to run the recovery tool. 
Often, the built-in system restore tool can help you fix a registry problem by copying its configuration files from a backup store. However, there are situations when there are no registry files on the hard drive or they are inoperative. In this case, the user must manually perform the system registry recovery procedure.
Startup recovery tools
The easiest way to restore startup is to use the built-in Windows tools:

A list of means for restoring system functionality will appear, in which you must select “Startup recovery”.  It will scan and automatically correct any errors found, if possible.
If nothing worked with the startup, you can try to restore the system by rolling it back to its previous state. Everything is standard here: select a control point with a working configuration and return the system to that period. 
Another method that often helps is restoring the Windows bootloader via the command line. You can also launch it through the “Recovery Options” menu. On the command line you need to enter several queries (all commands are entered without quotes):

After all commands have been successfully completed and the report appears, Windows 7 should start up normally.
How to restore Windows 7 system on the laptop, when loading, a black screen appears, the recovery environment does not work, I deleted all the hidden partitions, there is no original disk. I spent a lot of time, tell me what to do now, or at least how to insure myself against such situations in the future, preferably without using paid data backup programs. Ilya.
How to restore Windows 7 system
Unfortunately, there are many reasons for this problem, ranging from incorrectly written drivers, harmful effects of a virus, file system errors and ending with our erroneous actions when working with a computer. There is no need to be afraid of such problems, you need to learn how to deal with them effectively.
Let's think how to restore windows 7 system, and we will also insure ourselves in the future against possible troubles using backup and recovery tools built into the operating system. We will learn how to restore Windows 7 without using third-party backup programs, even when System Recovery Options do not load and the F-8 button is useless.
- Friends, if our article does not help you, then check out others on this topic, for example: in it you will learn how to restore a non-bootable system using various command line utilities, the first is Bootrec.exe with the commands /FixMbr and /FixBoot or the utility bootsect /NT60 SYS, as well as Bootrec.exe with the /RebuildBcd parameter, these utilities can be launched from the recovery environment or from the Windows 7 recovery disk. Another article will teach you how to restore a damaged or deleted bootloader bootmgr. The article will show you how to restore your operating system when system recovery is disabled and much more.
- If Windows 7 freezes on boot or suddenly reboots, or may suddenly show a blue screen with an error, then all these problems may be due to numerous file system errors. How to fix the situation even when the operating system does not boot due to these errors is written in this article.
- Well, eight articles from the section will give you a detailed understanding of all the built-in recovery tools in Windows 7: restore points, previous versions of files, creating a system image and a recovery disk, and so on. So, let's begin.
Windows 7 has quite a powerful and good tool in its arsenal -> Recovery environment, which is created automatically when installing Windows 7 in a hidden partition and contains five other tools that solve numerous problems and problems.
- Note: If you learn how to use Windows 7 recovery tools correctly, and this is not difficult, then you can do without additional and paid data backup programs.
You can launch the recovery tool by pressing the F-8 button on the keyboard immediately after starting the computer. After this, the menu Additional boot options will open in front of you: Troubleshoot your computer, then Safe Mode, Safe Mode with loading network drivers, etc.

The first thing to do is apply Startup recovery(Automatically fix problems that prevent Windows from starting)
Required digression: After pressing the F-8 button when booting the computer, you may not have the > item, but only Safe Mode and so on, the question arises why.
When installing Windows 7, a recovery environment partition is created automatically and is located in the root of the drive (C:) in the Recovery folder. You can also see in the Disk Management window - a separate, hidden partition of the hard drive, its volume is only 100 MB, it is used to store boot configuration files (BCD) and the system bootloader (bootmgr file).
You can see it under Computer->Management->Disk Management. Under no circumstances should you delete this partition (many people delete it out of ignorance), otherwise you will not be able to start the recovery environment, that is, the item Troubleshooting your computer you won’t, and in more severe cases you simply won’t boot the system.

In the lower screenshot you can see another hidden partition, with a capacity of 9.02 GB, this is a hidden recovery partition with factory settings on my laptop, yours may be larger or smaller. It’s also better not to delete it; if necessary, you can always restore Windows 7 from it.

What should you do if you do not have a partition with a recovery environment and when you press the F-8 button in the Additional boot options menu, the Troubleshooting computer option does not appear? How then to restore the Windows 7 system??
An installation disk with the Windows 7 operating system can help here. You can run the recovery tool by booting from the original Windows 7 installation disk by selecting the item at the very beginning System Restore. If you don’t have an installation disk, then you can use it (you can make it in any running Windows 7) in five minutes, then you can also boot from it and do the same.


So we finally got to the System Recovery Options, either using the F-8 button and the Troubleshooting item, or the Windows 7 installation disk or the Windows 7 Recovery Disk.
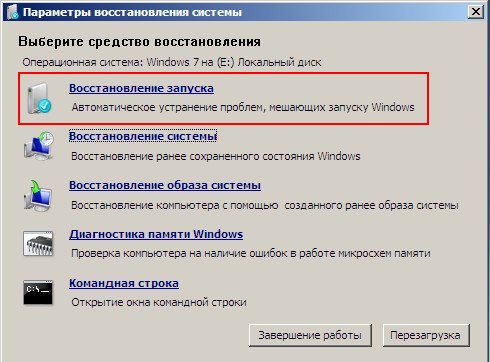
In the System Restore Tools Selection menu, select the first one:
Startup recovery-> there will be an analysis of faults that interfere with the normal loading of Windows 7 and their further correction for the normal loading and functioning of the operating system. During the process, we may be warned that problems have been detected in the boot parameters, click Fix and restart.


System Restore->using this function, we can, if we have it enabled, roll back to the time when our Windows 7 worked and loaded perfectly, everything is simple here.


->I personally use this tool; if used skillfully, it can replace paid data backup programs. If you are interested, read on.

What's good about it? It will help when you don't have the original Windows 7 installation disk and you've deleted the hidden partition with your laptop's factory settings, but that's not all.
Sometimes there are situations when, for various reasons or due to the actions of a virus, you will not be able to load the operating system at all, or many people ask How to restore Windows 7 system even if the menu with Additional boot options is also unavailable. Should I reinstall the operating system again?
Therefore, immediately after installing Windows 7 on your laptop or computer, we create using this function-> Restoring a system image, an archived image of our Windows 7 on the hard drive, we take care of it. You must create a Windows 7 Recovery Disk (read below), it will help you use the System Image if the Advanced Boot Options menu does not load.
Let's go to Start -> Control Panel->Archiving computer data.

Choose Creating a system image

Next, select Local disk on which we will store the system archive. In my case, Local disk (E:), if you have several hard drives in the system unit, then of course it is better to place the backup on the hard drive where the operating system is not installed.


Note: You may notice that I have two operating systems installed on my laptop, so the archiving program selected two Local disks.

Click Archive and the process of creating an archive with our Windows 7 will begin.
Created, it will look like this.

Now, if necessary, you can deploy the archive with Windows 7 to your computer in 20-30 minutes. It would be better if you additionally copy the archive with the system onto a portable hard drive, this will doubly protect you.
Let's imagine that we can't start Windows 7 and deploy the backup we created, let's do it together.
Let's launch Windows 7 Recovery Tool, by pressing the F-8 button on the keyboard immediately after starting the computer. The Advanced boot options menu opens, select Troubleshoot your computer.

Restoring a system image


Use the latest available system image
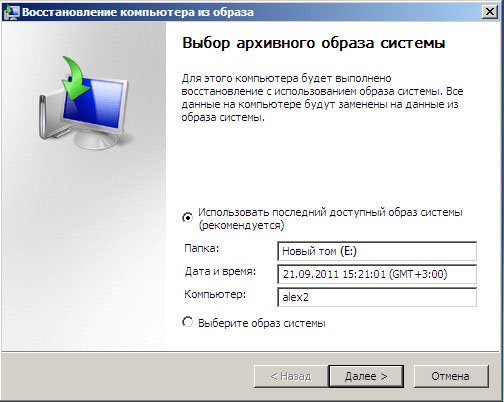

Of course, all our data on the Local Disk, where the operating system is now being restored, will be deleted, so you can first boot from any Live CD and copy what you need.
How else can you restore your Windows 7 system? Of course, using the Windows 7 Recovery Disk. Let's create Recovery disk, which can be used to boot the computer, it will contain recovery tools that can be used to repair Windows 7 boot problems, as well as restore the operating system from the backup copy that we created in advance.
Important: The bitness of the system is important for the recovery disk, you can use a 32-bit recovery disk for any 32-bit Windows 7, and a 64-bit recovery disk for any 64-bit Windows 7.
Let's go again Backing up computer data
Create a system repair disk, insert the DVD into the drive, press

Create disk


When the Windows 7 Bootable Recovery Disk is ready, put it in a safe place.
To restore Windows 7 from a Recovery Disk, you basically don’t need any working operating system at all. You will only need to change the boot priority to the drive in the BIOS of your computer, insert the recovery disk into it and restore your Windows 7 using the archive. Many here can draw an analogy with data backup programs and this is correct, they work on the same principle, only Of course, their functionality is more convenient.
- If you don’t know how to change the boot priority in the BIOS, read our articles and
Recovering Windows 7 from a Recovery Disk. I show you how to do it. Let's say we're in trouble, we can't start Windows 7, when we press F-8 on the keyboard immediately after starting the computer, nothing happens. We cannot get into the menu with Additional boot options and an error message is displayed. In this case, the system archive on the hard drive is not available to us. This is exactly the kind of trouble that happened to our reader Ilya, who wrote us a letter asking for help.
In this situation, many people reinstall Windows 7 from scratch, but not you and me, because we have System Recovery Disk.
We insert it into the drive and reboot, set the BIOS to boot from the drive, as I said, the disk is bootable, the System Recovery Options program starts.
Press Enter until the prompt to boot from the disk disappears.