Setting up automatic updates in Windows 10
In Windows 10, the approach to updating the system has changed dramatically, and therefore the ability to configure automatic updates is greatly reduced. Additionally, the available settings depend on the type of Windows edition.
So in Windows 10 Home, all new features, updates and security updates are installed with Windows Update, while the user has no control over the update process. The only thing the user can do is postpone the reboot for a while. The Pro edition is more humane and allows you to manage some update settings - select the update source, set a schedule and defer the installation of updates (except for security updates) for long term. Opportunity complete shutdown Automatic updating is not provided in any of the editions in principle.
Of course, automatic updates are an important component operating system, and regular downloading and installation of updates, especially critical patches and security updates, is necessary for the stable and secure operation of the system. However, the user must be able to choose when, how, and what updates to download and install. And there should even be an option to completely turn off automatic checking for updates. How to realize this opportunity will be discussed further.
I will try to describe all the ways I know to manage automatic updates in Windows 10. Let's start with the simplest and most accessible.
Windows Update
In Windows 10, the familiar classic “Windows Update” has been permanently removed from the Control Panel and is no longer available. The new update center is located in the system settings section and to open it, go to the Start menu and go to Settings - Update and Security.
In the main window of the Update Center there is practically no choice; you can only view the list of available updates and information about them.
The only available setting allows you to select the time for a mandatory reboot. Here you can specify the desired day and time of reboot, or reboot immediately, so as not to suffer for a long time :)

In the Home edition, these are all available settings, and in older editions of Windows 10 (Pro, Enterprise and Education), the user can follow the link “ Extra options».

In the advanced settings, you can choose how updates will be installed. True, the choice is limited and consists of only two options:
Automatic - updates are automatically downloaded and installed, followed by an automatic reboot;
Notify when a reboot is scheduled—updates are also downloaded and installed automatically, but the reboot can be scheduled at a time convenient for you.

You can also enable the “Delay updates” option, which allows you to disable the download and installation of updates for a while. This option is aimed primarily at corporate users and is intended to give them the opportunity to test new functionality (which may now be included in updates) before its mass implementation in the organization. Users of the Home edition do not have this option, so they unwittingly act as testers 🙂 for the corporate sector.
Deferred updates do not include critical fixes and security updates, which will be installed automatically in any case. The exact period for which updates are delayed is unknown; various sources provide figures ranging from several days to several months.

Another interesting point. Windows 10 has a new update delivery mechanism (Windows Update Delivery Optimisation), based on P2P technology. Simply put, after downloading updates from Windows servers Update your computer starts distributing them to other devices on the network, similar to a torrent client.
This feature is enabled by default and to disable it you need to follow the link “Choose how and when to receive updates” and set the slider to Off.

You can view installed updates in the Control Panel by going to the “Programs and Features” - “Installed Updates” section. If problems arise after the update, then here is any of the installed updates can be deleted.

Disable automatic driver updates
The Windows operating system contains a repository of drivers for the most common devices. New driver versions are downloaded automatically by default, with using Windows Update. In some cases, the presence in the system the required driver quite convenient, but Windows Update does not always contain the latest/best driver, and it is better to update drivers manually to avoid unexpected problems with the hardware. Therefore, it is better to disable automatic driver updates, since this option is still available in Windows 10.
In order to get to the driver update settings, you need to open the “System” section in the control panel and select “Advanced system settings”, then go to the “Hardware” tab and click the “Device installation options” button. You can also open the desired window by clicking Win+R and running the command rundll32 newdev.dll,DeviceInternetSettingUi.

To disable automatic driver downloads, select “Never install drivers from Windows Update.”

Disable automatic updates for modern apps
Modern apps (Windows Store apps) also update automatically. To fix this, you need to open the “Store” item in the “Start” menu, click on the little man icon, select “Settings” in the menu that opens, and then in the “Update applications automatically” item, turn the switch to the Off position.

After this, apps from the store will not update automatically and will have to be updated manually if necessary.

Note. Initially Windows users 10 Home could not disable automatic updates of applications from the Windows Store. This feature was added later with update KB3081448.
Show or hide update utility
The old Update Center, among other things, gave the ability to select and postpone indefinitely (hide) updates. The new one does not initially have this feature, but there is a special utility from Microsoft called Show or hide update, which can do approximately the same thing. The utility is not included in the system and is downloaded separately.
No installation is required, just copy and run the wushowhide.diagcab file, after which the utility begins collecting data about available updates.

After collecting data, you are prompted to select an action. To hide updates, select “Hide updates”.

Mark the updates that need to be hidden and click “Next”.

While the update is hidden, the operating system will not install it. And if necessary hidden updates You can restore it by running the utility again, selecting “Show hidden updates” and checking the box next to the desired update. After this, the update will be installed as usual.

Using “Show or hide update” makes it possible to postpone the installation of any problematic updates (including security updates), but it will not be possible to completely avoid updating in this way. All minor updates are part of major ones and will be installed sooner or later.
These were simple ways, we are slowly moving on to more advanced ones.
Setting up automatic updates using PowerShell
To manage updates, you can use the PSWindowsUpdate module from the Microsoft Script Center. To use, download the archive, unpack it and put it in the %WINDIR%\System32\WindowsPowerShell\v1.0\Modules folder. Then we launch the PowerShell console and allow the execution of unsigned scripts with the command:
Set-ExecutionPolicy Bypass -Force
Import the module into the current session:
Import-Module PSWindowsUpdate
And we display a list of commands for the module:
Get-Command -Module PSWindowsUpdate

The module contains 14 cmdlets:
Get-WUList - displays a list of available updates;
Get-WUInstall - starts downloading and installing updates;
Get-WUUninstall - removes selected updates;
Invoke-WUInstall - used to manage updates on remote computers;
Hide-WUUpdate - hides selected updates;
Get-WUHistory - displays information about installed updates;
Add-WUOfflineSync - registers a service that allows you to install updates from the local cache (Offline sync service);
Remove-WUOfflineSync - removes a registered service;
Get-WUServiceManager - displays a list of available update services (Windows Update, WSUS, etc.);
Add-WUSericeManager - registers the selected update service;
Remove-WUSericeManager - removes the selected update service;
Get-WUInstallerStatus - shows the status Windows services Update Installer;
Get-WURebootStatus - allows you to clarify the need to reboot;
Update-WUModule - serves for centralized updating of the PSWindowsUpdate module on remote computers.
For example, let's display a list of available updates and hide one of them:
Get-WUList
Hide-WUUpdate -KBArticleID KB3087040 -Confirm:$false
After this, the KB3087040 update will not be installed. If necessary, you can unlock it with the following command:
Hide-WUUpdate -KBArticleID KB3087040 -HideStatus:$false

In general, the PSWindowsUpdate module has quite a lot of capabilities, which, of course, need to be understood in detail. Windows support 10 has not yet been announced by the author, but the commands are executed quite correctly.
Configuring automatic updates using group policies
This method is only available for older editions of Windows 10, because... the Home edition does not have a group policy editor. To open the Local Group Policy Editor snap-in, click Win+R and execute the command gpedit.msc. Automatic update settings are located in the Computer Configuration - Administrative Templates - Windows Components - Windows Update section.

All basic settings are specified in the “Automatic update settings” policy. First you need to enable it, after which you can choose one of 4 update options:
2 — notification about downloading and installing updates;
3 — automatic download and installation notice;
4 — automatic download and installation according to a schedule;
5 - Allow the local administrator to select automatic update options.
If option 4 is selected, then you can additionally set the day and hour for installing updates, and also specify that updates should be installed only during idle periods, during automatic maintenance systems.

Note. When this policy is activated, settings in Windows Update become unavailable. The exception is option number 5, which allows local administrators to change the update mode in the update center.
If you select the option of automatic download and scheduled installation, you can additionally use the following settings.
Always automatically reboot at scheduled time
If this policy is enabled, then after installing updates the computer will restart no matter what. To ensure that the reboot is not sudden and users have time to save the results of their work, you can set a reboot timer from 15 minutes to 3 hours.
Do not automatically reboot when installing updates automatically if there are users on the system
Everything is clear from the name of the policy. If this policy is enabled, then after installing updates, the computer does not restart automatically, but displays a notification that the installation is complete and waits for the user to restart. Overrides the previous policy.
Repeated request to reboot during scheduled installations
This policy determines the amount of time after which the system will prompt again when a scheduled reboot is cancelled. If this policy is not active, requests will be issued every 10 minutes.
Reboot delay for scheduled installations
This policy specifies the time that must pass from the end of the update installation to the reboot.
Transfer of scheduled automatic installations updates
If the computer was turned off and the updates were not installed at the scheduled time, it will be launched immediately after the next computer startup. In this policy, you can specify the time that should pass from the moment the system boots until the installation begins.
Prevent installation of devices not covered by other policy settings
This policy is used to disable automatic driver updates and is located in the Computer Configuration - Administrative Templates - System - Device Installation - Device Installation Restrictions section.

Note. I described setting up local group policies, but there are also exactly the same domain ones. And if the computer is on the enterprise network and is a member of a domain Active Directory, then (usually) automatic update settings are determined by domain policies. Domain policies have the highest priority and override any local settings.
Setting up automatic updates using the registry
The most powerful system management tool is editing the registry. In the registry, you can set all the same settings as using group policies, in addition, it allows you to completely turn off automatic updates.
To configure, open the registry editor (Win+R -> Regedit) and go to the HKLM\SOFTWARE\Policies\Microsoft\Windows section. Create a new section WindowsUpdate, it contains a subsection with the name AU. In the AU section we create DWORD type parameters that are responsible for automatic updating.
Here are the most important ones.
AUOptions— the main parameter responsible for the method of receiving and installing updates. May have the following meanings:
2 - notify before downloading and installing any updates;
3 — automatically download updates and notify when installation is ready;
4 — automatically download updates and install according to a schedule;
5 - Allow local administrators to manage update settings.
NoAutoUpdate— an option that allows you to completely disable automatic search and installing updates. Meaning 1 — automatic updates are disabled, 0 — updates will be downloaded and installed according to the settings specified in the parameter AUOptions.
If the value is enabled, automatic download and installation on a schedule (AUOptions = 4), then you can additionally specify additional parameters.
ScheduledInstallDay— day of the week on which updates are scheduled to be installed. Meaning 0 means daily setting, values from 1 before 7 indicate a specific day of the week (1 - Monday).
ScheduledInstallTime-time for which updates are scheduled to be installed. This parameter has values from 0 to 23 hours, which corresponds to the hours in the day.
AutomaticMaintenanceEnabled— value 1 means that updates must be installed during downtime, as part of automatic system maintenance.
NoAutoRebootWithLoggedOnUsers— value 1 prohibits automatic reboot after installing updates. The automatic update service will wait for a restart by any logged-in user.

Note. Purely theoretically, managing updates by editing the registry can work in Windows 10 Home. In practice, this was not tested due to the lack of the necessary edition.
To disable automatic driver updates, you need to find the parameter in the HKLM\SOFTWARE\Microsoft\Windows\CurrentVersion\DriverSearching section SearchOrderConfig and set its value to 0 .

Disabling Automatic Updates
And in the most urgent case, you can disable automatic updates by stopping the corresponding service. To do this, you need to open the “Services” snap-in (Win + R -> services.msc), find the service called “Windows Update” and stop it. To prevent it from starting on its own, the startup type must be set to Disabled.

The same can be done using PowerShell. To stop we use the following command:
Stop-Service wuauserv -Force
To disable this:
Set-Service wuauserv -StartupType Disabled
You can view the service status like this:
Get-Service wuauserv
Well, you can return everything back and start the service:
Set-Service wuauserv -StartupType Manual
Start-Service wuauserv

After disabling the service, Update will display an error when you try to check for updates. This is an extremely crude method, although it works on all dozens of editions without exception, but I repeat - it should be used in emergency cases, for example, if it is necessary to urgently stop the update process.
Conclusion
As you can see, although managing automatic updates in Windows 10 has become more difficult, there are plenty of ways to do it. In conclusion, Microsoft does not recommend delaying or stopping automatic updates for too long. Updates have a specific expiration date, so if you do not update within 8 months, new updates will not be able to be installed.
This article shows various ways, with which you can disable automatic system updates in the operating system Windows system 10
Windows Update is an important and integral component of the Windows operating system. Windows Update regularly checks Microsoft servers for available updates, critical patches, or device drivers. As soon as updates become available, Windows Update notifies you and prompts you to download and install them. This is very important because updates improve system security, performance, reliability, and stability.
Previous versions of the operating system allowed you to customize the Update Center. In the settings you can choose how to download and install updates: automatically or manually, you can also choose which updates should be installed and which not; You can completely turn off checking for updates. This allows you to decide whether to install certain updates.
IN , Microsoft company left users without any choice: editors Windows 10 Pro allows you to defer the installation of updates only for a while, while users Windows 10 Home Even this opportunity is not provided. In other words, a new version The operating system downloads and installs updates automatically and without notification. In principle, there is nothing wrong with this, but in reality it is not at all true. Often updates cause various problems, for example, after installing the next update, the system simply stops booting.
But still, in Windows 10 it is possible to take control of the system update process. The following article describes all possible ways, which will work in all editions of the operating system: Windows 10 Home, Pro, etc.
Setting up Windows Update using the "Advanced options" section (except Home edition)
By using this method You can delay the automatic downloading of some updates for at least a while, and you can also prevent your computer from automatically restarting. You will not be able to completely disable or block updates using this method.
Open the Settings panel by clicking the button on the taskbar "Start" and select "Options"
You can also open the Settings panel by pressing the keyboard shortcut + I

In the opened panel "Options" select "Update and Security"

In chapter "Windows Update" Press "Extra options"

In advanced options, select "Notify when reboot is scheduled". This action will prevent Windows from automatically restarting your computer after downloading and installing updates.
Also turn off the option "When you update Windows, provide updates for other Microsoft products" by clearing the corresponding checkbox.
Now activate the option "Stop updates" by checking the appropriate box. When this option is enabled, new updates will not be downloaded or installed for several days or months, with the exception of security updates.

In the window "Choose how and when to receive updates" set the switch "Update from multiple locations" in a state "Off". This will help in saving Internet traffic, since this function works on the principle of P2P technology or torrent clients, which is described

Disable automatic loading of device drivers
Windows 10 allows you to prevent drivers from being automatically downloaded and installed.
To do this, press the key combination + R and in the dialog box that opens Execute enter the command:
rundll32 newdev.dll,DeviceInternetSettingUi
Press the key Enter↵

In the window that opens "Device Installation Options" first select “No, give a choice”, and then "Never install drivers from Windows Update". Click the button Save

After this, Windows will always search for and install drivers from the computer, and the system will contact the Update Center only if suitable driver will not be found on the hard drive.
Hide or block updates using
Show or hide updates tool
Even before the official release of Windows 10, Microsoft released a program Show or hide updates, which returns to the system the ability to hide unnecessary driver updates or system updates.
Download the tool Show or hide updates By

Then click "Hide updates".
On the next screen, select the updates you want to hide from the list, and then click "Further". If you later want to return hidden updates, instead of "Hide updates" select an option "Show hidden updates"

Installation wireless network as a metered connection
This is one way to prevent Windows 10 from automatically downloading and installing updates. To prevent the system from downloading new updates, you just need to configure your Internet connection as a metered connection.
Open the panel "Options" and select "Network and Internet"

In chapter "Wi-Fi" go to "Extra options"

Set the switch “Set as metered connection” to position "On".

Now Windows 10 will not automatically download and install new updates as long as your Internet connection is set to metered.
Setting up updates in the local editor
group policy and in the registry editor
Although Microsoft has removed the ability to manage update downloads, update settings through the Local Group Policy Editor still work.
Editorial Windows 10 Home missing, however if you have a version Pro, you can enable either download and installation notifications, automatic download and installation notifications, or scheduled automatic download and installation.
Note. Since Microsoft has completely replaced the old Update Center with the new one modern application, Group Policy settings or registry tweaks do not take effect immediately. Even after restarting your computer or running the command, you will not see any changes in Windows window Update. That is, if you open the update settings, you will find that the option is still enabled there "Automatic (recommended)".
So how do you force Windows 10 to apply a Group Policy or registry change? It's actually very simple. You just need to click a button in Windows Update.

Once you click this button, the system will immediately apply the changes, and when you open advanced options in Windows Update, you will see that the new settings have been successfully applied.
To make changes in the Local Group Policy Editor, press the keyboard shortcut + R and in the dialog box that opens Execute enter the command:
Press the key Enter↵

In the Local Group Policy Editor window, follow the following path:
Computer Configuration → Administrative Templates →
Windows Components → Windows Update
On the right side of the window, double-click the policy setting "Setting up automatic updates"

In the window that opens, click "Enabled", and in the section "Options" select one of the following options:
■ 2 – download and installation notifications
■ 3 – automatic download and installation notifications
■ 4 – automatic download and scheduled installation
■ 5 – Allow local administrator to select options
Click the button OK

By selecting the latter option, you will be able to select options from a drop-down list on the Center settings page Windows updates.
By selecting the first option, when new updates appear, the system will notify you about them using , and when you click on such a notification, a Windows Update window will open with a list of new updates and the ability to download them.

■ If you need to completely disable updates, use Registry Editor.
Execute enter the command:
Press the key Enter↵
In Registry Editor, go to the following section:
HKEY_LOCAL_MACHINE\SOFTWARE\Policies\Microsoft\Windows
Create a new section within section and name it WindowsUpdate.
Create another partition (subpartition) in WindowsUpdate and name it AU to end up with the following registry branch:
HKEY_LOCAL_MACHINE\SOFTWARE\Policies\Microsoft\Windows\WindowsUpdate\AU
Now select a section AU and in the right side of the window create new parameter DWORD (32 bits) With name NoAutoUpdate and assign it the value 1.
Parameter NoAutoUpdate with a value of 1 is the same as if you set the value for automatic updates in the Local Group Policy Editor "Disabled".

Close Registry Editor, open Windows Update and press the button "Checking for updates" to apply the changes.
By opening additional Windows settings Update, you will see that checking for updates no longer works.

To return everything as it was, just remove the parameter NoAutoUpdate or set the value to 0
Disabling Windows Update
Another method that allows you to 100% block the downloading and installation of updates in Windows 10.
Press the keyboard shortcut + R and in the dialog box that opens Execute enter the command:
Windows 10 Update allows you to timely download operating system updates from official Microsoft servers. After installing the OS, this service is enabled by default and runs in background. However, you can disable it yourself and not receive new versions. If you don't care about keeping your computer busy with tracking and installation related processes system files, then you can enable Windows 10 Update in several ways.
This procedure can only be performed using the built-in functionality of the operating system. Third party software you won't need it. First, check if Update is running by default on your computer. You can do it like this:
- Launch Task Manager using the combination Ctrl + Shift + Esc.

- Open the Services tab. Here, look for a service named "wuauserv".

Thanks to it, auto-update works in the background in the operating system. If you don’t have “wuauserv”, then go to one of the inclusion methods:
- through group policy;
- through "Windows Settings";
- using the command line;
- through registry settings;
- via Services.
Let's consider each method in detail.
Enable in Local Group Policy
Restore work of this service in “ten” you can do this:
- Open the Run program using the key combination Win + R. Enter the command “services.msc” and start execution with the OK button.

- The “Services” window will appear in front of you. In the right list, find the line “Windows Update” and using RMB in the menu, select “Properties”.

- In the “General” tab, find the “Startup type” line and set the “Automatic” option in the menu, then apply the changes with the “OK” button.

- Restart your PC.
In this way, you can start the CO in the Windows 10 operating system. This method can help you get rid of error code 0x80070422.
Now let's figure out how to check for available updates manually and start downloading/installing them. To do this, you will need the functionality of the “Parameters” section:
- Right-click on the “Start” icon on the bottom panel and select “Settings” from the menu.

- Open the "Update and Security" section.

- Go to the “Windows Update” subsection in the left column.

- In this window you can do everything necessary settings CO and check for files to download. To check, you need to click on the button marked in the screenshot.

- The tool will now scan for new Windows 10 patches and notify you about it. In the “Advanced Settings” section, move the option to the “Off” position, as shown in the screenshot. By clicking on "Choose how and when to receive updates", you can configure delivery methods (from PC to local network, Internet, etc.).

If you have a problem with the operation of the central authority, you need to check the settings in the Group Policy Editor.
"Local Group Policy Editor"
To run the program, follow these steps:
- Go to Run using Win + R. Write the command “gpedit.msc”.

- Open the “Windows Update” branch, which is located along the path “Computer Configuration” - “Administrative Templates” - “Windows Components”.

- On the right side of the window, find the line “Setting automatic updates” and right-click on it. In the menu, go to “Edit”.

- Set the setting to Enabled (1). In the "Options" section, select the settings according to which automatic updates will work (schedule, installation, notifications about available downloads, etc.). Apply the changes with the “OK” button.

Using command Windows strings 10, you can disable or enable Update Center. This will force you to start the “wuauserv” service.
- Open command line with administrator rights. Type the command “net start wuauserv” and press Enter.

- The program will start the service, after which you will see a corresponding message. The process will start every time you turn on your PC, so you won't have to repeat this procedure. To disable the Windows 10 CO, you must enter the command “net stop wuauserv”.

- Now it remains to check whether the system will be updated.
Registry
Also, the central heating center will not work unless the value of the parameter in the registry is corrected. You need to do the following:
- In the “Run” window (Win + R) enter the command “regedit”.

- In the registry editor, find the HKLM\System\CurrentControlSet\Services\wuauserv branch. Just copy the path from these instructions and paste it into the search bar at the top of the window.

- On the right side of the window there will be a “Start” option. Right-click to select “Edit” from the menu.

- In the disabled state, the parameter will have a value of 4. For the CO to start downloading updates, set the value to 1.

The launch of this service is not affected by any others, so malfunctions and performance problems should not arise. You can also check the HKEY_LOCAL_MACHINE\SOFTWARE\Microsoft\Windows NT\CurrentVersion\Hotfix branch, which contains information about all update files.
Third party programs
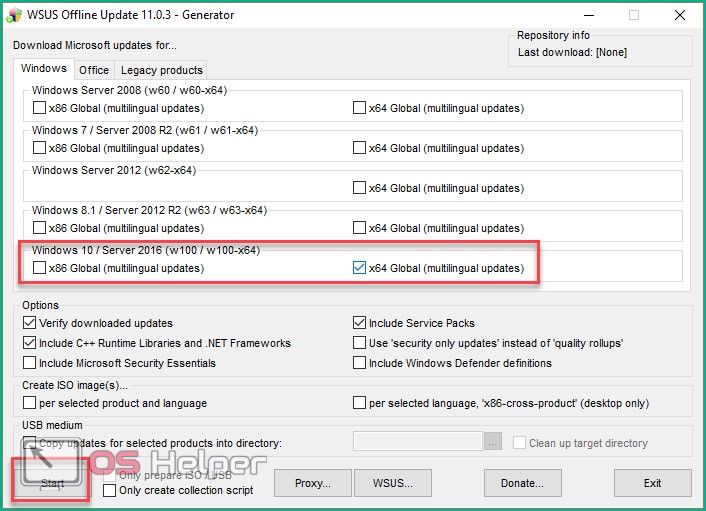
What to do if you can’t set up automatic downloading? Starting the service doesn't help, but you don't have the time or knowledge to find workarounds? Then try updating the operating system using the WSUS Offline Update utility. Download it from the official developer website using this link. On home page Click on the button marked in the screenshot. The creators guarantee complete security for users and their personal data on their PC. After downloading, follow the following procedure:
- In the program folder, open the UpdateGenerator.exe file.

- Select your OS version: Windows 10 x32 or x64. To start downloading files, click “Start”.
- Once the download is complete, you will see a log on the screen with a list of all downloaded files. The download and installation time depends on how long it has been since you updated Windows. Now you need to go to the “client” folder and open the UpdateInstaller.exe file.

- In the program window, click “Start” to begin installation.

If WSUS Offline Update starts to freeze or stops searching for files, try using an earlier, more stable version of the program.
You only need to update the operating system in this way once, since after installing the patch, troubleshooting will be carried out and the default central processing center will be launched.
Bottom line
If you want to install the latest version of Windows 10, then all the methods described will help you with this. Don’t forget to adjust the settings for yourself so that downloading or rebooting with scheduled installation doesn’t take you by surprise.
Video
So, to consolidate the material received, let's watch a video on this topic.
Today, despite the abundance of various criticisms, Windows remains an advanced operating system, occupying a leading position throughout the world. This year, the company released a new OS to the public - Windows 10, giving users of old systems the opportunity to upgrade to it (the promotion is open until August 2016).
In general, the “ten” received positive ratings, unlike its predecessor, but certain elements caused some misunderstanding. One of these elements is the update center, whose operation is best described as “forced”.
Moreover, initial settings involve installing updates during the reboot process, about which the user is not even notified. Naturally, the user is not given any choice.
Update system
In Windows 10, it is made so that the computer system is restarted for the purpose of installing updates only if it is idle. An obvious measure that was supposed to prevent the system from interfering with the user's work.
It is worth saying that in the vast majority of situations, Windows 10 is quite good at detecting that the computer is not in use. However, for many people who need their PC to run in the background, such a system will not be suitable, since unexpected reboots will create some discomfort.
In all past Microsoft operating systems, the update center was a permanent element that was responsible for downloading and checking for the latest patches and drivers for devices from the Internet, as well as their further integration.
Previously, all these processes were completely customizable. Even in Windows 8, the user could manually manage through the control panel system updates. You could optionally turn them off and on, and choose to download only the most serious fixes.
In the last 10 operating rooms Microsoft system The option to refuse updates has been completely removed. IN in this case Naturally, we are talking about configuration using built-in interfaces - the control panel and the program “ Options».
Now Microsoft alone makes decisions about updating your system. The only thing left to the user is the ability to postpone the installation of patches for a certain period of time. But even this function is available only to owners Windows versions 10 Pro. Owners of other operating system builds do not have this option.
Settings
The operating system update center in 10 has finally moved to standard application « Options", which you can go to using the link from the menu " Start».

Among other subsections of settings, it is located on the main screen of the program under the name “ Update and Security».
Here you will find a modest number of customizable elements:
- Enable/disable PC restart when installing patches. If you want to avoid your computer suddenly shutting down, you should change this parameter, as a result of which you will receive notifications before the system restarts.
- Enable/disable updates for other Microsoft programs installed on your PC. If you don't want to receive Maintenance various company products, you should disable this option.
- Postponing updates. Using this option, you can postpone the system update. However, system security fixes will continue to arrive.
In addition, the basic functionality of the OS allows you to disable the download and installation of drivers. To do this you need:
- Open the Run dialog box using the Win + R keyboard shortcut
- Enter the following text in the window:
Rundll32 newdev.dll,DeviceInternetSettingUi
then click on the Enter button. - In the window that appears, first select “ No, give a choice", then - " Never install drivers from Windows Update».
- Save changes.
By completing this sequence of actions, you will prevent the system from searching for drivers on the Internet, and order them to be installed exclusively from the memory of a personal computer.

Show or hide updates tool for Windows 10
Another way to stop automatic update system is to use the Show or hide updates tool.
To do this, you should download the program from the Internet and run it, which will start scanning the system, after which you should click on the Hide updates button.
The screen that appears will prompt you to select the corrections you want to hide. You should proceed in a similar way if you want to return some of the updates.
Wi-Fi limiting
Another method of limiting updates. To do this, you need to set up an Internet connection via a “metered” Wi-Fi channel.
To do this you need to follow these steps:
- Open menu " Options" and go to the subsection " Network and Internet».
- Then in the subsection wireless connection go to " Extra options" and enable the option " Set as metered connection».

Using the Windows 10 Registry
Using the registry, you can completely disable downloading of update packages.
To do this you should perform the following operations:

Thus, there are many options for customizing and limiting the Windows 10 update system, which more than pays for the modesty of the built-in functionality, which has only a few adjustable options.
Video on the topic
In Windows 10, as you know, the update tools are not located in the Control Panel, as in previous versions system, and in the “Settings” (that is,) OS section. Additionally, unlike previous versions, Win 10 also lacks the option to view and install custom updates.
Thus, previously Windows allowed you to selectively install updates of the system itself, its individual applications, as well as third party programs. It was convenient.
At the present time, In this mode, you can only update Intel drivers and Microsoft Silverlight. The rest of the software can also be selectively updated, but in other ways, in particular by manual loading necessary programs or drivers, which in itself is more troublesome.
what updates in Windows 10 can be installed selectively
Obviously, you need to start by finding out what updates are generally available in this moment. IN In Windows 10, this data is no longer displayed, which means you need to look for it elsewhere.
Alternatively, you can simply download and install the additional Troubleshooter Pack " Show or hide updates ", which Microsoft has been offering for some time on its website in the Support section. The program checks and shows available updates for Win 10, installed applications and new versions of drivers for the hardware used.
As an alternative (and simpler) solution to the same issue, you can try Windows application Update MiniTool ( link ). It's free, works even without installation, and searches for updates no worse than the aforementioned Microsoft software tool.
Software updates and latest driver versions MiniTool groups into separate lists. With “firewood” this is especially convenient, since then you only need to select the one you need from the list, open “ » Windows 10 and therefore start the procedure for updating the driver of the corresponding device. Not all that, of course, but overall it saves a lot of time.