APN (Access Point Name) is the conventional name of a GPRS/3G access point of a mobile operator, through which the user connects to a data service (WAP, Internet, MMS). The stable operation and pricing of the service depends on the correct APN settings.
Errors when setting up APN are one of the most common failures of GPS trackers. In this case, the data is not transmitted, the object does not appear on the map, and a perfectly working tracker seems to “not work.” It is usually convenient to configure APN on a GPS tracker using SMS commands.
Russian Federation
Beeline / Beeline Russia (GPRS/EDGE)
Regular SIM card "BeeLine"
A regular SIM card can be purchased at communication stores. The balance of a regular SIM card is monitored by the user himself.
APN: internet.beeline.ru
Username: beeline
Password: beeline
SIM card "BeeLine Business"
This SIM card is purchased through partners of the BeeLine operator, usually complete with equipment.
The BeeLine Business SIM card is supplied by GlobalSat as part of a set of GlobalSat TR-203 LOCK SIM GPS trackers and other trackers purchased along with the connection. The balance of such a SIM card is replenished automatically when paying for GPShome.ru monitoring services.
To send SMS commands to SIM cards included in the GlobalSat tracker kit, it is planned to launch a special gateway in the GPShome.ru monitoring system.
The "BeeLine Business" SIM card in Chita works only with the "National Roaming" service enabled; in Ulan-Ude it does not work.
APN: m2m.beeline.ru
Username: beeline
Password: beeline
MTS / MTS Russia (GPRS/EDGE)
Regular SIM card "MTS"
APN: internet.mts.ru
Username: mts
Password: mts
SIM card "MTS m2m" (Telematics)
This SIM card is used in navigation, monitoring and other systems. SIM cards"MTS m2m" usually comes with equipment purchased along with a connection to the network. The balance of the MTS m2m SIM card is replenished automatically when paying for GPShome.ru services.
APN: m2m.msk
Username: mts
Password: mts
MegaFon / MegaFon Russia (GPRS/EDGE)
Standard Internet connection settings in the MegaFon network. Tariffs of the "Light" series have different settings and are not recommended for use in GPS trackers.
APN: internet
Username: gdata
Password: gdata
Tele2 / Tele2 Russia (GPRS/EDGE)
These APN settings are relevant only for the Russian Tele2 network
APN: internet.tele2.ru
SMARTS / SMARTS Russia (GPRS/EDGE)
The operator works in the Volga region
APN: internet.smarts.ru
Username: not required (leave blank)
Password: not required (leave blank)
You can check whether the "Access to GPRS" service is activated using the USSD command by dialing *109#-call.
BaikalWestCom (GPRS/EDGE)
The operator operates in the Irkutsk region and the Republic of Buryatia (Ulan-Ude)
APN: inet.bwc.ru
Username: bwc
Password: bwc
DNS1: 081.018.113.002
DNS2: 081.018.112.050
Motive - Ekaterinburg Cellular Communications (GPRS/EDGE)
The operator works in Yekaterinburg and the Sverdlovsk region
APN: inet.ycc.ru
Username: motiv
Password: not required (leave blank)
Tatincom ON / Tatincom ON (GPRS/EDGE)
The operator works in Tatarstan
APN: internet.tatincom.ru
Username: tatincom
Password: tatincom
Ukraine
Kyivstar / Kyivstar Ukraine (GPRS/EDGE/3G)
Standard settings
APN GPRS/EDGE: www.kyivstar.net
APN 3G: 3g.kyivstar.net
Username: not required (leave blank)
Password: not required (leave blank)
Prepaid tariff settings
APN GPRS/EDGE: www.ab.kyivstar.net
Username: igrps
Password: internet
DJuice Ukraine (GPRS/EDGE)
APN: www.djuice.com.ua
Username: not required (leave blank)
Password: not required (leave blank)
UMC (MTS UA) Ukraine (GPRS/EDGE)
These APN settings are relevant only for the Ukrainian MTS UA (UMC) network
Standard GPRS/EDGE settings
APN: www.umc.ua (www.mts.com.ua)
Username: not required (leave blank)
Password: not required (leave blank)
HYPER.NET service settings
APN: hyper.net
Username: not required (leave blank)
Password: not required (leave blank)
Beeline / Beeline Ukraine (GPRS/EDGE)
These APN settings are relevant only for the Ukrainian Beeline UA network
APN: internet
Username: not required (leave blank)
Password: not required (leave blank)
Life Ukraine (GPRS/EDGE)
APN: internet
Username: not required (leave blank)
Password: not required (leave blank)
Utel Ukraine (3G)
APN: 3g.utel.ua
Username: not required (leave blank)
Password: not required (leave blank)
Kazakhstan
Beeline Kazakhstan / Beeline Kazakhstan (GPRS/EDGE)
These settings are relevant only for the BeeLine network in Kazakhstan
APN GPRS/EDGE: internet.beeline.kz
Username: not required (leave blank)
Password: not required (leave blank)
Kcell (GPRS/EDGE)
APN GPRS/EDGE: internet
Username: not required (leave blank)
Password: not required (leave blank)
Latvia
Tele2 Latvija (GPRS/EDGE)
These settings are relevant only for subscribers of the Tele2 network in Latvia.
APN GPRS/EDGE: internet.tele2.lv
Username: not required (leave blank)
Password: not required (leave blank)
When automatically setting up an Internet connection in the Tele2 Latvia network, you must check that the Proxy and Port fields are not filled in. If the operator has automatically entered some values into them, you need to delete them, otherwise the Internet will not work.
LMT Latvija (GPRS/EDGE)
These settings are relevant only for LMT network subscribers in Latvia.
APN GPRS/EDGE: internet.lmt.lv
Username: not required (leave blank)
Password: not required (leave blank)
Lithuania
Pildyk / Tele2 Lietuva (GPRS/EDGE)
These settings are relevant only for subscribers of the Pildyk and Tele2 networks in Lithuania.
APN GPRS/EDGE: internet.tele2.lt
Username: not required (leave blank)
Password: not required (leave blank)
When automatically setting up an Internet connection in the Pildyk / Tele2 Lithuania networks, you must check that the Proxy and Port fields are not filled in. If the operator has automatically entered some values into them, you need to delete them, otherwise the Internet will not work.
Belarus
Velcom (GPRS/EDGE)
Tariff plan WEB BASIC
APN GPRS/EDGE: web1.velcome.by
Username: web1
Password: web1
Tariff plan WEB 25
Username: web2
Password: web2
Tariff plan WEB 250
APN GPRS/EDGE: web3.velcome.by
Username: web3
Password: web3
Tariff plans WEB 500, WEB 750, WEB 1500, WEB 3000
APN GPRS/EDGE: vmi.velcome.by
Username: vmi
Password: vmi
Tariff plan WEB PLUS
APN GPRS/EDGE: plus.velcome.by
Username: plus
Password: plus
Tariff plan WEB 25
APN GPRS/EDGE: web2.velcome.by
Username: web2
Password: web2
Azerbaijan
Azercell (GPRS/EDGE)
APN GPRS/EDGE: gprs
Username: user
Password: user
Spain
Vodafone Spain (GPRS/EDGE)
These settings are only relevant for subscribers of the Spanish Vodafone network
APN GPRS/EDGE: ac.vodafone.es
Username: vodafone
Password: vodafone
Moldova
Moldcell (GPRS/EDGE)
APN GPRS/EDGE: internet
Username: not required (leave blank)
Password: not required (leave blank)
Orange Moldova (GPRS/EDGE)
These settings are relevant only for subscribers of the Moldovan Orange network
APN GPRS/EDGE: wap.orange.md
Username: not required (leave blank)
Password: not required (leave blank)
Romania
Vodafone Romania (GPRS/EDGE)
The settings are relevant only for subscribers of the Romanian Vodafone network
APN GPRS/EDGE: internet.connex.ro
Username: internet.connex.ro
Password: connex
If it doesn't work, add DNS settings(IP address is determined automatically):
DNS1: 193.230.161.3
DNS2: 193.230.161.4
Türkiye
Turkcell (GSM, GPRS, EDGE, UMTS, HSDPA)
APN GPRS/EDGE: internet
Username: empty (or) gprs
Password: empty (or) gprs
Vodafone Turkey (GSM, GPRS, EDGE, UMTS, HSDPA)
The settings are relevant only for subscribers of the Turkish network Vodafone Telekomunikasyon A.S.
APN GPRS/EDGE: internet
Username: vodafone
Password: vodafone
Avea (GSM, GPRS, EDGE, UMTS, HSDPA)
APN GPRS/EDGE: internet
Username: empty (or) wap
Password: empty (or) wap
TTNET mobil (GSM, GPRS, EDGE, UMTS, HSDPA)
APN GPRS/EDGE: internet
Username: empty
Password: empty
Kartalcell (GSM, GPRS, EDGE, UMTS, HSDPA)
APN GPRS/EDGE: kapsamaktad±r.BlackBerry.net
Username: empty
Password: empty
Muhabbet Kart (GSM, GPRS, EDGE, UMTS, HSDPA)
APN GPRS/EDGE: internet
Username: empty
Password: empty
TrabzonCell (GSM, GPRS, EDGE, UMTS, HSDPA)
APN GPRS/EDGE: internet
Username: empty
Password: empty
Czech
Vodafone Czechia (GPRS/EDGE)
The settings are relevant only for subscribers of the Czech Vodafone network
Prepaid (GPRS/EDGE)
Prepaid tariffs of the Czech Vodafone network
APN GPRS/EDGE: ointernet
Username: not required (leave blank)
Password: not required (leave blank)
Postpaid (GPRS/EDGE)
Postpaid (contract) tariffs of the Czech Vodafone network
APN GPRS/EDGE: internet
Username: not required (leave blank)
Password: not required (leave blank)
And you even activated it yourself, but something went wrong and the Internet doesn’t work? Don't be upset - setup mobile internet Yota is extremely simple and will not take much time, and this article will tell you in detail about all the nuances of connecting and setting up the Yota Internet on devices running Android, iOS and Windows Phone.
Automatic Internet settings Yota
After the first installation of the Yota SIM card and its activation, an SMS message from the operator with automatic Internet and MMS settings is immediately sent to your phone. Almost everything modern devices They easily recognize these parameters and independently configure themselves to work correctly with the Internet.
If you accidentally deleted this message or it was simply lost in SMS spam, you can re-order Yota’s automatic Internet settings, or through the company’s official website - in a chat with a contact center specialist. You can also contact a consultant and find out the parameters for setting up mobile Internet through mobile app Iota.
If your gadget is not able to recognize the received automatic parameters, then you can enter the data manually, especially since you only need to fill out one field, or rather, create a point APN access.
Manual Internet setup Yota
Self-configuration mobile Internet from the Yota operator is carried out in three simple steps:
Step 1. Check if data transfer is enabled.
Before you start setting up mobile Internet on your Yota SIM card, make sure that data transfer is turned on on your phone. Don't neglect this simple step, and then you won't have to worry unnecessarily if, after creating an access point, you find that the Internet still doesn't work.
- On Android: menu item “Settings” → “More” → “ Mobile network» → “Data transfer” - check the box next to “Mobile data”.
If your phone has two SIM cards, then make sure that the Yota SIM card is activated in the “Mobile Data” section. - On iOS:“Settings” → “ cellular» — activate the “Cellular Data” item. Here, in the “Cellular” submenu, go to the “Data Settings” → “Voice and Data” tab and select your preferred data network - 2G/3G/4G/LTE.
- On Windows Phone:“Settings” → “Network and wireless connection» → “Cellular network and SIM card” - activate data transfer by moving the slider to the “on” position.
Step 2. Create an APN access point
The process for creating an access point is slightly different depending on operating system your device, but ultimately, you only need to fill out one line: "APN: internet.yota" and come up with a name for the created access point, for example “Internet Yota” or simply “Yota”. The name of the created access point does not matter - it is rather necessary so that the user himself does not get confused in the created settings, and on many phone models it is impossible to save an unnamed access point.
- On Android:“Settings” → “More…” → “Mobile networks” → “Access points (APN)” → “Create an access point.”
Set the name of the new access point - for example, Internet Yota and fill in the "APN" field - internet.yota.
Leave all other fields, including username and password, blank.
Check that the "APN type" field is set to "default" or "supl". - On iOS:“Settings” → “Cellular” → “Cellular Data” → “Data Options” → “Cellular Data Network” - specify APN: internet.yota, and leave the rest of the fields blank.
Save your changes. - On Windows Phone:“Settings” → “Network and wireless communications” → “Cellular network and SIM card” → “SIM card options” → “Internet access point” - select “Add Internet access point”.
Here, enter the values in two fields: “Profile name” - Internet Yota and, in fact, “Access point” - internet.yota.
Save the created access point.
Step 3. Reboot the phone
This is a mandatory and very important step! In order for the manually entered Yota Internet settings to take effect and the mobile Internet to work, you need to restart the phone. To put it simply, you need to first turn it off and then turn it on again. As soon as the device is fully loaded and the SIM card is registered in the Yota network, you can enjoy all the benefits of the operator’s unlimited mobile Internet!
MMS Yota settings
The MMS sending service is not very popular among Iota subscribers. This is understandable - why pay for this type of message when the owner of a modern gadget can send any picture, melody or even a short video for free through a messenger program?
However, there is a small group of users who, for a number of reasons, prefer to use MMS. If you are one of them, and your phone is not configured to work with MMS automatically, then here is the algorithm for how to set required parameters to send MMS manually:
- On Android:“Settings” → “More…” → “Mobile network” → “Access points (APN) - click on the icon for creating a new access point and fill in the required fields:
Name: MMS Yota
APN: mms.yota
MMSC: http://mmsc:8002
Proxy MMS: 10.10.10.10
Port: 8080
APN Type: mms - On iOS:"Settings" → "Cellular" → "Cellular Data Network" → "MMS" and enter the following values:
APN: mms.yota
MMSC: http://mmsc:8002
MMS proxy: 10.10.10.10:8080 - On Windows Phone:“Settings” → “Network and wireless” → “Cellular network and SIM card” → “SIM card options” → “Add MMS hotspot”.
Create an access point with the following parameters:
Name: MMS Yota
Access point: mms.yota
WAP gateway: 10.10.10.10
WAP gateway port: 8080
MMS center: http://mmsc/
MMS center port: 8002
Also check that your phone allows data transfer— how to do this is described at the beginning of the article (Step 1).
If everything is fine, then restart your phone for the new settings to take effect. Ready! You have set up MMS Yota on your phone!
As you can see, the Yota and MMS Internet settings are so simple that absolutely any user can solve the problem of not connecting to the Internet or sending MMS and getting their device working. I sincerely hope that this article helped you understand the issue of setting up Iota mobile Internet and MMS, regardless of the model of your gadget, be it Android, iOS or Windows Phone.
Video instructions on how to set up an APN access point on Yota using the example of an Asus Padfone2 smartphone:
This may come in handy:
All you need to know to set up a SIM card on your device is the APN.
All operators use a specific APN (Access Point Name). Often the APN is pre-configured on the SIM card, but sometimes it needs to be configured manually.
To do this, you need to know how to access the configuration menu on the device. You can find this out in the user manual for the device or look at the description on the Internet. The corresponding APN of all providers is listed at the end of each article on this website. In some rare cases, you will also need to configure a username and password; all other fields can be left blank.
Setting up APN on iOS devices
On devices iOS Apple, such as iPhone, you first need to select "Network" from the "General" menu. Then tap "Cellular Data Network" and additional settings. The APN must be filled in the Cellular APN field. It is necessary to check that it is 100% accurate. Some networks require you to add a username and password.
To change the settings, you must touch each field and enter the data. All settings should be saved automatically. Some operators do not have the ability to edit cellular data settings. If the operator requires a different APN setting, you must use a configuration profile with correct setting. This is explained.
If you're not using an iOS update configuration profile, you can reset any changes you've made to your APN settings. If you have edited the APN settings before iOS updates, all settings will be reset to default. Therefore, you may need to apply the settings again after updating iOS.
To return the APN data for the default carrier, you need to click “Reset Settings” on your iPhone. If a configuration profile was installed, it will be reset to default.
Setting up APN on Android devices
 Since there are several on the market Android versions, it is impossible to summarize the basic steps for setting up the Internet. Once the SIM card is inserted into the device, the following procedure must be followed:
On Android devices 2 and 3: Menu or Applications > Settings > Wireless network> Mobile networks > Access point names
On Android 4: Menu > Settings > Mobile networks (often hidden in the More submenu in the Wireless or Networks folder) > Access Point Names. On some devices, such as Samsung, you need to click: .... Mobile networks > Mobile data > Access point names.
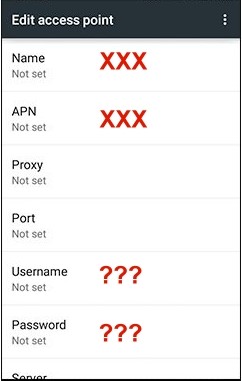 On Android 5 and 6: Essentially the same steps as on Android 4, but with a changed color scheme to be more similar to iOS devices.
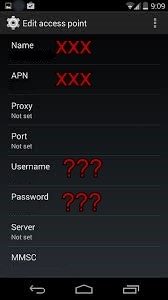
After completing the settings according to Fig. above on the left, you need to click “Menu” and select “New APN” or the (+) icon then click “Name”. In the “Name” field, you can enter any fictitious value/name for this SIM card. Then you need to click “APN” and enter the correct APN. Also, you need to make sure that the fields: proxy, port and server are not filled in. If you need to enter a username and password, you need to touch these words and enter them. The default APN type should be internet, the authentication type should be PNP, the APN IPv4 protocol and the “Enable” field should be checked. Then you need to press the “Menu” button and select “SAVE”, then exit using the “Back” button. After the completed manipulations it will be visible APN name, which must be enabled for activation. To complete the setup, you need to press the “Home” button and turn on the mobile data network if it does not start automatically.
Setting up APN on Windows Phone devices
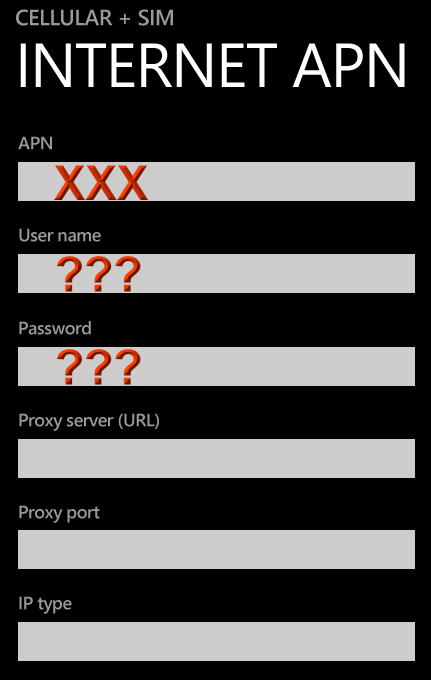 Tap Settings > Cellular & SIM > SIM Settings > Add Internet APN. Click "APN" and enter your username and password if required. Finally, click “SAVE” to save.
The Access Point Name (APN) defines the network path for all cellular data connections. On iPhone devices and iPad, you can view and change the APN for cellular data services. You can find out or change APN settings only if this is provided by the operator. If you have a SIM card inserted into your device and your carrier allows you to change the APN, follow these steps:
View and change APN settings
Choice incorrect settings An APN may result in the inability to transmit data over the cellular network and additional costs. Do not change the APN unless specifically instructed to do so by your operator or IT administrator. to check if the APN settings are correct.
If provided by your operator, APN settings can be viewed on iOS device, by going to Settings > Cellular > Cellular Data Options > Cellular Network. If you're using your device outside the US, APN settings are available in Settings > Mobile Data > Mobile Data Settings > Mobile Data Network.
To change settings, click in each of the fields and enter the information provided by the operator. The settings will be saved automatically. The ability to change your cellular data settings may vary depending on your operator. If the operator needs a different APN setting, they can use a configuration profile with the correct settings.
If a configuration profile is not installed, updating iOS resets any changes made to APN settings. If APN settings were changed before updating iOS, they will be restored to their default values. You may need to reapply these settings after updating iOS.
Reset APN settings
To restore your default carrier APN data, go to Settings > Cellular > Cellular Data > Reset Settings. If a configuration profile is installed, the default information for that profile will be used.
If the iPhone or iPad is used in an enterprise environment, your IT administrator can configure a separate APN for the device. In this case, contact your IT administrator to change the APN. If you have changed the APN set by your IT administrator using a configuration profile, you can undo the changes by clicking the Reset Settings button.
- iPhone: Tap the Reset settings button in the Settings > Cellular > Cellular Data screen.
- iPad: Remove the configuration profile and then add it again.
For getting additional information Contact your IT administrator.
IT administrators can change additional settings on iPhone and iPad devices, including APN, from using Apple Configurator, OS X Server Profile Manager, or other mobile device management tool.
For more information, see
Proper setup of the Yota Internet guarantees the normal functioning of your tablet PC or smartphone on the network. To do this, you need to correctly enter the access point name – APN. It serves as a kind of identifier with which the subscriber mobile communications gains access to the Internet and can send MMS.
Automatic setup
Yota makes every effort to ensure that its future subscribers do not have to make unnecessary touches on the touch screen and configure anything. When inserting a SIM card into your gadget, the user needs to wait a little, after which the name will appear on the screen mobile operator– Yota. The operator independently sends all the settings of the APN Yota access point, which are automatically registered in the mobile device. Then you can turn on data transfer and try to use the Internet.
If identification on the network and automatic APN setup went without problems, then one of the icons (GPRS, 3G, 4G LTE) will appear in the status bar, depending on the signal strength in the coverage area of the Iota network. However, the reason for low Internet speed or its complete absence may be incorrectly set parameters, which can be set manually.
Manual setting
Manually register an APN access point for Yota in a device with touch screen as easy as setting an alarm on it. It will only take a few minutes to solve this problem.
On Android device
To set up APN Yota, owners of devices running Android OS will only need to specify two parameters located in the section: Settings > More > Mobile network > Select SIM card > Access points (APN). You can then edit existing point access or create a new one. Among the proposed list of parameters, we are only interested in two lines in which we should enter:
- “Name” – yota;
- "APN" - internet.yota.
This completes the setup of Yota on Android. It is worth noting that the values of the remaining parameters do not need to be changed. On different mobile devices Menu names may vary slightly. However, intuitively you can always get to entering the parameters of the access point.
On iOS and Windows Phone
Setting up a Yota access point in products from Apple and Microsoft involves filling out just one line (APN - internet.yota), which can be found in the section:
- for iPhone: Settings > Cellular > Cellular Data.
- for WinPhone: Settings > Access point > Add access point.
Possible problems
Sometimes Yota Internet users find themselves in a situation where the actual data transfer speed is lower than stated, although the Yota Internet settings are correct. In this case, the smartphone is in an area with 4G LTE coverage. The problem is hidden in the incorrectly set “Network mode” setting, which is located in the following tab: “Other networks” or “More” > “Mobile network” > “SIM card selection”. The user should select the option with automatic network detection (LTE/3G/2G). The choice in favor of “Only 3G (WCDMA)” or “Only 2G (GSM)” is justified in cases where the subscriber is outside the coverage area of 4G LTE. This reduces the load on the battery.
Yota subscribers should remember that high speed internet available only on one tablet device without the right to distribute to other users. In case of illegal activation Wi-Fi points access speed is reduced to 64 Kbit/s. In this case, Yota offers to return maximum speed and fully distribute the Internet via Wi-Fi for an additional fee, as evidenced by a pop-up window on the tablet screen indicating the available tariffs. At the end of 2016, Yota tariffs for smartphones underwent changes - they no longer include unlimited internet, and the ban on Wi-Fi distribution and downloading torrents is disabled.