Most modern motherboards can automatically adjust the frequency and voltage of the installed processor, provided that the board is approved for use with that brand of processor. The article describes how to configure the processor. In order for the processor setup to be successful, you must perform the following steps:
Some users experience blue screen, system errors and restart. . You will also need a motherboard that supports overclocking. You will need to consider additional cooling. Wear gloves to apply them and keep them out of your eyes! . You are almost ready to start the overclocking process. There are three selection methods.
For getting additional information contact your manual motherboard- this method is useful for those who are new to overclocking, but does not always give best results in terms of performance. Use automatic motherboard overclocking tools. . You will use this to check that your system is stable during the overclocking process.
- Make sure the board is tested and suitable for your processor: this includes processor operating frequency, voltage, and processor core stepping. All three options must be supported in the BIOS setup utility.
- Download and run the Intel ® Processor Identification Utility to identify the operating clock speed supported by the processor.
- Refer to your motherboard documentation for processor configuration information. Most boards will not require a configuration change for the processor, but you can enter configuration mode to manually select the correct settings for your processor.
- If necessary, download and install latest version BIOS for your motherboard. Instructions and files should be provided by your motherboard manufacturer.
If you decide to manually configure or make some of your own adjustments to the operation of the processor, then you need to enter the menu BIOS settings. All settings for processor operation parameters are made in this menu. In order to enter the BIOS, you need to start the computer and during testing, immediately, as soon as the first information appears on the monitor, press the F2 or Del button. These are the most common keys, but other options are possible depending on the motherboard settings.
Once you have completed all of the above, you are ready to start overclocking. This can be referred to as the base clock - a small speed that is multiplied to estimate the overall speed. Increase it by a small amount each time until the system becomes unstable. Be sure to perform a stress test after each adjustment. Adjust the multiplier on your motherboard to improve performance. Increase the number of multipliers by one. You may reach the temperature limit before the system becomes unstable. Ensuring temperatures are still within a safe limit, you can now start adjusting voltage levels to further improve performance. Raise the voltage by 025 each time. Don't exceed this as it is easy for the voltage to become too high very quickly, damaging your components. Perform a stress test after the first voltage increase. If the system is stable, check that the temperature is still within the safe limit. If it is still unstable, reduce the base clock frequency or multiplier and check again. Return to the multiplier or base clock section. Once you get your unstable system back to a stable state by increasing the voltage, you can increase either the multiplier or the base clock speed again. Remember to stress test after each increase until the system becomes unstable. Overvoltage has the biggest impact on temperature, so try to find the highest base clock and multiplier settings for best performance while keeping the voltage as low as possible. 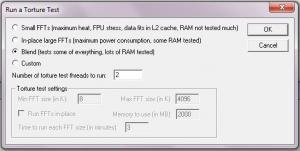
- Hold down the "delete" key as you start your computer.
- Open the "overclocking" menu.
- This will prevent memory errors from occurring.
After starting the BIOS, select a menu item depending on your purpose. Let's look at the most common setting: overclocking the processor, that is, increasing its performance. This goal can be achieved by changing the basic characteristics: changing the frequency, multiplier or voltage. So, let's look at these three types of settings separately.
Simply adjust the fan speed, clock speed and memory speed sliders and use the highest game to test the results. Since the voltage isn't regulated by the built-in overclocking tools, there's no need to be as careful with the settings - choose the overclocking settings that work best for your needs.
Each overclock should be approached with some caution if you are concerned about causing long-term damage to your system. Extra cooling helps you achieve more safely high levels acceleration What is your experience with overclocking? Share your stories with us today!
Setting up the frequency
Let's look at what it means to adjust the processor frequency. The processor clock speed is equal to the bus frequency (FSB) multiplied by a multiplier. That is, to increase the processor frequency you need to increase the frequency system bus FSB. To do this you need to open the main BIOS menu. Then go to the CPU Clock tab. Press Enter and change the system bus frequency. You need to change gradually in increments of up to 10%.
Best of all, it can provide significant performance improvements. The overclock clock refers to the clock speed of the computer component. The clock speed is specified in Hz and determines the overall speed of the component. This feature allows you to increase the clock speed by changing the clock multiplier.
Overclocking: A First-Hand Guide
If done correctly, it is safe and easy. The process can get quite tedious, especially if you've never overclocked before. After all, even a little overclocking will give you speeds you wouldn't otherwise have.
Overclocking terms and options
Certain conditions are vital for overclocking.Changing the multiplier
You can also increase the processor frequency by changing the multiplier. To do this, launch the BIOS main menu. Go to the CPU Ratio tab. Press Enter and change the multiplier value. Unfortunately, the multiplier can only be changed in those processors that are labeled Extreme. Because of this, this method least common.
Once you have achieved stability, start increasing the tension by tenths of a board. The overall clock frequency does not occur in the chunk. . The software acts as a bridge between your hardware and your overclock. They provide an easy to use interface, software for real-time monitoring and necessary parameter limits so that you don't do anything rash. It is often used among gamers. The exact key you need depends on your hardware.
Before entering overclocking settings, there is one thing to note. Canned overclocking promises better performance at the touch of a button. However, ease comes at a price. Additionally, it doesn't effectively measure your clock speed. The same goes for other overclocking programs.
Voltage change
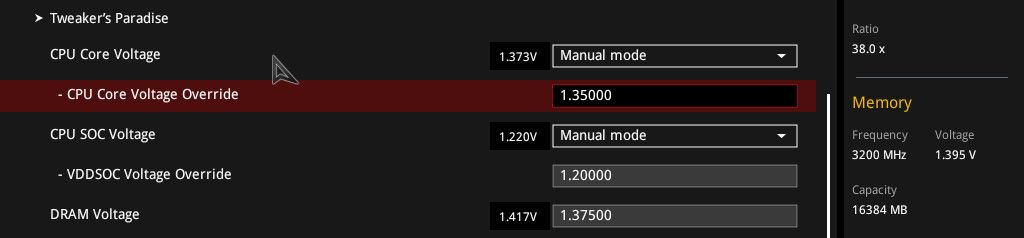
It is also very possible to overclock the processor by changing the voltage. In the BIOS menu, go to the Power Bios Setup tab, then to Vcore Voltege. Press Enter and select required parameter voltage. It is recommended to start by increasing the voltage by 0.1 volt. After this, you need to set the cooling system to maximum to prevent the processor from overheating. To do this, in the BIOS menu, open the Hardware Monitor Setup tab and select Cpu Fan Speed. Press Enter and increase the options. Having overclocked the processor to optimal parameters, you need to consolidate the result. To do this, increase the bus frequency to 3-5% and wait for the computer to restart. After which it is necessary to reduce the system bus frequency by about 4%.
Output Project: Desktop Overclocking
You must enter the value yourself. Stress test and repeat until you achieve stability stability. Don't increase your tension wildly. Bookmark this article so you have a list of tools to help you when this happens to you! By adjusting the speed of your desktop system's core components—the processor, memory, and motherboard—you can achieve noticeable performance gains.
However, it is not for the faint of heart. You could cause your system to become unstable and, in the worst case, damage components and void your warranty. But if you're up for a challenge, read on. This crash course will walk you through the basics—and luckily, help you avoid crashing.
All these methods can also be implemented using special programs and utilities. But it is not as secure as in BIOS. If you encounter any errors, you can always correct the situation by selecting the Load Optimized Default item in the BIOS menu. Activating this item will reset your overclock settings and return to the previous processor settings. Now setting up the processor will not be so difficult.
Step 1: Get the right equipment. If you're buying parts with overclocking in mind, do your research in online forums first, because some processors, motherboards, and memory have a better reputation for overclocking than others. The fastest of them have a small margin for acceleration - as a rule, they already operate at maximum speed.
Your video card is a potential fourth candidate for overclocking, but the procedure depends on your model. Exit the voltage menu to the main menu where you should select "Built-in peripherals" It doesn't matter what you choose, but you need some method of monitoring the temperature. It can be overclocked this way, but it may cause problems with loads that are worth it. Acceleration with reproduction is simpler and has fewer complications.
A sufficient level of PC performance is something ephemeral for many novice users. Because each user has his own ideas about how fast his computer should be. However, at some point (for example, when installing some resource-intensive program), the user observes a strange and, frankly, inconvenient behavior of the computer - the computer begins to slow down mercilessly. At such moments, the user can be helped by the implemented process - overclocking the processor through the BIOS. Read here and now about how this is done correctly in practice, what should be taken into account when carrying out such an overclocking operation, and how to avoid irreparable errors when overclocking the CPU!
There are two philosophies for determining the maximum clock speed. First, you can start to gradually increase your multiplier one step at a time, testing each one until your computer shuts down and you need to set the voltage. The other option is much faster. Choose a "reasonable" clock speed and voltage. Check it and adjust accordingly. This guide will go with this option because it's faster, easier, and won't cause any problems if you don't find ridiculous value.
This option may be dangerous. Voltage creates heat, and heat kills components. Remember that you need a cooling solution that matches your voltage settings. The chip will heat up too quickly. This area is reserved for high performance air coolers and fluids. They will determine the stability of the clock. When you increase the clock speed, you may also need to increase the timings.

Introduction to Temperature Safety
Any increase in clock speed central processor inevitably leads to one thing - an increase in temperature indicators. In simple words, an overclocked processor will heat up more than a CPU operating in normal mode (stable default settings).
In most cases, a voltage around 35V should be fine, but never go too far beyond the recommended voltage. Again, this is a very sensitive setting. This is a utility command line for finding prime numbers, but also includes a stress test. Download and run the program in a terminal. Say yes. Stress Test Option - 15. Use default values for the following questions.
Monitor your temperatures as you test. It's probably best to be safe and keep it below 70 degrees. The most common cause of failure is that there is not enough voltage to support the selected clock speed. This means you need to either increase the voltage or decrease the clock speed.
Exclusively in view of the last factor, it is necessary to increase the tactical and technical characteristics of the CPU with extreme caution. Moreover, the correctness and reliability of the overclocking process can only be guaranteed by your own accuracy and consistency in actions. And lastly, before you begin practical overclocking of the CPU, you should carefully study a number of technical issues, namely:
- Familiarize yourself with the characteristics of the installed processor (manuals and other types of reference information can be easily downloaded from official sources - the manufacturer’s website).
- Research the overclocking potential of a specific CPU modification (unfortunately, manufacturers do not like to share secret overclocking data, so valuable information on CPU overclocking can only be found on specialized sites and forums).
- Carefully study the characteristics of the motherboard - update BIOS to the latest version.
After you own complete information about the processor, have an idea of what the reserve potential of an individual PC component means, and your mind and heart will be filled with confidence in the success of the upcoming event - start taking action!
How to overclock my processor: step-by-step algorithm of actions
First of all, you need to download several specialized programs:
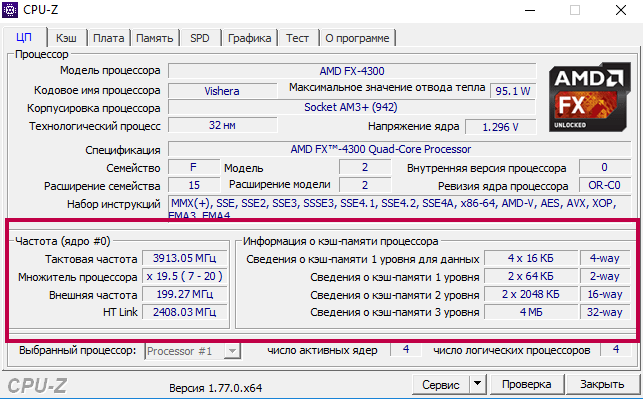
- Download the CPU-Z utility (after installing the application, carefully read the table of CPU operating parameters - more details about the process of interacting with the program will be written a little later).
- Download this software to your computer - AIDA64 (you can download this software Here ).
This is the reference software minimum. Using this arsenal software will allow you, dear readers, to visually monitor changes in the system and, in simple words, don't cause trouble.
Monitoring operating parameters after CPU software upgrade operations (also relevant for other system components) is a mandatory and undeniably useful process, due to the critical nature of operations for overclocking computer components.
Step No. 1: Enter the BIOS basic settings menu
Depending on the version of the microsystem you are using, the section in which you, dear friends, will have to make changes may have a name different from that indicated in the example described below. However, it is not difficult to grasp the meaning of the correctness of the selected item in view of the specifics of the standardization used in the names of the BSVV options.
In our case, we use as an example new interface BIOS/UEFI version 2603 from the company American Megatrends Inc . (the most common option in modern computers).
We will focus on the traditional option - when you turn on the PC, press the service key “F2” or “Delete” several times.
Step #2: Which overclocking scenario should I use?
So, after you have entered the BIOS, activate the “F7” key, after which you will find yourself in the menu additional settings basic microsystem.
- Go to the “Ai Tweaker” tab to the section you need.
Here you should choose a specific overclocking scenario, the implementation of which should be based on your own “discretion” regarding the question of how hard you will overclock the processor. The most painless way to tighten the speed optimization screws is the “Ai Overclock Tuner” option with the “Auto” option active.
- Set the value to auto mode, save the changes in the BIOS settings (F10) and reboot the system.
This option has a number of advantages; the BIOS system will automatically set the values increased productivity, reserving the right of distribution system resources according to the conditions laid down by the manufacturer. In other words, by activating the mentioned mode, you will protect yourself and the system as much as possible from unexpected errors that may be made during the manual overclocking process, which is described in more detail below.
Manual method of overclocking the CPU via BIOS

What benefits does it provide? this method CPU upgrade:
- Increasing multiplier values implemented using an arbitrary method.
- You can increase the operating frequency of the CPU core at your own discretion.
- The use of a manual method of correcting the voltage parameters of the specified PC component to achieve stability in the operation of the CPU is also permissible in the “Manual Overclocking” mode.
The last example is the most dangerous and is associated with the possibility of damage to the functional part of the CPU. As you understand, dear readers, if you want to achieve the maximum effect in terms of a software CPU upgrade, there is nothing to do here without confidence and a firm belief in the correctness of the settings used.
Otherwise, you will simply “fry the flint.” In other words, you will burn out the processor. However, as a rule, the BIOS will not allow deliberately harmful settings to take effect; your system simply will not start.
To eliminate the “last trouble,” you will need to return the BIOS settings to their original state.
Step #3: Checking the hardware after the overclocking scenario has been applied
So, after you have harnessed the overclocking potential of your processor, you need to conduct a comprehensive analysis of the CPU's performance indicators. In other words, it is necessary to examine the “patient” for his healthy condition:
- Open the previously installed CPU-Z utility and carefully read the list of parameters involved.
- Go to the “Test” tabinto the working scan window and launch the utility utility with the “Stress CPU” key.

The subsequent test process, to determine the proper level of stability, is carried out using another program - AIDA64.
- Launch the previously downloaded software.
- Go to the sensors section, make sure that the temperature values are normal.
Attention: it should be noted that characteristics such as the thermal capacity of the processor and the effective ability of the cooling cooler to remove the heat generated by the CPU are inseparable concepts. Because without proper cooling, the whole overclocking idea is simply doomed to failure. Make sure that the cooling system matches the CPU overclocking scheme used.
- Next, you should conduct a series of tests for the stability of the overclocked component - go to the “Service” section,and activate the “System stability test” item from the program’s drop-down menu.
If the survivability test procedure went in a positive way, then you can be congratulated. However, it should be understood that the service life of components that operate at maximum permissible speeds is reduced. Therefore, before you rejoice at the fantastic performance of an overclocked CPU, think about how advisable it is to “quickly fly into the abyss of digital death.”
Software overclocking of the processor
There is an alternative overclocking method: you can optimize the CPU using special utilities.
For AMD CPU, this is the AMD OverDrive program (you can download it from the official website - http://www.amd.com/ru-ru/innovations/software-technologies/technologies-gaming/over-drive ).
Intel processors are driven by this program - SetFSB (to download the software, click on this link - http://www13.plala.or.jp/setfsb ).
In both the first and second cases, the desired effect is achieved only if the processor’s multiplier corresponds to the “Unlocked” standard. Unfortunately, there is no other way.
As an example, let's look at how an AMD processor is overclocked...
We have this CPU with the promising addition “Black Edition”.