A router in repeater mode is quite a useful device, the purpose of which is to extend the range of Wi-Fi.
On the Internet you can find a lot of articles about how such a device works and where you can get it.
But most of these do not really answer the question, but only confuse users even more. We, in turn, will try to explain complex things as much as possible. plain language. Let's start with what a repeater is and how it works.
What is a repeater
The repeater is translated from in English as a "repeater" (repeater). Simply put, this is a device that catches wifi signal and distributes it further. Due to this, the coverage area of the router is increased. As for how much it increases, this figure depends on the characteristics of the repeater and router.
Visually, all this looks as shown in Figure 1.
Rice. 1. Visual scheme of the repeater
On the left is the router from which the Wi-Fi signal originates. This signal enters the repeater, which is located in the middle and also emits the signal received from the router. Thus, the desired effect is achieved - the signal coverage area is increased.
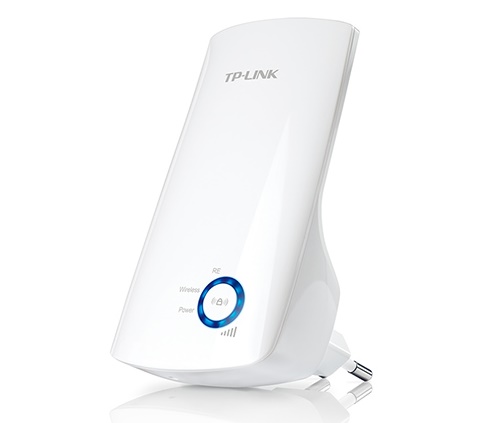
There are a huge number of both routers and repeaters on the market. One of the most popular models the latest TP-LINK RE200, which costs approximately $400. It is distinguished by the following characteristics:
- maximum speed connections - 733 Mbps;
- transmitter power - 20 dBM;
- supports the following types of encryption: WEP, WPA, WPA2;
- port speed - 100 Mbps;
- 3 antennas;
- type of antennas - internal;
- dimensions - 1.1 × 6.6 × 7.2 cm.
Rice. 2.TP-LINK RE200
It is important that this model is dual-band. This means that if you use the same router (2.4 GHz and 5 GHz frequencies are used), the repeater can easily repeat its signal.
As you can see, the repeater is plugged into an outlet and has a connector for an RJ45 tip. WEB-interface is used for configuration. It is worth saying that everything is done very conveniently and well. Any user can easily configure this device.
So, we figured out what a repeater is. Now let's get back to where we started. The fact is that the router can also be used as a repeater.
Important! There is only one criterion for determining whether it is possible to use a particular router model as a repeater, and it lies in whether the manufacturer has laid such a possibility. If the developers specific device initially it was assumed that it could be a repeater, which means that it can be used that way. And if they did not assume such an opportunity, it is impossible to remake the router so that it appears. If you try to do it anyway, you can just break the device.
If you show this on the same diagram as shown in Figure 1, then on the right, instead of a repeater, there will be another such router. That's all!
Rice. 3. Scheme of using a repeater with a router as a repeater.
As you can see, everything is quite simple to understand. But there are a few more points that should be clarified. This is what it's about:
- Even though two devices are used, the network is still one. This is also true for cases where the router is used as a repeater. The functions of the repeater, among other things, include copying information from the router.
- All devices that you connect to Wi-Fi will connect to the device with the strongest signal. But you won't notice it. However, from the point of view of the user, it does not matter whether the same smartphone is connected to a router or to a repeater. The main thing is that the signal will be enough for the full use of Wi-Fi.
- A repeater (as well as a router in repeater mode) allows you to organize a local network, which will include all devices connected to Wi-Fi.
Rice. 4. Repeater and router
Benefits of Using a Repeater
The main advantage of the repeater is that you can provide a Wi-Fi signal to a large area of the room. In addition, the use of a repeater has the following advantages:
- the aforementioned possibility of organizing local network with all devices that are connected to Wi-Fi;
- regardless of the number of repeaters, all devices that will connect to the signal will use the same verification (the same password);
- in some cases, the repeater can even amplify the signal of the router (but usually only certain models have such an opportunity and you need to find out about this from the manufacturer or the consultant of the hardware store).
But, basically, the repeater is used to solve the problem with a weak Wi-Fi signal. A simple everyday situation, when the Internet does not catch in the bedroom or in the kitchen, is easily solved with the help of a repeater or a second router that can be used as a repeater. Now it makes sense to talk about how to set up the second router so that it can repeat the Wi-Fi signal from the first one. But before that, it is worth clarifying a few points regarding the cases in which you can use the router as a repeater.
When is a router suitable for use as a repeater?
Experts agree that it makes sense to use it in this way only if you have an unnecessary router. In other cases, it is better to purchase a full-fledged repeater. And there are several reasons for this, namely:
- it is far from always possible to provide a signal of the same quality as it comes from the main router;
- signal stability can also often suffer;
- it is also far from always possible to successfully complete all the manipulations to set up such a connection the first time.
The problem is that each router is configured in a completely special way, although there is a certain general algorithm for performing such actions.
Tip: Use two routers from the same manufacturer. Then both will work much better.
Then let's go!
Configuring the router for use in repeater mode
This process consists of two stages (according to the number of routers used). The first one is to do the following:
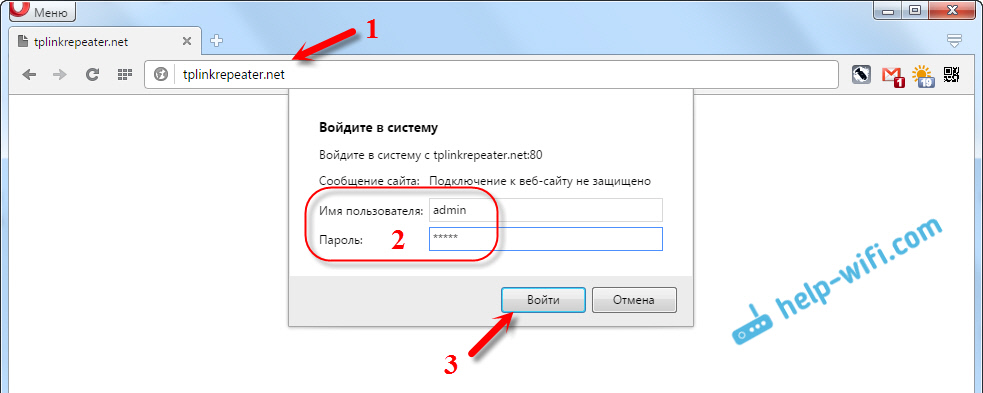
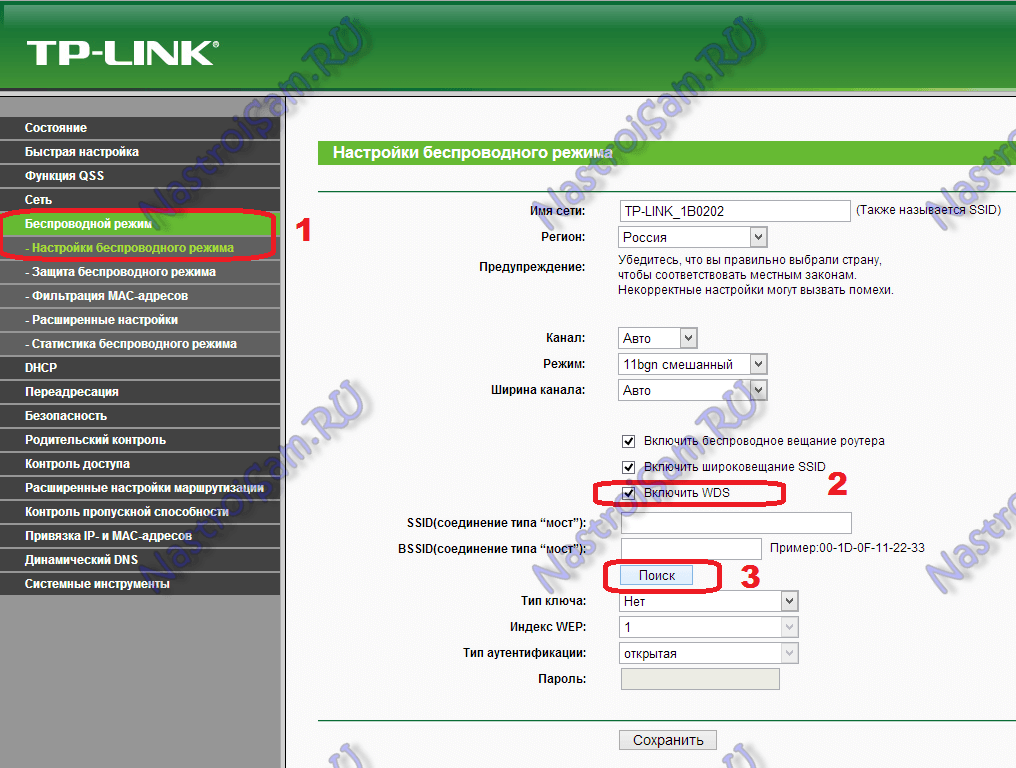
1. Go to the settings of the router that initially distributes Wi-Fi (we will call it the first one). This is usually done by entering address bar browser of one of two addresses: 192.168.0.1 or 192.168.1.1. Next, you will need to enter the username and password, which are usually indicated on the device itself. If you have changed something in these settings, then you know how to enter this menu.
2. Next, go to the "Wireless" or "Wireless Network" section. There, find the line "Channel", that is, "Channel". All we need to know in this case is that the value of this parameter must be the same on both routers. For example, let's set it to "6".
Rice. 5. Configuring Wireless Network Settings
3. This completes the setup of the first device. Next, connect the second to the computer with a cable, go to the settings (just like we said above) and open the WPS menu. In it, click on the "Disable WPS" button. We will not go into details of what it is.
4. Reboot the second router, that is, unplug it from the outlet and plug it in again. The same can be done if you click on the inscription "click here", which will appear after completing the previous step.
5. After that, go to the "Network" menu and the "LAN" submenu. Enter a new IP address in the "IP Address" field. It should be more than the one that was, by one. That is, it was originally 192.168.0.1, and now you need to enter 192.168.0.2, as shown in Figure 6. Click the "Save" button to save the settings.
6. Now in the address bar, enter the address that was specified in the previous step.
Rice. 6. The first steps in setting up a router in repeater mode
7. The previous step will allow you to go back to the settings of the second router. Go to the “Wireless” section again and go to the “Wireless Settings” subsection. There we will be interested in the following parameters:
- "Wireless Network Name" - the name of the network that the second router will distribute;
- "Region" - region (the country in which you live);
- "Channel" - channel (we said above that for example we will take its value 6);
- "Enable WDS Bridging" - just check the box, this is the item that enables WDS.
8. Click on the "Survey" button to continue working.
That's all! Now the network should work fine.
Hint: WDS is a repeater mode.
Hard enough.
But from the entire procedure described above, you can extract the very algorithm that is suitable for connecting any two routers and using the second one as a repeater. It looks like this:
- turn on the first possibility of using its signal by a repeater;
- we set the same channel on both (although this is not always necessary, but if there is a corresponding item in the settings, indicate its value);
- connect the second to the first in repeater mode;
- we use.
The above procedure is shown in the example TP-LINK routers. In some cases, there is an item called "Repeater" (not "WDS") if the device settings have a Russian interface. It can be in many different sections, so you will have to look for it. But be that as it may, if this item is, you can definitely find it.
What if I don't get anything?
If something doesn't work for you, there are several options:
- Try to perform all the above procedures again, from the very beginning.
- Write in the comments under this article at what stage you have problems, we will definitely help you.
- Contact the manufacturer of the devices (at least one of the two) you are using for assistance.
- Call a specialist from your provider. These people should help their customers use the Internet in a way that suits them.
But there are not as many manipulations as it might seem at first glance, so even a novice user can perform all of them. The main thing is to follow the algorithm described above and adhere (at least roughly) to the procedure that we also talked about earlier. Good luck with your setup!
Today we will install and configure an interesting and useful device called a repeater. Still, it is called a repeater, or a Wi-Fi network repeater, all this is one device, the task of which is to expand the range of an already existing Wi-Fi network. We will consider the setup process using the excellent TP-LINK TL-WA850RE repeater model as an example.
You can read more about repeaters in the article:. If you have a router installed and the Wi-Fi signal "does not reach" some distant rooms, or, for example, the second floor, then a device such as the TP-LINK TL-WA850RE can solve this problem without any problems. You can of course try to boost the Wi-Fi signal correct setting router, and in other ways, which I wrote about in the article. Or, replace the antennas on the Wi-Fi router with more powerful ones. But, you will not get such an effect of expanding the Wi-Fi network as from installing a repeater. This is the most best option increase wireless coverage. The repeater is not very expensive, but the effect of it is good.
A few words about how it all works. We have a router that distributes the Internet via Wi-Fi. But, in some room, Wi-Fi does not catch, or a very bad signal. We take a repeater, in our case TP-LINK TL-WA850RE, and turn it on in the place where the signal from the router is still stable (preferably 50-60%). We set up a connection, and there will be one Wi-Fi network (with the same username and password as on the main router), but reinforced by a repeater. All devices will automatically switch from the router to the repeater and vice versa. Depending on the signal level. It can be configured so that the repeater broadcasts another network, with a different name and password.
Setting up the TP-LINK TL-WA850RE repeater
The main thing is to choose the right place for the location of our repeater. You need to try to install the device in a place where there will be the maximum possible signal from the router (for minimal loss of speed), and where the repeater will cover the Wi-Fi signal of the rooms we need.
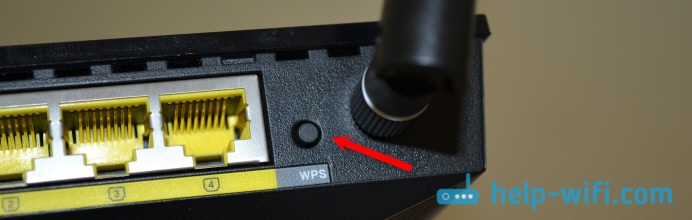
You can set up the TL-WA850RE repeater in one minute. We turn it on. On the router, look for and press the WPS button. It looks something like this:
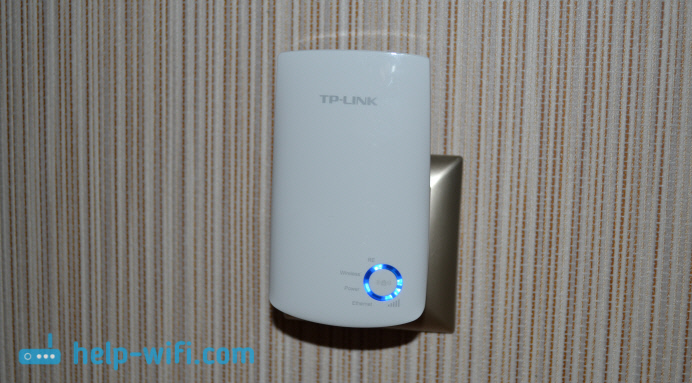
The indicators that appear on the right side will show the signal strength from the router. In my photo above, you can see three divisions. This good signal. For stable operation, and minimal loss in speed, it is necessary that there be at least two divisions. Three is better.
That's all, the repeater amplifies the signal of the Wi-Fi network. You will not even notice any changes, except for a stronger Wi-Fi signal, which will appear in places where you did not catch at all before.
You can turn off the TP-LINK TL-WA850RE and plug it into an outlet in another room. It will immediately connect to the wireless network, no re-configuration is needed. Moreover, it remembers the networks with which you have established a connection.
There is one LAN port on the bottom of this repeater, for connecting devices to the Internet via network cable. It can be used to connect desktop computers, TVs, and other devices that do not have the ability to connect via Wi-Fi, or need a stable connection.
As you can see, everything is very simple and clear. Turned on, pressed the button, and everything works.
Control panel TP-LINK TL-WA850RE. Setting up a repeater without a WPS button
This little device has its own control panel. There you can set up a connection to a Wi-Fi network if your router does not have a WPS button. Now we will look at how to enter the settings of the TP-LINK TL-WA850RE repeater.
To enter the TL-WA850RE control panel, you must first connect to it. You can use a network cable or Wi-Fi. Immediately after turning on the repeater, it will broadcast a Wi-Fi network without a password, with a factory name. If your repeater is already configured, then you can also go to its settings when connecting via Wi-Fi.
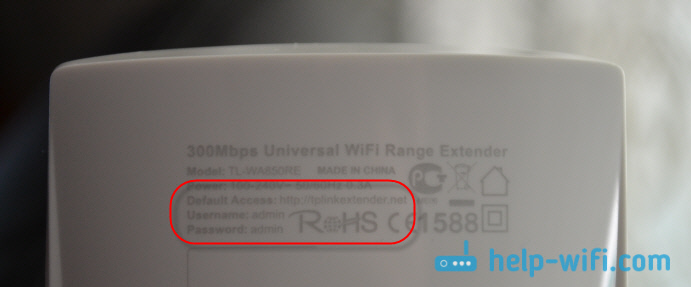
It is enough to go to the address in the browser tplinkrepeater.net. The address for entering the settings, the factory username and password are indicated on the device itself:
On home page the current status of the repeater will be displayed. If the connection is already set up, you will see this information.
Setting up a TP-LINK Wi-Fi Extender via the control panel (without WPS button)
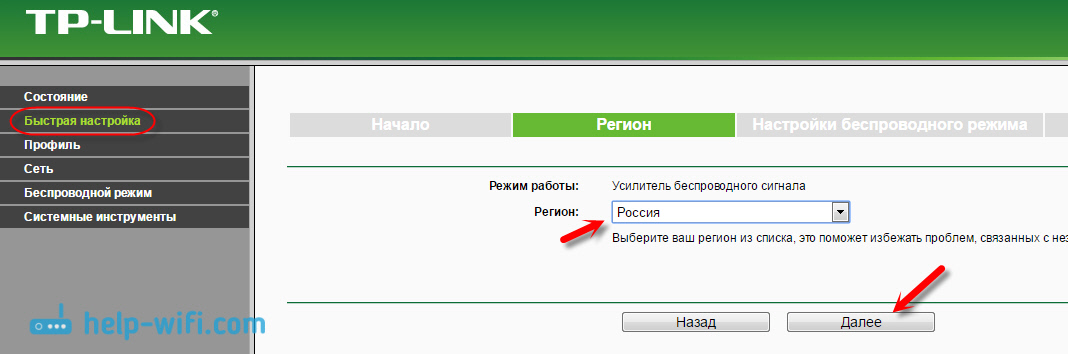
There are routers that no WPS button. In such cases, the repeater can be configured manually, preferably through a quick setup wizard. In the control panel, go to the " Quick Setup", and click the "Next" button.
In the next window, select your region, and click "Next".
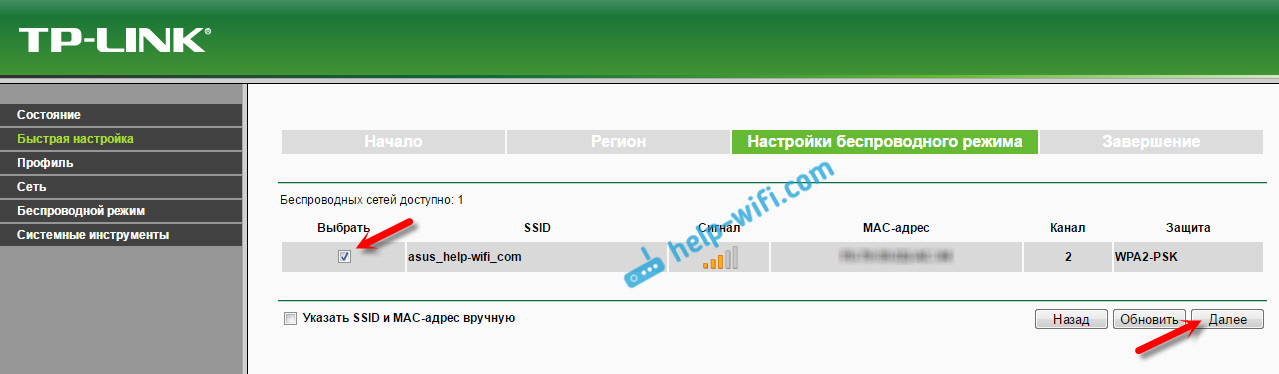
The repeater will search for wireless networks to connect to. Highlight your network and click Next.
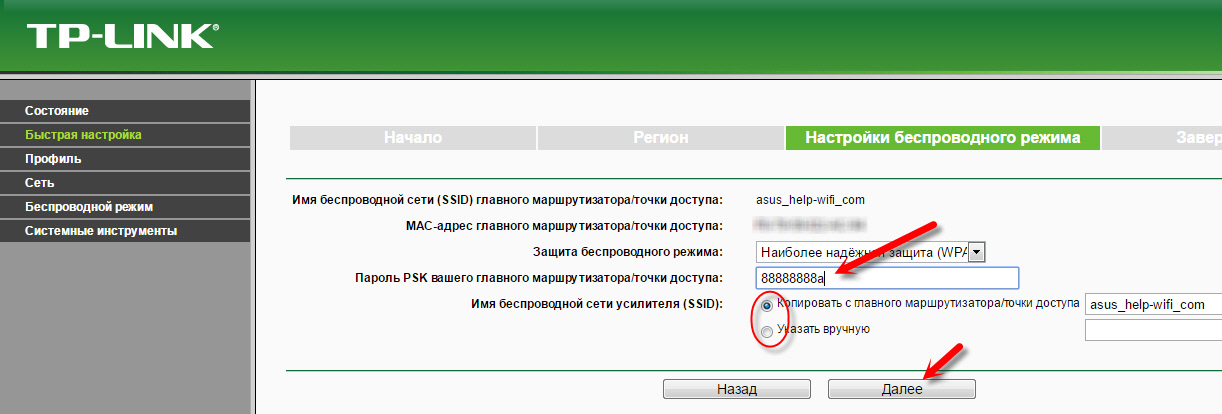
Enter the password for the Wi-Fi network you want to connect to. Also, you can select the name of the Wi-Fi network. You can clone it from the router, or enter your own name. Click on the "Next" button.
We are watching preset settings, and click on the "Finish" button. The repeater will reboot. Then, it should connect to the network we have configured.
Resetting the TP-LINK TL-WA850RE Repeater
If you want to reset the repeater to factory settings, there are two ways to do it. Through the control panel, or a button on the device itself. Turn on the repeater, take something sharp, and hold down the RESET button (bottom) for a couple of seconds. All indicators will light up, the repeater will reboot and the settings will be reset to factory defaults.
Or, go to the web interface, go to the "System Tools" - "Factory Settings" tab, and click on the "Restore" button.
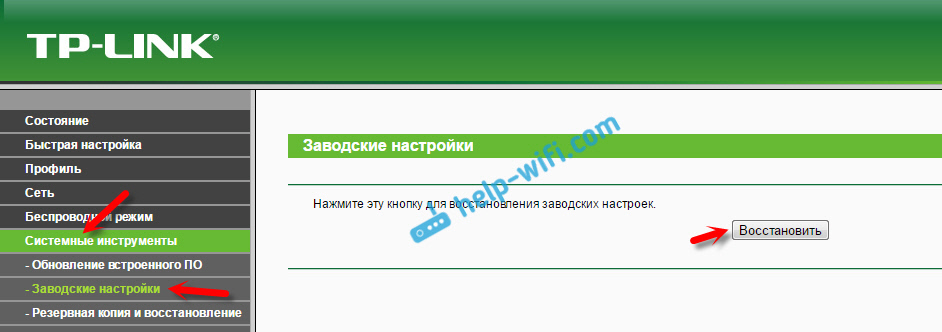
After a reboot, the settings will be reset.
If the Internet does not work after setting up the TP-LINK repeater
Judging by the reviews, sometimes there are problems during the setup process. Either the repeater cannot connect to the Wi-Fi network of the router, or there is a connection, but the Internet does not work. A few tips for problem solving:
- Install the repeater closer to the router. Most often, problems at work wifi booster networks appear due to a weak signal, or interference.
- If the repeater cannot connect to the router, or the Internet does not work, then restore the factory settings on the TL-WA850RE (how to do it, wrote above), then reboot your router and try to pair them again.
- If you have problems setting up via the WPS button, you can try connecting with desired Wi-Fi network through the control panel. Above I wrote how to do it.
- You can also try updating the firmware of your repeater.
- And yet, in the settings of the router, you can change the channel of the Wi-Fi network. How to do this, I wrote in the article:.
Here are some tips. If you can’t set up TP-LINK TL-WA850RE, and you have already tried everything, then ask a question in the comments. I try to help. Best wishes!
What is a wifi repeater and how can this device be useful?
wifi repeater- This is a device that allows you to expand the coverage area of \u200b\u200bthe WI-FI signal. This device is also called a signal repeater. For example, a router is installed in one of the rooms - there the signal is excellent, stable, but in the back room there are problems with speed.
To eliminate this phenomenon and install a wifi repeater, which expands the range router and makes the signal more stable.
How to make a wifi repeater from a router
If you do not have a repeater, but there are two routers, then you can install between them wireless connection. At the same time, one of routers will perform its direct functions, and the other will act as a signal repeater.
To make a wifi repeater with your own hands, you need in the router, which will be the main in the circuit, change the transmission channel.
For this in router settings you need to open the Wireless section. Opposite the Channel parameter, you must enter the channel number in the empty field.
The number can be any, most importantly, remember its value - this information will come in handy when setting up a router that acts as a repeater. To all changes made saved, click the "Save" button.

Now let's start configuring the router, which will act as a repeater. To open the settings, in the address bar of the browser, enter the address that is indicated on the back cover of the router.
For company devices tp link this is , or 192.168.1.1. If you did not change the standard data when connecting the router, then enter the word admin in the login and password fields, if there were changes, enter your own data.

Now you need to disable the WPS function - to do this, select the section of the same name in the menu and click "Disable WPS".
For all changes to take effect, you must restart the device. Then you need to click on "click here".

Upon completion of the reboot, the settings menu will open again, we proceed to change the IP address of the router - go to the Network section and from it to the LAN tab. Now the last number IP addresses you need to replace it with the number "2" and save the changes with the "Save" button.

After rebooting the device, the changes should already take effect.
Setting up a wireless bridge
Select the Wireless tab from the menu. Opposite the Wireless Network Name line, enter the name new network, and opposite Region - your region. Next to Channel, enter the channel number that you specified when setting up the main router.
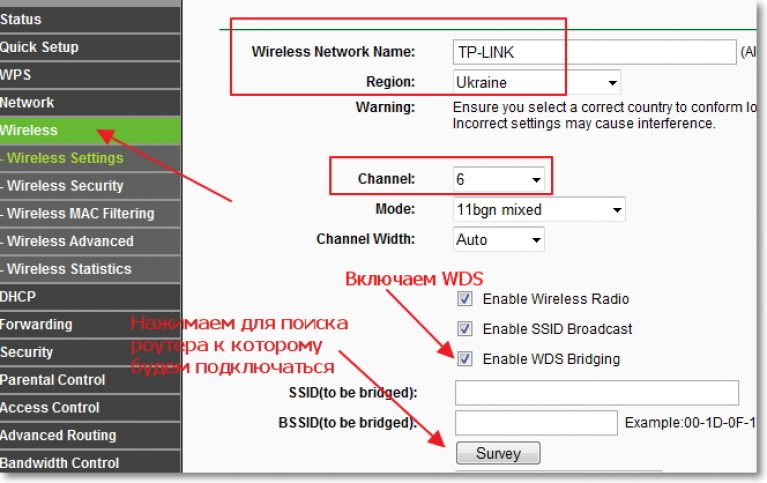
Advice! If the Internet does not work when specifying the same channels, try entering different numbers.
Now it remains to activate the WDS mode - to do this, check the box next to the Enable WDS Bridging line and start the search for available routers with the "Survey" button.

If there are several proposed networks, select the one broadcast by the main router and confirm the selection.
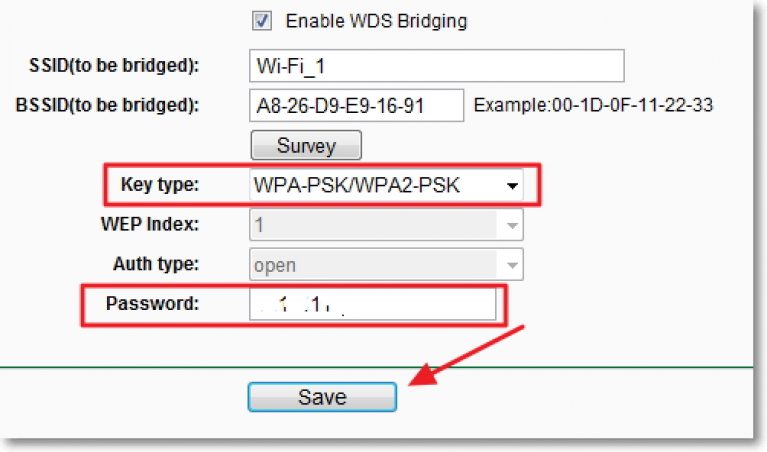
On the settings page that opens, the SSID and BSSID fields will be automatically filled in. If the network transmitted by the main device is password-protected, then in the field opposite Key type you need to specify the type of encryption, and in the Password field enter the network password.
Save your settings and reboot your router.
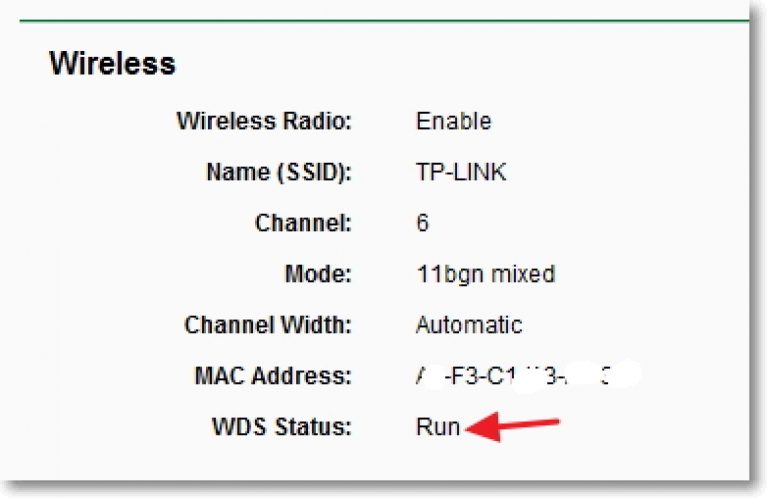
The network is ready to use. The connection status can be seen on the main settings page - if Run is indicated opposite the WDS Status line, this confirms the correctness of the actions performed.
Connecting and configuring WIFI Repeater.
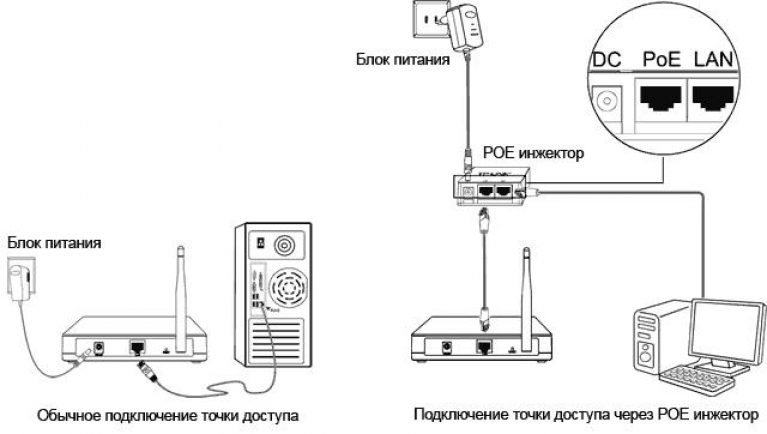
The wifi tp-link repeater is connected to a PC or laptop using a special cable, better known to most users under the name " twisted pair". The repeater is powered via a POE injector.

Now you need to set up network card. Go to "Start" - then to the "Control Panel" and select "Network and Control Center" public access».

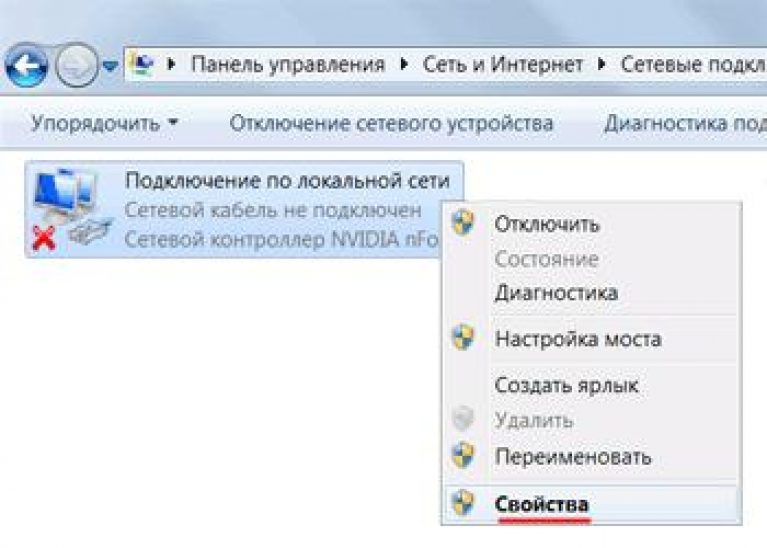
Hover over the line "Local Area Connection" click on it right click. Next, select "Properties".
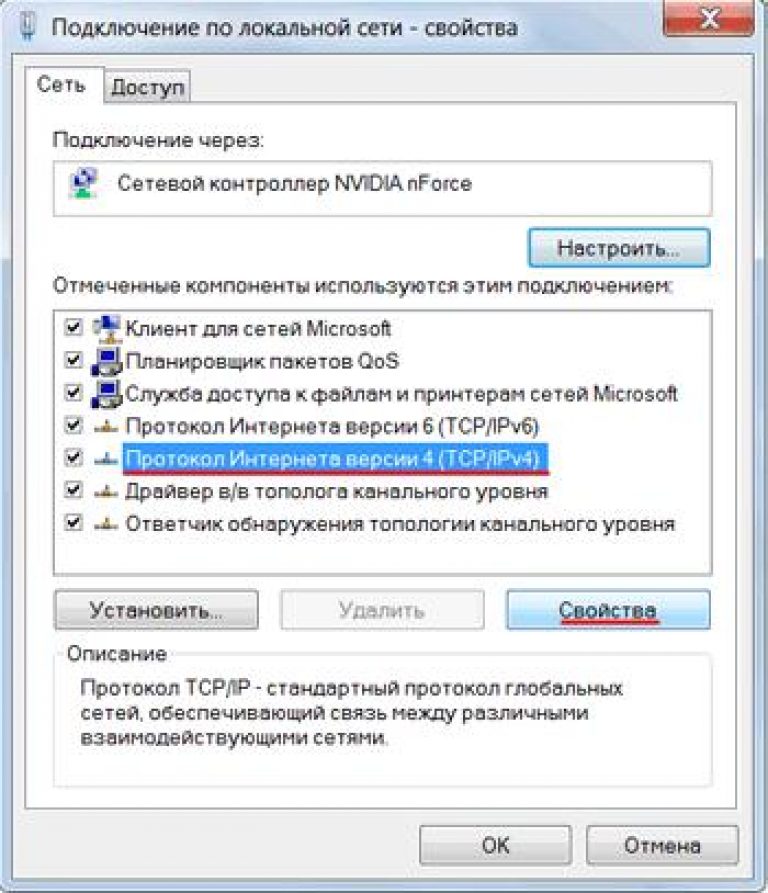
Now you need to select the line "Internet Protocol 4 (TCP / IPv4)", and then on "Properties".

In the window that opens, put a checkmark in front of the line "Use the following IP address". The IP address must match the address set by the manufacturer. For the wifi tp-link repeater, it is 192.168.1.21, the mask is 255.255.255.0.
After selecting all the necessary values, confirm the changes by clicking on the "OK" button.

Now you need to configure access in the Wi-Fi repeater. To do this, go to your browser, enter the IP address in the address bar - 192.168.1.254.
Before executing, check if the proxy server is enabled in the browser settings. Disable it if necessary.
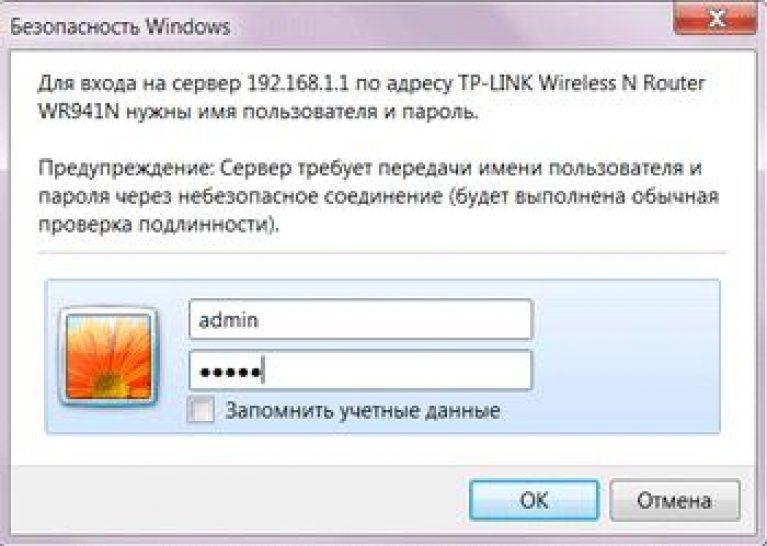
In the personalization window that opens, enter the login admin, password admin.
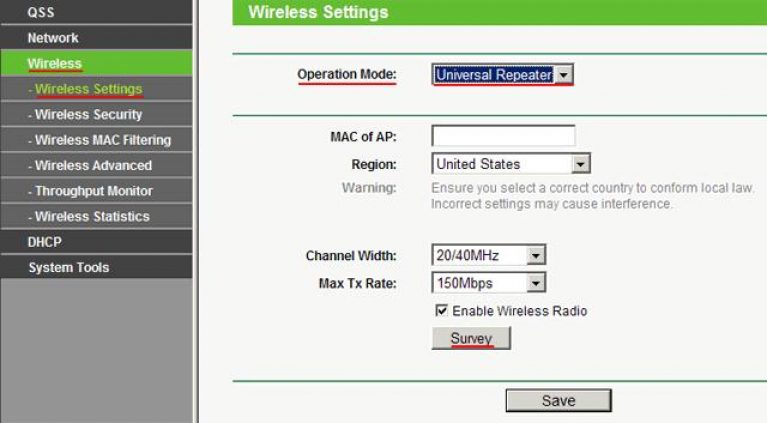
Go to the Wireless menu, select the Wireless Settings section. Opposite the Operation Mode line, set the Universal Repeater status. We confirm the changes.

In the Survey menu, you will see a list available networks. Select the one you need by clicking the Connect button.
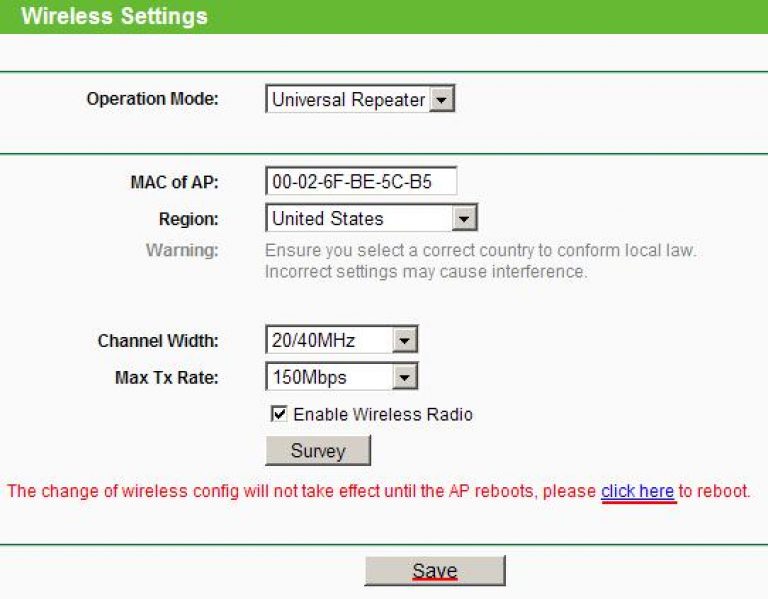
Save the settings changes.


In the Wireless menu, select the Wireless Security section and in the required fields, specify the type of encryption and password corresponding to the router.
Please note that if WEP encryption is activated on the TP-Link router, then Type, WEP Key Format, WEP Key, Key Type - the parameters should be similar to the settings of the router. Otherwise, the TP-Link repeater will not establish a connection with the signal distributor.
You can check the connection status by checking the Status menu. If when you refresh the Channel page, you see permanent shift numbers, it means that the security settings were entered incorrectly.
After verifying that the security settings are correct, save the changes and reboot the device.
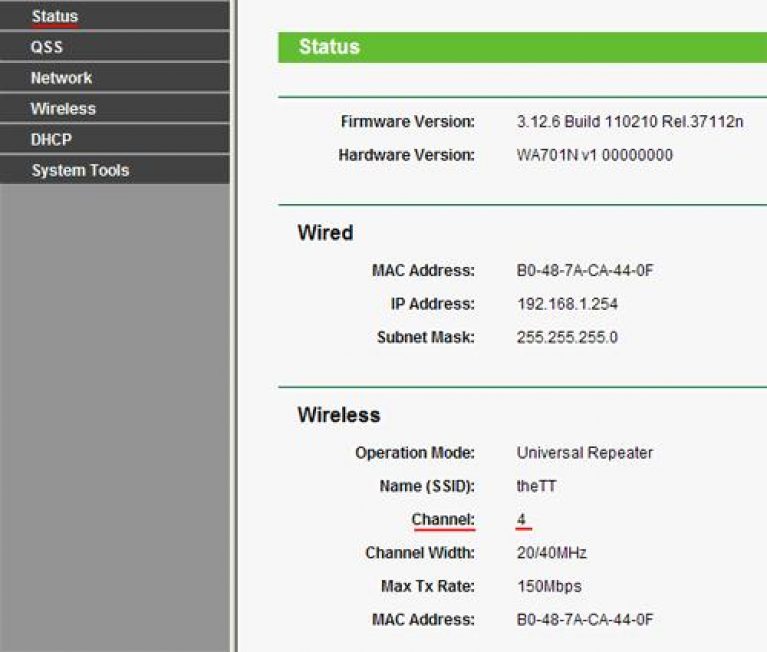
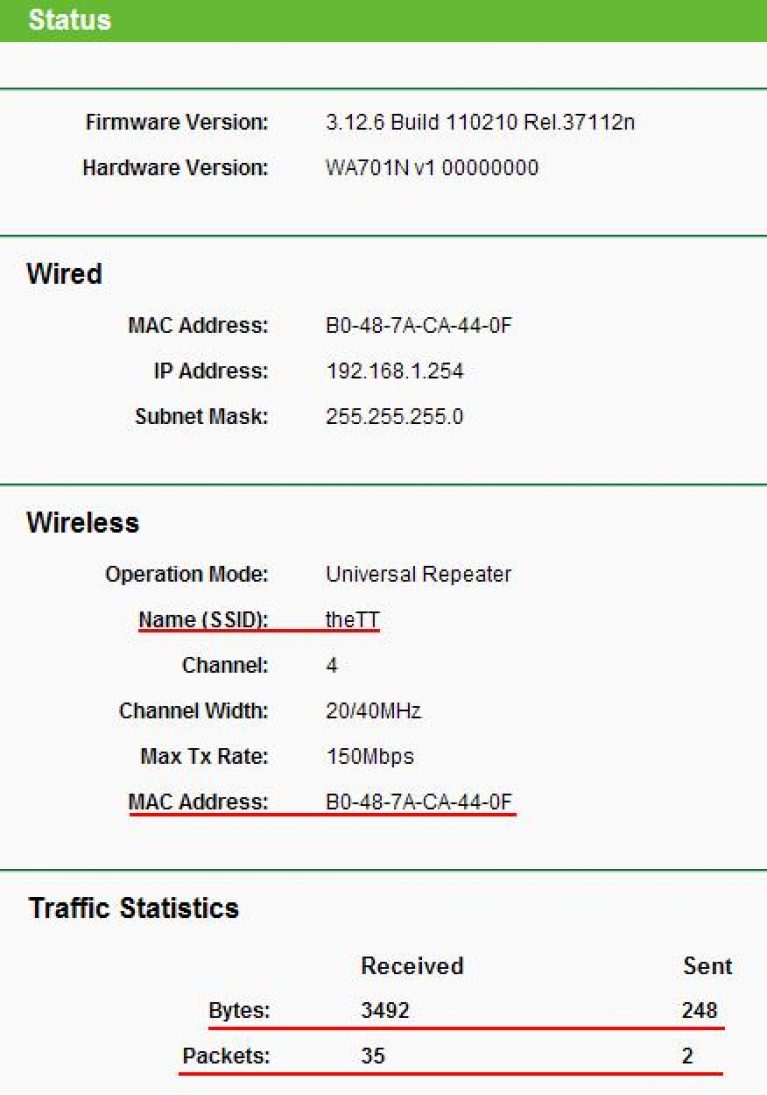
To check the connection status of the repeater and router, go to the Status menu and pay attention to the connection parameters. Opposite the Name field, the name of the router with which the connection is being made should appear, the Channel, MAC Address fields should be filled in.
In the Traffic Statistics field, you will observe a continuous change of data packets.
WiFi signal booster - how a Wi-Fi repeater will help expand the network coverage area
Strengthening the WiFi signal and thereby increasing the range of the wireless network is a problem that faces the owners of large apartments or country houses when wifi signal must be taken not only in neighboring rooms, but also in the garage
The main criteria for choosing a repeater are its power, the presence or absence of a port for wired connection and operating ranges. When used at home, the design of the device also becomes an important factor. Most Wi-Fi signal repeaters plug directly into a power outlet through the built-in power supply. More productive models use an external adapter.
7th place: NETGEAR WN3000RP
Wireless repeater with two external antennas providing high level relayed Wi-Fi signal. Using the 802.11n standard allows you to achieve connection speeds up to 300 Mbps. A LAN port is located on the side panel, with which you can connect one home device using a cable. In this case, the repeater will also act as a network adapter.
The speed with a cable connection is limited to 100 Mbps. The NETGEAR WN3000RP repeater supports WEP and WPA/WPA2 encryption protocols. To ensure high performance and reliable protection of transmitted information, it is recommended to use WPA2. The rest of the standards apply to preserve backward compatibility and work with old routers that do not support modern technology Wi-Fi Protected Access.
For initial setup using a wireless or cable connection. To change the connection settings via Wi-Fi, plug the extender into a power outlet and wait for the download (the Power indicator will stop flashing and stay on). in green). Connect to the "NETGEAR_EXT" network from a laptop or other device. After that, go to the address of the web interface, which is indicated in the documentation. In it, you can connect a repeater to your home WiFi networks and install Extra options work.
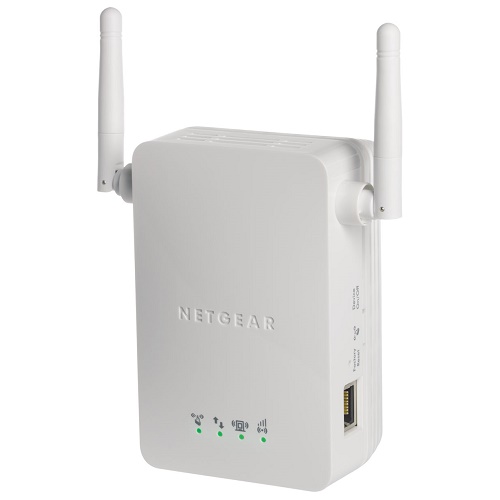
Advice! Repeater antennas transmit the signal most efficiently in planes perpendicular to their direction. If you are planning to use wireless Internet on multiple floors, it is recommended that one of the antennas be pointing horizontally, parallel to the floor.
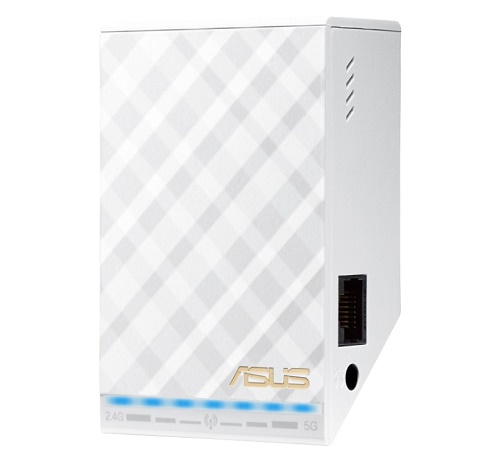
6th place: ASUS RP-N14
This repeater works in two frequency bands: 2.4 and 5 GHz. Inside the case is a pair of built-in MIMO antennas. The reception level of the home network is indicated by the LEDs on the front of the repeater. At the same time, for networks in different ranges, their own indicators are provided - on the left and right side from the middle of the indicator strip.
Interesting feature this device- support for ASUS AiPlayer and AirPlay technologies (for Apple devices). These features provide live streaming sound over Wi-Fi, turning the repeater into a wireless player. On the side of the ASUS RP-N14 is a standard 3.5 mm input for headphones or speakers. All you have to do is plug your speakers into this Mini-Jack and set up multimedia streaming from your computer. Internet radio playback is also supported. You can select the desired station and start the player through mobile app on iOS or Android.
On the bottom of the body of the device are LEDs that provide decorative lighting. The front panel is equipped with a touch sensor. Music and lights are turned on with one touch to the repeater. These additional features significantly increase the final price of the device. The high cost can be considered the main disadvantage of the ASUS RP-N14 repeater.
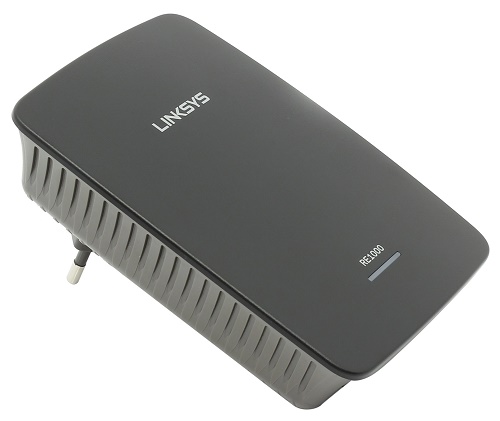
5th place: Linksys RE1000
The main advantages of this repeater are the reliability and stability of Wi-Fi relaying. The device is equipped with a minimum additional features complicating its use and increasing the price. Each of the two built-in antennas has a gain of 3.5 dBi. The transmitter power is 18 dBM.
The Linksys RE1000 is powered by one of two methods:
- Through a removable plug on the rear panel;
- Using a cable, the input for which is located on top.
The first method is more suitable for wall mounting the repeater. If there is no socket at the place of the desired connection, it is advisable to use the cable that is included in the delivery. The main plug in this case is removed. Also, the second method is convenient for the desktop location of the home repeater.
4th place: Edimax EW-7438RPN Mini
Compact wireless repeater with built-in guest Wi-Fi function. The repeater is configured through the iQ Setup interface, which allows you to quickly connect and specify authentication data. You can use the free mobile application EdiRange to change parameters and receive performance reports.
In addition to the standard repeater mode, the Edimax EW-7438RPN Mini settings also include bridge and access point modes. When using the device as a bridge, you can connect any computer, laptop, TV or other home device that has Ethernet port. Edimax EW-7438RPN Mini will receive the Wi-Fi signal from the router and provide wired access to the Internet.
Access point mode is relevant when used with routers or modems without Wi-Fi support. To activate it, you need to connect the router and the repeater with a cable. Distribution of the network will be carried out through a repeater. In this way, you can connect up to 32 wireless devices to your home Wi-Fi.

Note! Do not connect the repeater to floor surge protectors. Best Level a home network signal will be ensured by installation in a wall socket located as high as possible.
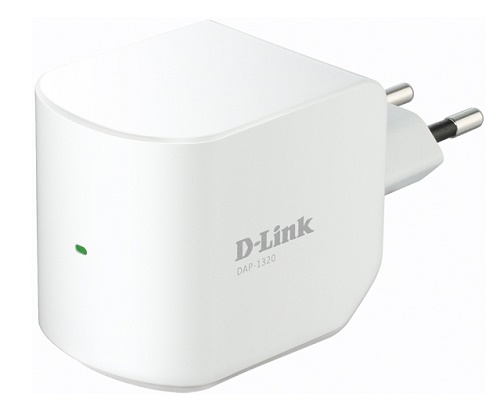
3rd place: D-Link DAP-1320
Another compact repeater from the well-known network equipment manufacturer D-Link. Despite its small size and weight of 69 grams, it has two built-in antennas. There is only one button and one status indicator on the case. You can connect to your home network using WPS by pressing the buttons on the repeater and router.
An alternative configuration option is to use the control panel that opens in any browser. The data for connecting to the repeater's Wi-Fi network is indicated on the insert included in the package. After the connection is established, go to the address 192.168.0.50 and click the "Authorize" button. By default, no password is set in the web interface, leave the field for entering it empty.
The D-Link DAP-1320 repeater will search for available wireless networks, after which you will have to select your Wi-Fi and enter a password for authorization. The device will reboot, after which it will start distributing home wifi expanding the coverage area. On a smartphone or tablet, it is more convenient to use the D-Link QRS Mobile program.
2nd place: TP-Link TL-WA854RE
The repeater is compatible with all network devices operating according to 802.11 b/g/n standards. It has a stylish design, significant transmitter power and impeccable stability. The functionality of the TL-WA854RE control panel is higher than most repeaters in this price range. The repeater supports WMM, a technology that increases the priority of multimedia traffic.
The blue LEDs around the WPS (Wi-Fi Protected Setup) button indicate the level of reception of the main home network by the repeater. The more diodes are lit on the right side of the ring, the more stable the connection and the higher the data transfer rate. The maximum bandwidth on the TP-Link TL-WA854RE is 300 Mbps, but in real conditions it is usually lower. Disadvantages of TP-Link TL-WA854RE: lack of a LAN port and the ability to expand home network on the 5 GHz frequency band.
Interesting video: Overview of the TP-LINK TL-WA850RE repeater
Our Winner: ASUS RP-AC68U
A repeater of the highest price range with a declared data transfer rate of up to 1900 Mbps. Of these, 1300 Mbps can be transmitted on 5 GHz, and the remaining 600 on 2.4 GHz. Even when using a single band router, the repeater will extend coverage over two frequency bands. This allows you to increase the final speed and minimize interference. The main advantages of ASUS RP-AC68U:
- Support for simultaneous operation in 2.4 and 5 GHz modes.
- Better performance and information transfer rate.
- Bright design with LED backlight.
- Four built-in antennas for stable Wi-Fi reception from the router and transmission to network clients.
- Availability USB port 3.0 and the possibility of creating cloud storage.
- High-speed Ethernet interfaces for wired connection of up to 5 devices.
- Possibility of realization of home file servers Samba or FTP.
The scheme of operation of the built-in antennas: 3 × 4. This means that 3 antennas are used for data transmission, 4 for reception. The repeater can be located at a considerable distance from the router. The high gain provides a stable signal even in such conditions. The reception level is displayed on the indicator on the back of the repeater.
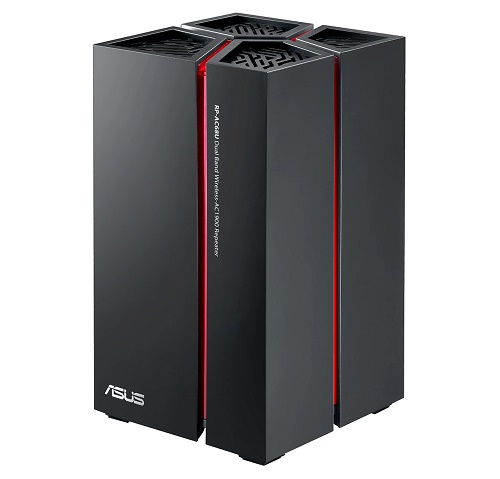
Important! When using the ASUS RP-AC68U repeater with a router of the same brand, it is recommended to activate the "Roaming Assist" function. It implements the switching of wireless devices between the router and the repeater, depending on the level of the Wi-Fi signal.
High-speed broadband Internet access has been walking around our country for a decade for sure, having managed to evolve it from copper ADSL to GPON fiber during this time. The development of access devices also does not stand still, constantly improving what is available and coming up with something new. Therefore, in pursuit of progress, people must update the existing equipment. I don’t know about you, but during this time I changed at least 10 routers at home. With all this, something manages to be realized, but something remains to hang dead; cargo. But some wireless routers can be used in a small role in a different role and with great benefit for all this. For example, as a WiFi network repeater. I will tell you how to configure the router as a repeater to amplify the signal of the wireless network.
You need to start with the fact that not all routers can work in repeater or repeater mode (repeat; English repeat), but only those in software which the manufacturer has built in such a function. By the way, in recent years the number of such devices has increased significantly due to the development of WDS technology.
You can find out if your router can work as a repeater on the official website of the manufacturer. Such information is usually indicated in the specifications.
As an example, I will give several models of wireless routers. For other models that support this function, everything will be implemented in much the same way. The main thing is to understand the essence of the actions, and then there should not be any questions.
Setting up WDS on a TP-Link router
In the web interface of the router, go to the Wireless Functions section;:
Check the Enable WDS; box, after which additional fields for configuring the function will appear.
Press the Search button; and select an existing wireless network WiFi. Enter the password and connect to it. Everything, after that you can disconnect the device from the computer and install it in the place of the vile reception.
ASUS routers and repeater mode
Here, too, everything is not simple. You can find two identical models with a different index (for example, RT-N12 C1 and RT-N12 D1), of which one can work in repeater mode, and the other; No.
In the main menu of the web interface, select the Administration item;, the Operation mode tab;:
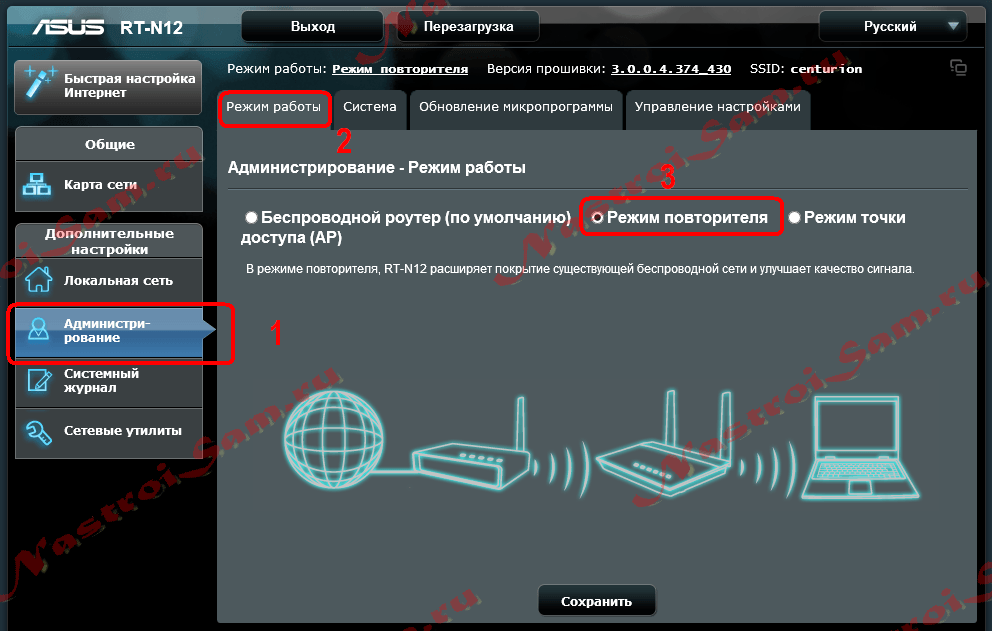
Set the flag to Repeater mode; and click the Save button. The router will reboot and then you will see this web interface, truncated in functionality:
![]()
In the section Internet settings; see the list of available WiFi networks. Select the appropriate one, enter the password and click the Connect button ;. That's all. Main; be sure to save the device functions.
Netgear and repeater function:
Netgear; is another manufacturer that, in its own wireless routers integrates the WiFi repeater function. The truth here, too, has its own nuances. 100% functionality is guaranteed if only devices from this manufacturer are used. How this function will work with routers from other manufacturers; dont clear. Well, the process of the function itself is not weakly confused, in my opinion. For other vendors, this is implemented much more simply.
For the function, you need to go to Advanced mode;, section Additional functions;-;;Wireless relaying;:
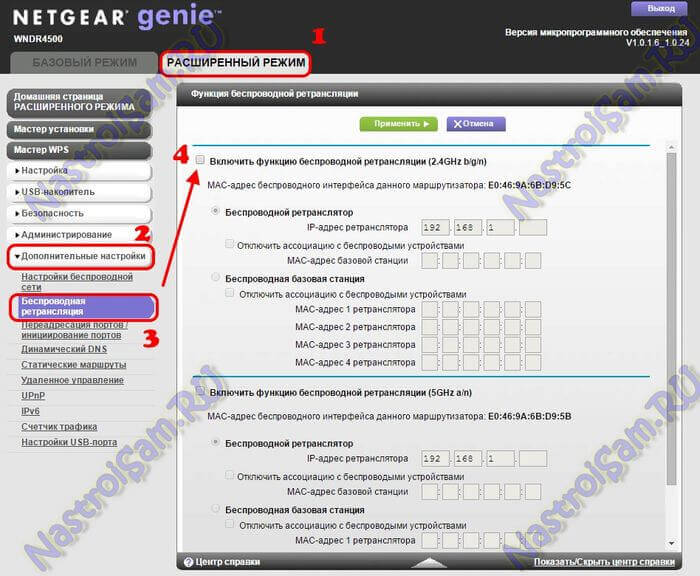
Check the Enable wireless relay function checkbox, after which the functions below will become available. On the main router that distributes Wi-Fi, you must select the Wireless base station mode;, and in the MAC address field 1 of the repeater; register the poppy of the second router (you can see it in the sticker on the bottom of the device). Likewise, on base station it is necessary to set a statically used radio channel.
On this moment on the device that will work as a repeater, select the Wireless repeater mode ;, prescribe the IP address (preferably at the end of the range; 192.168.1.254, for example) and prescribe the MAC address of the base station.
Almost everything. The only remark; on a router that works as a WiFi repeater, the DHCP server must be disabled in the local network settings.